vue mysql demo_使用开源框架Sqlsugar结合mysql开发一个小demo

一、Sqlsugar简介

1.性能上有很大优势

sqlsugar是性能最好的ORM之一,具有超越Dapper的性能 ,走的是EMIT够构中间语言动态编译到程序集,完成高性能的实体绑定,达到原生水平。

2.功能非常强大

除了EF以外可以说的是功能最大的ORM框架

支持 DbFirst、CodeFirst、数据库维护、链式查询、链式更新、链式删除、链式插入、实体属性、复杂模型的查询、ADO.NET。特别是批量等功能都是货真价实的并非循环操作。

SqlSugar 4.0版本 6月底支持SqlSever的Core版 ,预计7月份支持多库,8月分开始分布式ORM的开发。 (3.x版本已经支持了4种数据库,相对稳定功能简单)

3.语法简单

完美的语法,可以秒杀现有所有ORM框架

二、主要介绍的是如何使用结合mysql数据库使用Sqlsugar

1.新建解决方案,自定义解决方案名称和保存路径

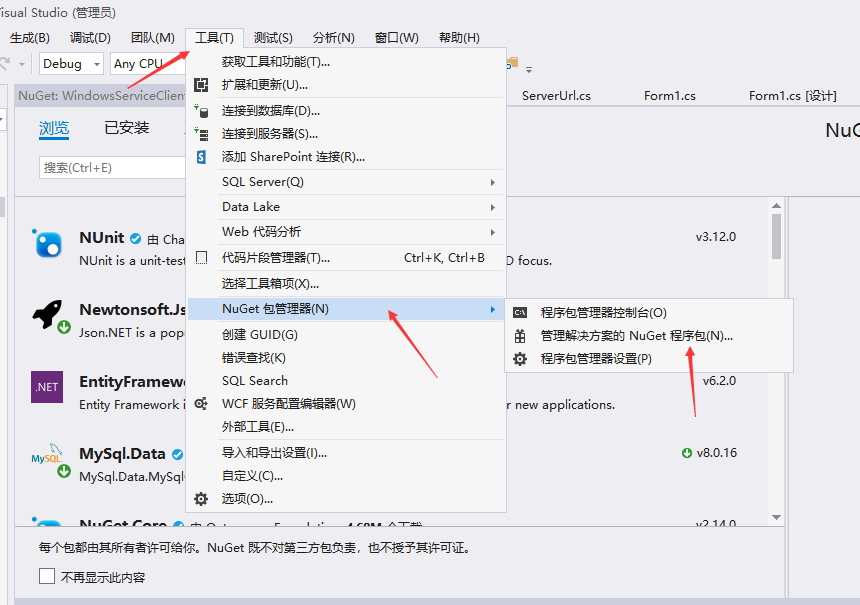
2.此时我们需要添加三个包,首先找到工具 =》NuGet包管理器 =>管理解决方案的NuGet程序包
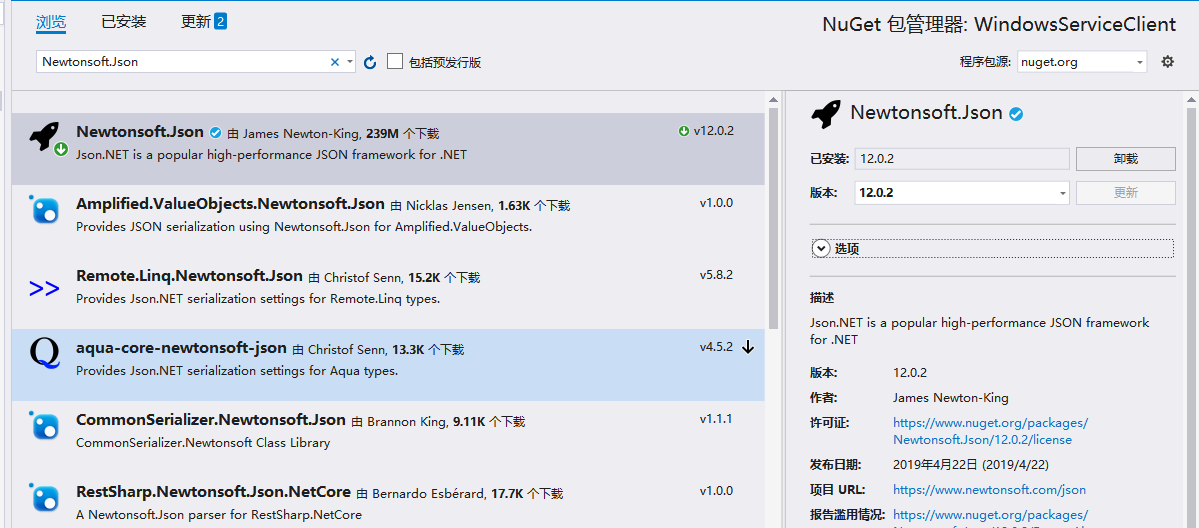
1b2fe1d976f7e9c980536be43941a21d.png

3.依次添加以下三个程序包

Newtonsoft.Json:要注意最好添加较高版本的,否则会有兼容性问题

a6094c636f8fbe5c18b04abc57c70517.png

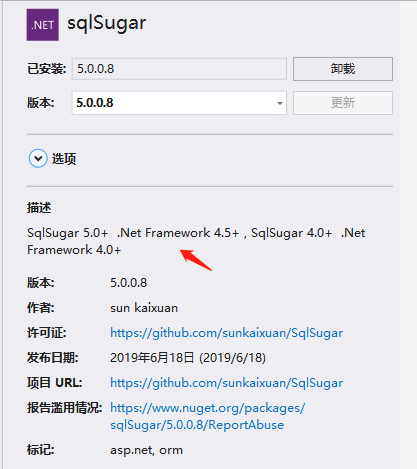
Sqlsugar:这个版本要根据你的.Net Framework的版本选择你合适的版本,这里我用的是.Net Framework4.5所以我安装的是sqlsugar5.0.0.8
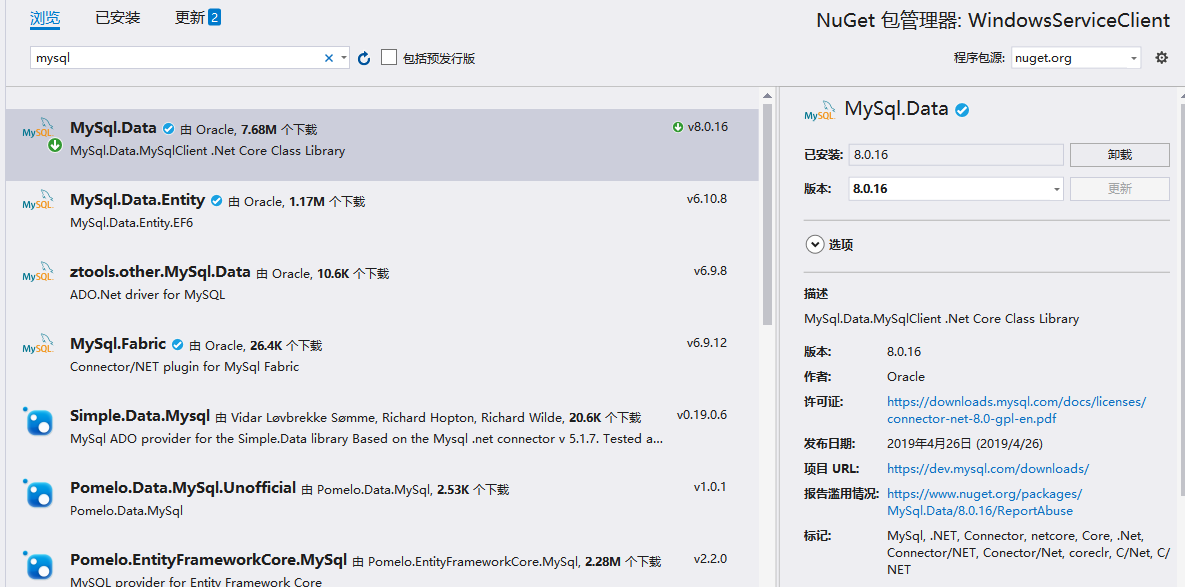
81e34606516783246f025dd3ea1805f4.png

MySql.Data

e8556d2b6881731cbf78ba5c14963bb2.png

4.准备工作已经做完了,现在可以开始正文了

先贴一段代码,这个是我封装的一个操作数据库的一个类,我采用的是单例模式,不过有个弊端就是不能使用高并发的情况

public class DBContext where T : class, new()

{

public SqlSugarClient Db;

private static DBContext mSingle = null;

public static DBContext GetInstance()

{

if (mSingle == null)

mSingle = new DBContext();

return mSingle;

}

protected DBContext()

{  //通过这个可以直接连接数据库

Db = new SqlSugarClient(new ConnectionConfig()

{

//可以在连接字符串中设置连接池pooling=true;表示开启连接池

//eg:min pool size=2;max poll size=4;表示最小连接池为2,最大连接池是4;默认是100

ConnectionString = "database='" + "BookShop" + "';Data Source = '" + "127.0.0.1" + "'; User Id = '" + "root" + "'; pwd='" + "1234" + "';charset='utf8';pooling=true",

DbType = SqlSugar.DbType.MySql,//我这里使用的是Mysql数据库

IsAutoCloseConnection = true,//自动关闭连接

InitKeyType = InitKeyType.Attribute

});

//调式代码 用来打印SQL

//Db.Aop.OnLogExecuting = (sql, pars) =>

//{

// Console.WriteLine(sql + "\r\n" +

// Db.Utilities.SerializeObject(pars.ToDictionary(it => it.ParameterName, it => it.Value)));

// Console.WriteLine();

//};

}

public void Dispose()

{

if (Db != null)

{

Db.Dispose();

}

}

public SimpleClient CurrentDb { get { return new SimpleClient(Db); } }

///

/// 获取所有

///

///

public virtual List GetList()

{

return CurrentDb.GetList();

}

///

/// 根据表达式查询

///

///

public virtual List GetList(Expression> whereExpression)

{

return CurrentDb.GetList(whereExpression);

}

///

/// 根据表达式查询分页

///

///

public virtual List GetPageList(Expression> whereExpression, PageModel pageModel)

{

return CurrentDb.GetPageList(whereExpression, pageModel);

}

///

/// 根据表达式查询分页并排序

///

/// it

///

/// it=>it.id或者it=>new{it.id,it.name}

/// OrderByType.Desc

///

public virtual List GetPageList(Expression> whereExpression, PageModel pageModel, Expression> orderByExpression = null, OrderByType orderByType = OrderByType.Asc)

{

return CurrentDb.GetPageList(whereExpression, pageModel, orderByExpression, orderByType);

}

///

/// 根据主键查询

///

///

public virtual List GetById(dynamic id)

{

return CurrentDb.GetById(id);

}

///

/// 根据主键删除

///

///

///

public virtual bool Delete(dynamic id)

{

if (string.IsNullOrEmpty(id.ObjToString))

{

Console.WriteLine(string.Format("要删除的主键id不能为空值!"));

}

return CurrentDb.Delete(id);

}

///

/// 根据实体删除

///

///

///

public virtual bool Delete(T data)

{

if (data == null)

{

Console.WriteLine(string.Format("要删除的实体对象不能为空值!"));

}

return CurrentDb.Delete(data);

}

///

/// 根据主键删除

///

///

///

public virtual bool Delete(dynamic[] ids)

{

if (ids.Count() <= 0)

{

Console.WriteLine(string.Format("要删除的主键ids不能为空值!"));

}

return CurrentDb.AsDeleteable().In(ids).ExecuteCommand() > 0;

}

///

/// 根据表达式删除

///

///

///

public virtual bool Delete(Expression> whereExpression)

{

return CurrentDb.Delete(whereExpression);

}

///

/// 根据实体更新,实体需要有主键

///

///

///

public virtual bool Update(T obj)

{

if (obj == null)

{

Console.WriteLine(string.Format("要更新的实体不能为空,必须带上主键!"));

}

return CurrentDb.Update(obj);

}

///

///批量更新

///

///

///

public virtual bool Update(List objs)

{

if (objs.Count <= 0)

{

Console.WriteLine(string.Format("要批量更新的实体不能为空,必须带上主键!"));

}

return CurrentDb.UpdateRange(objs);

}

///

/// 插入

///

///

///

public virtual bool Insert(T obj)

{

return CurrentDb.Insert(obj);

}

///

/// 批量

///

///

///

public virtual bool Insert(List objs)

{

return CurrentDb.InsertRange(objs);

}

//可以扩展更多方法

}

5.还有就是需要有model类,就是跟数据库中表对应的model类,比如我这里是book和booktype,附加一段代码做个参考

[SugarTable("Books")]//指定数据库中的表名,要对应数据库的表名,否则会出错

public class Books

{

[SugarColumn(IsPrimaryKey = true, IsIdentity = true)]//指定主键和自动增长

public int Id { get; set; }

public int BId { get; set; }

public string BName { get; set; }

public int TypeId { get; set; }

}

6.开始操作数据库了

Books b = new Books() { BId = 2, BName = "西游记", TypeId = 2 };

BookType bt = new BookType() { TId= 3, TName = "健康"};

if (DBContext.GetInstance().CurrentDb.Insert(b))

{

Console.WriteLine("books_添加成功!");

}

if (DBContext.GetInstance().Db.Insertable(bt).ExecuteCommand() > 0)

{

Console.WriteLine("BookType_添加成功!");

}

例子到这里就结束了,分享一下,我在做这个过程中遇到的问题:

1.因为我原本项目中已经存在程序包Newtonsoft.Json,而它的版本较低,当时忽略了版本问题,导致版本不兼容问题。后面升级之后就可以了。

2.犹豫项目需要高并发处理数据,所以我上边写的单例模式其实存在一定的问题,所以做了一定的修改,代码贴一下

public class DBContext where T : class, new()

{

public SqlSugarClient Db;

///

/// 修改后的代码

///

///

public static DBContext OpDB()

{

DBContext dbcontext_t = new DBContext();

dbcontext_t.Db = new SqlSugarClient(new ConnectionConfig()

{

ConnectionString = "database='" + "bookshop" + "';Data Source = '" + "127.0.0.1" + "'; User Id = '" + "root" + "'; pwd='" + "1234" + "';charset='utf8';pooling=true",

DbType = SqlSugar.DbType.MySql,

IsAutoCloseConnection = true,

InitKeyType = InitKeyType.Attribute

});

return dbcontext_t;

}

protected DBContext()

{

Db = new SqlSugarClient(new ConnectionConfig()

{

ConnectionString = "database='" + "bookshop" + "';Data Source = '" + "127.0.0.1" + "'; User Id = '" + "root" + "'; pwd='" + "1234" + "';charset='utf8';pooling=true",

DbType = SqlSugar.DbType.MySql,

IsAutoCloseConnection = true,

InitKeyType = InitKeyType.Attribute

});

//调式代码 用来打印SQL

Db.Aop.OnLogExecuting = (sql, pars) =>

{

Console.WriteLine(sql + "\r\n" +

Db.Utilities.SerializeObject(pars.ToDictionary(it => it.ParameterName, it => it.Value)));

Console.WriteLine();

};

}

public SimpleClient CurrentDb { get { return new SimpleClient(Db); } }

//可以扩展更多方法

}

ok,该demo的分享就到这了,如果有什么错误的地方欢迎指出,有不理解的也可以留言。

作者:Tulip123

  • 0
    点赞
  • 0
    收藏
    觉得还不错? 一键收藏
  • 0
    评论
好的,下面我将为您提供一个简单的demo示例,使用jfinal+vue+el来实现一个用户管理系统。 1. 准备工作 首先,需要安装Java环境和Maven工具。然后,创建一个Maven项目,并添加以下依赖: ```xml <dependency> <groupId>com.jfinal</groupId> <artifactId>jfinal</artifactId> <version>4.9.06</version> </dependency> <dependency> <groupId>com.alibaba</groupId> <artifactId>fastjson</artifactId> <version>1.2.78</version> </dependency> <dependency> <groupId>com.github.pagehelper</groupId> <artifactId>pagehelper-spring-boot-starter</artifactId> <version>1.3.0</version> </dependency> <dependency> <groupId>mysql</groupId> <artifactId>mysql-connector-java</artifactId> <version>8.0.26</version> </dependency> ``` 2. 创建数据库表 在MySQL中创建一个名为user的表,包含以下字段: - id - username - password - nickname - email 3. 创建后端代码 创建一个UserController类,用于处理用户相关的请求。 ```java public class UserController extends Controller { public void index() { render("index.html"); } public void list() { int pageNumber = getParaToInt("page"); int pageSize = getParaToInt("limit"); Page<User> userList = User.dao.paginate(pageNumber, pageSize, "select *", "from user"); renderJson(JSON.toJSONString(userList)); } public void save() { User user = getModel(User.class, ""); if (user.save()) { renderJson(JSON.toJSONString(Result.success())); } else { renderJson(JSON.toJSONString(Result.failure("保存失败"))); } } public void update() { User user = getModel(User.class, ""); if (user.update()) { renderJson(JSON.toJSONString(Result.success())); } else { renderJson(JSON.toJSONString(Result.failure("更新失败"))); } } public void delete() { Integer id = getParaToInt("id"); if (User.dao.deleteById(id)) { renderJson(JSON.toJSONString(Result.success())); } else { renderJson(JSON.toJSONString(Result.failure("删除失败"))); } } } ``` 创建一个User类,用于操作数据库。 ```java public class User extends Model<User> { public static final User dao = new User().dao(); public Integer getId() { return getInt("id"); } public void setId(Integer id) { set("id", id); } public String getUsername() { return getStr("username"); } public void setUsername(String username) { set("username", username); } public String getPassword() { return getStr("password"); } public void setPassword(String password) { set("password", password); } public String getNickname() { return getStr("nickname"); } public void setNickname(String nickname) { set("nickname", nickname); } public String getEmail() { return getStr("email"); } public void setEmail(String email) { set("email", email); } } ``` 4. 创建前端代码 创建一个index.html文件,用于展示用户列表和添加用户。 ```html <!DOCTYPE html> <html lang="en"> <head> <meta charset="UTF-8"> <title>User Management System</title> <link rel="stylesheet" href="https://cdn.staticfile.org/element-ui/2.15.1/theme-chalk/index.css"> </head> <body> <div id="app"> <el-container> <el-header> <h1 style="color: white">用户管理系统</h1> </el-header> <el-main> <el-table :data="userList" border style="width: 100%"> <el-table-column label="ID" prop="id"></el-table-column> <el-table-column label="用户名" prop="username"></el-table-column> <el-table-column label="昵称" prop="nickname"></el-table-column> <el-table-column label="邮箱" prop="email"></el-table-column> <el-table-column label="操作"> <template slot-scope="scope"> <el-button type="primary" @click="editUser(scope.row)">编辑</el-button> <el-button type="danger" @click="deleteUser(scope.row)">删除</el-button> </template> </el-table-column> </el-table> <el-pagination :total="total" :page-size="pageSize" :current-page.sync="currentPage" @current-change="getPage"></el-pagination> <el-form :model="user" ref="userForm" label-width="80px" style="margin-top: 20px;"> <el-form-item label="用户名" prop="username"> <el-input v-model="user.username" placeholder="请输入用户名"></el-input> </el-form-item> <el-form-item label="密码" prop="password"> <el-input v-model="user.password" placeholder="请输入密码"></el-input> </el-form-item> <el-form-item label="昵称" prop="nickname"> <el-input v-model="user.nickname" placeholder="请输入昵称"></el-input> </el-form-item> <el-form-item label="邮箱" prop="email"> <el-input v-model="user.email" placeholder="请输入邮箱"></el-input> </el-form-item> <el-form-item> <el-button type="primary" @click="saveUser">保存</el-button> <el-button @click="resetForm">重置</el-button> </el-form-item> </el-form> </el-main> </el-container> </div> <script src="https://cdn.staticfile.org/vue/2.6.14/vue.min.js"></script> <script src="https://cdn.staticfile.org/element-ui/2.15.1/index.js"></script> <script src="https://cdn.staticfile.org/axios/0.21.1/axios.min.js"></script> <script type="text/javascript"> new Vue({ el: '#app', data: { userList: [], total: 0, pageSize: 10, currentPage: 1, user: { username: '', password: '', nickname: '', email: '' } }, created: function () { this.getPage(1); }, methods: { getPage: function (page) { let _this = this; axios.get('/user/list', { params: { page: page, limit: _this.pageSize } }).then(function (response) { _this.userList = response.data.list; _this.total = response.data.total; }).catch(function (error) { console.log(error); }); }, editUser: function (row) { this.user = row; }, deleteUser: function (row) { let _this = this; let id = row.id; axios.post('/user/delete', { id: id }).then(function (response) { _this.getPage(_this.currentPage); }).catch(function (error) { console.log(error); }); }, saveUser: function () { let _this = this; this.$refs.userForm.validate(function (valid) { if (valid) { axios.post('/user/save', _this.user).then(function (response) { _this.getPage(_this.currentPage); _this.resetForm('userForm'); }).catch(function (error) { console.log(error); }); } else { return false; } }); }, resetForm: function (formName) { this.$refs[formName].resetFields(); this.user = { username: '', password: '', nickname: '', email: '' }; } } }); </script> </body> </html> ``` 5. 配置路由 在JFinalConfig类中配置路由。 ```java public class DemoConfig extends JFinalConfig { @Override public void configConstant(Constants me) { me.setDevMode(true); } @Override public void configRoute(Routes me) { me.add("/user", UserController.class); } @Override public void configPlugin(Plugins me) { DruidPlugin dp = new DruidPlugin("jdbc:mysql://localhost:3306/demo?useSSL=false&serverTimezone=Asia/Shanghai&characterEncoding=utf-8", "root", "123456"); me.add(dp); ActiveRecordPlugin arp = new ActiveRecordPlugin(dp); me.add(arp); arp.addMapping("user", User.class); } @Override public void configInterceptor(Interceptors me) { } @Override public void configHandler(Handlers me) { } } ``` 6. 运行项目 运行项目,访问http://localhost:8080/user/index即可看到用户管理系统页面。

“相关推荐”对你有帮助么?

  • 非常没帮助
  • 没帮助
  • 一般
  • 有帮助
  • 非常有帮助
提交
评论
添加红包

请填写红包祝福语或标题

红包个数最小为10个

红包金额最低5元

当前余额3.43前往充值 >
需支付:10.00
成就一亿技术人!
领取后你会自动成为博主和红包主的粉丝 规则
hope_wisdom
发出的红包
实付
使用余额支付
点击重新获取
扫码支付
钱包余额 0

抵扣说明:

1.余额是钱包充值的虚拟货币,按照1:1的比例进行支付金额的抵扣。
2.余额无法直接购买下载,可以购买VIP、付费专栏及课程。

余额充值