一、介绍

插槽允许在样式中创建定义明确的插入点,如:通常“面”图层需要插入到“线”图层下方,在标准样式之前,需要通过指定图层 id 来实现,一旦 id 发生变化,则会抛出错误,而在新的标准样式中,只需要指定相应的插槽即可。

{
  "layers": [
    ...,
    {
      "id": "bottom",
      "type": "slot",
      "metadata": {
        "mapbox:description": "Above polygons (land, landuse, water, etc.)"
      }
    },
    ...
  ]
}
  • 1.
  • 2.
  • 3.
  • 4.
  • 5.
  • 6.
  • 7.
  • 8.
  • 9.
  • 10.
  • 11.
  • 12.
  • 13.

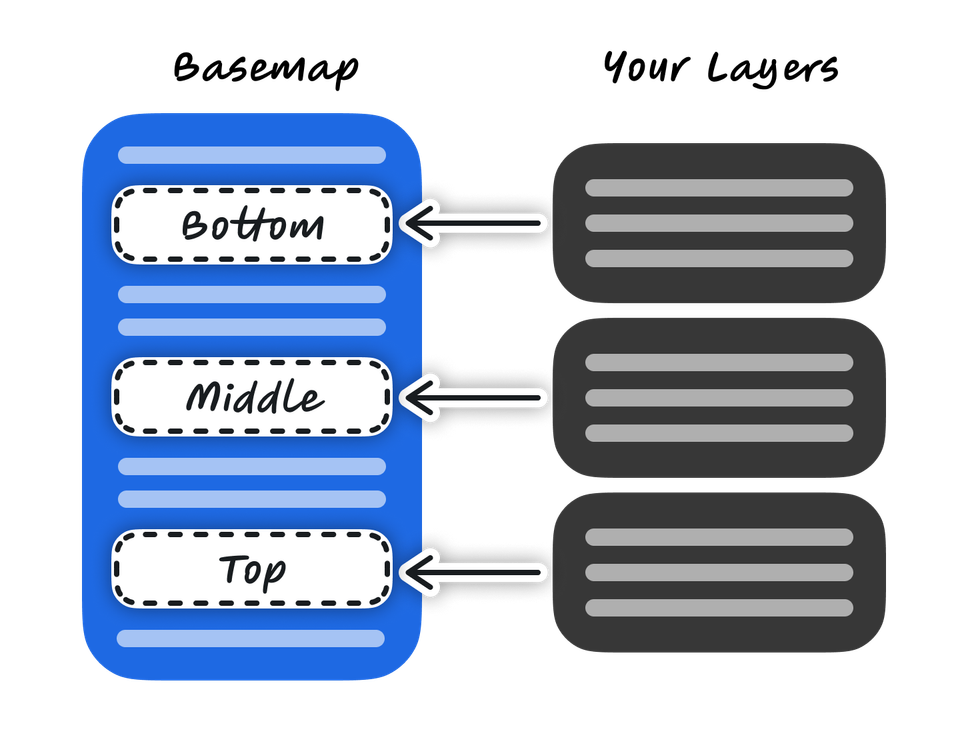
当前提供的标准样式(mapbox://styles/mapbox/standard)中定义了三个插槽:bottom, middle 和 top。

bottom:突出显示路径和道路、建筑物、模型和注记下方的区域(面)。
middle:覆盖区域,或在路径和道路上方,但在建筑物、模型和注记下方添加的线条。
top:将数据放置在 POI 图层上方,但在地点和交通注记下方。

可通过 map.getSlots()获取。

二、使用

在Style定义所需插槽

const map = new mapboxgl.Map({
  container: 'mapView',
  accessToken:'***',
  style: {
    sources: {},
    layers: [
      {
        id: 'bottom',
        type: 'slot',
        metadata: {
          'mapbox:description': '面',
        },
      },
      {
        id: 'middle',
        type: 'slot',
        metadata: {
          'mapbox:description': '线',
        },
      },
      {
        id: 'top',
        type: 'slot',
        metadata: {
          'mapbox:description': '点',
        },
      },
    ],
    version: 8,
  },
  center: [113,23],
  zoom: 3,
  attributionControl: false,
  minZoom: 1,
  maxZoom: 18,
});
  • 1.
  • 2.
  • 3.
  • 4.
  • 5.
  • 6.
  • 7.
  • 8.
  • 9.
  • 10.
  • 11.
  • 12.
  • 13.
  • 14.
  • 15.
  • 16.
  • 17.
  • 18.
  • 19.
  • 20.
  • 21.
  • 22.
  • 23.
  • 24.
  • 25.
  • 26.
  • 27.
  • 28.
  • 29.
  • 30.
  • 31.
  • 32.
  • 33.
  • 34.
  • 35.
  • 36.

然后在添加图层的时候,指定插槽名称就可以了

this.map?.addLayer({
  id: layerId,
  type: 'symbol',
  slot: 'top',
  source: layerId,
  layout: {
    'icon-image': '{icon}',
    'icon-anchor': 'bottom',
  },
  paint: {
    'text-color': ['get', 'color'],
    'text-halo-color': 'white',
    'text-halo-width': 2,
  },
});
  • 1.
  • 2.
  • 3.
  • 4.
  • 5.
  • 6.
  • 7.
  • 8.
  • 9.
  • 10.
  • 11.
  • 12.
  • 13.
  • 14.
  • 15.

 https://docs.mapbox.com/style-spec/reference/slots

mapboxgl V3 Slot插槽使用介绍_插槽