说到搭建自建 Docker 镜像仓库,业内推荐最多的是 Harbor。然而,Harbor 并没有集成高可用(HA),这使得其服务相对不那么可靠。如果开发者想要创建一个高可用 Harbor 集群,通常需要先创建和配置高可用 Redis 和 PostgreSQL 集群,但这一过程却相当麻烦。
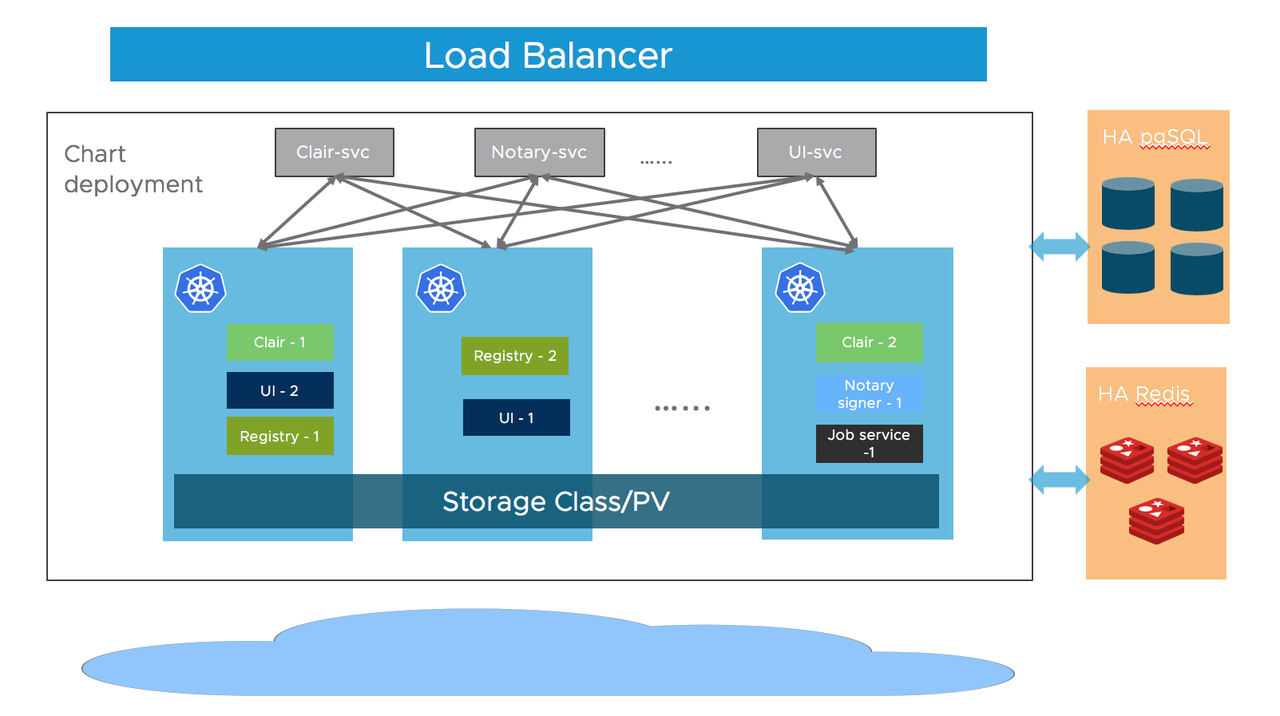
在 K8s 上用 KubeBlocks 提供的 PG 和 Redis operator 部署高可用 Harbor 集群_PostgreSQL

图 1.  Harbor 架构图

现在有了 KubeBlocks ,您只需简单几步即可搭建高可用 Harbor 集群。

为什么选用 KubeBlocks

KubeBlocks 是开源管理控制平面,支持在 K8s 上运行和管理数据库、消息队列和其他数据基础设施。KubeBlocks 支持管理多种数据引擎,包括 RDBMSs(如 MySQL、PostgreSQL)、内存型(Redis)、NoSQLs(MongoDB)、MQs(Kafka、Pulsar)等等。

本文将演示如何使用 KubeBlocks 在 5 分钟内搭建一个高可用 Harbor 集群。

环境准备

开始之前,请确保您的环境满足  KubeBlocks Harbor 的环境要求。

安装 kbcli 和 KubeBlocks

  1. 安装 kbcli。
curl -fsSL https://kubeblocks.io/installer/install_cli.sh | bash
  • 1.
  1. 安装 KubeBlocks。
kbcli kubeblocks install
  • 1.
  1. 检查 KubeBlocks 是否安装成功。
kbcli kubeblocks status
  • 1.
  1. 在 KubeBlocks 中开启 PostgreSQL 和 Redis 引擎。这两个引擎默认开启。您可以执行以下命令,检查引擎启用状态。如果引擎未启用,您可以参考
kbcli addon list
  • 1.

创建 PostgreSQL 和 Redis 集群

  1. 创建一个名为 demo 的独立 namespace,将集群资源独立出来。
kubectl create namespace demo
  • 1.
  1. 创建 PostgreSQL 集群。本文中我们使用了 replication 模式,创建了主备集群,可支持自动故障转移。关于创建集群的细节,可参考
kbcli cluster create postgresql mypg --mode replication --namespace demo
  • 1.
  1. 创建 Redis 集群。本文中我们使用了 replication 模式,指定版本为 redis-7.0.6。KubeBlocks 将创建 sentinel 模式的主备集群,关于创建集群的细节,可参考
kbcli cluster create redis myredis --mode replication --version redis-7.0.6 --namespace demo
  • 1.
  1. 查看已创建的集群状态,确保两个集群的状态都为
kbcli cluster list --namespace demo
  • 1.

连接集群

 KubeBlocks 官方文档根据不同的情景,提供了多种连接集群的方式。您可根据实际场景选择对应的方式。本文中我们将使用试用环境的方式来演示连接至集群。

连接到 PostgreSQL 集群
  1. 连接至 PostgreSQL 集群。
kbcli cluster connect mypg --namespace demo
  • 1.
  1. 在 PostgreSQL CLI 客户端中,创建新用户。
create user test with password 'password';
  • 1.
  1. 为 Harbor 创建新的数据库注册表。
CREATE DATABASE registry OWNER test;
  • 1.

此处创建的用户和数据库将在安装 Harbor 时使用。

连接到 Redis 集群
  1. 连接至 Redis 集群。
kbcli cluster connect myredis --namespace demo
  • 1.
  1. 创建用户。
ACL SETUSER test on >password ~* +@all
  • 1.

安装 Harbor

  1. 下载 Harbor Helm chart。
helm repo add harbor https://helm.goharbor.io

helm fetch harbor/harbor --untar
  • 1.
  • 2.
  • 3.
  1. 获取集群中服务信息。
kubectl get service -n demo
>
NAME                                    TYPE           CLUSTER-IP       EXTERNAL-IP    PORT(S)                                                  AGE
mypg-postgresql                         ClusterIP      172.16.155.121   <none>         5432/TCP,6432/TCP                                        74m
myredis-redis-redis                     ClusterIP      172.16.190.126   <none>         6379/TCP                                                 66m
  • 1.
  • 2.
  • 3.
  • 4.
  • 5.

3.在 values.yaml 文件中配置 PostgreSQL 数据库。使用 KubeBlocks 提供的外部数据库,并填写必要的数据库信息。如需配置其他参数(如 expose.type),可参考 官方文档

database:
  type: external
  ...
  external:
    host: "172.16.155.121" # clusterIP of postgresql
    port: "5432"
    username: "test"       # your username
    password: "password".  # your password
    coreDatabase: "registry" # your database name
    existingSecret: ""
    sslmode: "disable"
  • 1.
  • 2.
  • 3.
  • 4.
  • 5.
  • 6.
  • 7.
  • 8.
  • 9.
  • 10.
  • 11.

4.在 values.yaml 文件中配置 Redis 数据库。

redis:
  type: external
  ...
  external:
    addr: "172.16.190.126:6379" # clusterIp of redis: port
    sentinelMasterSet: ""
    coreDatabaseIndex: "0"
    jobserviceDatabaseIndex: "1"
    registryDatabaseIndex: "2"
    trivyAdapterIndex: "5"
    username: "test"        # your username
    password: "password"    # your password
    existingSecret: ""
  • 1.
  • 2.
  • 3.
  • 4.
  • 5.
  • 6.
  • 7.
  • 8.
  • 9.
  • 10.
  • 11.
  • 12.
  • 13.
  1. 安装 Harbor。
helm install myharbor. -n demo
  • 1.
  1. 检查 Pod 状态,确保所有服务都处于 Running 状态。
kubectl get pods -n demo
> 
NAME                                   READY   STATUS    RESTARTS   AGE
myharbor-core-66d95c9f45-vpcnn         1/1     Running   0          44m
myharbor-jobservice-85b5676456-kl5r9   1/1     Running   0          44m
myharbor-nginx-55dd86f5d8-s78gn        1/1     Running   0          44m
myharbor-portal-869c6656c5-5dtsc       1/1     Running   0          44m
myharbor-registry-c66cd79b-77k5j       2/2     Running   0          44m
myharbor-trivy-0                       1/1     Running   0          44m
mypg-postgresql-0                      4/4     Running   0          65m
mypg-postgresql-1                      4/4     Running   0          82s
myredis-redis-0                        3/3     Running   0          57m
myredis-redis-1                        3/3     Running   0          57m
myredis-redis-sentinel-0               1/1     Running   0          58m
myredis-redis-sentinel-1               1/1     Running   0          58m
myredis-redis-sentinel-2               1/1     Running   0          58m
  • 1.
  • 2.
  • 3.
  • 4.
  • 5.
  • 6.
  • 7.
  • 8.
  • 9.
  • 10.
  • 11.
  • 12.
  • 13.
  • 14.
  • 15.
  • 16.

至此,部署完成,您可以照常连接 Harbor UI。

高可用演示

本节将演示 KubeBlocks 创建的 Harbor 集群的高可用能力。我们将通过 PostgreSQL 集群主节点故障来模拟。

  1. 查看 PostgreSQL 集群和 Pod 的初始状态。当前,mypg-postgresql-0 为主节点,mypg-postgresql-1 为备节点。
kubectl -n demo get pod -L kubeblocks.io/role
>
NAME                                   READY   STATUS    RESTARTS   AGE     ROLE
...
mypg-postgresql-0                      4/4     Running   0          66m     primary
mypg-postgresql-1                      4/4     Running   0          66m     secondary
...
  • 1.
  • 2.
  • 3.
  • 4.
  • 5.
  • 6.
  • 7.

2.向 Harbor 注册表中推送一个名为 busybox 的测试镜像。

docker docker tag busybox harbor.domain.com/library/busybox
docker push harbor.domain.com/library/busybox
  • 1.
  • 2.

3.查看 Harbor 仓库,可以看到该镜像已成功推送到 Harbor 注册表。

  1. 接下来,模拟 PostgreSQL 主节点故障。
# Enter the primary pod
kubectl exec -it mypg-postgresql-0 -n demo -- bash

# Delete the data directory of PostgreSQL to simulate an exception
root@mycluster-postgresql-0:/home/postgres# rm -fr /home/postgres/pgdata/pgroot/data
  • 1.
  • 2.
  • 3.
  • 4.
  • 5.

5.查看集群日志,观察故障发生时节点角色变化。

# View the primary pod logs
kubectl logs mypg-postgresql-0 -n demo
  • 1.
  • 2.

从日志中我们可以看到,leader lock 从主节点释放出来,触发了 HA 切换,并从备份数据中创建出新的副本。该服务几十秒便恢复正常。

2024-06-26 08:00:51,759 INFO: no action. I am (mypg-postgresql-0), the leader with the lock
 2024-06-26 08:01:01,726 INFO: Lock owner: mypg-postgresql-0; I am mypg-postgresql-0
 2024-06-26 08:01:01,802 INFO: Leader key released
 2024-06-26 08:01:01,824 INFO: released leader key voluntarily as data dir empty and currently leader
 2024-06-26 08:01:01,825 INFO: Lock owner: mypg-postgresql-1; I am mypg-postgresql-0
 ...
 2024-06-26 08:01:04,475 INFO: replica has been created using basebackup_fast_xlog
 2024-06-26 08:01:04,475 INFO: bootstrapped from leader 'mypg-postgresql-1'
 2024-06-26 08:01:04,476 INFO: closed patroni connection to the postgresql cluster
  • 1.
  • 2.
  • 3.
  • 4.
  • 5.
  • 6.
  • 7.
  • 8.
  • 9.
# View secondary pod logs
kubectl logs mypg-postgresql-1 -n demo
  • 1.
  • 2.

原来的备节点 mypg-postgresql-1 获得了 leader locks,成为主节点。

2024-06-26 08:02:13,638 INFO: no action. I am (mypg-postgresql-1), the leader with the lock
  • 1.

6.再次查看 PostgreSQL 集群和 Pod 的状态。故障切换后,mypg-posgresql-0 变成了备节点,mypg-postgresql-1 变成了主节点。

kubectl -n demo get pod -L kubeblocks.io/role
>
NAME                                   READY   STATUS    RESTARTS   AGE   ROLE
...
mypg-postgresql-0                      4/4     Running   0          89m   secondary
mypg-postgresql-1                      4/4     Running   0          26m   primary
...
  • 1.
  • 2.
  • 3.
  • 4.
  • 5.
  • 6.
  • 7.

7.连接到 PostgreSQL 集群,查看主节点的 replication 信息。

postgres=# select * from pg_stat_replication;
  • 1.

在 K8s 上用 KubeBlocks 提供的 PG 和 Redis operator 部署高可用 Harbor 集群_kubernetes_02

结果显示 mypg-postgresql-0 已被分配备节点角色。

8.验证 Harbor 集群的服务。这里我们拉取之前推送的 busybox 镜像。该镜像可以成功地从 Harbor 注册表中拉取。同时,我们也推送了新镜像 hello-world。该镜像也能够成功推送到 Harbor 注册表。故障切换后,Harbor 集群的读写功能已恢复,证实了 KubeBlocks 提供的高可用功能的有效性。

集群扩容

KubeBlocks 提供了垂直和水平扩容的能力。您可以通过执行以下命令轻松扩容集群。

  • 垂直扩容
kbcli cluster vscale mypg \
--components="postgresql" \
--memory="4Gi" --cpu="2" \
--namespace demo
  • 1.
  • 2.
  • 3.
  • 4.
  • 水平扩容
kbcli cluster hscale mypg 
--replicas 3 \
--namespace demo \ 
--components postgresql
  • 1.
  • 2.
  • 3.
  • 4.

总结

通过集成 KubeBlocks,仅需 5 分钟,您就可以拉起高可用 Harbor 集群,并能确保您的 Harbor 集群能提供持续、可信赖的服务。KubeBlocks 简化了整个创建过程,因此您可以有更多的精力去关注重要任务,而无需担心底层基础设施的配置和管理。

参考