


第二篇:jetty服务器插件配置,ssm所需基本jar包引入,ssm相关文件配置
1. 配置jetty服务器插件
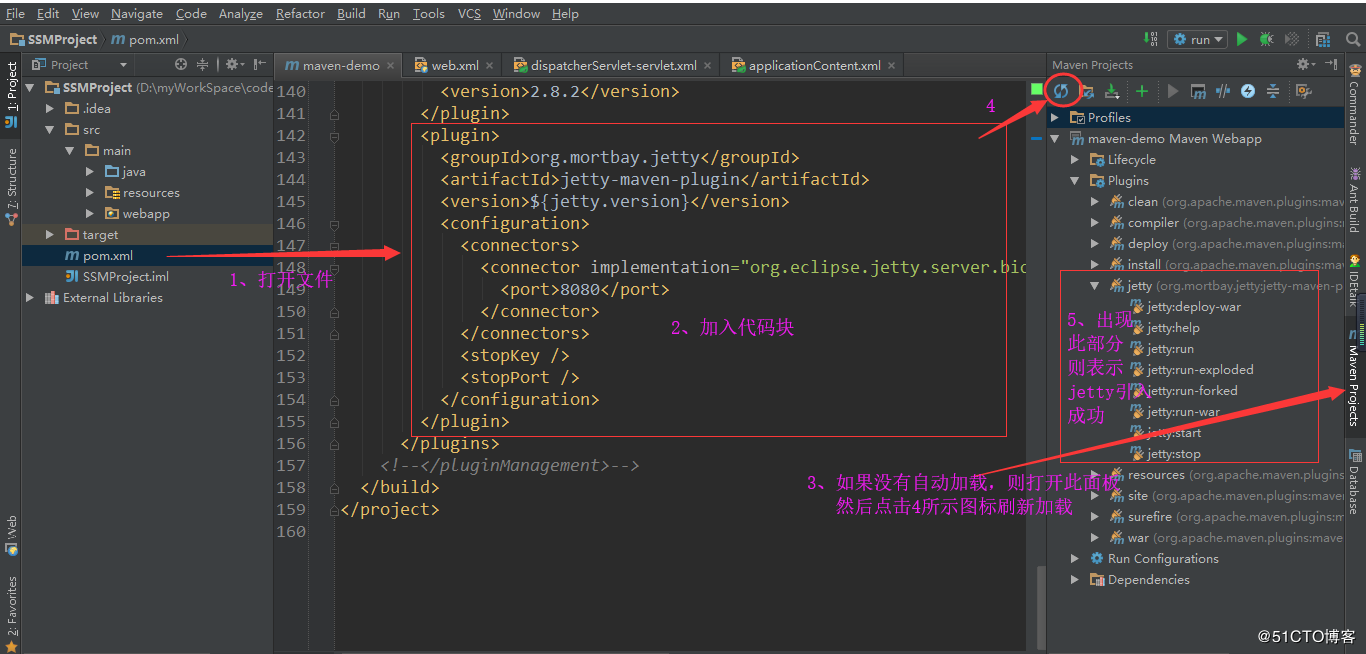
打开已默认创建的pom.xml文件,其中已经自动引入了一些jar和maven插件,我们在插件区标签内加入以下代码段,引入jetty插件jar包,此时idea会自动下载jar包,或者打开右边Maven project面板刷新,如图:
org.mortbay.jetty
jetty-maven-plugin
8.1.16.v20140903
8080
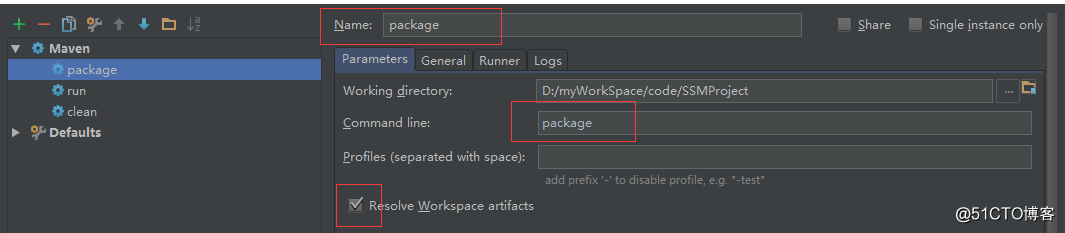
2. 配置常用maven命令:clean、package、run
点击工具栏 run-->Edit Configurations,或者点击图标进行配置命令,如图:

打开面板后,点击左上角+号,选择maven
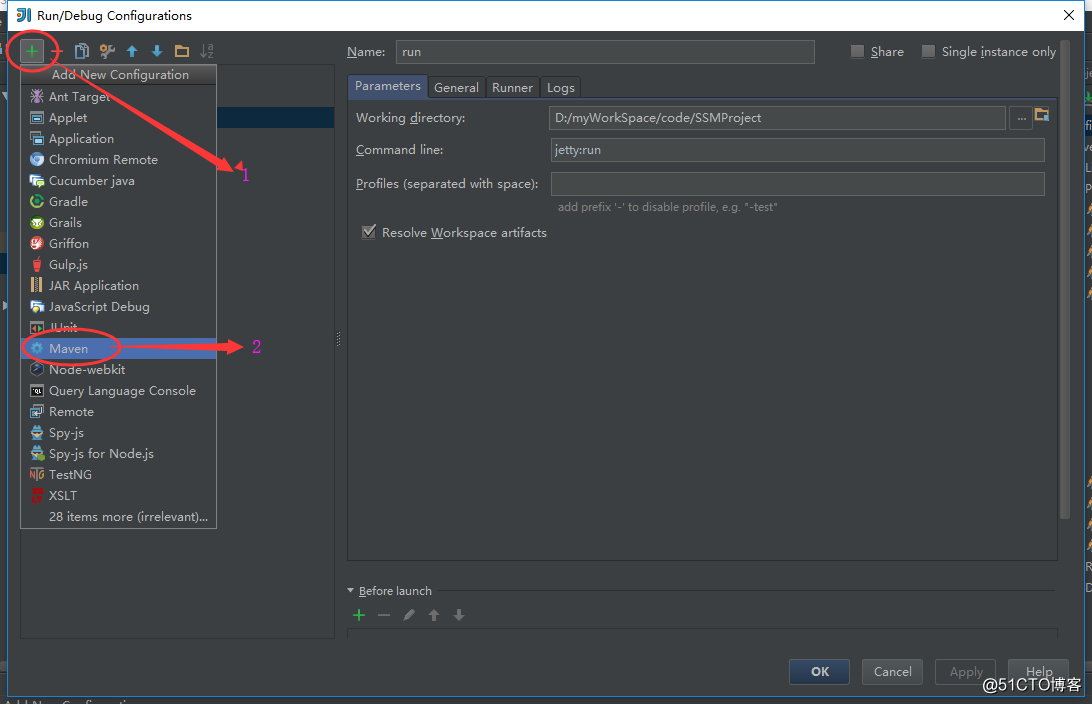
输入Name(自定义)和命令行,package和clean同样
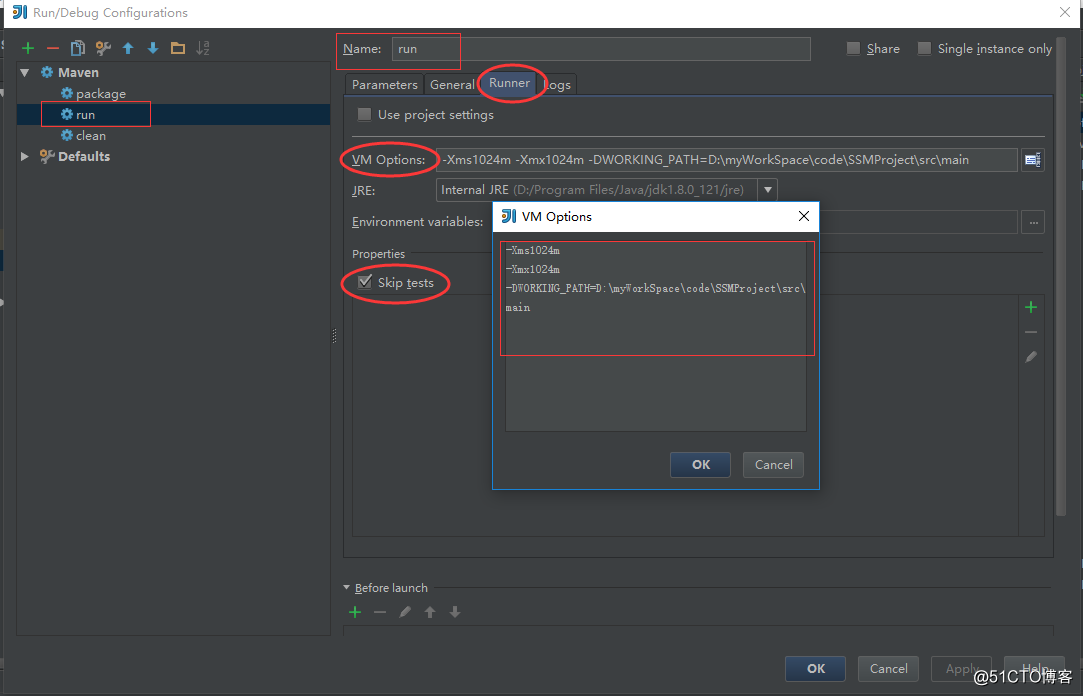
配置run时需要设置VM
此时,jetty服务器已配置完成,可以启动。接下来进行SSM项目所需jar和默认jar的引入
3. SSM项目所需jar和默认jar的引入
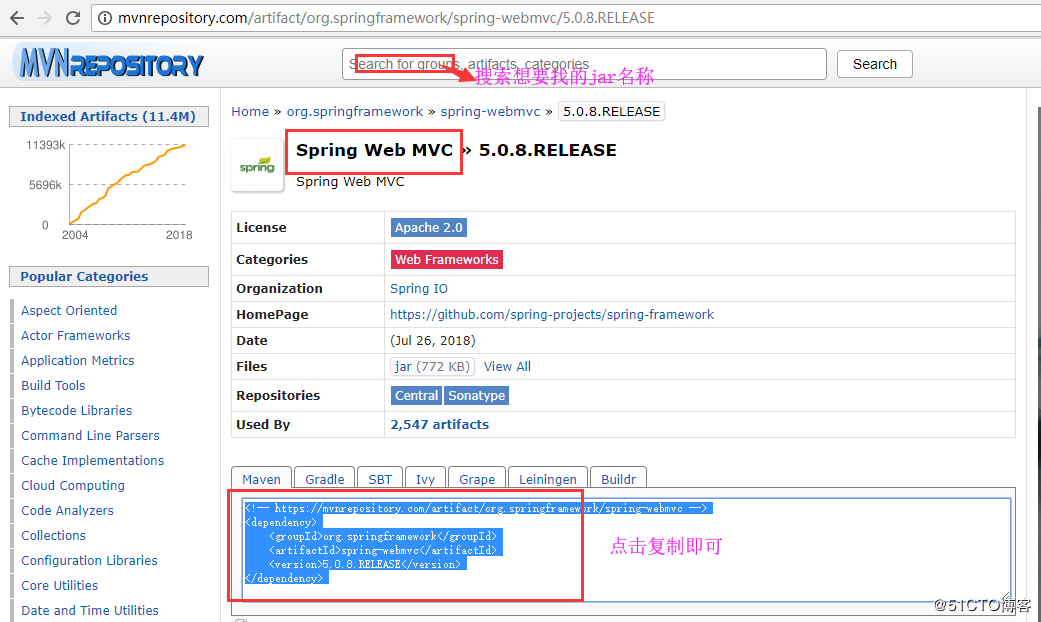
打开pom.xml文件,在标签内加入以下代码片段,将需要的ssm项目所需要的jar引入,这些都可以从maven中央仓库找到,需要注意的是要保证版本的一致性,maven中央仓库地址:http://mvnrepository.com/
junit
junit
4.11
test
org.springframework
spring-webmvc
4.3.18.RELEASE
org.springframework
spring-jdbc
4.3.18.RELEASE
org.springframework
spring-aspects
4.3.18.RELEASE
org.mybatis
mybatis
3.4.6
org.mybatis
mybatis-spring
1.3.2
com.oracle
ojdbc6
11.2.0.1.0
com.alibaba
druid
1.0.5
javax.servlet
jstl
1.2
provided
javax.servlet.jsp
jsp-api
2.1
provided
org.slf4j
jcl-over-slf4j
${slf4j.version}
provided
org.glassfish
javax.servlet
3.0.1
provided
引入后可以看到这些依赖包已经加入项目:

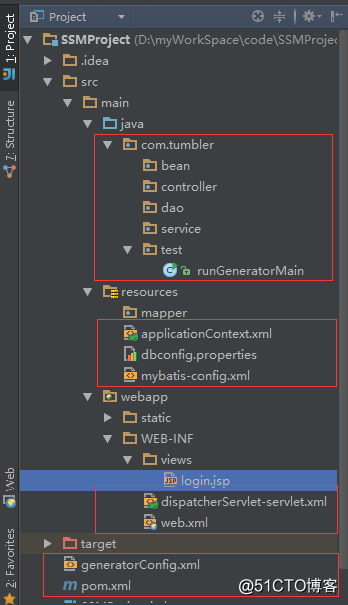
配置好服务器和引入jar包后,接下来进行ssm项目文件配置,最后进行mybatis逆向生成,配置文件主要有:
web.xml 、applicationContext.xml(Spring) 、dispatcherServlet-servlet.xml (Spring MVC)、mybatis-config.xml(Mybatis)
对于ssm的完整组合,可以免去mybatis-config.xml的配置,这里为了各框架的清晰表达,将全部列出
下面是项目的目录结构和各配置文件所放位置:
直接上代码,有注释
1. web.xml
/p>
"-//Sun Microsystems, Inc.//DTD Web Application 2.3//EN"
"http://java.sun.com/dtd/web-app_2_3.dtd" >
Archetype Created Web Application
contextConfigLocation
classpath:applicationContext.xml
org.springframework.web.context.ContextLoaderListener
dispatcherServlet
org.springframework.web.servlet.DispatcherServlet
1
dispatcherServlet
*.action
CharacterEncodingFilter
org.springframework.web.filter.CharacterEncodingFilter
encoding
UTF-8
forceRequestEncoding
true
forceResponseEncoding
true
CharacterEncodingFilter
/*
HiddenHttpMethodFilter
org.springframework.web.filter.HiddenHttpMethodFilter
HiddenHttpMethodFilter
/*
2. applicationContext.xml
spring配置文件,里面的数据库连接部分除了主要信息,其他的可以根据需求配置
xmlns:xsi="http://www.w3.org/2001/XMLSchema-instance"
xmlns:context="http://www.springframework.org/schema/context"
xmlns:aop="http://www.springframework.org/schema/aop"
xmlns:tx="http://www.springframework.org/schema/tx"
xsi:schemaLocation="http://www.springframework.org/schema/beans
http://www.springframework.org/schema/beans/spring-beans.xsd
http://www.springframework.org/schema/context
http://www.springframework.org/schema/context/spring-context.xsd
http://www.springframework.org/schema/aop
http://www.springframework.org/schema/aop/spring-aop.xsd
http://www.springframework.org/schema/tx
http://www.springframework.org/schema/tx/spring-tx.xsd">
3. dispatcherServlet-servlet.xml
xmlns:xsi="http://www.w3.org/2001/XMLSchema-instance"
xmlns:context="http://www.springframework.org/schema/context"
xmlns:mvc="http://www.springframework.org/schema/mvc"
xsi:schemaLocation="http://www.springframework.org/schema/beans
http://www.springframework.org/schema/beans/spring-beans.xsd
http://www.springframework.org/schema/mvc
http://www.springframework.org/schema/mvc/spring-mvc.xsd">
4. mybatis-config.xml
/p>
PUBLIC "-//mybatis.org//DTD Config 3.0//EN"
"http://mybatis.org/dtd/mybatis-3-config.dtd">
5. dbconfig.properties
除了基本信息,其他根据需求配置
jdbc.url=jdbc:oracle:thin:@127.0.0.1:1521:orcl
jdbc.driver=oracle.jdbc.driver.OracleDriver
jdbc.username=scott
jdbc.password=oracle
#------------------------------------------------------------------------------------------
#配置扩展插件 监控统计用filters:stat 日志用filters:log4j 防御sql注入用filters:wall
filters:log4j
#最大连接池数量 初始化建立物理连接的个数 获取连接时最长的等待时间 最小连接池数量 maxIdle已经弃用
maxActive:20
initialSize:1
maxWait:60000
minIdle:10
maxIdle:15
#有两个含义 1.Destroy 线程会检测连接的时间 2.testWhileIdle的判断依据
timeBetweenEvictionRunsMillis:60000
#Destory线程中如果检测到当前连接的最后活跃时间和当前时间的差值大于minEvictableIdleTimeMillis,则关闭当前连接
minEvictableIdleTimeMillis:300000
#用来检测连接是否的sql,要求是一个查询语句。在mysql中通常设置为SELECT 'X'
validationQuery:SELECT 'x'
#申请连接的时候检测,如果空闲时间大于timeBetweenEvictionRunsMillis,执行validationQuery连接是否有效
testWhileIdle:true
#申请连接时执行validationQuery检测连接是否有效 这个配置会降低性能
testOnBorrow:false
#归还连接时执行validationQuery检测连接是否有效 这个配置会降低性能
testOnReturn:false
#要启用PSCache,必须配置大于0,当大于0时,poolPreparedStatements自动触发修改为true
maxOpenPreparedStatements:20
#对于建立连接超过removeAbandonedTimeout的连接强制关闭
removeAbandoned:true
#指定连接建立多长就被强制关闭
removeAbandonedTimeout:1800
#指定发生removeabandoned时,是否记录当前线程的堆栈信息到日志中
logAbandoned:true
6. generatorConfig.xml
Mybatis逆向生成配置文件
/p>
PUBLIC "-//mybatis.org//DTD MyBatis Generator Configuration 1.0//EN"
"http://mybatis.org/dtd/mybatis-generator-config_1_0.dtd">
connectionURL="jdbc:oracle:thin:@127.0.0.1:1521:orcl"
userId="scott"
password="oracle">
7. runGeneratorMain.java
Mybatis逆向生成运行入口方法
package com.tumbler.test;
import org.mybatis.generator.api.MyBatisGenerator;
import org.mybatis.generator.config.Configuration;
import org.mybatis.generator.config.xml.ConfigurationParser;
import org.mybatis.generator.internal.DefaultShellCallback;
import java.io.File;
import java.util.ArrayList;
import java.util.List;
/**
* User:tumbler
* Date:2018/8/22.
* Desc:Mybatis逆向工程生成代码主类入口
*/
public class runGeneratorMain {
public static void main(String[] args) throws Exception{
List warnings = new ArrayList();
boolean overwrite = true;
File configFile = new File("generatorConfig.xml");
ConfigurationParser cp = new ConfigurationParser(warnings);
Configuration config = cp.parseConfiguration(configFile);
DefaultShellCallback callback = new DefaultShellCallback(overwrite);
MyBatisGenerator myBatisGenerator = new MyBatisGenerator(config, callback, warnings);
myBatisGenerator.generate(null);
}
}
到此为止,SSM项目已经搭建并配置完成,可以进行业务开发了。。。


 78
78


 被折叠的 条评论
为什么被折叠?
被折叠的 条评论
为什么被折叠?
 到【灌水乐园】发言


