


 本文详细解析了Flutter引擎中MessageLoop的启动、Dart层Microtask和引擎层Task的生产和消费过程。从ThreadHost初始化到MessageLoopAndroid的创建,再到Microtask和Task的调度与执行,揭示了Flutter消息机制的内部工作原理。文中还对比了Flutter与Android原生消息机制的异同,展示了TaskRunner和MicrotaskQueue在任务处理中的角色。
一、概述
在深入理解Flutter引擎启动 已经介绍了引擎启动阶段会创建AndroidShellHolder对象,在该过程会执行ThreadHost初始化,MessageLoop便是在这个阶段启动的。
1.1 消息流程图
MessageLoop启动流程图
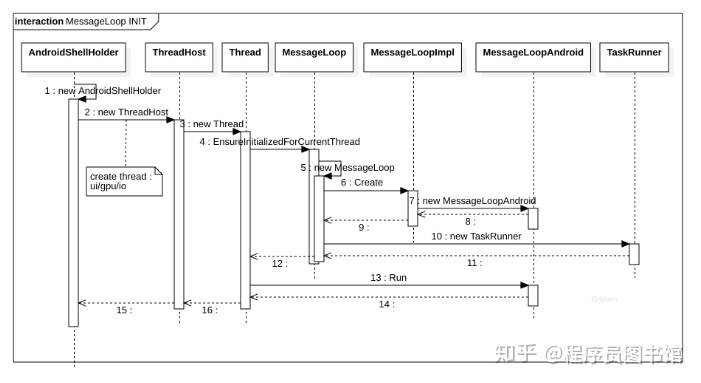
该过程主要工作:创建线程,并给每个线程中创建相应的MessageLoop,对于Android平台创建的是MessageLoopAndroid,同时还会创建TaskRunner,之后便进入到相应MessageLoop的run()方法。
ScheduleMicrotask流程图

1.2 MessageLoop类图
MessageLoop类图

图解:
- Thread和MessageLoop类都有成员变量记录着TaskRunner类;
- MessageLoopImpl类在Android系统的实现子类为MessageLoopAndroid;
二、MessageLoop启动
引擎启动过程会创建UI/GPU/IO这3个线程,代码如下。
thread_host_ = {thread_label, ThreadHost::Type::UI
                              | ThreadHost::Type::GPU
                              | ThreadHost::Type::IO};
2.1 ThreadHost初始化
[-> flutter/shell/common/http://thread_host.cc]
ThreadHost::ThreadHost(std::string name_prefix, uint64_t mask) {
  if (mask & ThreadHost::Type::Platform) {
    platform_thread = std::make_unique<fml::Thread>(name_prefix + ".platform");
  }

  if (mask & ThreadHost::Type::UI) {
    //创建线程 [见小节2.2]
    ui_thread = std::make_unique<fml::Thread>(name_prefix + ".ui");
  }

  if (mask & ThreadHost::Type::GPU) {
    gpu_thread = std::make_unique<fml::Thread>(name_prefix + ".gpu");
  }

  if (mask & ThreadHost::Type::IO) {
    io_thread = std::make_unique<fml::Thread>(name_prefix + ".io");
  }
}
根据传递的参数,可知首次创建AndroidShellHolder实例的过程,会创建3个线程名为1.ui, 1.gpu, http://1.io。
2.2 Thread初始化
[-> flutter/fml/http://thread.cc]
Thread::Thread(const std::string& name) : joined_(false) {
  fml::AutoResetWaitableEvent latch;
  fml::RefPtr<fml::TaskRunner> runner;
  thread_ = std::make_unique<std::thread>([&latch, &runner, name]() -> void {
    SetCurrentThreadName(name); //设置线程名
    fml::MessageLoop::EnsureInitializedForCurrentThread(); //[见小节2.3]
    //从ThreadLocal中获取MessageLoop指针
    auto& loop = MessageLoop::GetCurrent();
    runner = loop.GetTaskRunner();
    latch.Signal();
    loop.Run(); //运行 [见小节2.8]
  });
  latch.Wait();
  task_runner_ = runner;
}
Thread线程对象会有两个重要的成员变量:
- thread_: 类型为unique_ptr
- task_runner_: 类型为RefPtr
2.3 EnsureInitializedForCurrentThread
[-> flutter/fml/http://message_loop.cc]
FML_THREAD_LOCAL ThreadLocal tls_message_loop([](intptr_t value) {
  delete reinterpret_cast<MessageLoop*>(value);
});

void MessageLoop::EnsureInitializedForCurrentThread() {
  if (tls_message_loop.Get() != 0) {
    return;  //保证只初始化一次
  }
  //创建MessageLoop,并保持在tls_message_loop [见小节2.4]
  tls_message_loop.Set(reinterpret_cast<intptr_t>(new MessageLoop()));
}
创建MessageLoop对象保存在ThreadLocal类型的tls_message_loop变量中。
2.4 MessageLoop初始化
[-> flutter/fml/http://message_loop.cc]
MessageLoop::MessageLoop()
       //[见小节2.5]
    : loop_(MessageLoopImpl::Create()),
      //[见小节2.7]
      task_runner_(fml::MakeRefCounted<fml::TaskRunner>(loop_)) {
}
创建MessageLoopAndroid对象和TaskRunner对象,并保持在当前的MessageLoop对象的成员变量。
2.5 MessageLoopImpl::Create
[-> flutter/fml/http://message_loop_impl.cc]
fml::RefPtr<MessageLoopImpl> MessageLoopImpl::Create() {
#if OS_MACOSX
  return fml::MakeRefCounted<MessageLoopDarwin>();
#elif OS_ANDROID
  return fml::MakeRefCounted<MessageLoopAndroid>(); //[见小节2.6]
#elif OS_LINUX
  return fml::MakeRefCounted<MessageLoopLinux>();
#elif OS_WIN
  return fml::MakeRefCounted<MessageLoopWin>();
#else
  return nullptr;
#endif
}
针对Android平台,则MessageLoopImpl的实例为MessageLoopAndroid对象。
2.6 MessageLoopAndroid初始化
[-> flutter/fml/platform/android/http://message_loop_android.cc]
MessageLoopAndroid::MessageLoopAndroid()
    : looper_(AcquireLooperForThread()), //[见小节2.6.1]
      timer_fd_(::timerfd_create(kClockType, TFD_NONBLOCK | TFD_CLOEXEC)),
      running_(false) {
  static const i
最低0.47元/天 解锁文章


 729
729


 被折叠的 条评论
为什么被折叠?
被折叠的 条评论
为什么被折叠?
 到【灌水乐园】发言


