


一、Maven依赖添加
com.rabbitmqamqp-client3.0.4
复制代码
二、七种工作模式的java实例
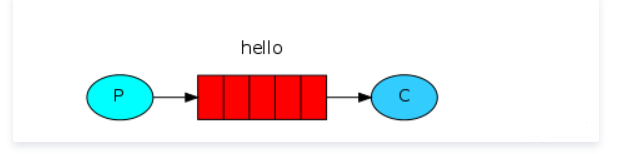
1、简单模式
最简单的一个消费者和一个生产者模式,生产者生成消息,消费者监听消息,若是消费者监听到它所需要的消息,就会消费该消息,这种消息是次性的,被消费了就没有了。
1.1.1、EasyRecv.java
import com.rabbitmq.client.Channel;
import com.rabbitmq.client.Connection;
import com.rabbitmq.client.ConnectionFactory;
import com.rabbitmq.client.QueueingConsumer;
public class EasyRecv{
//队列名称
private final static String QUEUE_NAME = "hello world";
public static void main(String[] argv) throws java.io.IOException,java.lang.InterruptedException {
//打开连接和创建频道,与发送端一样
ConnectionFactory factory = new ConnectionFactory();
//设置RabbitMQ所在主机ip或者主机名
factory.setHost("127.0.0.1");
Connection connection = factory.newConnection();
Channel channel = connection.createChannel();
//声明队列,主要为了防止消息接收者先运行此程序,队列还不存在时创建队列。
/** * 队列名 * 是否持久化 * 是否排外 即只允许该channel访问该队列 一般等于true的话用于一个队列只能有一个消费者来消费的场景 * 是否自动删除 消费完删除 * 其他属性 * */
channel.queueDeclare(QUEUE_NAME, false, false, false, null);
System.out.println("Waiting for messages. To exit press CTRL+C");
//创建队列消费者
QueueingConsumer consumer = new QueueingConsumer(channel);
//指定消费队列
/** * 队列名 * 其他属性 路由 * 消息body */
channel.basicConsume(QUEUE_NAME, true, consumer);
while (true)
{
//nextDelivery是一个阻塞方法(内部实现其实是阻塞队列的take方法)
QueueingConsumer.Delivery delivery = consumer.nextDelivery();
String message = new String(delivery.getBody());
System.out.println("Received '" + message + "'");
}
}
}
复制代码
1.1.2、EasySend.java
import com.rabbitmq.client.Channel;
import com.rabbitmq.client.Connection;
import com.rabbitmq.client.ConnectionFactory;
import java.util.Scanner;
public class EasySend{
//队列名称
private final static String QUEUE_NAME = "hello world";
public static void main(String[] argv) throws java.io.IOException
{
/** * 创建连接连接到MabbitMQ */
ConnectionFactory factory = new ConnectionFactory();
//设置MabbitMQ所在主机ip或者主机名
factory.setHost("127.0.0.1");
while (true){
//创建一个连接
Connection connection = factory.newConnection();
//创建一个频道
Channel channel = connection.createChannel();
//指定一个队列
channel.queueDeclare(QUEUE_NAME, false, false, false, null);
//发送的消息
Scanner scanner = new Scanner(System.in);
String ms = scanner.nextLine();
//String message = "hello world!";
//往队列中发出一条消息
channel.basicPublish("", QUEUE_NAME, null, ms.getBytes());
System.out.println("Sent '" + ms + "'");
//关闭频道和连接
channel.close();
connection.close();
}
}
复制代码
以上两个已经可以进行通信了,下面同样是简单的实例,但是我们可以看到在代码层面上,连接的代码都是一样的,所以我们可以创建一个连接的工具类。
1.2.1、RabbitmqConnectionUtil .java
import com.rabbitmq.client.Connection;
import com.rabbitmq.client.ConnectionFactory;
import java.io.IOException;
public class RabbitmqConnectionUtil{
public static Connection getConnection() throws IOException {
//连接工厂
ConnectionFactory factory = new ConnectionFactory();
factory.setHost("localhost");
//连接5672端口 注意15672为工具界面端口 25672为集群端口
factory.setPort(5672);
//factory.setVirtualHost("/xxxxx");
// factory.setUsername("xxxxxx");
// factory.setPassword("123456");
//获取连接
Connection connection = factory.newConnection();
return connection;
}
}
复制代码
1.2.2、UtilSend.java
import com.rabbitmq.client.Channel;
import com.rabbitmq.client.Connection;
import top.san.RabbitMq.util.RabbitmqConnectionUtil;
import java.io.IOException;
public class UtilSend{
private final static String QUEUE_NAME = "UtilConn";
public static void main(String[] args) throws IOException {
Connection connection = RabbitmqConnectionUtil.getConnection();
//创建通道
Channel channel = connection.createChannel();
//声明队列
channel.queueDeclare(QUEUE_NAME, false, false, false, null);
//消息内容
String message = "这里是lbw广场";
channel.basicPublish("", QUEUE_NAME,null,message.getBytes());
System.out.println("[x]Sent '"+message + "'");
//最后关闭通关和连接
channel.close();
connection.close();
}
}
复制代码
1.2.3、UtilRecv.java
import com.rabbitmq.client.Channel;
import com.rabbitmq.client.Connection;
import com.rabbitmq.client.QueueingConsumer;
import top.san.RabbitMq.util.RabbitmqConnectionUtil;
import java.io.IOException;
public class UtilRecv{
private final static String QUEUE_NAME = "UtilConn";
public static void main(String[] args) throws IOException, InterruptedException {
Connection connection = null;
connection = RabbitmqConnectionUtil.getConnection();
//创建通道
Channel channel = connection.createChannel();
//声明队列
channel.queueDeclare(QUEUE_NAME, false, false, false, null);
QueueingConsumer queueingConsumer = new QueueingConsumer(channel);
channel.basicConsume(QUEUE_NAME,true,queueingConsumer);
while(true){
//该方法会阻塞
QueueingConsumer.Delivery delivery = queueingConsumer.nextDelivery();
String message = new String(delivery.getBody());
System.out.println("[x] Received '"+message+"'");
}
}
}
复制代码
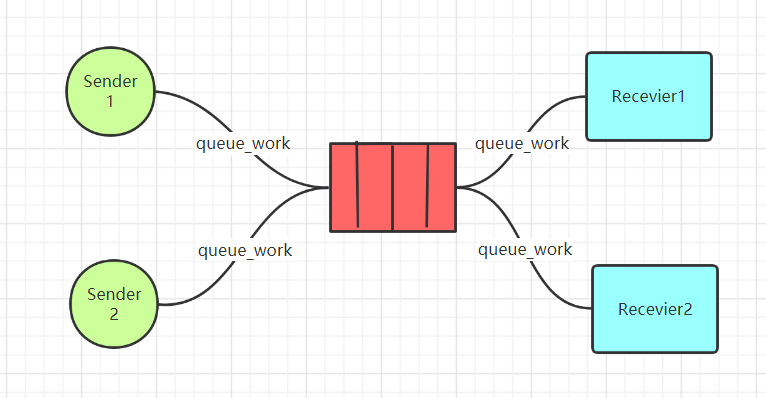
2、工作队列
工作队列也就是简单模式的强化版,一个队列是可以多个生产者,也可以有多个消费者来竞争消费消息,但是我们仍需保证队列的幂等性,队列存在就不能再创建同名队列,关注公众号:麒麟改bug,还可以获取Java核心知识点思维导图以及Java核心学习笔记。
下面的每个进程都控制其主线程休眠,让我们可以更好的看到结果。
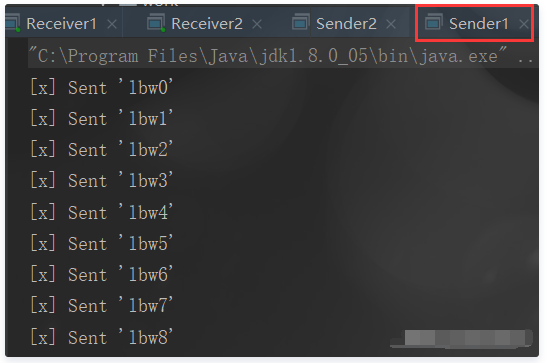
2.1.1、Sender1.java
import com.rabbitmq.client.Channel;
import com.rabbitmq.client.Connection;
import top.san.RabbitMq.util.RabbitmqConnectionUtil;
import java.io.IOException;
public class Sender1{
private final static String QUEUE_NAME = "queue_work";
public static void main(String[] args) throws IOException, InterruptedException {
Connection connection = RabbitmqConnectionUtil.getConnection();
Channel channel = connection.createChannel();
channel.queueDeclare(QUEUE_NAME, false, false, false, null);
for(int i = 0; i < 100; i++){
String message = "lbw" + i;
channel.basicPublish("", QUEUE_NAME, null, message.getBytes());
System.out.println("[x] Sent '"+message + "'");
Thread.sleep(i*10);
}
channel.close();
connection.close();
}
}
复制代码
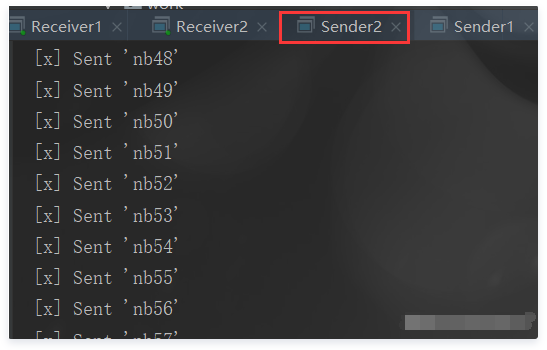
2.1.2、Sender2.java
import com.rabbitmq.client.Channel;
import com.rabbitmq.client.Connection;
import top.san.RabbitMq.util.RabbitmqConnectionUtil;
import java.io.IOException;
public class Sender2{
private final static String QUEUE_NAME = "queue_work";
public static void main(String[] args) throws IOException, InterruptedException {
Connection connection = RabbitmqConnectionUtil.getConnection();
Channel channel = connection.createChannel();
channel.queueDeclare(QUEUE_NAME, false, false, false, null);
for(int i = 0; i < 100; i++){
String message = "nb" + i;
channel.basicPublish("", QUEUE_NAME, null, message.getBytes());
System.out.println("[x] Sent '"+message + "'");
Thread.sleep(i*10);
}
channel.close();
connection.close();
}
}
复制代码
2.1.3、Receiver1.java
import com.rabbitmq.client.Channel;
import com.rabbitmq.client.Connection;
import com.rabbitmq.client.QueueingConsumer;
import top.san.RabbitMq.util.RabbitmqConnectionUtil;
import java.io.IOException;
/** * Created by san */
public class Receiver1{
private final static String QUEUE_NAME = "queue_work";
public static void main(String[] args) throws IOException, InterruptedException {
Connection connection = RabbitmqConnectionUtil.getConnection();
Channel channel = connection.createChannel();
channel.queueDeclare(QUEUE_NAME, false,false, false,null);
//同一时刻服务器只会发送一条消息给消费者
channel.basicQos(1);
QueueingConsumer consumer = new QueueingConsumer(channel);
//关于手工确认 待之后有时间研究下
channel.basicConsume(QUEUE_NAME, false, consumer);
while(true){
QueueingConsumer.Delivery delivery = consumer.nextDelivery();
String message = new String(delivery.getBody());
System.out.println("[x] Received1 '"+message+"'");
Thread.sleep(10);
//返回确认状态
channel.basicAck(delivery.getEnvelope().getDeliveryTag(), false);
}
}
}
复制代码
2.1.4、Receiver2.java
import com.rabbitmq.client.Channel;
import com.rabbitmq.client.Connection;
import com.rabbitmq.client.QueueingConsumer;
import top.san.RabbitMq.util.RabbitmqConnectionUtil;
import java.io.IOException;
/** * Created by san */
public class Receiver2{
private final static String QUEUE_NAME = "queue_work";
public static void main(String[] args) throws IOException, InterruptedException {
Connection connection = RabbitmqConnectionUtil.getConnection();
Channel channel = connection.createChannel();
channel.queueDeclare(QUEUE_NAME, false,false, false,null);
//同一时刻服务器只会发送一条消息给消费者
channel.basicQos(1);
QueueingConsumer consumer = new QueueingConsumer(channel);
channel.basicConsume(QUEUE_NAME, false, consumer);
while(true){
QueueingConsumer.Delivery delivery = consumer.nextDelivery();
String message = new String(delivery.getBody());
System.out.println("[x] Received2 '"+message+"'");
Thread.sleep(1000);
//返回确认状态
channel.basicAck(delivery.getEnvelope().getDeliveryTag(), false);
}
}
}
复制代码
2.1.5、结果
上面的四个程序都运行起来,结果可以看到如下,依据结果分析,可知,同一个消息队列,是可以有多个生产者和消费者的。
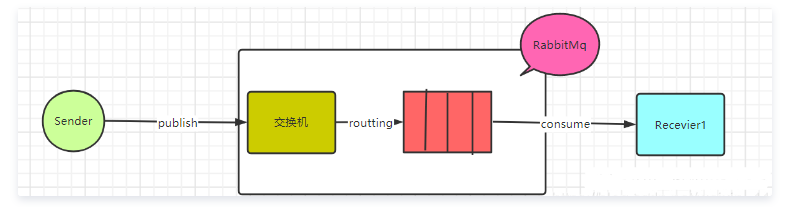
3、发布/订阅(fanout)
3.1.1、Sender.java
import com.rabbitmq.client.Channel;
import com.rabbitmq.client.Connection;
import com.rabbitmq.client.ConnectionFactory;
import top.san.RabbitMq.util.RabbitmqConnectionUtil;
public class Sender{
private final static String EXCHANGE_NAME = "test_exchange_fanout";
public static void main(String[] args)
{
try
{
//获取连接
Connection connection = RabbitmqConnectionUtil.getConnection();
//从连接中获取一个通道
Channel channel = connection.createChannel();
//声明交换机(分发:发布/订阅模式)
channel.exchangeDeclare(EXCHANGE_NAME, "fanout");
//发送消息
for (int i = 0; i < 5; i++)
{
String message = "卢本伟广场" + i;
System.out.println("[send]:" + message);
//发送消息
channel.basicPublish(EXCHANGE_NAME, "", null, message.getBytes("utf-8"));
Thread.sleep(5 * i);
}
channel.close();
connection.close();
}
catch (Exception e)
{
e.printStackTrace();
}
}
}
复制代码
3.1.2、Receiver1.java
import com.rabbitmq.client.*;
import top.san.RabbitMq.util.RabbitmqConnectionUtil;
import java.io.IOException;
public class Receiver1{
//交换机名称
private final static String EXCHANGE_NAME = "test_exchange_fanout";
//队列名称
private static final String QUEUE_NAME = "test_queue_email";
public static void main(String[] args)
{
try
{
//获取连接
Connection connection = RabbitmqConnectionUtil.getConnection();
//从连接中获取一个通道
final Channel channel = connection.createChannel();
//声明交换机(分发:发布/订阅模式)
channel.exchangeDeclare(EXCHANGE_NAME, "fanout");
//声明队列
channel.queueDeclare(QUEUE_NAME, false, false, false, null);
//将队列绑定到交换机
channel.queueBind(QUEUE_NAME, EXCHANGE_NAME, "");
//保证一次只分发一个
int prefetchCount = 1;
channel.basicQos(prefetchCount);
//定义消费者
DefaultConsumer consumer = new DefaultConsumer(channel)
{
//当消息到达时执行回调方法
@Override
public void handleDelivery(String consumerTag, Envelope envelope, AMQP.BasicProperties properties,
byte[] body) throws IOException
{
String message = new String(body, "utf-8");
System.out.println("[email] Receive message:" + message);
try
{
//消费者休息2s处理业务
Thread.sleep(1000);
}
catch (InterruptedException e)
{
e.printStackTrace();
}
finally
{
System.out.println("[1] done");
//手动应答
channel.basicAck(envelope.getDeliveryTag(), false);
}
}
};
//设置手动应答
boolean autoAck = false;
//监听队列
channel.basicConsume(QUEUE_NAME, autoAck, consumer);
}
catch (IOException e)
{
e.printStackTrace();
}
}
}
复制代码
3.1.3、Receiver2.java
import com.rabbitmq.client.*;
import top.san.RabbitMq.util.RabbitmqConnectionUtil;
import java.io.IOException;
public class Receiver2{
//交换机名称
private final static String EXCHANGE_NAME = "test_exchange_fanout";
//队列名称
private static final String QUEUE_NAME = "test_queue_phone";
public static void main(String[] args)
{
try
{
//获取连接
Connection connection = RabbitmqConnectionUtil.getConnection();
//从连接中获取一个通道
final Channel channel = connection.createChannel();
//声明交换机(分发:发布/订阅模式)
channel.exchangeDeclare(EXCHANGE_NAME, "fanout");
//声明队列
channel.queueDeclare(QUEUE_NAME, false, false, false, null);
//将队列绑定到交换机
channel.queueBind(QUEUE_NAME, EXCHANGE_NAME, "");
//保证一次只分发一个
int prefetchCount = 1;
channel.basicQos(prefetchCount);
//定义消费者
DefaultConsumer consumer = new DefaultConsumer(channel)
{
//当消息到达时执行回调方法
@Override
public void handleDelivery(String consumerTag, Envelope envelope, AMQP.BasicProperties properties,
byte[] body) throws IOException
{
String message = new String(body, "utf-8");
System.out.println("[phone] Receive message:" + message);
try
{
//消费者休息1s处理业务
Thread.sleep(1000);
}
catch (InterruptedException e)
{
e.printStackTrace();
}
finally
{
System.out.println("[2] done");
//手动应答
channel.basicAck(envelope.getDeliveryTag(), false);
}
}
};
//设置手动应答
boolean autoAck = false;
//监听队列
channel.basicConsume(QUEUE_NAME, autoAck, consumer);
}
catch (IOException e)
{
e.printStackTrace();
}
}
}
复制代码
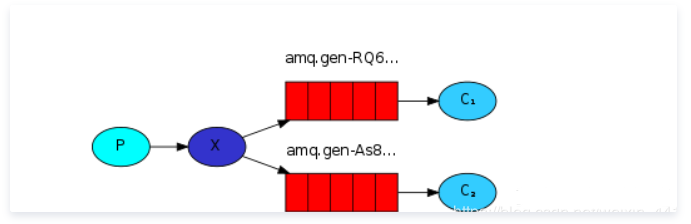
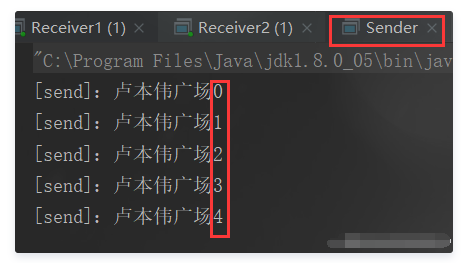
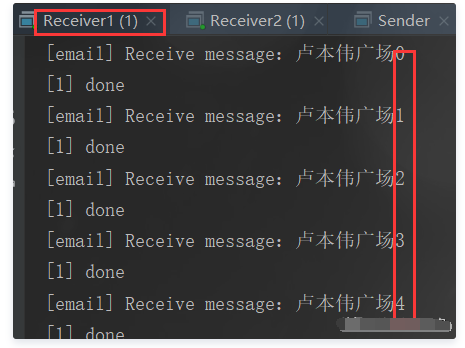
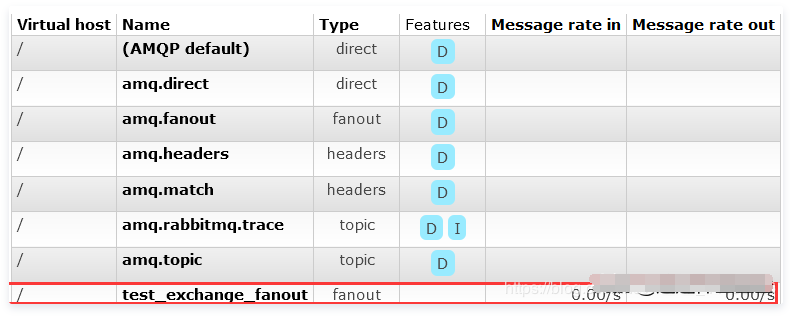
3.1.4、结果
从程序运行结果和RabbitMq的后台看出,这样的消息属于广播型,两个不同名的队列的都能收到该消息,只需它们都将自己绑定到同一个交换机,而且,该消息是持久的,只要交换机还在,消费者啥时候上线都能消费它所绑定的交换机,而且只会一个消费者只会消费一

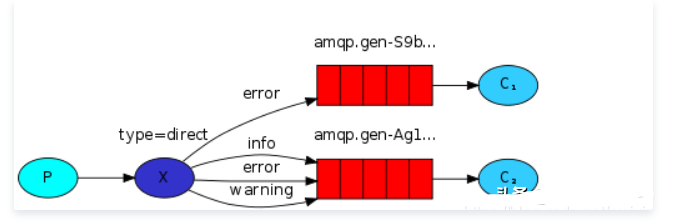
4、路由(direct)
在前面的示例中,我们已经在创建绑定。您可能会想起类似的代码:
channel.queueBind(queueName,EXCHANGE_NAME,“”);
复制代码
绑定是交换和队列之间的关系。可以简单地理解为:队列对来自此交换的消息感兴趣。
绑定可以采用额外的routingKey参数。为了避免与basic_publish参数混淆,我们将其称为 绑定键。这是我们可以创建带有键的绑定的方法:
channel.queueBind(queueName,EXCHANGE_NAME,“ black”);
复制代码
直接绑定(密钥直接绑定到单个队列)
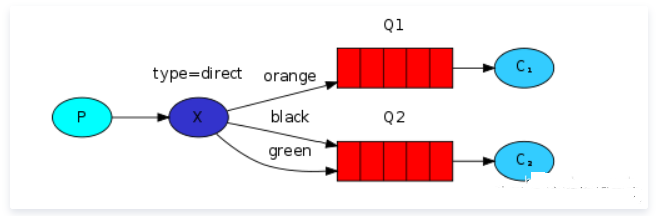
多重绑定(相同的绑定密钥绑定多个队列)
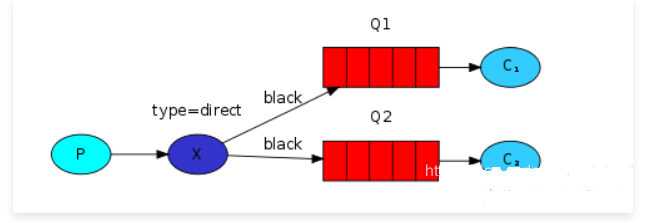
不同密钥绑定不同的队列,可以发挥出不同日志级别发送到不同的队列的效果。
4.1.1、Sender
import com.rabbitmq.client.Channel;
import com.rabbitmq.client.Connection;
import top.san.RabbitMq.util.RabbitmqConnectionUtil;
import java.io.IOException;
public class Sender{
private final static String EXCHANGE_NAME = "exchange_direct";
private final static String EXCHANGE_TYPE = "direct";
public static void main(String[] args) throws IOException {
Connection connection = RabbitmqConnectionUtil.getConnection();
Channel channel = connection.createChannel();
channel.exchangeDeclare(EXCHANGE_NAME,EXCHANGE_TYPE);
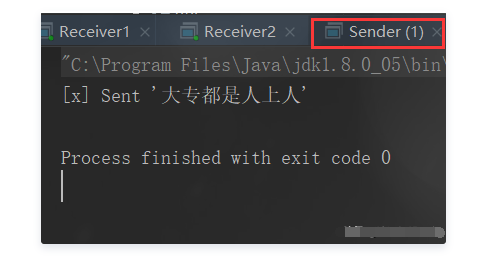
String message = "那一定是蓝色";
channel.basicPublish(EXCHANGE_NAME,"key2", null, message.getBytes());
System.out.println("[x] Sent '"+message+"'");
channel.close();
connection.close();
}
}
复制代码
4.1.2、Receiver1.java
import com.rabbitmq.client.Channel;
import com.rabbitmq.client.Connection;
import com.rabbitmq.client.QueueingConsumer;
import top.san.RabbitMq.util.RabbitmqConnectionUtil;
import java.io.IOException;
/** * Created by san */
public class Receiver1{
private final static String QUEUE_NAME = "queue_routing";
private final static String EXCHANGE_NAME = "exchange_direct";
public static void main(String[] args) throws IOException, InterruptedException {
// 获取到连接以及mq通道
Connection connection = RabbitmqConnectionUtil.getConnection();
Channel channel = connection.createChannel();
channel.queueDeclare(QUEUE_NAME, false,false,false,null);
channel.queueBind(QUEUE_NAME,EXCHANGE_NAME,"key");
channel.queueBind(QUEUE_NAME,EXCHANGE_NAME,"key2");
channel.basicQos(1);
QueueingConsumer consumer = new QueueingConsumer(channel);
channel.basicConsume(QUEUE_NAME, false, consumer);
while(true){
QueueingConsumer.Delivery delivery = consumer.nextDelivery();
String message = new String(delivery.getBody());
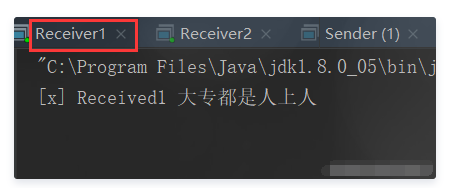
System.out.println("[x] Received1 "+message);
Thread.sleep(10);
channel.basicAck(delivery.getEnvelope().getDeliveryTag(), false);
}
}
}
复制代码
4.1.3、Receiver2.java
import com.rabbitmq.client.Channel;
import com.rabbitmq.client.Connection;
import com.rabbitmq.client.QueueingConsumer;
import top.san.RabbitMq.util.RabbitmqConnectionUtil;
import java.io.IOException;
/** * Created by san */
public class Receiver2{
private final static String QUEUE_NAME = "queue_routing2";
private final static String EXCHANGE_NAME = "exchange_direct";
public static void main(String[] args) throws IOException, InterruptedException {
// 获取到连接以及mq通道
Connection connection = RabbitmqConnectionUtil.getConnection();
Channel channel = connection.createChannel();
channel.queueDeclare(QUEUE_NAME, false,false,false,null);
channel.queueBind(QUEUE_NAME,EXCHANGE_NAME,"key2");
channel.basicQos(1);
QueueingConsumer consumer = new QueueingConsumer(channel);
channel.basicConsume(QUEUE_NAME, false, consumer);
while(true){
QueueingConsumer.Delivery delivery = consumer.nextDelivery();
String message = new String(delivery.getBody());
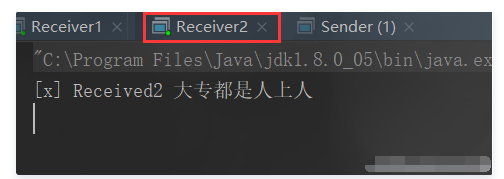
System.out.println("[x] Received2 "+message);
Thread.sleep(10);
channel.basicAck(delivery.getEnvelope().getDeliveryTag(), false);
}
}
}
复制代码
4.1.4、结果-总结
有一点要注意是:在direct下,必须是Exchange(交换机)已经存在,消费端的队列才能绑定到Exchange,否则会报错。也就说上面的程序第一次运行时,需先启Sender,才能成功启动Reciver。

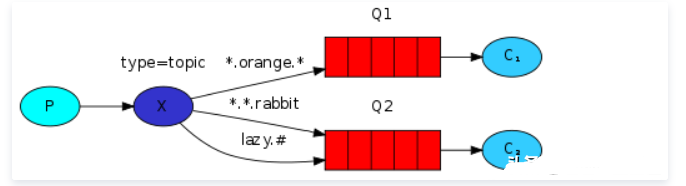
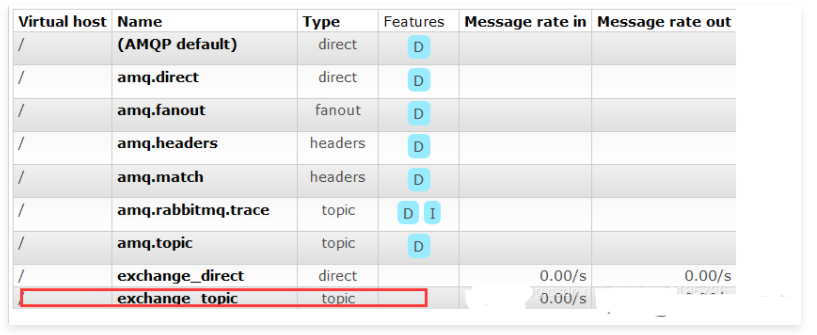
5、话题(topic)
话题也是一个持久的消息,只要交换机还在,每个上线的消费者都可以消费一次自己感兴趣的topic。
*(星号)可以代替一个单词。
#(哈希)可以替代零个或多个单词。
关注公众号:麒麟改bug,还可以获取Java核心知识点思维导图以及Java核心学习笔记。
5.1.1、Sender.java
import com.rabbitmq.client.Channel;
import com.rabbitmq.client.Connection;
import top.san.RabbitMq.util.RabbitmqConnectionUtil;
import java.io.IOException;
public class Sender{
private final static String EXCHANGE_NAME = "exchange_topic";
private final static String EXCHANGE_TYPE = "topic";
public static void main(String[] args) throws IOException {
Connection connection = RabbitmqConnectionUtil.getConnection();
Channel channel = connection.createChannel();
channel.exchangeDeclare(EXCHANGE_NAME, EXCHANGE_TYPE);
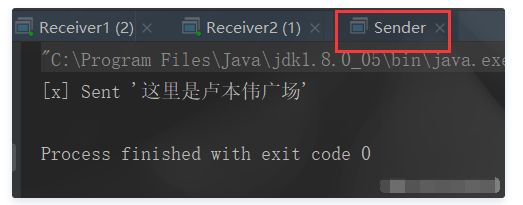
//消息内容
String message = "这里是卢本伟广场";
//第二个参数是topic匹配值
channel.basicPublish(EXCHANGE_NAME,"lbw.nb",null,message.getBytes());
System.out.println("[x] Sent '"+message+"'");
//关通道 关连接
channel.close();
connection.close();
}
}
复制代码
5.1.2、Receiver1.java
import com.rabbitmq.client.Channel;
import com.rabbitmq.client.Connection;
import com.rabbitmq.client.QueueingConsumer;
import top.san.RabbitMq.util.RabbitmqConnectionUtil;
import java.io.IOException;
public class Receiver1{
private final static String QUEUE_NAME = "queue_topic";
private final static String EXCHANGE_NAME = "exchange_topic";
private final static String EXCHANGE_TYPE = "topic";
public static void main(String[] args) throws IOException, InterruptedException {
Connection connection = RabbitmqConnectionUtil.getConnection();
Channel channel = connection.createChannel();
channel.queueDeclare(QUEUE_NAME, false, false,false, null);
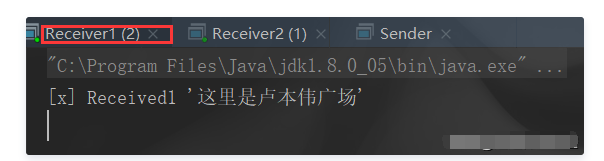
//第二参数就是去匹配我兴趣的topic
channel.queueBind(QUEUE_NAME, EXCHANGE_NAME, "lbw.nb.*");
channel.basicQos(1);
QueueingConsumer consumer = new QueueingConsumer(channel);
channel.basicConsume(QUEUE_NAME, false, consumer);
while(true){
QueueingConsumer.Delivery delivery = consumer.nextDelivery();
String message = new String(delivery.getBody());
System.out.println("[x] Received1 '"+message + "'");
Thread.sleep(10);
channel.basicAck(delivery.getEnvelope().getDeliveryTag(), false);
}
}
}
复制代码
5.1.3、Receiver2.java
import com.rabbitmq.client.Channel;
import com.rabbitmq.client.Connection;
import com.rabbitmq.client.QueueingConsumer;
import top.san.RabbitMq.util.RabbitmqConnectionUtil;
import java.io.IOException;
public class Receiver2{
private final static String QUEUE_NAME = "queue_topic2";
private final static String EXCHANGE_NAME = "exchange_topic";
private final static String EXCHANGE_TYPE = "topic";
public static void main(String[] args) throws IOException, InterruptedException {
Connection connection = RabbitmqConnectionUtil.getConnection();
Channel channel = connection.createChannel();
channel.queueDeclare(QUEUE_NAME, false, false,false, null);
//第二参数就是去匹配我兴趣的topic
channel.queueBind(QUEUE_NAME, EXCHANGE_NAME, "lbw.#");
channel.basicQos(1);
QueueingConsumer consumer = new QueueingConsumer(channel);
channel.basicConsume(QUEUE_NAME, false, consumer);
while(true){
QueueingConsumer.Delivery delivery = consumer.nextDelivery();
String message = new String(delivery.getBody());
System.out.println("[x] Received2 '"+message + "'");
Thread.sleep(10);
channel.basicAck(delivery.getEnvelope().getDeliveryTag(), false);
}
}
}
复制代码
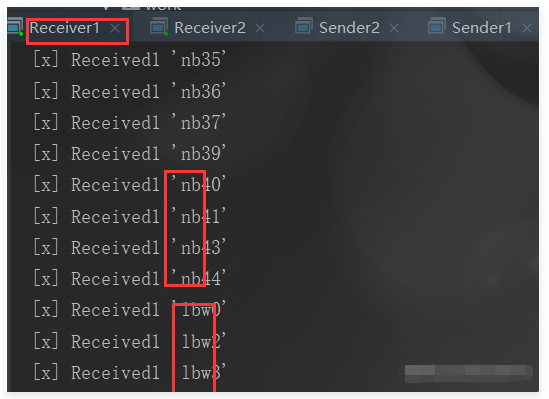
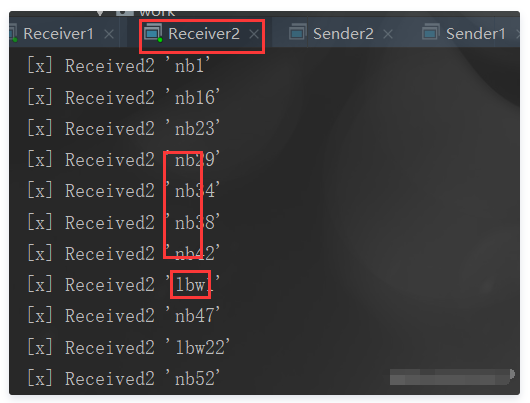
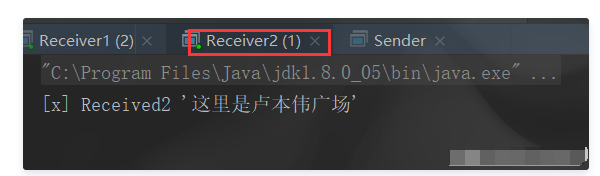
5.1.4、结果-分析
话题的特色就是队列可以获取自己感兴趣的话题消息,可以通过通配符*或#来表示匹配所有的感兴趣的字符串。

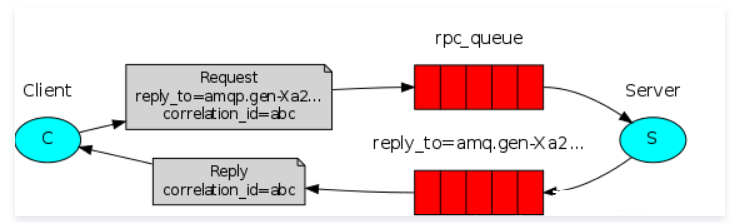
6、RPC(远程过程调用)
给张图自己体会吧(官网没给示例代码,我也就不写了),就是通过两个交换机实现一个可回调的过程吧。
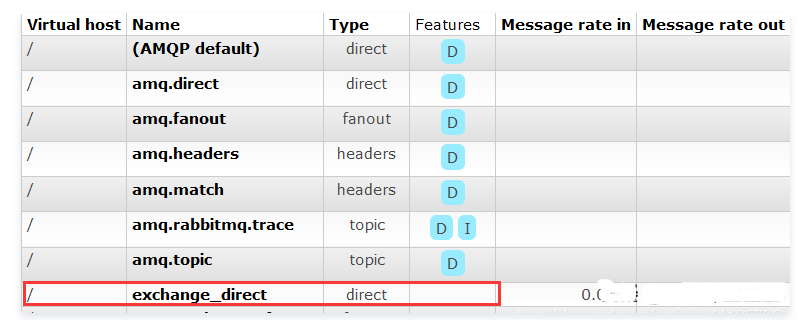
三、RabbitMq的交换机
RabbitMq是有一个交换机的概念的, 消息(Message)由Client发送,RabbitMQ接收到消息之后通过交换机转发到对应的队列上面。Worker会从队列中获取未被读取的数据处理。这样就可以实现消息的发送者无需知道消息使用者的存在,反之亦然,关注公众号:麒麟改bug,还可以获取Java核心知识点思维导图以及Java核心学习笔记。
Direct exchange:直连(路由)交换机,转发消息到routigKey指定的队列
Fanout exchange:扇形交换机,转发消息到所有绑定队列(相当于广播)
Topic exchange:主题交换机,按规则转发消息(很灵活)
Headers exchange:首部交换机
前面的简单类型我们都是忽略了交换机的参数的,如该方法:channel.basicPublish("", QUEUE_NAME, null, message.getBytes());就是这个方法的第一个参数,置空说明使用了默认的交换机。 有几种交换类型可用:direct,topic,headers 和fanout。
小编分享的文章到这里就结束了,喜欢小编的分享可以点赞分享关注哦,感谢你们的支持!


 544
544


 被折叠的 条评论
为什么被折叠?
被折叠的 条评论
为什么被折叠?
 到【灌水乐园】发言


