


 本文详细介绍了如何开发一个简单的Vue UI组件库,包括创建Vue组件、实现按需引入、组件打包配置以及在新项目中测试组件的效果。通过babel-plugin-component插件实现按需引入,减少了项目体积。在测试阶段,分别展示了全量引入和按需引入的使用情况,验证了按需引入的正确性。

开发一个简单的 Vue UI 组件库(按需引入部分)
目的
按需引入的目的是只引入用到的组件,以达到减小项目体积的目的。
实现原理
举个例子:babel-plugin-component
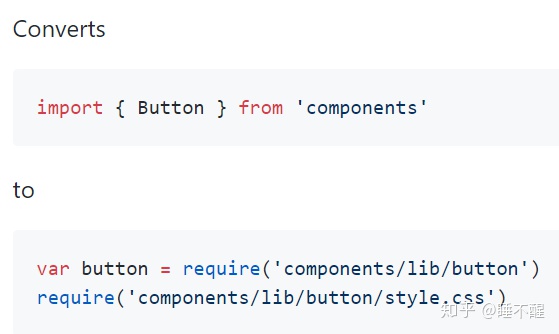
其实按需引入插件是将我们引入组件的语句转换了一下,至于转换后的路径我们可以按照官方文档配置。组件库需要做的工作是按照插件的要求将组件打包为相应的文档结构。
实践
一个组件做全引入和按需引入区别不大,因此再开发一个组件——toast 组件,toast 组件比较特殊,其他组件一般都是注册后后使用标签对使用,toast 则是需要在项目中通过this.xxx.toast.show()或类似的方式使用。
开发 toast 组件
文件结构:
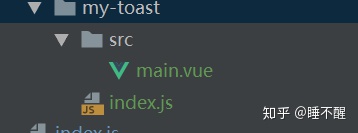
// main.vue
<template>
<!-- Vue 提供的过渡组件 -->
<transition name="toast-from-top">
<div class="my-toast"
v-show="show">
<div class="my-toast-content">
这是个 toast ~
</div>
</div>
</transition>
</template>
<script>
export default {
name: 'MyToast',
data () {
return {
time: 2000, // toast 展示时长
timer: null, // 用来防抖
show: false // toast 是否展示
}
},
watch: {
show (val) {
if (val) {
this.timer = setTimeout(() => {
this.show = false
this.timer = null
}, this.time)
}
}
}
}
</script>
<style scoped>
.my-toast {
position: fixed;
top: 25%;
width: 100%;
text-align: center;
}
.my-toast-content {
display: inline-block;
max-width: 80%;
box-sizing: border-box;
padding: 10px;
background-color: hsla(0, 0%, 7%, .7);
color: #fff;
border-radius: 3px;
}
.toast-from-top-enter-active, .toast-from-top-leave-active {
transition: all .5s;
}
.toast-from-top-enter, .toast-from-top-leave-to {
transform: translateY(-100%);
opacity: 0;
}
</style>
// index.js
import main from './src/main'
let instance
const plugin = {
// Vue.use 会调用的这个方法
install (Vue) {
const Toast = Vue.extend(main)
if (!instance) {
// 创建 toast 组件实例
instance = new Toast({
el: document.createElement('div')
})
// 向 body 添加 toast dom
document.body.appendChild(instance.$el)
}
const toast = {
show (options = {}) {
if (instance.timer) {
return
}
let defaults = {}
for (let key in instance.$options.props) {
defaults[key] = instance.$options.props[key].default
}
Object.assign(instance, defaults, options)
// 展示 toast
instance.show = true
}
}
if (!Vue.$myui) {
Vue.$myui = {
toast
}
} else {
Vue.$myui.toast = toast
}
// 全局混入,开发中,组件在created时,将 $myui 绑在每一个组件实例上,就可以在组件里通过 this.$myui.toast.show(...) 展示了
Vue.mixin({
created () {
this.$myui = Vue.$myui
}
})
}
}
export default plugin
这个时候还需要修改src下的index.js,因为全局引入时,其实是引入的这个文件。
// src/index.js
'use strict'
import MyButton from './components/my-button'
import MyToast from './components/my-toast'
const components = [
MyButton
]
const plugins = [
MyToast
]
const install = function (Vue) {
components.forEach(component => {
Vue.component(component.name, component)
})
plugins.forEach(plugin => {
// Vue.use 会调用 plugin 中的 install 方法
Vue.use(plugin)
})
}
export default {
install
}
这个时候,就可以在example里写示例了,添加一下必要的路由。
// example-toast.vue
<template>
<div class="example-toast">
<my-button @click="clickFunc">
这是一个Toast
</my-button>
</div>
</template>
<script>
export default {
name: 'example-button',
methods: {
clickFunc () {
this.$myui.toast.show({
text: '这是一个Toast'
})
}
}
}
</script>
<style scoped>
</style>效果图:

组件开发的工作已经完成了,现在需要添加 Webpack 打包的配置了。
配置 Webpack
思路也很简单,就是以每个组件文件夹下的 index.js 为入口,配置多入口,然后将每个组件打包到lib文件夹下。
新建一个 build-components.js
'use strict'
require('./check-versions')()
process.env.NODE_ENV = 'publish'
const ora = require('ora')
const rm = require('rimraf')
const fs = require('fs')
const path = require('path')
const chalk = require('chalk')
const webpack = require('webpack')
let webpackConfig = require('./webpack.publish.conf')
let config = require('../config')
function getFolders (dir) {
return fs.readdirSync(dir).filter(function (file) {
return fs.statSync(path.join(dir, file)).isDirectory()
})
}
const spinner = ora('building for production...')
spinner.start()
rm(path.join(config.publish.distRoot, 'lib'), err => {
if (err) throw err
})
// 获取组件文件夹名列表
const folders = getFolders(path.join(__dirname, '../src/components'))
const originEntry = Object.assign(webpackConfig.entry)
const originOutput = Object.assign(webpackConfig.output)
// 遍历数组,并添加到入口
webpackConfig.entry = {}
for (let i = 0; i < folders.length; i++) {
let componentName = folders[i]
if (!webpackConfig.entry[componentName]) {
webpackConfig.entry[componentName] = `./src/components/${componentName}/index.js`
}
}
webpackConfig.output.path = path.join(config.publish.distRoot, 'lib')
webpackConfig.output.filename = '[name].js'
webpack(webpackConfig, (err, stats) => {
spinner.stop()
if (err) throw err
process.stdout.write(stats.toString({
colors: true,
modules: false,
children: false,
chunks: false,
chunkModules: false
}) + 'nn')
if (stats.hasErrors()) {
console.log(chalk.red('Build failed with errors.n'))
process.exit(1)
}
console.log(chalk.greenBright(`$Build components successfully!n`))
webpackConfig.entry = originEntry
webpackConfig.output = originOutput
})
测试
为了测试组件效果,我们再新建一个项目:TestMyComponent,初始化项目的操作和之前一样。
然后安装开发完成并打包完成的组件库,我把组件库放在我的 github 上,安装时,只需要用 github 的链接就好了。
npm install https://github.com/NicholasCui/MyComponent.git -S在main.js中引入组件库:
// ...
import MyComponent from 'my-component'
Vue.use(MyComponent)
// ...
在App.vue中使用组件库:
<template>
<div id="app">
<my-button @click="clickFunc">
button
</my-button>
<my-button @click="toastFunc">
toast
</my-button>
</div>
</template>
<script>
export default {
name: 'App',
methods: {
clickFunc () {
alert('click')
},
toastFunc () {
this.$myui.toast.show({
text: '成功了~'
})
}
}
}
</script>
<style>
</style>
效果如下:
下面测试按需引入,首先在TestMyComponent安装babel-plugin-component。
npm i babel-plugin-component -D并在.babelrc的添加配置,更多配置见babel-plugin-component
{
  // ...
  "plugins": [
    // ...
    [
      "component",
      {
        "libraryName": "my-component",
        "libDir": "lib",
        "style": false
      },
      "my-component"
    ]
  ]
}修改main.js
// 注释全引入
// import MyComponents from 'my-component'
// Vue.use(MyComponents)
// 只引入toast,不引入button,my-button标签会报错
import {
// MyButton,
MyToast
} from 'my-component'
// Vue.use(MyButton)
Vue.use(MyToast)
效果图:
we-button标签报错,但是toast还是可以正常使用,说明toast被引入,we-button没有被引入。
总结
感触最深的就是“路漫漫其修远兮,吾将上下而求索”,还有许多东西需要学习。
源代码:
NicholasCui/MyComponentgithub.com


 8752
8752

 被折叠的 条评论
为什么被折叠?
被折叠的 条评论
为什么被折叠?
 到【灌水乐园】发言


