


这次主要是练习一下Android的自定义view和path的相关使用,所以做了一个简单的demo:自定义一个view,并用path在上面画一个可以动态改变圆角大小的长方形。
自定义相关属性
自定义view首先需要在values文件夹下建一个attrs文件,并在其中定义view的相关属性,如下:
其中round_position指的是圆角的位置,这里属性类型定为flag(位或运算)这样就可以在布局中同时使用多个属性了,类似于EditText中定义文字样式:android:textStyle="bold|italic";round_radius指圆角大小,类型为dimension。
自定义view类
新建一个类继承View,如下:
public class CustomView extends View {
private Paint paint = new Paint(Paint.ANTI_ALIAS_FLAG);
private Path path;
private int color = Color.GREEN;
private final int LEFT_TOP = 0x1;
private final int LEFT_BOTTOM = 0x2;
private final int RIGHT_TOP = 0x4;
private final int RIGHT_BOTTOM = 0x8;
private boolean drawLeftTop;
private boolean drawLeftBottom;
private boolean drawRightTop;
private boolean drawRightBottom;
private float radius;
public CustomView(Context context) {
super(context);
initDraw();
}
public CustomView(Context context, @Nullable AttributeSet attrs) {
super(context, attrs);
TypedArray typedArray = context.obtainStyledAttributes(attrs, R.styleable.CustomView);
int position = typedArray.getInt(R.styleable.CustomView_round_position, 0);
radius = typedArray.getDimension(R.styleable.CustomView_round_radius, 0);
drawLeftTop = (position & LEFT_TOP) == LEFT_TOP;
drawLeftBottom = (position & LEFT_BOTTOM) == LEFT_BOTTOM;
drawRightTop = (position & RIGHT_TOP) == RIGHT_TOP;
drawRightBottom = (position & RIGHT_BOTTOM) == RIGHT_BOTTOM;
typedArray.recycle();
initDraw();
}
public CustomView(Context context, @Nullable AttributeSet attrs, int defStyleAttr) {
super(context, attrs, defStyleAttr);
initDraw();
}
private void initDraw() {
path = new Path();
paint.setColor(Color.GREEN);
paint.setAntiAlias(true);
paint.setStrokeWidth((float) 5);
paint.setStyle(Paint.Style.STROKE);
}
@Override
protected void onDraw(Canvas canvas) {
path.reset();//这里很重要,如果不写这一行,则每次重绘view后先前绘制的还会存在
path.moveTo(radius, 0);
if (drawRightTop) {
path.lineTo(getWidth() - radius, 0);
// path.cubicTo(radius + getWidth() / 3, 0, radius + getWidth() / 3 * 2, 0, getWidth() - radius, 0);
path.cubicTo(getWidth() - radius / 2, 0, getWidth(), radius / 2, getWidth(), radius);
} else {
path.lineTo(getWidth(), 0);
// path.cubicTo(radius + getWidth() / 3, 0, radius + getWidth() / 3 * 2, 0, getWidth(), 0);
}
path.lineTo(getWidth(), getHeight() - radius);
// path.cubicTo(getWidth(), radius + getHeight() / 3, getWidth(), radius + getHeight() / 3 * 2, getWidth(), getHeight() - radius);
if (drawRightBottom) {
path.cubicTo(getWidth(), getHeight() - radius / 2, getWidth() - radius / 2, getHeight(), getWidth() - radius, getHeight());
} else {
path.lineTo(getWidth(), getHeight());
}
path.lineTo(radius, getHeight());
if (drawLeftBottom) {
path.cubicTo(radius / 2, getHeight(), 0, getHeight() - radius / 2, 0, getHeight() - radius);
} else {
path.lineTo(0, getHeight());
}
path.lineTo(0, radius);
if (drawLeftTop) {
path.cubicTo(0, radius / 2, radius / 2, 0, radius, 0);
} else {
path.lineTo(0, 0);
path.lineTo(radius, 0);
}
canvas.drawPath(path, paint);
super.onDraw(canvas);
}
public void setRadius(float radius) {
this.radius = radius;
}
public void refreshView() {
invalidate();
}
}
这里使用了path和贝塞尔曲线的绘制方法来绘制可动态调整圆角大小的长方形,注意每次重绘时要先调用path.reset()清除之前绘制的path,然后再绘制新的path,不然旧的path还会一直存在。
布局中使用自定义view
android:id="@+id/custom_view"
android:layout_width="200dp"
android:layout_height="200dp"
android:layout_margin="100dp"
app:layout_constraintLeft_toLeftOf="parent"
app:layout_constraintRight_toRightOf="parent"
app:layout_constraintTop_toTopOf="parent"
app:round_position="left-bottom|right-bottom|right-top|left-top" />
这样就完成了一个简单的自定义可调整圆角的长方形,在MainActivity中进行动态控制:
view.setRadius(progress);
view.refreshView();
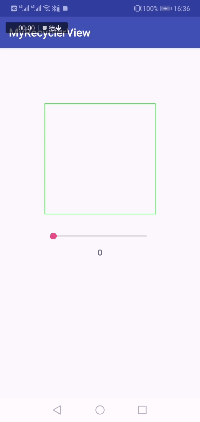
实现的最终效果
以上就是本文的全部内容,希望对大家的学习有所帮助,也希望大家多多支持云海天教程。


 712
712


 被折叠的 条评论
为什么被折叠?
被折叠的 条评论
为什么被折叠?
 到【灌水乐园】发言


