


Spring和SpringMVC的容器具有父子关系,Spring容器为父容器,SpringMVC为子容器,子容器可以引用父容器中的Bean,而父容器不可以引用子容器中的Bean。
了解了Spring与SpringMVC父子容器的关系,接下来让我们看看Spring与SpringMVC容器的初始化过程。
以下讲解使用的web.xml文件如下:
contextConfigLocation//指定spring ioc配置文件的位置
classpath*:spring/*.xml
org.springframework.web.context.ContextLoaderListener
springMVC
org.springframework.web.servlet.DispatcherServlet
contextConfigLocation
springMVC配置文件的路径
1
springMVC
/
spring ioc容器初始化的过程
1、web应用程序启动时,tomcat会读取web.xml文件中的context-parm(含有配置文件的路径)和listener节点,接着会为应用程序创建一个ServletContext,为全局共享,Spring ioc容器就是存储在这里
2、tomcat将context-param节点转换为键值对,写入到ServletContext中
3、创建listener节点中的ContextLoaderListener实例,调用该实例,初始化webapplicationContext,这是一个接口,其实现类为XmlWebApplicationContext(即spring的IOC容器),其通过ServletContext.getinitialParameter("contextConfigLoaction")从ServletContext中获取context-param中的值(即spring ioc容器配置文件的路径),这就是为什么要有第二步的原因。接着根据配置文件的路径加载配置文件信息(其中含有Bean的配置信息)到WebApplicationContext(即spring ioc容器)中,将WebApplicationContext以WebApplicationContext.ROOTWEBAPPLICATIONCONTEXTATTRIBUTE为属性Key,将其存储到ServletContext中,便于获取。至此,spring ioc容器初始化完毕
4、容器初始化web.xml中配置的servlet,为其初始化自己的上下文信息servletContext,并加载其设置的配置信息到该上下文中。将WebApplicationContext(即spring ioc容器)设置为它的父容器。其中便有SpringMVC(假设配置了SpringMVC),这就是为什么spring ioc是springmvc ioc的父容器的原因
SpringMVC初始化过程
SpringMVC通过web.xml文件中servlet标签下的DispatcherServlet类完成自身的初始化
DispatcherServlet类的继承体系如下:
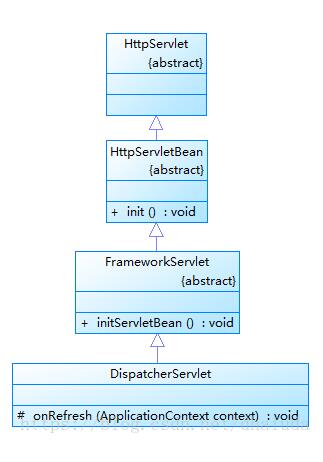
请注意每个长方形中第三行的方法,其为完成SpringMVC ioc容器初始化的关键。
我们知道,每个servlet在初始化时,会先调用servlte的构造函数(为默认构造函数),接着调用init函数,而DispatcherServlet的init方法在其父类HttpServlet中。
HttpServlet中的init方法
/DispatcherServlet第一次加载时调用init方法
@Override
public final void init() throws ServletException {
if (logger.isDebugEnabled()) {
logger.debug("Initializing servlet '" + getServletName() + "'");
}
// Set bean properties from init parameters.
try {
/*加载web.xml文件中的servlet标签中的init-param,其中含有springMVC的配置文件的名字和路径
*若没有,则默认为(servlet-name)-servlet.xml,
*默认路径为WEF—INF下
*/
PropertyValues pvs = new ServletConfigPropertyValues(getServletConfig(), this.requiredProperties);
//创建BeanWrapper实例,为DispatcherServlet设置属性
BeanWrapper bw = PropertyAccessorFactory.forBeanPropertyAccess(this);
ResourceLoader resourceLoader = new ServletContextResourceLoader(getServletContext());
bw.registerCustomEditor(Resource.class, new ResourceEditor(resourceLoader, getEnvironment()));
initBeanWrapper(bw);
//把init-param中的参数设置到DispatcherServlet里面去
bw.setPropertyValues(pvs, true);
}
catch (BeansException ex) {
logger.error("Failed to set bean properties on servlet '" + getServletName() + "'", ex);
throw ex;
}
// Let subclasses do whatever initialization they like.
//该方法在FrameworkServlet中
initServletBean();
if (logger.isDebugEnabled()) {
logger.debug("Servlet '" + getServletName() + "' configured successfully");
}
}
FrameworkServlet中的initServletBean方法
@Override
protected final void initServletBean() throws ServletException {
getServletContext().log("Initializing Spring FrameworkServlet '" + getServletName() + "'");
if (this.logger.isInfoEnabled()) {
this.logger.info("FrameworkServlet '" + getServletName() + "': initialization started");
}
long startTime = System.currentTimeMillis();
try {
//创建springmvc的ioc容器实例
this.webApplicationContext = initWebApplicationContext();
initFrameworkServlet();
}
catch (ServletException ex) {
this.logger.error("Context initialization failed", ex);
throw ex;
}
catch (RuntimeException ex) {
this.logger.error("Context initialization failed", ex);
throw ex;
}
if (this.logger.isInfoEnabled()) {
long elapsedTime = System.currentTimeMillis() - startTime;
this.logger.info("FrameworkServlet '" + getServletName() + "': initialization completed in " +
elapsedTime + " ms");
}
}
FrameworkServlet中的initWebapplicationContext方法
protected WebApplicationContext initWebApplicationContext() {
//首先通过ServletContext获得spring容器,因为子容器springMVC要和父容器spring容器进行关联
//这就是为什么要在ServletContext中注册spring ioc容器的原因
WebApplicationContext rootContext =
WebApplicationContextUtils.getWebApplicationContext(getServletContext());
//定义springMVC容器wac
WebApplicationContext wac = null;
//判断容器是否由编程式传入(即是否已经存在了容器实例),存在的话直接赋值给wac,给springMVC容器设置父容器
//最后调用刷新函数configureAndRefreshWebApplicationContext(wac),作用是把springMVC的配置信息加载到容器中去(之前已经将配置信息的路径设置到了bw中)
if (this.webApplicationContext != null) {
// A context instance was injected at construction time -> use it
wac = this.webApplicationContext;
if (wac instanceof ConfigurableWebApplicationContext) {
ConfigurableWebApplicationContext cwac = (ConfigurableWebApplicationContext) wac;
if (!cwac.isActive()) {
if (cwac.getParent() == null) {
// The context instance was injected without an explicit parent -> set
// the root application context (if any; may be null) as the parent
//将spring ioc设置为springMVC ioc的父容器
cwac.setParent(rootContext);
}
configureAndRefreshWebApplicationContext(cwac);
}
}
}
if (wac == null) {
// 在ServletContext中寻找是否有springMVC容器,初次运行是没有的,springMVC初始化完毕ServletContext就有了springMVC容器
wac = findWebApplicationContext();
}
//当wac既没有没被编程式注册到容器中的,也没在ServletContext找得到,此时就要新建一个springMVC容器
if (wac == null) {
// 创建springMVC容器
wac = createWebApplicationContext(rootContext);
}
if (!this.refreshEventReceived) {
//到这里mvc的容器已经创建完毕,接着才是真正调用DispatcherServlet的初始化方法onRefresh(wac)
onRefresh(wac);
}
if (this.publishContext) {
//将springMVC容器存放到ServletContext中去,方便下次取出来
String attrName = getServletContextAttributeName();
getServletContext().setAttribute(attrName, wac);
if (this.logger.isDebugEnabled()) {
this.logger.debug("Published WebApplicationContext of servlet '" + getServletName() +
"' as ServletContext attribute with name [" + attrName + "]");
}
}
return wac;
}
FrameworkServlet中的createWebApplicationContext(WebApplicationContext parent)方法
protected WebApplicationContext createWebApplicationContext(ApplicationContext parent) {
Class> contextClass = getContextClass();
if (this.logger.isDebugEnabled()) {
this.logger.debug("Servlet with name '" + getServletName() +
"' will try to create custom WebApplicationContext context of class '" +
contextClass.getName() + "'" + ", using parent context [" + parent + "]");
}
if (!ConfigurableWebApplicationContext.class.isAssignableFrom(contextClass)) {
throw new ApplicationContextException(
"Fatal initialization error in servlet with name '" + getServletName() +
"': custom WebApplicationContext class [" + contextClass.getName() +
"] is not of type ConfigurableWebApplicationContext");
}
//实例化空白的ioc容器
ConfigurableWebApplicationContext wac =
(ConfigurableWebApplicationContext) BeanUtils.instantiateClass(contextClass);
//给容器设置环境
wac.setEnvironment(getEnvironment());
//给容器设置父容器(就是spring容器),两个ioc容器关联在一起了
wac.setParent(parent);
//给容器加载springMVC的配置信息,之前已经通过bw将配置文件路径写入到了DispatcherServlet中
wac.setConfigLocation(getContextConfigLocation());
//上面提到过这方法,刷新容器,根据springMVC配置文件完成初始化操作,此时springMVC容器创建完成
configureAndRefreshWebApplicationContext(wac);
return wac;
}
DispatcherServlet的onRefresh(ApplicationContext context)方法
@Override
protected void onRefresh(ApplicationContext context) {
initStrategies(context);
}
DispatcherServlet的initStrategies(ApplicationContext context)方法
protected void initStrategies(ApplicationContext context) {
initMultipartResolver(context);//文件上传解析
initLocaleResolver(context);//本地解析
initThemeResolver(context);//主题解析
initHandlerMappings(context);//url请求映射
initHandlerAdapters(context);//初始化真正调用controloler方法的类
initHandlerExceptionResolvers(context);//异常解析
initRequestToViewNameTranslator(context);
initViewResolvers(context);//视图解析
initFlashMapManager(context);
}
总结以下DispatcherServlet及各个父类(接口)的功能:
HttpServlet:实现了init方法,完成web,xml中与DispatcherServlet有关的参数的读入,初始化DispatcherServlet。
FrameworkServlet:完成了springMVC ioc 容器的创建,并且将spring ioc容器设置为springMVC ioc容器的父容器,将springMVC ioc容器注册到ServletContext中
DispatcherServlet:完成策略组件的初始化
至此,SpringMVC容器初始化完成
以上这篇浅谈Spring与SpringMVC父子容器的关系与初始化就是小编分享给大家的全部内容了,希望能给大家一个参考,也希望大家多多支持脚本之家。


 4663
4663


 被折叠的 条评论
为什么被折叠?
被折叠的 条评论
为什么被折叠?
 到【灌水乐园】发言


