


参考cv2.copyMakeBorder - 云+社区 - 腾讯云
OpenCV-Python是旨在解决计算机视觉问题的Python绑定库。cv2.copyMakeBorder()方法用于在像相框一样的图像周围创建边框。
用法: cv2.copyMakeBorder(src, top, bottom, left, right, borderType, value)
参数:
src:它是源图像。
top:它是顶部方向上的像素数的边框宽度。
bottom:它是底部方向上的像素数的边框宽度。
left:它是左侧像素的边界宽度。
right:它是沿正确方向的像素数的边框宽度。
borderType:它描述了要添加哪种边框。它由cv2.BORDER_CONSTANT,cv2.BORDER_REFLECT等标志定义
value:这是一个可选参数,如果border type为,则描述边框的颜色cv2.BORDER_CONSTANT。
返回值:它返回一个图像。
borderType标志如下所述:
cv2.BORDER_CONSTANT: It adds a constant colored border. The value should be given as next argument.
cv2.BORDER_REFLECT: The border will be mirror reflection of the border elements. Suppose, if image contains letters “abcdefg” then output will be “gfedcba|abcdefg|gfedcba“.
cv2.BORDER_REFLECT_101 or cv2.BORDER_DEFAULT: It does the same works as cv2.BORDER_REFLECT but with slight change. Suppose, if image contains letters “abcdefgh” then output will be “gfedcb|abcdefgh|gfedcba“.
cv2.BORDER_REPLICATE: It replicates the last element. Suppose, if image contains letters “abcdefgh” then output will be “aaaaa|abcdefgh|hhhhh“.
用于以下所有示例的图像:
示例1:
# Python program to explain cv2.copyMakeBorder() method

# importing cv2
import cv2

# path
path = r'C:\Users\Rajnish\Desktop\geeksforgeeks\geeks.png'

# Reading an image in default mode
image = cv2.imread(path)

# Window name in which image is displayed
window_name = 'Image'

# Using cv2.copyMakeBorder() method
image = cv2.copyMakeBorder(image, 10, 10, 10, 10, cv2.BORDER_CONSTANT)

# Displaying the image
cv2.imshow(window_name, image)
输出:
示例2:
# Python program to explain cv2.copyMakeBorder() method

# importing cv2
import cv2

# path
path = r'C:\Users\Rajnish\Desktop\geeksforgeeks\geeks.png'

# Reading an image in default mode
image = cv2.imread(path)

# Window name in which image is displayed
window_name = 'Image'

# Using cv2.copyMakeBorder() method
image = cv2.copyMakeBorder(image, 100, 100, 50, 50, cv2.BORDER_REFLECT)

# Displaying the image
cv2.imshow(window_name, image)
输出: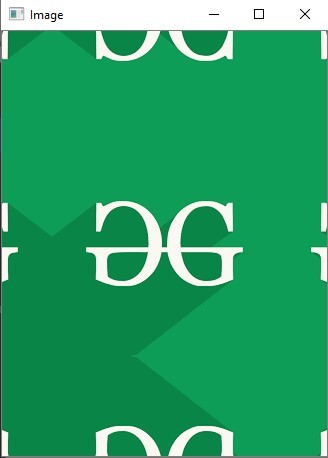


 1421
1421


 被折叠的 条评论
为什么被折叠?
被折叠的 条评论
为什么被折叠?
 到【灌水乐园】发言


