


这篇文章,我将带领大家使用微信内置地图详细讲解关于如何配置地图、打开地图和使用地图。
目录
2、先写页面内,这里我创建了一个 map示例页面 mapDemo.vue
2.2 在使用 uni.getSetting() 方法来获取用户的当前设置,每次进入程序判断当前是否获得授权,如果没有,就去调起弹窗请求获得授权,如果获得授权,就直接获取当前地理位置。
3.1 首先在 onLoad 方法内触发 isGetLocation()方法
3.2 点击右上角确定按钮时,getLocationInfo() 方法会返回具体位置信息。
4.3 再把控件定在地图的中心点,然后手动拖动地图,从而实现手动选择收货地址的功能。
uni-app 官方文档如下:
微信小程序官方文档如下:
wx.openLocation(Object object) | 微信开放文档
个人建议,如果是 uni-app 开发,那就直接按照 uni-app 的文档来做。如果有差异的你可以再去看看微信的文档,因为本身 uni-app 就已经帮我们做好了集成封装。
1、配置地图
打开manifest.json 勾选位置接口,并添加描叙信息:你的位置信息将用于小程序位置接口的效果展示
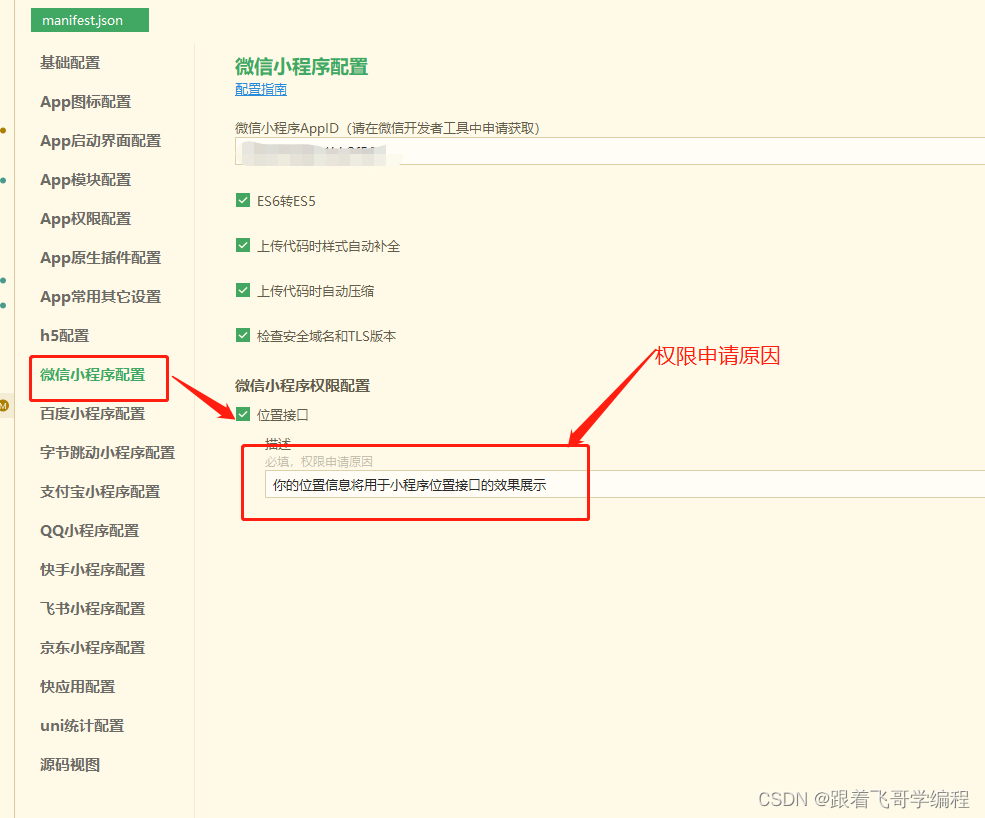
这里点击保存,切到源码视图就会发现在 mp-weixin 下多了如下内容:
"permission" : {
            "scope.userLocation" : {
                "desc" : "你的位置信息将用于小程序位置接口的效果展示"
            }
        },
2、先写页面内,这里我创建了一个 map示例页面 mapDemo.vue
<template>
    <view class="map_wrap">
        <map id="mapSelected" style="width: 690rpx; height: 300px; margin-left: 30rpx;" :latitude="latitude" :longitude="longitude" :markers="covers" :controls="controls" :scale="18" @controltap="controltap" @tap="clickMap"
        @regionchange="regionchange">
        </map>

		<view class="mform">
			<view class="item">
				<view class="t">当前地址:</view>
				<view class="m">{{address}}</view>
			</view>
			<view class="item">
				<view class="t">推荐地址:</view>
				<view class="m">{{address_info}}</view>
			</view>
		</view>

        <!-- 保存按钮这里具体保存事件我没写,根据实际需要调用后台保存地址即可 -->
		<view class="btnbox">
			<button class="btn" @click="saveAddress()" style="width:85%;">保存</button>
		</view>
    </view>
</template>
页面数据项 data 部分
data() {
		return {
			title: 'map',
			latitude: 39.909,// 默认纬度
			longitude: 116.39742,// 默认经度(北京天安门)
			covers: [{
				id: 110,
				latitude: 39.909,
				longitude: 116.39742,
				iconPath: '	https://hellouniapp.dcloud.net.cn/static/location.png',
				width: "20",
				height: "20"
			}],
			controls: [{ // 控件
				id: 99,
				position: { // 控件位置
					left: 160,
					top: 120
				},
				iconPath: 'https://hellouniapp.dcloud.net.cn/static/location.png' // 控件图标
			}],
			address_info :"",
			address_info_recomd:"",
			address :""
		}
	},
地图组件 map | uni-app官网 https://uniapp.dcloud.net.cn/component/map.html#地图组件用于展示地图,而定位API只是获取坐标,请勿混淆两者。
2.1 关于 map 组件各个属性的说明可以详见官方文档。
latitude::中心纬度
longitude:中心经度
markers:数组类型Array,标记点,用于标记你目前所处的位置。
scale:缩放级别,取值范围为3-20,默认16。高德地图缩放比例与微信小程序不同
controls:控件,可让你手指拖动地图时,它在你指定的位置不动
regionchange:视野发生变化时触发,依据这个函数的回调参数和控件来实时获取你选择的地址tap:点击地图时触发; App-nvue、微信小程序2.9支持返回经纬度
2.2 在使用 uni.getSetting() 方法来获取用户的当前设置,每次进入程序判断当前是否获得授权,如果没有,就去调起弹窗请求获得授权,如果获得授权,就直接获取当前地理位置。
3、实现调用地图组件方式一
3.1 首先在 onLoad 方法内触发 isGetLocation()方法
onLoad(){
		this.isGetLocation();
	},
methods内调用判断是否获取授权方法和触发弹窗获得授权方法
isGetLocation(a = "scope.userLocation") { //检查当前是否已经授权访问scope属性
		    var _this = this;
		        uni.getSetting({
		            success(res) {
		                console.log(res)
		                if (!res.authSetting[a]) { //每次进入程序判断当前是否获得授权,如果没有就去获得授权,如果获得授权,就直接获取当前地理位置
		                    _this.getAuthorizeInfo()
		                } else {
		                     //方式一
		                     _this.getLocationInfo();
		                    // 方式二
		                    //_this.getLocation();
		                }
		            }
		        });
		},
		getAuthorizeInfo(a = "scope.userLocation") { // uniapp弹窗弹出获取授权(地理,个人微信信息等授权信息)弹窗
		    var _this = this;
		    uni.authorize({
		        scope: a,
		        success() { //允许授权
		            //方式一
		             _this.getLocationInfo();
					// 方式二
					//_this.getLocation();
		        }
		    })
		},
效果如下:
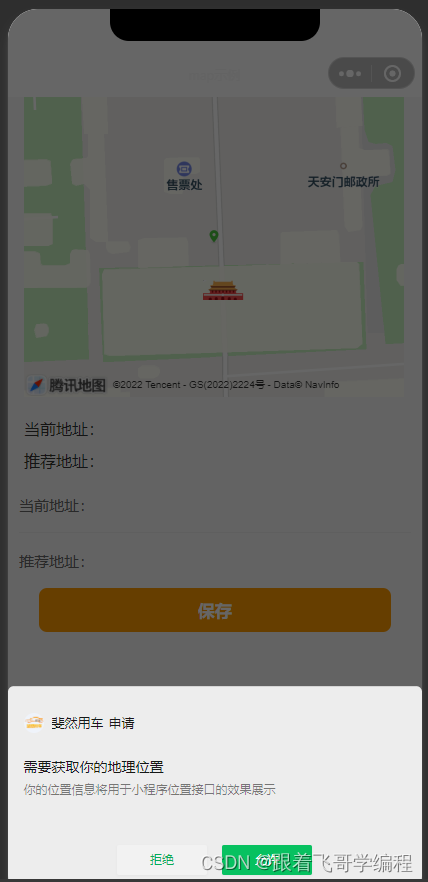
点击允许即可调用地图组件选择地址:
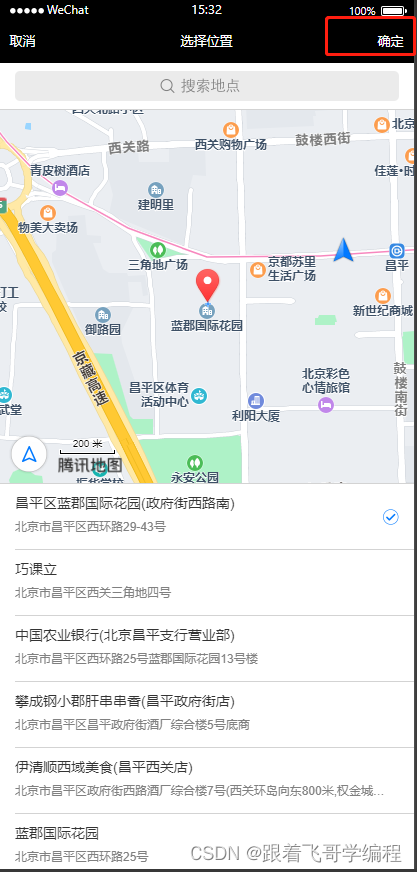
3.2 点击右上角确定按钮时,getLocationInfo() 方法会返回具体位置信息。
getLocationInfo () {
		    uni.chooseLocation({
		        success: (res) => {
		            console.log(res)
					if(res.errMsg == "chooseLocation:ok"){
						this.address_info = res.name + res.address;
						this.latitude= res.latitude;
						this.longitude = res.longitude;
					}
		        }
		    })
		},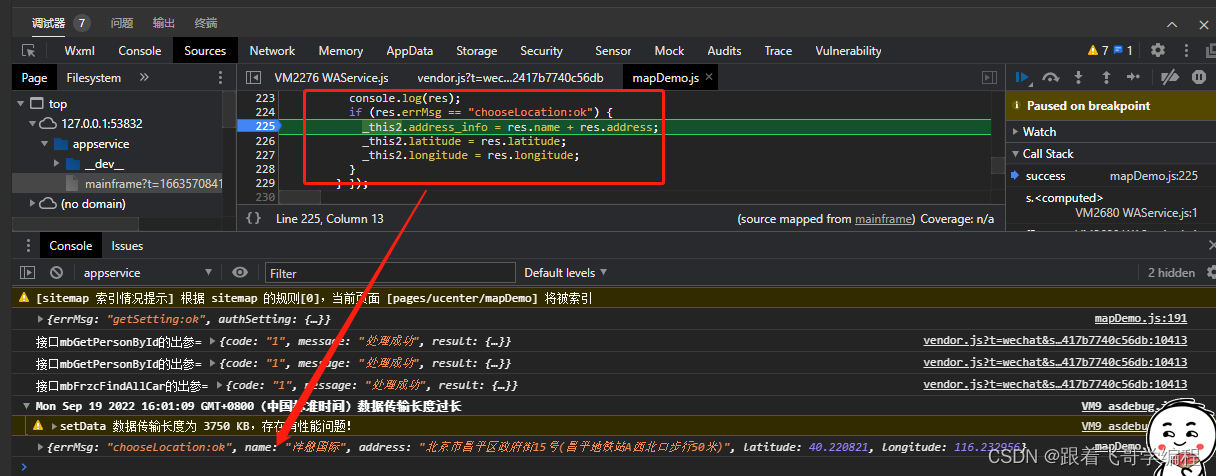
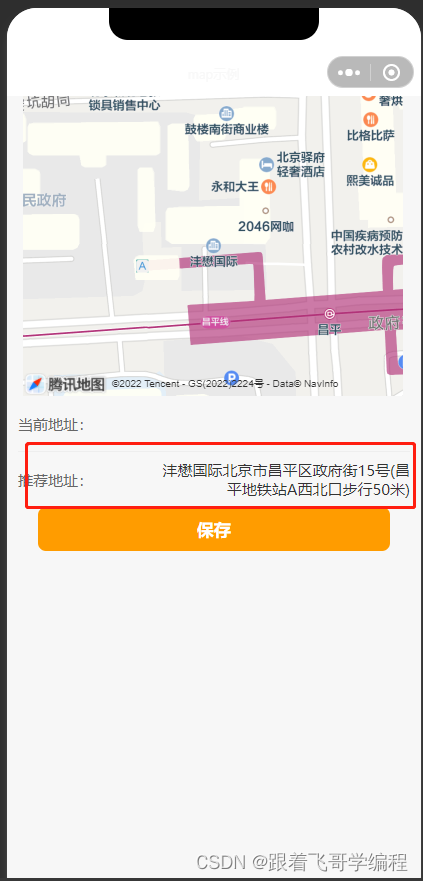
这种方式我们在获取用户授权后是直接通过 uni.chooseLocation() 方法选择的地理位置,相对简单。
4、实现调用地图组件方式二
通过 uni.getLocation() 获取地理位置,就相对复杂一点儿。
4.1 先去获取当前所在位置的经纬度
getLocation(){
			uni.getLocation({
			    type: 'gcj02',
			    success: (res) => {
			        console.log(res)
			        this.latitude = res.latitude.toString()
			        this.longitude = res.longitude.toString()

			        // 获取地理位置详情信息
			        this.getLocationDetail()
			    }
			});
		},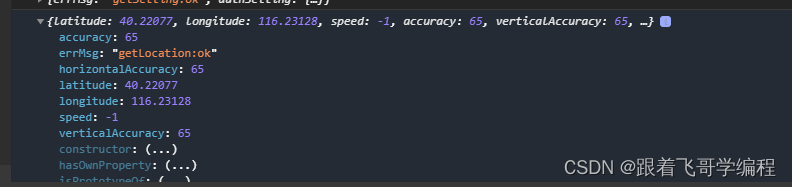
getLocation 返回参数如上图所示。
4.2 很据纬度获取详细的地址
//根据经纬度获取详细的地址
		getLocationDetail () {
		    uni.request({
		        header: {
		            "Content-Type": "application/text"
		        },
		        url: 'https://apis.map.qq.com/ws/geocoder/v1/?location=' + this.latitude + ',' + this.longitude +
		                        '&key=XOXBZ-MZWWD-CDX4H-PONXN-UA5PJ-D7FJN',
		        success:(re)=> {
		            //成功获取到经纬度
		            console.log(re)
		            if (re.statusCode == 200) {
		                this.address_info_recomd = re.data.result.formatted_addresses.recommend
		                this.address_info = re.data.result.address_reference.town.title + re.data.result.address_reference.street.title + re.data.result.address_reference.landmark_l2.title
		                this.address = re.data.result.address

		            } else {
		                uni.showToast({
		                    title: '获取地理位置失败,请重试',
		                    icon: "none"
		                })
		            }
		        }
		    });
		}
获取地理位置成功返回参数内容如上图所示。
4.3 再把控件定在地图的中心点,然后手动拖动地图,从而实现手动选择收货地址的功能。
regionchange (e) {
			console.log(e)
			if (e.type == 'end' && (e.causedBy == 'scale' || e.causedBy == 'drag')) {
				this.mapCtx = uni.createMapContext("mapSelected"); // 创建map的上下文对象, 从而操控map组件
				this.mapCtx.getCenterLocation({
					success: (res) => {
						console.log(res)
						this.latitude = res.latitude;
						this.longitude = res.longitude;
						this.getLocationDetail();
					}
				})
			}
		},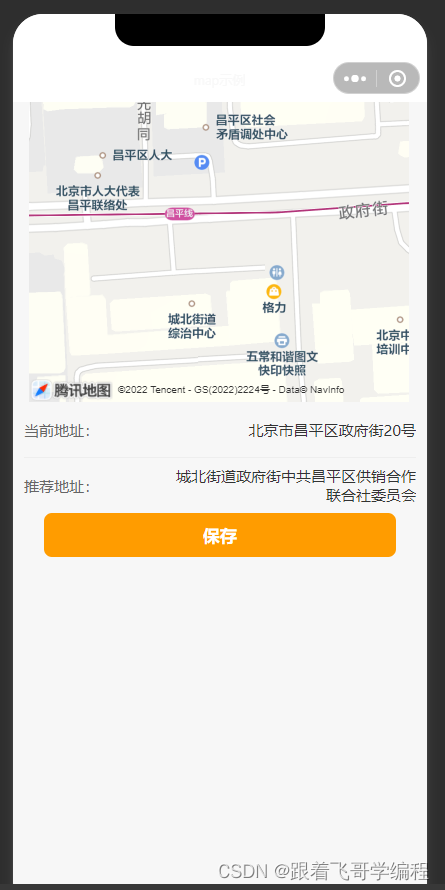
当你手动拖动地图时,效果图如上。
mapSelected:map组件的id,结合以上方法去实时获取你选择位置的经纬度,根据经纬度即可实现实时选择收货地址的功能。
5、完整代码示例 mapDemo.vue 内容如下:
<template>
    <view class="map_wrap">
        <map id="mapSelected" style="width: 690rpx; height: 300px; margin-left: 30rpx;" :latitude="latitude" :longitude="longitude" :markers="covers" :controls="controls" :scale="18" @controltap="controltap" @tap="clickMap"
        @regionchange="regionchange">
        </map>

		<view class="mform">
			<view class="item">
				<view class="t">当前地址:</view>
				<view class="m">{{address}}</view>
			</view>
			<view class="item">
				<view class="t">推荐地址:</view>
				<view class="m">{{address_info}}</view>
			</view>
		</view>

        <!-- 保存按钮 -->
		<view class="btnbox">
			<button class="btn" @click="saveAddress()" style="width:85%;">保存</button>
		</view>
    </view>
</template>

<script>
export default {
	data() {
		return {
			title: 'map',
			latitude: 39.909,// 默认纬度
			longitude: 116.39742,// 默认经度(北京天安门)
			covers: [{
				id: 110,
				latitude: 39.909,
				longitude: 116.39742,
				iconPath: '	https://hellouniapp.dcloud.net.cn/static/location.png',
				width: "20",
				height: "20"
			}],
			controls: [{ // 控件
				id: 99,
				position: { // 控件位置
					left: 160,
					top: 120
				},
				iconPath: 'https://hellouniapp.dcloud.net.cn/static/location.png' // 控件图标
			}],
			address_info :"",
			address_info_recomd:"",
			address :""
		}
	},
	onLoad(){
		this.isGetLocation();
	},
	methods: {
		isGetLocation(a = "scope.userLocation") { //检查当前是否已经授权访问scope属性
		    var _this = this;
		        uni.getSetting({
		            success(res) {
		                console.log(res)
		                if (!res.authSetting[a]) { //每次进入程序判断当前是否获得授权,如果没有就去获得授权,如果获得授权,就直接获取当前地理位置
		                    _this.getAuthorizeInfo()
		                } else {
		                    //方式一
		                    _this.getLocationInfo();
		                    // 方式二
		                    // _this.getLocation();
		                }
		            }
		        });
		},
		getAuthorizeInfo(a = "scope.userLocation") { // uniapp弹窗弹出获取授权(地理,个人微信信息等授权信息)弹窗
		    var _this = this;
		    uni.authorize({
		        scope: a,
		        success() { //允许授权
					//方式一
		            // _this.getLocationInfo();
					// 方式二
					_this.getLocation();
		        }
		    })
		},
		//点击地图时
		clickMap(e){
			console.log("点击地图时:"+e);
			this.latitude=e.detail.latitude;
			this.longitude = e.detail.longitude;
		},
		getLocationInfo () {
			//直接调用即可
		    uni.chooseLocation({
		        success: (res) => {
		            console.log(res)
					if(res.errMsg == "chooseLocation:ok"){
						this.address_info = res.name + res.address;
						this.latitude= res.latitude;
						this.longitude = res.longitude;
					}
		        }
		    })
		},
		//获取当前所在位置的经纬度
		getLocation(){
			uni.getLocation({
			    type: 'gcj02',
			    success: (res) => {
			        console.log(res)
			        this.latitude = res.latitude.toString()
			        this.longitude = res.longitude.toString()

			        // 获取地理位置详情信息
			        this.getLocationDetail()
			    }
			});
		},
		//根据经纬度获取详细的地址
		getLocationDetail () {
		    uni.request({
		        header: {
		            "Content-Type": "application/text"
		        },
		        url: 'https://apis.map.qq.com/ws/geocoder/v1/?location=' + this.latitude + ',' + this.longitude +
		                        '&key=XOXBZ-MZWWD-CDX4H-PONXN-UA5PJ-D7FJN',
		        success:(re)=> {
		            //成功获取到经纬度
		            console.log(re)
		            if (re.statusCode == 200) {
		                this.address_info_recomd = re.data.result.formatted_addresses.recommend
		                this.address_info = re.data.result.address_reference.town.title + re.data.result.address_reference.street.title + re.data.result.address_reference.landmark_l2.title
		                this.address = re.data.result.address

		            } else {
		                uni.showToast({
		                    title: '获取地理位置失败,请重试',
		                    icon: "none"
		                })
		            }
		        }
		    });
		},
		// 在地图渲染更新完成时触发
		regionchange (e) {
			console.log(e)
			if (e.type == 'end' && (e.causedBy == 'scale' || e.causedBy == 'drag')) {
				this.mapCtx = uni.createMapContext("mapSelected"); // 创建map的上下文对象, 从而操控map组件
				this.mapCtx.getCenterLocation({
					success: (res) => {
						console.log(res)
						this.latitude = res.latitude;
						this.longitude = res.longitude;
						this.getLocationDetail();
					}
				})
			}
		},
	}
}
</script>
<style>

</style>
6、结尾
以上就是两种调用地图组件,确定地理位置的方式,如您在使用过程中有所疑惑,可以私信我,咱们共同交流解决问题。这里页面样式我并没有太注意,毕竟我这个只是案例代码分享。
如果感觉小编的分享对您有所帮助的话,还请点赞、收藏 + 关注哦^_^


 2万+
2万+


 被折叠的 条评论
为什么被折叠?
被折叠的 条评论
为什么被折叠?
 到【灌水乐园】发言


