


环境:windows,idea,vmware 上安装的docker,NAT模式
1、拉取redis镜像
docker pull redis
pull下来之后查看,版本是6.2.6
我的宿主机ip是 192.168.75.103
2、启动三个redis,一主二从,配置文件可以从官网拉取,需要注意的是以下几个地方,以6379为例
#redis的密码,并且三个配置文件中密码要一致
requirepass 123456
#如果设置上边的密码,就一定要要配置masterauth
masterauth 123456
#如果想要使用idea调用sentinel,一定要指定宿主机p和端口,否则,获取的是容器的内部ip,无法通信
replica-announce-ip 192.168.75.103
replica-announce-port 6379
3、创建三个文件夹,分别是6379 、6380、6381,里边是配置文件和data目录,然后启动redis,其中的replicaof 命令的作用是,将此redis设置为从节点,并指定主节点的ip和端口,此处要使用宿主机的ip和端口,不要用容器的。并且此处最好关闭防火墙,否则会导致失败
docker run -p 6379:6379 --name redis-master --privileged=true -v /root/config/redis/6379/redis.conf:/etc/redis/redis.conf  -v /root/config/redis/6379/data:/data -d redis redis-server /etc/redis/redis.conf

docker run -p 6380:6379 --name redis-slave1 --privileged=true -v /root/config/redis/6380/redis.conf:/etc/redis/redis.conf  -v /root/config/redis/6380/data:/data -d redis redis-server /etc/redis/redis.conf --replicaof 192.168.75.103 6379

docker run -p 6381:6379 --name redis-slave2 --privileged=true -v /root/config/redis/6381/redis.conf:/etc/redis/redis.conf  -v /root/config/redis/6381/data:/data -d redis redis-server /etc/redis/redis.conf --replicaof 192.168.75.103 6379
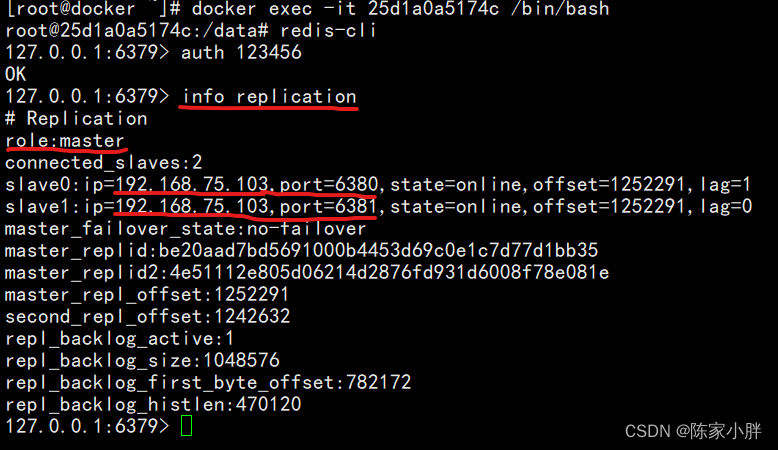
4、此时,可以使用docker进入容器内部,查看主从是否搭建成功
docker exec -it 容器id /bin/bash

进入端口为6379的容器内,连接redis,使用命令 info replication查看主从信息,如下图,6379为主节点,6380和6381为从节点,一主二从搭建成功
此处踩了个大坑,查看的时候一直没成功,使用命令查看日志 docker logs -f 容器id,发现
Error condition on socket for SYNC: No route to host ,MASTER aborted replication with an error: NOAUTH Authentication required,一直报这个错误。各种改配置,还是不行,后来关掉防火墙,重启了docker才成功了
5、准备sentinel配置文件,创建三个文件夹,分别是s1、s2、s3,并分别创建配置文件sentinel.conf,文件内端口分别是26379、26380、26381,以s1为例:
port 26379
#指定的是哨兵的ip,配置成宿主机ip
sentinel announce-ip 192.168.75.103
#给主节点起名字,并且指定主节点的ip和端口,要用宿主机的ip,不能用容器内的ip,否则会导致stringRedisTemplate请求哨兵,返回容器内ip
sentinel monitor mymaster 192.168.75.103 6379 2
#如果主从的三个redis配置了密码,一定要做此配置,否则会失败
sentinel auth-pass mymaster 123456
#以下两个是默认配置,可以省略
sentinel down-after-milliseconds mymaster 5000
sentinel failover-timeout mymaster 60000
6、启动sentinel
docker run -p 26379:26379 --name redis-sentinel-01 --privileged=true -v /root/config/redis/s1/sentinel.conf:/etc/redis/sentinel.conf -d redis redis-sentinel /etc/redis/sentinel.conf

docker run -p 26380:26380 --name redis-sentinel-02 --privileged=true -v /root/config/redis/s2/sentinel.conf:/etc/redis/sentinel.conf -d redis redis-sentinel /etc/redis/sentinel.conf

docker run -p 26381:26381 --name redis-sentinel-03 --privileged=true -v /root/config/redis/s3/sentinel.conf:/etc/redis/sentinel.conf -d redis redis-sentinel /etc/redis/sentinel.conf
7、可以使用docker logs -f 容器id,查看日志,主从哨兵模式搭建成功

8、在springboot中使用,找一个带redis配置的springboot项目,做如下配置
1.配置文件
spring:
  application:
    name: redistest
  datasource:
    driver-class-name: com.mysql.cj.jdbc.Driver
    url: jdbc:mysql://192.168.75.103:3306/hmdp?useSSL=false&serverTimezone=UTC&allowPublicKeyRetrieval=true
    username: root
    password: root
  redis:
    password: 123456
    sentinel:
      master: mymaster
      nodes:
        - 192.168.75.103:26379
        - 192.168.75.103:26380
        - 192.168.75.103:26381
2.配置读写分离
    @Bean
    public LettuceClientConfigurationBuilderCustomizer clientConfigurationBuilderCustomizer(){
        return clientConfigurationBuilder -> clientConfigurationBuilder.readFrom(ReadFrom.REPLICA_PREFERRED);
    }
3.写单元测试或者写一个Controller都可以,我是写了个Controller并启动项目,访问
package com.hmdp.controller;

import com.hmdp.dto.Result;
import org.springframework.beans.factory.annotation.Autowired;
import org.springframework.data.redis.core.StringRedisTemplate;
import org.springframework.web.bind.annotation.GetMapping;
import org.springframework.web.bind.annotation.PathVariable;
import org.springframework.web.bind.annotation.RequestMapping;
import org.springframework.web.bind.annotation.RestController;

@RestController
@RequestMapping("/redis")
public class RedisHelloController {

    @Autowired
    private StringRedisTemplate stringRedisTemplate;

    @GetMapping("/get/{key}")
    public Result getByKey(@PathVariable String key){
        String result = stringRedisTemplate.opsForValue().get(key);

        return Result.ok(result);
    }

    @GetMapping("/set/{key}/{value}")
    public Result getByKey(@PathVariable String key, @PathVariable String value){
        stringRedisTemplate.opsForValue().set(key, value);

        return Result.ok("success");
    }
}


 409
409


 被折叠的 条评论
为什么被折叠?
被折叠的 条评论
为什么被折叠?
 到【灌水乐园】发言


