


1.Spring的核心
IOC:控制反转,把创建对象的权利交给spring工厂,让别人(spring工厂)为你服务
AOP:控制反转,基于动态代理的功能增强模式
2.spring的核心配置文件
文件名applicationContext.xml,通常放到src目录下.
把类交给spring管理,xml配置方式如下:
<?xml version="1.0" encoding="UTF-8"?>
<beans xmlns="http://www.springframework.org/schema/beans"
       xmlns:xsi="http://www.w3.org/2001/XMLSchema-instance"
       xsi:schemaLocation="
http://www.springframework.org/schema/beans
http://www.springframework.org/schema/beans/spring-beans.xsd">

<!-- bean: spring工厂创建的一个对象(反射机制)
	id/name:对象的名字,可以用来引用或者获取对象, 一般为类名或接口名称的首字母小写
	class:要创建的对象类型的类字符串,类名全路径
 -->
<bean id="userDAO" class="cn.itcast.spring.a_quickstart.UserDAOImpl" />

</beans>
通过spring工厂获取对象
//spring配置方式,创建spring工厂,加载spring配置文件
	 ApplicationContext ac = new ClassPathXmlApplicationContext("applicationContext.xml");
	 //从spring工厂中获取对象,通过bean的id/name
	 IUserDAO userDAO = (IUserDAO) ac.getBean("userDAO");
	 userDAO.findUserByUsernameAndPassword();
3.依赖注入DI
在Spring框架负责创建Bean对象时,动态的将依赖对象注入到Bean组件(简单的说,可以将另外一个bean对象动态的注入到另外一个bean中)
步骤1:将要注入的对象也是交给spring管理的,此外通过配置property标签注入
<?xml version="1.0" encoding="UTF-8"?>
<beans xmlns="http://www.springframework.org/schema/beans"
       xmlns:xsi="http://www.w3.org/2001/XMLSchema-instance"
       xsi:schemaLocation="
http://www.springframework.org/schema/beans
http://www.springframework.org/schema/beans/spring-beans.xsd">

<!-- bean: spring工厂创建的一个对象(反射机制)
	id/name:对象的名字,可以用来引用或者获取对象, 一般为类名或接口名称的首字母小写
	class:要创建的对象类型的类字符串,类名全路径
 -->
<bean id="userDAO" class="cn.itcast.spring.a_quickstart.UserDAOImpl" />

<bean id ="userService" class="cn.itcast.spring.a_quickstart.UserServiceImpl">
	<!-- 注入对象 -->
	<!-- property 根据类中的setter方法进行属性注入 -->
	<!-- name:setter方法的后缀小写,比如setXxx 对应的name为xxx -->
	<!-- ref:引用哪一个bean(对象),值为bean的id/name -->
	<property name="userDAO" ref="userDAO" />
</bean>

</beans>
步骤2:property是根据setter方法注入,在使用的时候定义属性并提供setter方法,然后就可以直接使用
public class UserServiceImpl implements IUserService{

	//定义属性
	private IUserDAO userDAO;

	public void setUserDAO(IUserDAO userDAO) {
		this.userDAO = userDAO;
	}

	public void login() {
		 System.out.println("UserServiceImpl-service层方法调用了");
		 //ioc:依赖注入
		 userDAO.findUserByUsernameAndPassword();

	}
测试运行,此时获取对象必须从spring工厂获取(在spring容器配置中才有依赖注入,自己创建的对象没有注入依赖关系)
注入除了通过setter方法注入,还可以通过构造方法注入:后续详解
4.spring的工厂
ApplicationContext直译为应用上下文,是用来加载Spring框架配置文件,来构建Spring的工厂对象,它也称之为Spring容器的上下文对象,也称之为Spring的容器。
ApplicationContext 只是BeanFactory(Bean工厂,Bean就是一个java对象) 一个子接口:
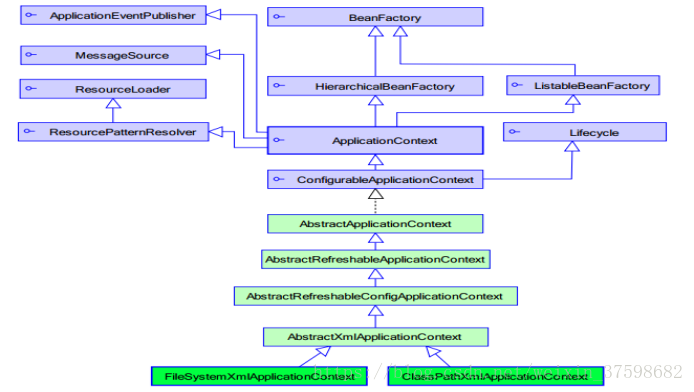
开发的时候为什么不用beanFactory?
BeanFactory 采取延迟加载,第一次getBean时才会初始化Bean
* Beanfactory的用法:
BeanFactory ac = new XmlBeanFactory(new FileSystemResource("D:\\applicationContext.xml"));
* ApplicationContext是对BeanFactory扩展,提供了更多功能
国际化处理
事件传递
Bean自动装配
各种不同应用层的Context实现
拓展:FactortyBean是什么?
是一个接口,实例化bean的一种方式,spring在实例化Bean的时候会判断是否实现了FactoryBean接口,如果实现了就调用getObject方法返回实例
BeanFactory:是一个工厂(其实是构建了一个spring上下文的环境,容器),用来管理和获取很多Bean对象。
FactoryBean:是一个Bean生成工具,是用来获取一种类型对象的Bean,它是构造Bean实例的一种方式。
5.Bean获取的2种方式
	@Test
	public void getBean(){

		ApplicationContext ac = new ClassPathXmlApplicationContext("applicationContext.xml");

		//获取bean的两种方式
		//1.通过spring容器中bean的id/name获取
		//IUserService userService = (IUserService) ac.getBean("userService");

		//2.根据bean的类型或者bean接口的类型获取,一般使用接口类型,如果配置多个类型,则抛出异常
		IUserService userService = (IUserService) ac.getBean(IUserService.class);

		userService.login();

	}
6.实例化bean的四种方式
1)默认使用无参构造器实例化bean,配置如下,
<!-- 实例化 bean的四种方式1 -->
	<!-- 1.默认构造器实例化对象 -->
	<bean id ="bean1" class="cn.itcast.spring.b_xmlnewbean.Bean1" />

使用方式:
 public  void test(){
//创建spring工厂
ApplicationContext ac = new ClassPathXmlApplicationContext("applicationContext.xml");
Bean1 bean1 = (Bean1) ac.getBean("bean1");
System.out.println(bean1);
}
如果要使用带参数的构造器,需要传递参数,通过:
<constructor-arg name="name" value="带参构造器"/>
2)静态工厂的方式
提供一个工厂类和静态的返回对象的方法
public class Bean2Factory {
	//静态方法,用来返回对象的实例
	public static Bean2 getBean2(){
		//在做实例化的时候,可以做其他的事情,即可以在这里写初始化其他对象的代码
		//Connection conn....
		return new Bean2();
	}

<!-- 2.静态工厂获取实例化对象 -->
	<!-- class:直接指定到静态工厂类, factory-method: 指定生产实例的方法, spring容器在实例化工厂类的时候会自动调用该方法并返回实例对象 -->
	<bean id = "bean2" class="cn.itcast.spring.b_xmlnewbean.Bean2Factory" factory-method="getBean2" />
3)实例工厂的方法
//实例工厂:必须new工厂--》bean
 public class bean3{}
 public class Bean3Factory {
	//普通的方法,非静态方法
	public Bean3 getBean3(){
		//初始化实例对象返回
		return new Bean3();
	}
}

<!-- 3:实例工厂的方式实例化bean -->
	<bean id="bean3Factory" class="cn.itcast.spring.b_xmlnewbean.Bean3Factory"/>
	<!-- factory-bean相当于ref:引用一个bean对象 -->
	<bean id="bean3" factory-bean="bean3Factory" factory-method="getBean3"/>
4)factoryBean的方式
/4实现FactoryBean接口的方式
//泛型:你要返回什么类型的对象,泛型就是什么
public class Bean4FactoryBean implements FactoryBean<Bean4>{
	//用来获取bean的实例,对象
	public Bean4 getObject() throws Exception {
		//写一些初始化数据库连接等等其他代码
		return new Bean4();
	}
	public Class<?> getObjectType() {
		return null;
	}
	public boolean isSingleton() {
		return false;
	}
}
<!-- 4.实现FactoryBean接口实例化对象 -->
	<!-- spring在实例化Bean4Factory的时候会判断是否实现了FactoryBean接口,如果实现了就调用getObject方法返回实例 -->
	<bean id="bean4" class="cn.itcast.spring.b_xmlnewbean.Bean4Factory" />
7.bean的作用域
意思就是spring创建的bean在什么情况下有效
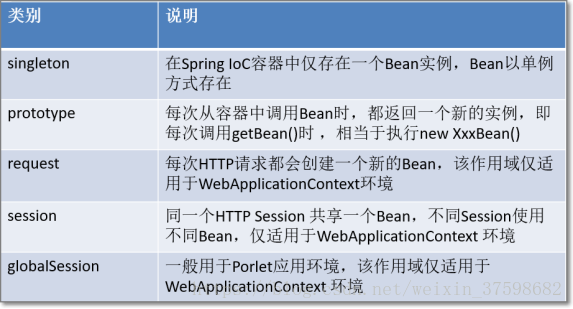
singleton 单例、 prototype多例
Singleton: 在一个spring容器中,对象只有一个实例。(默认值)
Prototype: 在一个spring容器中,存在多个实例,每次getBean 返回一个新的实例。
xml配置方式:scope,不写默认单例
   <!--
		bean的作用范围
		scope:配置作用范围的,默认值就是singleton单例
	 -->
	<!-- 单例 -->
	<!-- <bean id="singletonBean" class="cn.itcast.spring.c_xmlscope.SingletonBean" scope="singleton"/> -->
	<bean id="singletonBean" class="cn.itcast.spring.c_xmlscope.SingletonBean"/>
	<!-- 多例 -->
	<bean id="prototypeBean" class="cn.itcast.spring.c_xmlscope.PrototypeBean" scope="prototype"/>
8.spring中bean的生命周期
spring实例化bean的过程:
第一:如果你使用BeanFactory作为Spring Bean的工厂类,则所有的bean都是在第一次使用getBean的时候实例化
第二:如果你使用ApplicationContext作为Spring Bean的工厂类,则又分为以下几种情况:
(1):如果bean的scope是singleton的,并且lazy-init为false(默认是false,所以可以不用设置),则 ApplicationContext启动的时候就实例化该Bean,并且将实例化的Bean放在一个map结构的缓存中,下次再使用该Bean的时候, 直接从这个缓存中取
(2):如果bean的scope是singleton的,并且lazy-init为true,则该Bean的实例化是在第一次使用该Bean的时候进行实例化
(3):如果bean的scope是prototype的,则该Bean的实例化是在第一次使用该Bean的时候进行实例化
bean的生命周期:
beanFactoryPostProcessor接口构造
beanFactoryPostProcessor接口的postProcessBeanFactory方法
beanPostProcessor 的构造方法
InstantiationAwareBeanPostProcessor接口的构造方法
InstantiationAwareBeanPostProcessor接口的前置方法
bean构造方法
InstantiationAwareBeanPostProcessor接口的postProcessPropertyValue方法
setter方法属性注入
BeanNameAware接口 setBeanName
BeanFactoryAware接口 setBeanFactory
beanPostProcessor 的前置方法
@PostConstruct
initialzing bean 的afterPropertitySet
init-method方法
beanPostProcessor 的后置方法
InstantiationAwareBeanPostProcessor接口的后置方法
-------------初始化成功,下面执行销毁
@PreDestroy注解的方法
disposableBean的destory方法
destory-method的销毁方法
初始化和销毁方法的配置:指定方法名
<bean id="lifeCycleBean" class="cn.itcast.spring.d_xmllifecycle.LifeCycleBean" init-method="init" destroy-method="destroy" />销毁方法的执行必须满足两个条件:
1)单例(singleton)的bean才会可以手动销毁。
2)必须手动关闭容器(调用close的方法)时,才会执行手动销毁的方法。
9.后处理Bean(BeanPostProcessor接口)
后处理Bean也称之为Bean的后处理器,作用是:在Bean初始化的前后,对Bean对象进行增强。它既可以增强一个指定的Bean,也可以增强所有的Bean,底层很多功能(如AOP等)的实现都是基于它的,Spring可以在容器中直接识别调用。
public class MyBeanPostProcessor implements BeanPostProcessor{

	//初始化时(之前)调用的
	//参数1:bean对象,参数2,bean的名字,id、name
	public Object postProcessBeforeInitialization(Object bean, String beanName)
			throws BeansException {
//		System.out.println(beanName+"在初始化前开始增强了");
		//如何只增强一个bean
		if(beanName.equals("lifeCycleBean")){
			System.out.println(beanName+"在初始化前开始增强了");
		}
		return bean;//放行
	}

	//初始化时(之后)调用
	public Object postProcessAfterInitialization(Object bean, String beanName)
			throws BeansException {
//		System.out.println(beanName+"在初始化后开始增强了");
		if(beanName.equals("lifeCycleBean")){
			System.out.println(beanName+"在初始化后开始增强了");
		}
		return bean;
	}

}
10 bean属性的注入的3中方式
setter方法注入:bean提供setter方法
构造方法注入:bean提供构造方法
接口注入(x)
<!-- 构造器注入属性的值 -->
	<bean id="car" class="cn.itcast.spring.e_xmlpropertydi.Car">
		<!--constructor-arg:告诉spring容器,要调用有参构造方法了,不再调用默认的构造方法了
		new Car(1,"宝马",99999d)
		参数第一组:定位属性
		        * index:根据索引定位属性,0表示第一个位置
			* name:根据属性参数名称定位属性
			* type:根据属性数据类型定位属性
		参数第二组:值
			* value:简单的值,字符串
			* ref:复杂的(由spring容器创建的bean对象)
		-->
		<!-- <constructor-arg index="0" value="1"/> -->
		<constructor-arg index="0" name="id" value="1"/>
		<!-- <constructor-arg name="name" value="宝马1代"/> -->
		<constructor-arg name="name" >
			<value>宝马2代</value>
		</constructor-arg>
		<constructor-arg type="java.lang.Double" value="99999d"/>
	</bean>
<!-- setter方法属性注入:调用默认构造器,相当于new Person() -->
<bean id="person" class="cn.itcast.spring.e_xmlpropertydi.Person">
<!--
property:专门进行setter属性注入用的标签 。
* name:setter方法的属性的名字,例如SetXxx-那么name的属性值为xxx。
* value:简单的值
* ref:bean的名字,对象的引用
-->
<property name="id" value="1001"/>
<property name="name" value="Tom"/>
<!-- <property name="car" ref="car"/> --><!--等同于-->
<property name="car">
<ref bean="car"/>
</property>
</bean>11.注册bean的注解
注解的使用之前:需要开启spring注解功能
<!-- 开启spring的注解功能 :让注解有效了,识别注解-->
<context:annotation-config/>
<!-- 配置注解扫描 (配置注解扫描的时候默认开启注解功能,可以不用再开启)
context:component-scan:专门扫描含有@Component注解的类,自动将其作为bean
base-package:要扫描包的路径,包含子包,cn.itcast.spring表示子包下的所有类定义注解都有效
注解扫描配置的时候,会自动开启注解功能
-->
<context:component-scan base-package="cn.itcast.spring"/>
bean的注册:@component, @Controller, @Service, @Repository
@Component注解放置到类上
* 相当于spring容器中定义:<bean id="customerService" class="cn.itcast.spring.a_ioc.CustomerService">
* 其中id属性默认bean的名字是类名的小写
@Component(value="customerService")//自定义bean的名字
* 相当于spring容器中定义:<bean id="customerService" class="cn.itcast.spring.a_ioc.CustomerService">
12.注入bean的注解
bean的注入:@Autowired, @Value+SPEL表达式,@Resource,@inject
bean的注入
方式1:@value+SPEL表达式,spring3.0之后,其中customerDao表示<bean>节点id的属性值
@Value("#{customerDao}")
private CustomerDao customerDao;
方式2:
@Autowired//默认按照类型注入(用的做多)
private CustomerDao customerDao;
或者使用spring的@Autowired 结合 @Qualifier,则根据名字注入
@Autowired//默认按照类型注入的
@Qualifier("customerDao")//必须配合@Autowired注解使用,根据名字注入
private CustomerDao customerDao;
方式3:JSR-250标准(jdk) 提供@Resource
@Resource//默认先按照名称进行匹配,再按照类型进行匹配
private CustomerDao customerDao;
如果@Resource注解上添加name名称,则按照名称注入,会到spring容器中查找customerDao的名称,对应<bean id=””>,id的属性值,如果找到,可以匹配。 如果没有找到,抛出异常。
@Resource(name="customerDao")//只能按照customerDao名称进行匹配
private CustomerDao customerDao;
方式4:需要导入javax.inject的jar包
@Inject//默认按照类型注入
private CustomerDao customerDao;
使用@inject和@Named注解,则按照名称注入
@Inject//默认按照类型注入
@Named("customerDao")//按照名字注入,必须配合@Inject使用
private CustomerDao customerDao;
小拓展:关于@Resource注解的使用
@Resource完成Map的注入
	@Resource(name="requestUrlMap"); //通过Resource注解可以自动注入Map中值
	private Map<String, String> urlMap = new HashMap<String, String>();

	@Resouce(name="myObjectMap")
	private Map<String ,myObject> myObject = new HashMap<String ,myObject>();

	public void show(){
		String str = urlMap.get("HF-SAS");
		System.out.println(str);//打印/rqeust/sas/queryInfo

	}
XML的配置
<bean id="requestUrlMap" class="java.util.HashMap">
	<constructor-arg>
		<map>
			<entry key="HF-SAS" value="/rqeust/sas/queryInfo"></entry>
			<entry key="HF-CCS" value="/rqeust/sas/updateInfo"></entry>
		</map>
	</constructor-arg>
</bean>
---------------------------------------------------------------------------------------

<bean id="myObjectMap" class="java.util.HashMap">
	<constructor-arg>
		<map>
			<entry key="HF-OTO" key-ref="MQClient.HF-OTO"></entry>
		</map>
	</constructor-arg>
</bean>

<bean id="MQClient.HF-OTO" class="com.paic.test.MyObject">
	<property name="code">
		<value>HELLO_WORLD</value>
	</property>
</bean>
13.bean的初始化和销毁的注解
初始化和销毁@PostContruct ,@PreDestory
(1)当bean被载入到容器的时候调用setup ,
注解方式如下:
@PostConstruct
初始化
(2)当bean从容器中删除的时候调用teardown(scope= singleton有效)
注解方式如下:
@PreDestroy
销毁
@Component("lifeCycleBean")
		public class LifeCycleBean {

			public LifeCycleBean() {
				System.out.println("LifeCycleBean构造器调用了");
			}

			//初始化后自动调用方法:方法名随意,但也不能太随便,一会要配置
			@PostConstruct//初始化的方法
			public void init(){
				System.out.println("LifeCycleBean-init初始化时调用");
			}

			//bean销毁时调用的方法
			@PreDestroy
			public void destroy(){
				System.out.println("LifeCycleBean-destroy销毁时调用");
			}

		}
14.bean的作用域的注解
@Component("lifeCycleBean")
//@Scope(value=ConfigurableBeanFactory.SCOPE_PROTOTYPE)
@Scope("prototype")//默认是单例(singleton),更改为多例(prototype)
public class LifeCycleBean {
}
15.spring与web集成
将Spring容器绑定到Web Servlet容器上,让Web容器来管理Spring容器的创建和销毁
 <!-- spring的核心监听器 -->
          <listener>
              <listener-class>org.springframework.web.context.ContextLoaderListener</listener-class>
          </listener>
          <!-- 全局参数变量 -->
          <context-param>
              <param-name>contextConfigLocation</param-name>
              <!-- applicationContext.xml文件的位置,使用classpath定义 -->
              <param-value>classpath:applicationContext.xml</param-value>
          </context-param>
16.spring集成junit测试
使用spring和junit集成
		第一步:项目导入junit 开发包
		第二步:导入spring-test-3.2.0.RELEASE.jar
		第三步: 通过@RunWith注解,使用junit整合spring
		         通过@ContextConfiguration注解,指定spring容器的位置
		//目标:测试一下spring的bean的某些功能
		@RunWith(SpringJUnit4ClassRunner.class)//junit整合spring的测试//立马开启了spring的注解
		@ContextConfiguration(locations="classpath:applicationContext.xml")//加载核心配置文件,自动构建spring容器
		public class SpringTest {
			//使用注解注入要测试的bean
			@Autowired
			private HelloService helloService;

			@Test
			public void testSayHello(){
				//测试业务功能
				helloService.sayHello();

			}


 113
113


 被折叠的 条评论
为什么被折叠?
被折叠的 条评论
为什么被折叠?
 到【灌水乐园】发言


