从hex中获取函数code代码

在开发bootloader的过程中,为了安全起见,避免flash驱动被错误调用。一般而言,需要将flash 驱动放置在RAM中,同时,在每次执行完重编程后,启用复位操作,程序代码中将无flash驱动的代码存在,从而降低flash被错误改写的风险。因此,剥离flash驱动代码成为了一个基本技能,本文章旨在,用一个简单的例子来说明,制作flash驱动需要的基本知识,即如何将一个函数的code从hex中剥离出来,在另一个工程中调用剥离出来的code。

1、平台、工具介绍

赛普拉斯芯片,IAR开发环境,hexView

2、例子说明

为了简单的说明该问题,使用一个传递两个形参,返回两个形参之和的函数,函数体如下:

uint8 testAdd(uint8 a, uint8 b)
{
    uint8 k = 0;

    return a + b;
}
我们要做的事情,就是将此函数的code从hex中种提取出来,放置在一个数组中,将该数组强制转换为函数指针,通过函数指针引用,来而验证此方法。完整的例子如下:

typedef uint8 (*TestFUN)(uint8 x, uint8 y);//定义函数指针,类型需要与我们测试函数的类型一致

uint8 testAdd(uint8 a, uint8 b)//定义测试函数
{
    uint8 k = 0;

    return a + b;
}

#pragma pack (4)//4字节对齐,开始

//const uint8 testAddHex[] = {0x00,0x22, 0x08, 0x18, 0xC0, 0xB2, 0x70, 0x47, 0x80};
const uint8 testAddHex[] = {0x00};//预定义一个空值,该数组用来放testAdd生成的hex

#pragma pack ()//4字节对齐,结束

void TestSleep(void)//调用测试函数的函数,名称请忽略
{
    uint8 result = 0;
    uint8 a = 0,b = 1;

    TestFUN addFUN;

#if  0//测试开关,获取testAdd的code时候,将开关打开,验证时候将此开关关闭
    result = testAdd(a,b);

    if(result == 1)
    {
        result = 1;
    }
    else
    {
        result = 0;
    }
#else

    addFUN = (TestFUN)(testAddHex + 1);//因为是thumb指令,需要加1处理,否则程序会跑飞
    
    result = addFUN(a,b);
    
    if(result == 1)
    {
        result = 1;
    }
    else
    {
        result = 0;
    }
#endif
}

3、提取code阶段

将测试开关打开,编译程序,然后从map文件中找到testAdd的地址信息,如图

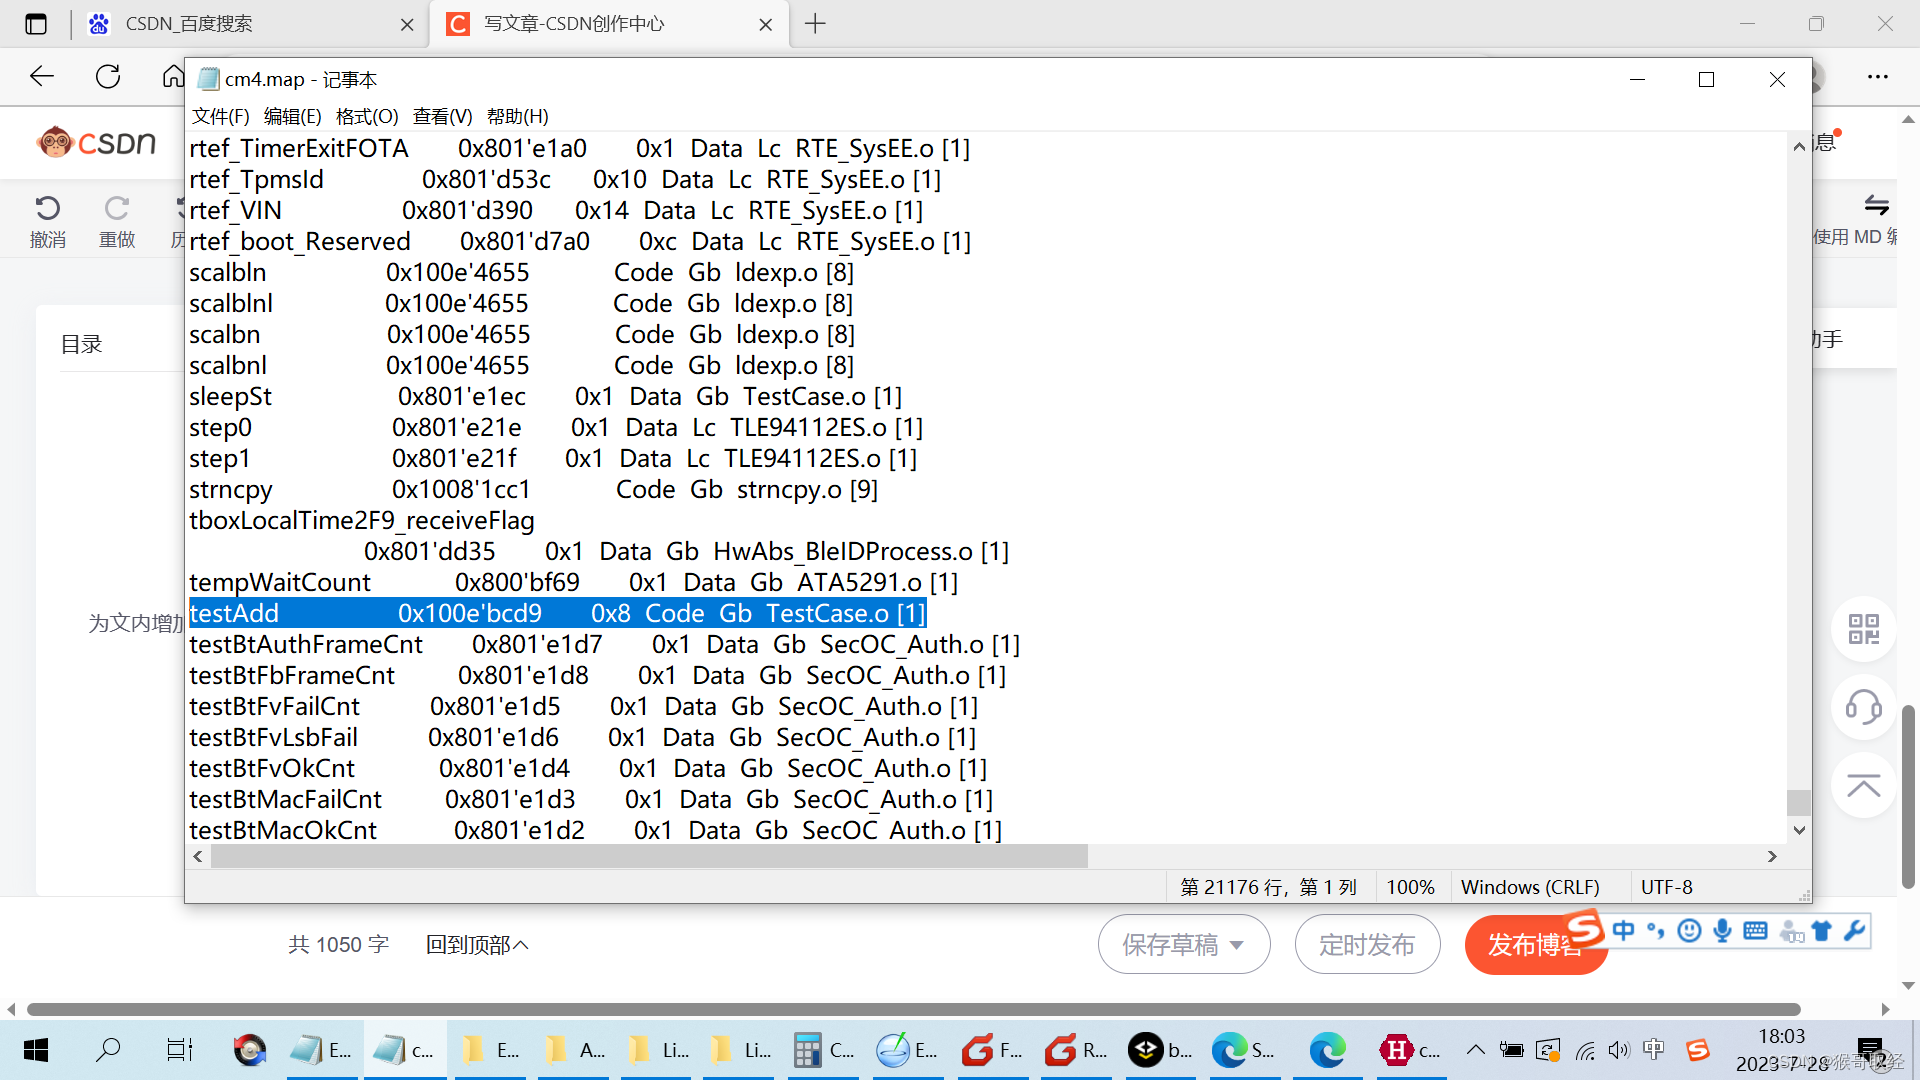
从图中可以看到testAdd的起始地址为0x100e'bcd9,长度为0x8字节,类型为Code。找到这个地址后将hex文件用hexView打开,从HexView中提取出这段长度的代码(地址为奇数,需要将前一个地址的内容也提取出来)。

所以得到:

const uint8 testAddHex[] = {0x00,0x22, 0x08, 0x18, 0xC0, 0xB2, 0x70, 0x47, 0x80};

 4、验证阶段

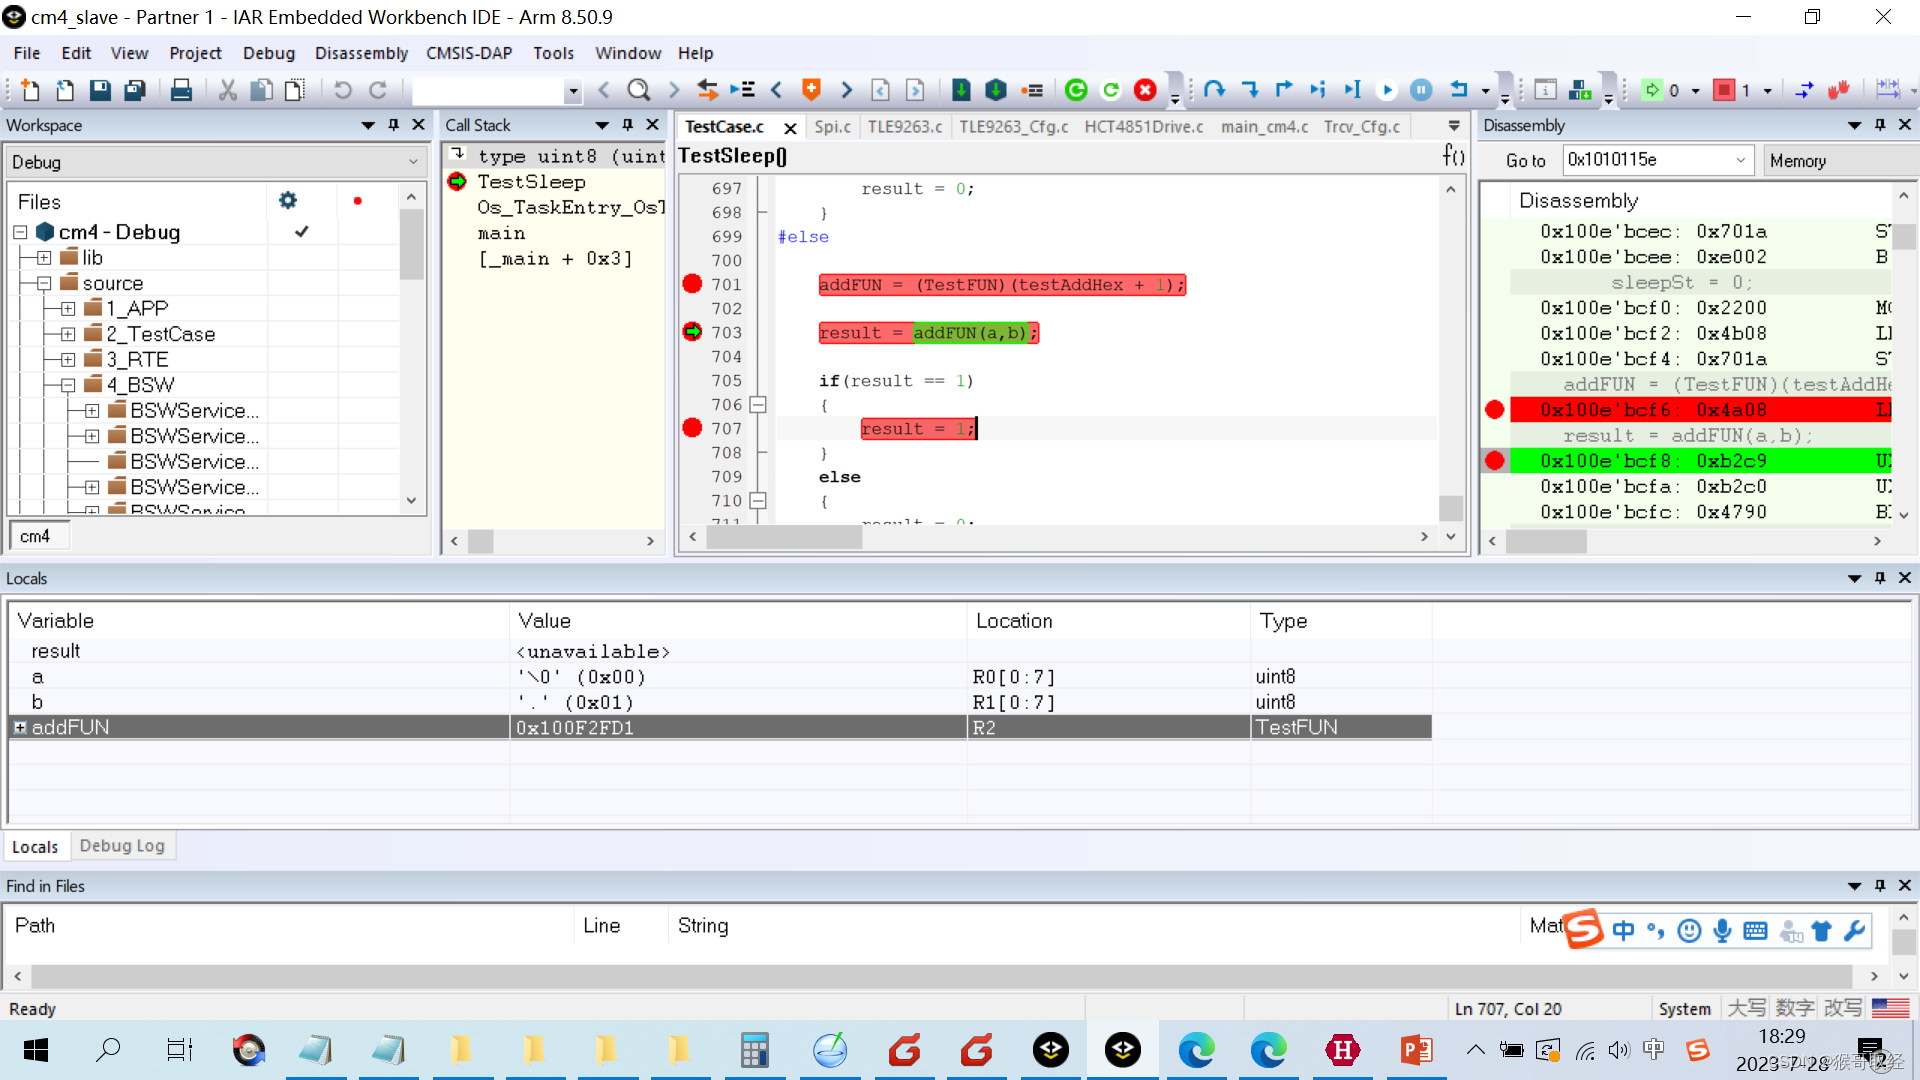
 获取testAdd函数的code并放置在testAddHex数组中后,将测试开关关闭,来测试该函数是否可以被调用,是否可以得到我们想要的结果,编译,下载,调试。将testAddHex的地址0x100F2FD1产强制转换为TestFUN类型函数指针,将实参a= 0,b = 1,传递给addFUN函数指针的形参。
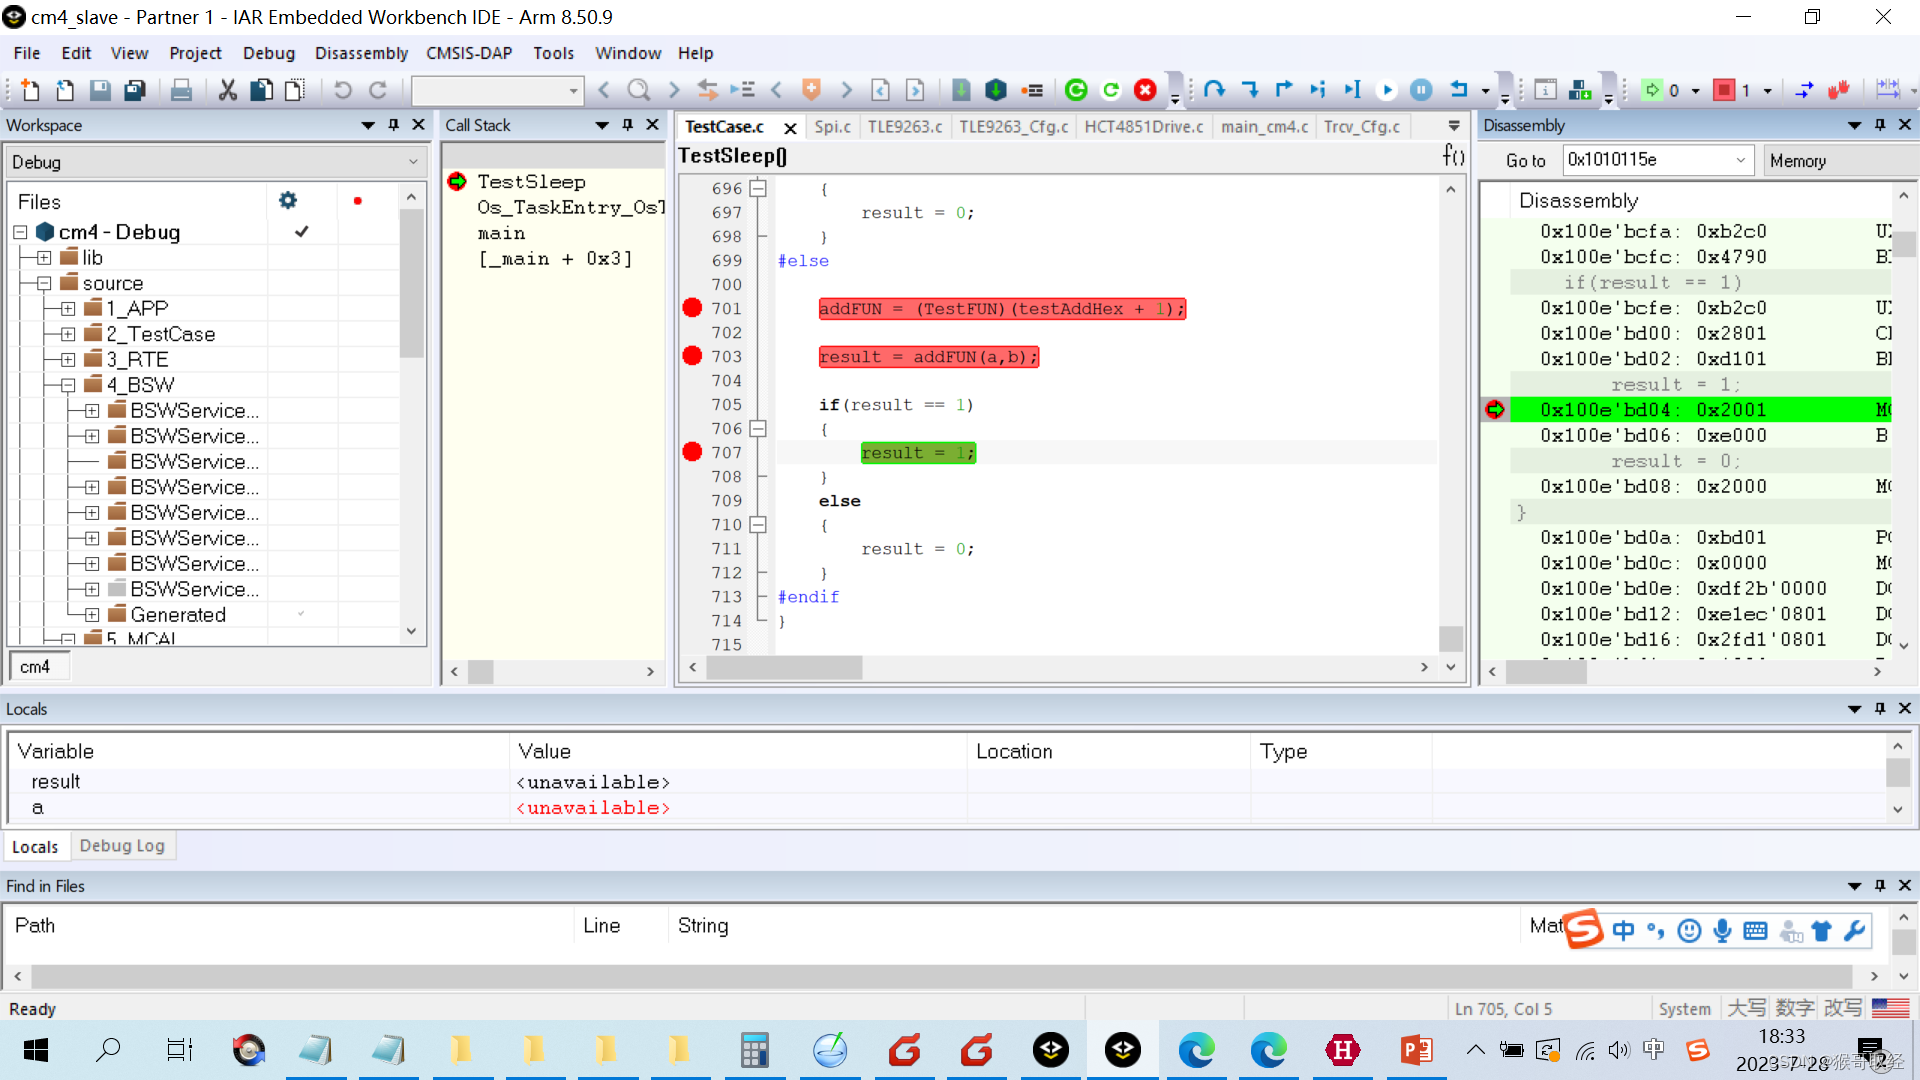
 

可以看到结果,Result == 1。


 5、结果与结论

1)可以从hex文件或bin件中的code剥离出来,通过强制类型转换,获得该函数;

2)在定义这个数组的时候,将数组类型定义程伟了const,默认放入到了flash中,这个不加const,及定义在RAM中也是可以的。

3)文中例子加了数据对齐的定义,不使用是否可以,需要去验证;

4)取code的时候,为什么需要从偶数取?该例子是多取了前一个地址的数据,如果起始地址刚好为偶数,是否可以不用夺取?

5)数组强制转换的时候,地址多加了一位,这里是因为指令集的原因?需要去获取资料验证。

  • 1
    点赞
  • 2
    收藏
    觉得还不错? 一键收藏
  • 0
    评论
以下是获取经纬度并通过32串口发送到阿里云的示例代码: ```c++ #include <TinyGPS++.h> #include <SoftwareSerial.h> #include <WiFi.h> #include <HTTPClient.h> // Define software serial object for 32 port SoftwareSerial Serial32(13, 15); // RX, TX // Define GPS object TinyGPSPlus gps; // Define WiFi credentials const char* ssid = "Your_SSID"; const char* password = "Your_PASSWORD"; // Define Aliyun IoT Platform credentials const char* server = "Your_Aliyun_Server_Address"; const char* deviceID = "Your_Device_ID"; const char* deviceSecret = "Your_Device_Secret"; const char* productKey = "Your_Product_Key"; void setup() { // Start serial communication Serial.begin(115200); Serial32.begin(9600); // Connect to WiFi WiFi.begin(ssid, password); while (WiFi.status() != WL_CONNECTED) { delay(1000); Serial.println("Connecting to WiFi..."); } Serial.println("Connected to WiFi!"); // Wait for GPS signal while (gps.satellites.value() == 0) { delay(1000); Serial.println("Waiting for GPS signal..."); } Serial.println("GPS signal found!"); } void loop() { // Update GPS data while (Serial32.available() > 0) { gps.encode(Serial32.read()); } // Check if GPS data is valid if (gps.location.isValid()) { // Get latitude and longitude float latitude = gps.location.lat(); float longitude = gps.location.lng(); // Convert latitude and longitude to string String location = String(latitude, 6) + "," + String(longitude, 6); // Send data to Aliyun IoT Platform sendToAliyun(location); } } void sendToAliyun(String location) { // Define API endpoint String endpoint = "/topic/" + productKey + "/" + deviceID + "/user/update"; // Define message payload String message = "{\"location\":\"" + location + "\"}"; // Define signature method and version String method = "GET"; String version = "1.0"; // Define timestamp String timestamp = String(millis()); // Define signature content String content = method + "\n" + endpoint + "\n" + timestamp + "\n" + version + "\n"; // Generate signature String signature = generateSignature(content, deviceSecret); // Define request URL String url = "http://" + server + endpoint + "?content=" + message + "&time=" + timestamp + "&sign=" + signature + "&version=" + version; // Send HTTP request HTTPClient http; http.begin(url); int httpCode = http.GET(); if (httpCode > 0) { Serial.println("Data sent to Aliyun IoT Platform!"); } else { Serial.println("Failed to send data to Aliyun IoT Platform!"); } http.end(); } String generateSignature(String content, String secret) { // Define HMAC-SHA1 object byte key[20]; for (int i = 0; i < secret.length(); i++) { key[i] = secret.charAt(i); } char hash[20]; Sha1.initHmac(key, secret.length()); Sha1.print(content); Sha1.finishHmac(key, secret.length(), hash); // Convert hash to string String signature = ""; for (int i = 0; i < 20; i++) { signature += String(hash[i], HEX); } return signature; } ``` 这段代码使用 TinyGPS++ 库从 GPS 模块获取经纬度信息,并通过串口发送到阿里云 IoT 平台。在 `sendToAliyun` 函数,使用 HTTP GET 请求向阿里云 IoT 平台发送数据,其包含经纬度信息和签名信息。签名使用 HMAC-SHA1 算法计算,需要使用 `Sha1` 库。请根据自己的实际情况修改 WiFi 和阿里云 IoT 平台的配置信息。

“相关推荐”对你有帮助么?

  • 非常没帮助
  • 没帮助
  • 一般
  • 有帮助
  • 非常有帮助
提交
评论
添加红包

请填写红包祝福语或标题

红包个数最小为10个

红包金额最低5元

当前余额3.43前往充值 >
需支付:10.00
成就一亿技术人!
领取后你会自动成为博主和红包主的粉丝 规则
hope_wisdom
发出的红包
实付
使用余额支付
点击重新获取
扫码支付
钱包余额 0

抵扣说明:

1.余额是钱包充值的虚拟货币,按照1:1的比例进行支付金额的抵扣。
2.余额无法直接购买下载,可以购买VIP、付费专栏及课程。

余额充值