


模型部署
Author:louwill
Machine Learning Lab
模型部署一直是深度学习算法走向落地的重要的一环。随着深度学习落地需求越来越迫切,具备一定工程部署能力是算法工程师的必备能力之一。
此前笔者曾经在深度学习100问系列文章中的如何部署一个轻量级的深度学习项目?中基于Keras+Flask+Redis技术框架搭建了一个REST API轻量级深度学习模型部署方式。这种部署方式可作为一些小的深度学习项目进行demo演示,总体而言比较方便。
但深度学习模型一个比较关键的前置条件就是需要花不少时间进行环境配置,可能先需要建一个虚拟环境,然后配置深度学习框架和一些第三方库,即时性和可移植性都比较差,总体而言可用性就不是那么强了。那么有没有一种可以一键部署的方式?能在10分钟内就可以在一台新机器上部署好我们的深度学习模型?答案是肯定的。本文笔者基于容器化技术的经典工具docker,对REST API模型部署方式进行升级,让模型部署更加高可用。
docker简介
先简单说一下docker。docker是一款基于Go语言开发的开源容器化技术。为了避免你写的代码在不同环境上表现不一,docker提供了一种环境隔离技术,将你的代码和代码所有的依赖都打包到container中去,做到once build,run everywhere的效果。关于docker更详细的介绍,各位读者可以自行查找资料进行学习,不作为本文的重点。
docker实际要重点掌握几个概念和操作如下图所示。
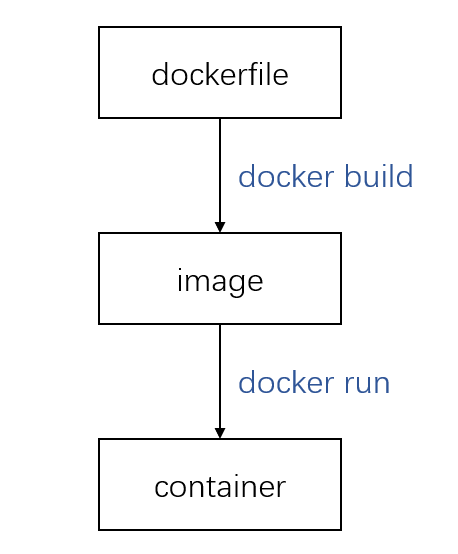
类似于makefile风格,dockfile是用于生成image(镜像)的文件,这个是需要我们自己编写的,编写完dockerfile之后,通过docker build命令生成image,这个image可以理解为可执行程序,最后通过docker run运行这个可执行程序image,运行起来的这个image就是container(容器)。
关于ubuntu docker安装可参考:
https://docs.docker.com/engine/install/ubuntu/
基于Falsk的REST API实现
下面进入正文,来看基于docker和Flask如何快速部署一个深度学习模型,模型是一个基于MobileNetV2的图像分类器。用于启动REST API的app.py文件代码编写如下:
import os
import sys
# Flask
from flask import Flask, redirect, url_for, request, render_template, Response, jsonify, redirect
from werkzeug.utils import secure_filename
from gevent.pywsgi import WSGIServer
# TensorFlow and tf.keras
import tensorflow as tf
from tensorflow import keras
from tensorflow.keras.applications.imagenet_utils import preprocess_input, decode_predictions
from tensorflow.keras.models import load_model
from tensorflow.keras.preprocessing import image
# Some utilites
import numpy as np
from util import base64_to_pil
# Declare a flask app
app = Flask(__name__)
# You can use pretrained model from Keras
# Check https://keras.io/applications/
# or https://www.tensorflow.org/api_docs/python/tf/keras/applications
from tensorflow.keras.applications.mobilenet_v2 import MobileNetV2
model = MobileNetV2(weights='imagenet')
print('Model loaded. Check http://127.0.0.1:5000/')
# Model saved with Keras model.save()
MODEL_PATH = 'models/your_model.h5'
# Load your own trained model
# model = load_model(MODEL_PATH)
# model._make_predict_function()          # Necessary
# print('Model loaded. Start serving...')
def model_predict(img, model):
    img = img.resize((224, 224))
    # Preprocessing the image
    x = image.img_to_array(img)
    # x = np.true_divide(x, 255)
    x = np.expand_dims(x, axis=0)
    # Be careful how your trained model deals with the input
    # otherwise, it won't make correct prediction!
    x = preprocess_input(x, mode='tf')
    preds = model.predict(x)
    return preds

@app.route('/', methods=['GET'])
def index():
    # Main page
    return render_template('index.html')
@app.route('/predict', methods=['GET', 'POST'])
def predict():
    if request.method == 'POST':
        # Get the image from post request
        img = base64_to_pil(request.json)
        # Save the image to ./uploads
        # img.save("./uploads/image.png")
        # Make prediction
        preds = model_predict(img, model)
        # Process your result for human
        pred_proba = "{:.3f}".format(np.amax(preds))    # Max probability
        pred_class = decode_predictions(preds, top=1)   # ImageNet Decode
        result = str(pred_class[0][0][1])               # Convert to string
        result = result.replace('_', ' ').capitalize()
        # Serialize the result, you can add additional fields
        return jsonify(result=result, probability=pred_proba)
    return None

if __name__ == '__main__':
    # app.run(port=5002, threaded=False)
  # Serve the app with gevent
    http_server = WSGIServer(('0.0.0.0', 5000), app)
    http_server.serve_forever()
这里主要是基于Flask web框架实现一个REST API服务,并添加html模板,将服务运行到指定的IP地址上。关于Python Flask web框架,可参考廖雪峰老师的教程进行学习:
https://www.liaoxuefeng.com/wiki/1016959663602400/1017806472608512
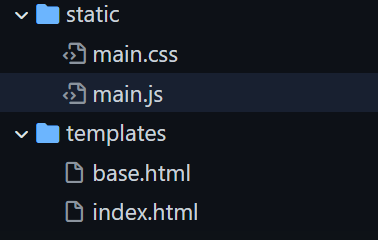
为了实现在指定网页上的效果,除了应用html模板之外,我们还需要编写一点css样式和js代码,这里略过,可参考文末链接查看完整代码。
编写dockerfile
接下来我们需要编写dockerfile,这是实现docker一键部署的起始点和关键所在。简单来说,就是通过一系列dockerfile指令将Python环境、项目所需第三方库、脚本运行等串起来,实现一键操作。所以在本例中我们可编写dockfile文件如下:
# 指定Python环境
FROM python:3.6-slim-stretch
# 拷贝Python依赖库requirements文件到当前目录下
ADD requirements.txt /
# 安装依赖库
RUN pip install -r /requirements.txt
# 拷贝所有文件到app目录下
ADD . /app
# 指定app为工作目录
WORKDIR /app
# 声明端口
EXPOSE 5000
# docker容器启动
CMD [ "python" , "app.py"]
requirements.txt包括的第三方依赖库有:
Flask==1.1.1
gevent==1.4.0
h5py==2.10.0
numpy==1.17.0
Pillow==6.1.0
tensorflow==2.3.1
Werkzeug==0.16.0
基于docker的模型部署
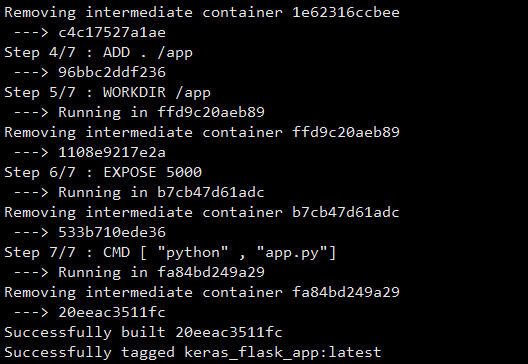
编写完dockerfile文件后,即可通过docker来对该深度学习分类器进行线上部署。docker build命令建立改项目镜像:
docker build -t keras_flask_app .根据dockerfile中的7条指令,docker build也会经过个步骤来生成镜像。
生成镜像后即可运行,使得该深度学习项目服务启动:
docker run -it --rm -p 5000:5000 keras_flask_app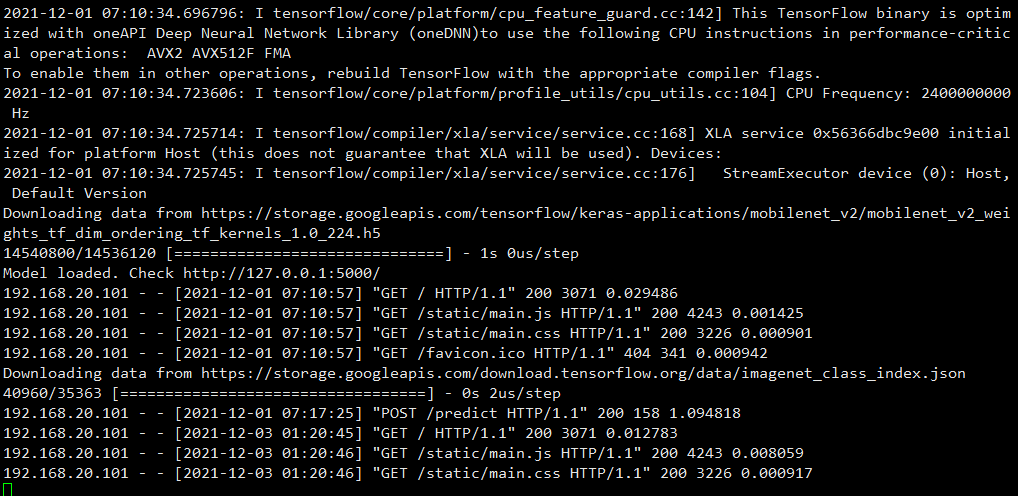
服务启动后,我们打开http://localhost:5000/即可使用该深度学习服务:

我们从本地上传一张图像进行测试:
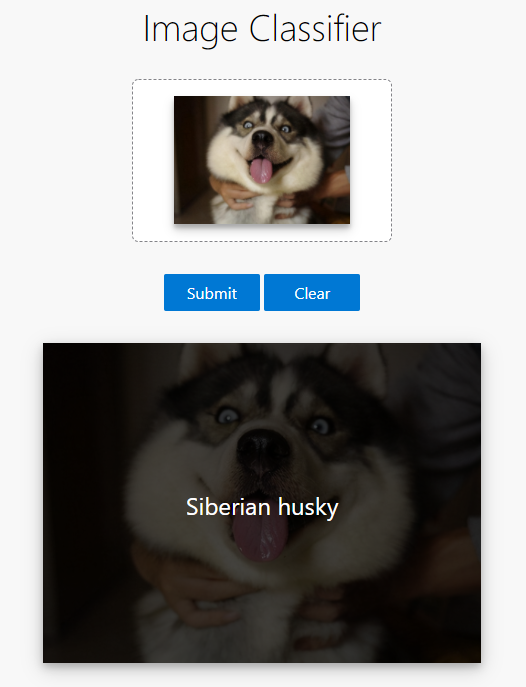
这样,通过基于Flask实现的REST API服务和基于docker的一键部署功能结合在一起,我们就可以在短时间内快速搭建一套线上的深度学习服务。
完整项目代码可参考:
https://github.com/mtobeiyf/keras-flask-deploy-webapp
往期精彩:
时隔一年!深度学习语义分割理论与代码实践指南.pdf第二版来了!
 新书预告 | 《机器学习公式推导与代码实现》出版在即!


 被折叠的 条评论
为什么被折叠?
被折叠的 条评论
为什么被折叠?
 到【灌水乐园】发言


