


本文搭建k8s集群,结果失败了。首先搭建了etcd、docker、flannelzhe三个是没有问题的,之后的ks8配置由于版本不对搭建失败,但是仍然有意义,特此记录。
1、资源准备
node1    192.168.187.159
node2    192.168.187.161
node3    192.168.187.162
准备三台虚拟机,按照上面进行划分,node1作为master,node2/node3作为worker。
2、apt更新
apt update
apt upgrade
3、集群时间同步
我们对时间要求不算大,只要时间大致没问题就可以了
3.1 修改时区
root@ubuntu16server:~# date -R
Fri, 07 Jun 2019 04:48:26 -0700
时区明显不对,修改时区:
root@ubuntu16server:~# tzselect
Please identify a location so that time zone rules can be set correctly.
Please select a continent, ocean, "coord", or "TZ".
1) Africa
2) Americas
3) Antarctica
4) Asia
5) Atlantic Ocean
6) Australia
7) Europe
8) Indian Ocean
9) Pacific Ocean
10) coord - I want to use geographical coordinates.
11) TZ - I want to specify the time zone using the Posix TZ format.
#? 4
Please select a country whose clocks agree with yours.
1) Afghanistan           18) Israel                35) Palestine
2) Armenia               19) Japan                 36) Philippines
3) Azerbaijan            20) Jordan                37) Qatar
4) Bahrain               21) Kazakhstan            38) Russia
5) Bangladesh            22) Korea (North)         39) Saudi Arabia
6) Bhutan                23) Korea (South)         40) Singapore
7) Brunei                24) Kuwait                41) Sri Lanka
8) Cambodia              25) Kyrgyzstan            42) Syria
9) China                 26) Laos                  43) Taiwan
10) Cyprus                27) Lebanon               44) Tajikistan
11) East Timor            28) Macau                 45) Thailand
12) Georgia               29) Malaysia              46) Turkmenistan
13) Hong Kong             30) Mongolia              47) United Arab Emirates
14) India                 31) Myanmar (Burma)       48) Uzbekistan
15) Indonesia             32) Nepal                 49) Vietnam
16) Iran                  33) Oman                  50) Yemen
17) Iraq                  34) Pakistan
#? 9

Please select one of the following time zone regions.
1) Beijing Time
2) Xinjiang Time
#? 1
The following information has been given:

        China
        Beijing Time

Therefore TZ='Asia/Shanghai' will be used.
Local time is now:      Fri Jun  7 19:49:14 CST 2019.
Universal Time is now:  Fri Jun  7 11:49:14 UTC 2019.
Is the above information OK?
1) Yes
2) No
#? 1

You can make this change permanent for yourself by appending the line
        TZ='Asia/Shanghai'; export TZ
to the file '.profile' in your home directory; then log out and log in again.

Here is that TZ value again, this time on standard output so that you
can use the /usr/bin/tzselect command in shell scripts:
Asia/Shanghai
root@ubuntu16server:~# cp /usr/share/zoneinfo/Asia/Shanghai /etc/localtime
root@ubuntu16server:~# date -R
Fri, 07 Jun 2019 19:49:31 +0800
3.2 node1同步网络时间
这里我们使用阿里云的ntp服务器
apt -y install ntp ntpdate
ntpdate -q ntp1.aliyun.com
root@ubuntu16server:~# ntpdate -q ntp1.aliyun.com
server 120.25.115.20, stratum 2, offset -0.002576, delay 0.06602
7 Jun 19:56:34 ntpdate[2490]: adjust time server 120.25.115.20 offset -0.002576 sec
设置定时任务,node1同步网络时间,node2、node3同步node1的时间,频率定为每五分钟同步一次:
node1: */5 * * * * ntpdate -q ntp1.aliyun.com
node2: */5 * * * * ntpdate -q 192.168.187.159
node3: */5 * * * * ntpdate -q 192.168.187.159
4、ssh免密码配置
4.1 确认在node1上可以使用root用户登陆到node2
root@ubuntu16server:/home/yufeiliu/work# ssh root@192.168.187.161
root@192.168.187.161's password:
Permission denied, please try again.
root@192.168.187.161's password:
Permission denied, please try again.
root@192.168.187.161's password:
Permission denied (publickey,password).
root@ubuntu16server:/home/yufeiliu/work#
发现在node1上无法使用root用户登陆node2,先修复这个问题。
修改vim /etc/ssh/sshd_config文件将PermitRootLogin改为yes
# PermitRootLogin prohibit-password
PermitRootLogin yes
然后重启ssh即可
root@ubuntu16server:/home/yufeiliu/work# vim /etc/ssh/sshd_config
root@ubuntu16server:/home/yufeiliu/work#
root@ubuntu16server:/home/yufeiliu/work# /etc/init.d/ssh restart
[ ok ] Restarting ssh (via systemctl): ssh.service.
需要在这三台机器都做相同操作。
4.2 在node1上生成密钥对,并把公钥拷贝到node2、node3
为了以后操作方便先将这三台机器ssh打通,流程如下:
1、在node1上生成密钥对,把密钥对的公钥分发到node2、node3,这样node1访问node2/3就可以免密登陆
2、在node2、node3重复以上步骤
原理说明:
node1在启动ssh连接node2时,node2上发现已经有node1的公钥信息,便会采用公钥认证的方式,只要node2将一个字符串使用私钥加密发送给node1,只要node1能够解密,node2便会认定node1是自己人,这时候就免密登陆了。其实说白了,ssh认证方式有两种密码认证、公钥认证,node2只要发现有该机器的公钥便会要求公钥认证,这时候就不用输入密码了。
root@ubuntu16server:/home/yufeiliu/work# ssh-keygen -t rsa
Generating public/private rsa key pair.
Enter file in which to save the key (/root/.ssh/id_rsa):
Created directory '/root/.ssh'.
Enter passphrase (empty for no passphrase):
Enter same passphrase again:
Your identification has been saved in /root/.ssh/id_rsa.
Your public key has been saved in /root/.ssh/id_rsa.pub.
The key fingerprint is:
SHA256:XrUd2aRHtcV1NZ8Sd+pMqvUa+aqeSFmejBzpRNkZcsk root@ubuntu16server
The key's randomart image is:
+---[RSA 2048]----+
|        ..o. . +&|
|         =Eo  oBX|
|        o o ..*o+|
|       . . . B.o |
|        S o + +  |
|       = O + o   |
|        B = o .  |
|       . . . +   |
|        ..+.o..  |
+----[SHA256]-----+

root@ubuntu16server:/home/yufeiliu/work#
root@ubuntu16server:/home/yufeiliu/work# ssh-copy-id -i ~/.ssh/id_rsa.pub root@192.168.187.161
/usr/bin/ssh-copy-id: INFO: Source of key(s) to be installed: "/root/.ssh/id_rsa.pub"
/usr/bin/ssh-copy-id: INFO: attempting to log in with the new key(s), to filter out any that are already installed

/usr/bin/ssh-copy-id: INFO: 1 key(s) remain to be installed -- if you are prompted now it is to install the new keys
root@192.168.187.161's password:
Number of key(s) added: 1
Now try logging into the machine, with:   "ssh 'root@192.168.187.161'"
and check to make sure that only the key(s) you wanted were added.
root@ubuntu16server:/home/yufeiliu/work# ssh-copy-id -i ~/.ssh/id_rsa.pub root@192.168.187.162
/usr/bin/ssh-copy-id: INFO: Source of key(s) to be installed: "/root/.ssh/id_rsa.pub"
The authenticity of host '192.168.187.162 (192.168.187.162)' can't be established.
ECDSA key fingerprint is SHA256:JGf+Uo2Ap1BOugBmfdlj8uNnsJw4acQTJzOPRCxuWpM.
Are you sure you want to continue connecting (yes/no)? yes
/usr/bin/ssh-copy-id: INFO: attempting to log in with the new key(s), to filter out any that are already installed
/usr/bin/ssh-copy-id: INFO: 1 key(s) remain to be installed -- if you are prompted now it is to install the new keys
root@192.168.187.162's password:
Number of key(s) added: 1
Now try logging into the machine, with:   "ssh 'root@192.168.187.162'"
and check to make sure that only the key(s) you wanted were added.
root@ubuntu16server:/home/yufeiliu/work#
root@ubuntu16server:/home/yufeiliu/work#
5、离线安装docker
参考文档:https://docs.docker.com/install/linux/docker-ce/binaries/#install-static-binaries
5.1 选择安装包
先选择硬件平台,然后再选择最新的版本就好了,这里可能会出现的问题是我不清楚当前的硬件平台是什么,可以选择可能的平台比如x86,如果中间出错再换一个平台。
root@ubuntu16server:/home/yufeiliu# cd software/
root@ubuntu16server:/home/yufeiliu/software# ls
docker-18.06.3-ce-x86-64.tgz  jdk-8u144-linux-x64.tar.gz
root@ubuntu16server:/home/yufeiliu/software# cp docker-18.06.3-ce-x86-64.tgz ../work/
root@ubuntu16server:/home/yufeiliu/software# cd ../work/
root@ubuntu16server:/home/yufeiliu/work# ls
docker-18.06.3-ce-x86-64.tgz  jdk1.8.0_144
root@ubuntu16server:/home/yufeiliu/work# tar -zxvf docker-18.06.3-ce-x86-64.tgz
docker/
docker/docker-containerd
docker/docker-proxy
docker/docker
docker/docker-runc
docker/dockerd
docker/docker-containerd-ctr
docker/docker-containerd-shim
docker/docker-init
root@ubuntu16server:/home/yufeiliu/work# cp docker/* /usr/bin/
root@ubuntu16server:/home/yufeiliu/work#
root@ubuntu16server:/home/yufeiliu/work# dockerd &
[1] 17061
root@ubuntu16server:/home/yufeiliu/work# WARN[2019-06-07T03:45:40.270919964-07:00] could not change group /var/run/docker.sock to docker: group docker not found
INFO[2019-06-07T03:45:40.276807941-07:00] libcontainerd: started new docker-containerd process  pid=17068
INFO[2019-06-07T03:45:40.277343912-07:00] parsed scheme: "unix"                         module=grpc
INFO[2019-06-07T03:45:40.277801659-07:00] scheme "unix" not registered, fallback to default scheme  module=grpc
INFO[2019-06-07T03:45:40.278302014-07:00] ccResolverWrapper: sending new addresses to cc: [{unix:///var/run/docker/containerd/docker-containerd.sock 0  <nil>}]  module=grpc
INFO[2019-06-07T03:45:40.278738997-07:00] ClientConn switching balancer to "pick_first" module=grpc注意:
在cp docker/* /usr/bin/之前可以直接直接docker命令,如果出现问题这时候说明安装包有问题就选择其他硬件平台的安装包
验证是否dockerd启动成功,只要如下正常返回便可以认定没有问题:
root@ubuntu16server:/home/yufeiliu/work# docker ps -a
CONTAINER ID        IMAGE               COMMAND             CREATED             STATUS              PORTS               NAMES
root@ubuntu16server:/home/yufeiliu/work#
然后将文件分发到其他两台机器,做相同的操作:
root@ubuntu16server:/home/yufeiliu/software# scp docker-18.06.3-ce-x86-64.tgz root@192.168.187.161:/home/yufeiliu/software
docker-18.06.3-ce-x86-64.tgz                                                                                                                               100%   42MB  41.8MB/s   00:01
root@ubuntu16server:/home/yufeiliu/software# scp docker-18.06.3-ce-x86-64.tgz root@192.168.187.162:/home/yufeiliu/software
docker-18.06.3-ce-x86-64.tgz                                                                                                                               100%   42MB  41.8MB/s   00:01
root@ubuntu16server:/home/yufeiliu/software#
5.2 自启动
这时候我们重启服务器dockerd进程是没启动的,所以我们需要让docker进程自启动
添加文件放到/etc/systemd/system然后重启服务器
root@ubuntu16server:/etc/systemd/system# cat docker.service
[Unit]
Description=Docker Application Container Engine
Documentation=https://docs.docker.com
After=network-online.target firewalld.service
Wants=network-online.target


[Service]
Type=notify
# the default is not to use systemd for cgroups because the delegate issues still
# exists and systemd currently does not support the cgroup feature set required
# for containers run by docker
ExecStart=/usr/bin/dockerd
ExecReload=/bin/kill -s HUP $MAINPID
# Having non-zero Limit*s causes performance problems due to accounting overhead
# in the kernel. We recommend using cgroups to do container-local accounting.
LimitNOFILE=infinity
LimitNPROC=infinity
LimitCORE=infinity
# Uncomment TasksMax if your systemd version supports it.
# Only systemd 226 and above support this version.
#TasksMax=infinity
TimeoutStartSec=0
# set delegate yes so that systemd does not reset the cgroups of docker containers
Delegate=yes
# kill only the docker process, not all processes in the cgroup
KillMode=process
# restart the docker process if it exits prematurely
Restart=on-failure
StartLimitBurst=3
StartLimitInterval=60s


[Install]
WantedBy=multi-user.target
root@ubuntu16server:/lib/systemd/system# ll docker.service
-rw-r--r-- 1 root root 1142 Jun  7 04:16 docker.service
然后添加到systemctl中管理:
chmod +x /etc/systemd/system/docker.service
systemctl enable docker.service
重启服务器测试一下:
root@ubuntu16server:/etc/systemd/system# reboot
login as: root
root@192.168.187.161's password:
Welcome to Ubuntu 16.04.6 LTS (GNU/Linux 4.4.0-150-generic x86_64)

* Documentation:  https://help.ubuntu.com
* Management:     https://landscape.canonical.com
* Support:        https://ubuntu.com/advantage
New release '18.04.2 LTS' available.
Run 'do-release-upgrade' to upgrade to it.

root@ubuntu16server:~# docker ps -a
CONTAINER ID        IMAGE               COMMAND             CREATED             STATUS              PORTS               NAMES
root@ubuntu16server:~#
6、安装etcd
目前我所了解的情况是k8s的apiServer依赖etcd,flannel中的路由信息同样依赖etcd,顺便我们学习使用java操作etcd
说明:
1、etcd集群允许服务发现,我们这里做静态发现,也就是说集群的大小和结点都是固定的
2、为了安全起见,我们添加TLS证书保护etcd
6.1 安装包
安装包: https://github.com/coreos/etcd/releases/download/v3.3.2/etcd-v3.3.2-linux-amd64.tar.gz
6.2 将可执行文件放到/usr/bin下面
root@ubuntu16server:/home/yufeiliu/work/etcd-v3.3.3-linux-amd64# ll
total 34544
drwxr-xr-x  3 yufeiliu yufeiliu     4096 Jun  7 21:29 ./
drwxrwxr-x  5 yufeiliu yufeiliu     4096 Jun  7 21:25 ../
drwxr-xr-x 11 yufeiliu yufeiliu     4096 Mar 30  2018 Documentation/
-rwxr-xr-x  1 yufeiliu yufeiliu 19283200 Mar 30  2018 etcd*
-rwxr-xr-x  1 yufeiliu yufeiliu 16018720 Mar 30  2018 etcdctl*
-rw-r--r--  1 yufeiliu yufeiliu    38864 Mar 30  2018 README-etcdctl.md
-rw-r--r--  1 yufeiliu yufeiliu     7262 Mar 30  2018 README.md
-rw-r--r--  1 yufeiliu yufeiliu     7855 Mar 30  2018 READMEv2-etcdctl.md
root@ubuntu16server:/home/yufeiliu/work/etcd-v3.3.3-linux-amd64# cd /usr/bin/
root@ubuntu16server:/usr/bin# ll | grep etcd
-rwxr-xr-x  1 root root    19283200 Jun  7 21:25 etcd*
-rwxr-xr-x  1 root root    16018720 Jun  7 21:25 etcdctl*
root@ubuntu16server:/usr/bin#
6.2 启动etcd集群
node1启动:
etcd --name node1 --data-dir /opt/etcd/xuanchi.etcd --initial-advertise-peer-urls http://192.168.187.159:2380 --listen-peer-urls http://192.168.187.159:2380 --listen-client-urls http://192.168.187.159:2379,http://127.0.0.1:2379 --advertise-client-urls http://192.168.187.159:2379 --initial-cluster-token 9b611e964585185921a72b792ba3ccfa --initial-cluster node1=http://192.168.187.159:2380,node2=http://192.168.187.161:2380,node3=http://192.168.187.162:2380 --initial-cluster-state newnode2启动:
etcd --name node2 --data-dir /opt/etcd/xuanchi.etcd --initial-advertise-peer-urls http://192.168.187.161:2380 --listen-peer-urls http://192.168.187.161:2380 --listen-client-urls http://192.168.187.161:2379,http://127.0.0.1:2379 --advertise-client-urls http://192.168.187.161:2379 --initial-cluster-token 9b611e964585185921a72b792ba3ccfa --initial-cluster node1=http://192.168.187.159:2380,node2=http://192.168.187.161:2380,node3=http://192.168.187.162:2380 --initial-cluster-state newnode3启动:
etcd --name node3 --data-dir /opt/etcd/xuanchi.etcd --initial-advertise-peer-urls http://192.168.187.162:2380 --listen-peer-urls http://192.168.187.162:2380 --listen-client-urls http://192.168.187.162:2379,http://127.0.0.1:2379 --advertise-client-urls http://192.168.187.162:2379 --initial-cluster-token 9b611e964585185921a72b792ba3ccfa --initial-cluster node1=http://192.168.187.159:2380,node2=http://192.168.187.161:2380,node3=http://192.168.187.162:2380 --initial-cluster-state new
这三个启动之后没发现什么异常就表示启动成功了,我们现在验证一下:
root@ubuntu16server:~# etcdctl --endpoints=http://localhost:2379 get key
Error:  100: Key not found (/key) [8]
root@ubuntu16server:~# etcdctl --endpoints=http://localhost:2379 set key value
value
root@ubuntu16server:~# etcdctl --endpoints=http://localhost:2379 get key
value
6.3 添加TLS证书
安装证书生成工具,这里我们使用官网demo总的cfssl,当然使用openssl也同样可以。我对这两个都不怎么熟悉,所以使用一个操作简单的。
wget https://pkg.cfssl.org/R1.2/cfssl_linux-amd64
wget https://pkg.cfssl.org/R1.2/cfssljson_linux-amd64
wget https://pkg.cfssl.org/R1.2/cfssl-certinfo_linux-amd64
chmod +x cfssl_linux-amd64 cfssljson_linux-amd64 cfssl-certinfo_linux-amd64
mv cfssl_linux-amd64 /usr/local/bin/cfssl
mv cfssljson_linux-amd64 /usr/local/bin/cfssljson
mv cfssl-certinfo_linux-amd64 /usr/bin/cfssl-certinfo
根证书的配置文件:
root@ubuntu16server:/home/yufeiliu/work/ssl# cat ca-config.json
{
  "signing": {
    "default": {
      "expiry": "87600h"
    },
    "profiles": {
      "kubernetes": {
         "expiry": "87600h",
         "usages": [
            "signing",
            "key encipherment",
            "server auth",
            "client auth"
        ]
      }
    }
  }
}

root@ubuntu16server:/home/yufeiliu/work/ssl# cat ca-csr.json
{
    "CN": "kubernetes",
    "key": {
        "algo": "rsa",
        "size": 2048
    },
    "names": [
        {
            "C": "CN",
            "L": "Shenzhen",
            "ST": "Guangzhou",
            "O": "k8s",
            "OU": "System"
        }
    ]
}
生成根证书:
root@ubuntu16server:/home/yufeiliu/work/ssl# cfssl gencert -initca ca-csr.json | cfssljson -bare ca -
2019/06/07 23:29:32 [INFO] generating a new CA key and certificate from CSR
2019/06/07 23:29:32 [INFO] generate received request
2019/06/07 23:29:32 [INFO] received CSR
2019/06/07 23:29:32 [INFO] generating key: rsa-2048
2019/06/07 23:29:32 [INFO] encoded CSR
2019/06/07 23:29:32 [INFO] signed certificate with serial number 121594422926079997705890969600978266215889823932
root@ubuntu16server:/home/yufeiliu/work/ssl#
root@ubuntu16server:/home/yufeiliu/work/ssl#
root@ubuntu16server:/home/yufeiliu/work/ssl# ll
total 28
drwxr-xr-x 2 root     root     4096 Jun  7 23:29 ./
drwxrwxr-x 6 yufeiliu yufeiliu 4096 Jun  7 21:43 ../
-rw-r--r-- 1 root     root      294 Jun  7 23:27 ca-config.json
-rw-r--r-- 1 root     root     1005 Jun  7 23:29 ca.csr
-rw-r--r-- 1 root     root      267 Jun  7 23:29 ca-csr.json
-rw------- 1 root     root     1679 Jun  7 23:29 ca-key.pem
-rw-r--r-- 1 root     root     1367 Jun  7 23:29 ca.pem
服务器端证书配置:
root@ubuntu16server:/home/yufeiliu/work/ssl# cat server-csr.json
{
    "CN": "kubernetes",
    "hosts": [
      "127.0.0.1",
      "192.168.187.159",
      "192.168.187.161",
      "192.168.187.162",
      "kubernetes",
      "kubernetes.default",
      "kubernetes.default.svc",
      "kubernetes.default.svc.cluster",
      "kubernetes.default.svc.cluster.local"
    ],
    "key": {
        "algo": "rsa",
        "size": 2048
    },
    "names": [
        {
            "C": "CN",
            "L": "Shenzhen",
            "ST": "Guangzhou",
            "O": "k8s",
            "OU": "System"
        }
    ]
}
生成服务器端证书:
root@ubuntu16server:/home/yufeiliu/work/ssl# cfssl gencert -ca=ca.pem -ca-key=ca-key.pem -config=ca-config.json -profile=kubernetes server-csr.json | cfssljson -bare server
2019/06/07 23:33:43 [INFO] generate received request
2019/06/07 23:33:43 [INFO] received CSR
2019/06/07 23:33:43 [INFO] generating key: rsa-2048
2019/06/07 23:33:44 [INFO] encoded CSR
2019/06/07 23:33:44 [INFO] signed certificate with serial number 654731000975935155825055915905924830549652326083
2019/06/07 23:33:44 [WARNING] This certificate lacks a "hosts" field. This makes it unsuitable for
websites. For more information see the Baseline Requirements for the Issuance and Management
of Publicly-Trusted Certificates, v.1.1.6, from the CA/Browser Forum (https://cabforum.org);
specifically, section 10.2.3 ("Information Requirements").
root@ubuntu16server:/home/yufeiliu/work/ssl# ll
total 44
drwxr-xr-x 2 root     root     4096 Jun  7 23:33 ./
drwxrwxr-x 6 yufeiliu yufeiliu 4096 Jun  7 21:43 ../
-rw-r--r-- 1 root     root      294 Jun  7 23:27 ca-config.json
-rw-r--r-- 1 root     root     1005 Jun  7 23:29 ca.csr
-rw-r--r-- 1 root     root      267 Jun  7 23:29 ca-csr.json
-rw------- 1 root     root     1679 Jun  7 23:29 ca-key.pem
-rw-r--r-- 1 root     root     1367 Jun  7 23:29 ca.pem
-rw-r--r-- 1 root     root     1257 Jun  7 23:33 server.csr
-rw-r--r-- 1 root     root      548 Jun  7 23:33 server-csr.json
-rw------- 1 root     root     1675 Jun  7 23:33 server-key.pem
-rw-r--r-- 1 root     root     1627 Jun  7 23:33 server.pem
admin证书:
root@ubuntu16server:/home/yufeiliu/work/ssl# cat admin-csr.json
{
  "CN": "admin",
  "hosts": [],
  "key": {
    "algo": "rsa",
    "size": 2048
  },
  "names": [
    {
      "C": "CN",
      "L": "Shenzhen",
      "ST": "Guangzhou",
      "O": "system:masters",
      "OU": "System"
    }
  ]
}
root@ubuntu16server:/home/yufeiliu/work/ssl# cfssl gencert -ca=ca.pem -ca-key=ca-key.pem -config=ca-config.json -profile=kubernetes admin-csr.json | cfssljson -bare admin
2019/06/07 23:35:29 [INFO] generate received request
2019/06/07 23:35:29 [INFO] received CSR
2019/06/07 23:35:29 [INFO] generating key: rsa-2048
2019/06/07 23:35:29 [INFO] encoded CSR
2019/06/07 23:35:29 [INFO] signed certificate with serial number 311412796816212706387186372725432935214475734148
2019/06/07 23:35:29 [WARNING] This certificate lacks a "hosts" field. This makes it unsuitable for
websites. For more information see the Baseline Requirements for the Issuance and Management
of Publicly-Trusted Certificates, v.1.1.6, from the CA/Browser Forum (https://cabforum.org);
specifically, section 10.2.3 ("Information Requirements").
root@ubuntu16server:/home/yufeiliu/work/ssl# ll
total 60
drwxr-xr-x 2 root     root     4096 Jun  7 23:35 ./
drwxrwxr-x 6 yufeiliu yufeiliu 4096 Jun  7 21:43 ../
-rw-r--r-- 1 root     root     1013 Jun  7 23:35 admin.csr
-rw-r--r-- 1 root     root      232 Jun  7 23:35 admin-csr.json
-rw------- 1 root     root     1679 Jun  7 23:35 admin-key.pem
-rw-r--r-- 1 root     root     1407 Jun  7 23:35 admin.pem
-rw-r--r-- 1 root     root      294 Jun  7 23:27 ca-config.json
-rw-r--r-- 1 root     root     1005 Jun  7 23:29 ca.csr
-rw-r--r-- 1 root     root      267 Jun  7 23:29 ca-csr.json
-rw------- 1 root     root     1679 Jun  7 23:29 ca-key.pem
-rw-r--r-- 1 root     root     1367 Jun  7 23:29 ca.pem
-rw-r--r-- 1 root     root     1257 Jun  7 23:33 server.csr
-rw-r--r-- 1 root     root      548 Jun  7 23:33 server-csr.json
-rw------- 1 root     root     1675 Jun  7 23:33 server-key.pem
-rw-r--r-- 1 root     root     1627 Jun  7 23:33 server.pem
kube-proxy证书:
root@ubuntu16server:/home/yufeiliu/work/ssl# cat kube-proxy-csr.json
{
  "CN": "system:kube-proxy",
  "hosts": [],
  "key": {
    "algo": "rsa",
    "size": 2048
  },
  "names": [
    {
      "C": "CN",
      "L": "Shenzhen",
      "ST": "Guangzhou",
      "O": "k8s",
      "OU": "System"
    }
  ]
}

root@ubuntu16server:/home/yufeiliu/work/ssl# cfssl gencert -ca=ca.pem -ca-key=ca-key.pem -config=ca-config.json -profile=kubernetes kube-proxy-csr.json | cfssljson -bare kube-proxy
2019/06/07 23:36:15 [INFO] generate received request
2019/06/07 23:36:15 [INFO] received CSR
2019/06/07 23:36:15 [INFO] generating key: rsa-2048
2019/06/07 23:36:16 [INFO] encoded CSR
2019/06/07 23:36:16 [INFO] signed certificate with serial number 471603339640342656341551571262241220174846187480
2019/06/07 23:36:16 [WARNING] This certificate lacks a "hosts" field. This makes it unsuitable for
websites. For more information see the Baseline Requirements for the Issuance and Management
of Publicly-Trusted Certificates, v.1.1.6, from the CA/Browser Forum (https://cabforum.org);
specifically, section 10.2.3 ("Information Requirements").
root@ubuntu16server:/home/yufeiliu/work/ssl# ll
total 76
drwxr-xr-x 2 root     root     4096 Jun  7 23:36 ./
drwxrwxr-x 6 yufeiliu yufeiliu 4096 Jun  7 21:43 ../
-rw-r--r-- 1 root     root     1013 Jun  7 23:35 admin.csr
-rw-r--r-- 1 root     root      232 Jun  7 23:35 admin-csr.json
-rw------- 1 root     root     1679 Jun  7 23:35 admin-key.pem
-rw-r--r-- 1 root     root     1407 Jun  7 23:35 admin.pem
-rw-r--r-- 1 root     root      294 Jun  7 23:27 ca-config.json
-rw-r--r-- 1 root     root     1005 Jun  7 23:29 ca.csr
-rw-r--r-- 1 root     root      267 Jun  7 23:29 ca-csr.json
-rw------- 1 root     root     1679 Jun  7 23:29 ca-key.pem
-rw-r--r-- 1 root     root     1367 Jun  7 23:29 ca.pem
-rw-r--r-- 1 root     root     1013 Jun  7 23:36 kube-proxy.csr
-rw-r--r-- 1 root     root      233 Jun  7 23:35 kube-proxy-csr.json
-rw------- 1 root     root     1679 Jun  7 23:36 kube-proxy-key.pem
-rw-r--r-- 1 root     root     1411 Jun  7 23:36 kube-proxy.pem
-rw-r--r-- 1 root     root     1257 Jun  7 23:33 server.csr
-rw-r--r-- 1 root     root      548 Jun  7 23:33 server-csr.json
-rw------- 1 root     root     1675 Jun  7 23:33 server-key.pem
-rw-r--r-- 1 root     root     1627 Jun  7 23:33 server.pem
把这些证书发送到其他两台机器:
scp * root@192.168.187.161:/home/yufeiliu/work/ssl
scp * root@192.168.187.162:/home/yufeiliu/work/ssl
node1启动:
etcd --name node1 --data-dir /opt/etcd/xuanchi.etcd --initial-advertise-peer-urls https://192.168.187.159:2380 --listen-peer-urls https://192.168.187.159:2380 --listen-client-urls https://192.168.187.159:2379,https://127.0.0.1:2379 --advertise-client-urls https://192.168.187.159:2379 --initial-cluster-token 9b611e964585185921a72b792ba3ccfa --initial-cluster node1=https://192.168.187.159:2380,node2=https://192.168.187.161:2380,node3=https://192.168.187.162:2380 --initial-cluster-state new --client-cert-auth --cert-file=/home/yufeiliu/work/ssl/server.pem --key-file=/home/yufeiliu/work/ssl/server-key.pem --peer-client-cert-auth --peer-trusted-ca-file=/home/yufeiliu/work/ssl/ca.pem --trusted-ca-file=/home/yufeiliu/work/ssl/ca.pem --peer-cert-file=/home/yufeiliu/work/ssl/server.pem --peer-key-file=/home/yufeiliu/work/ssl/server-key.pem
node2启动:
etcd --name node2 --data-dir /opt/etcd/xuanchi.etcd --initial-advertise-peer-urls https://192.168.187.161:2380 --listen-peer-urls https://192.168.187.161:2380 --listen-client-urls https://192.168.187.161:2379,https://127.0.0.1:2379 --advertise-client-urls https://192.168.187.161:2379 --initial-cluster-token 9b611e964585185921a72b792ba3ccfa --initial-cluster node1=https://192.168.187.159:2380,node2=https://192.168.187.161:2380,node3=https://192.168.187.162:2380 --initial-cluster-state new --client-cert-auth --cert-file=/home/yufeiliu/work/ssl/server.pem --key-file=/home/yufeiliu/work/ssl/server-key.pem --peer-client-cert-auth --peer-trusted-ca-file=/home/yufeiliu/work/ssl/ca.pem --trusted-ca-file=/home/yufeiliu/work/ssl/ca.pem --peer-cert-file=/home/yufeiliu/work/ssl/server.pem --peer-key-file=/home/yufeiliu/work/ssl/server-key.pem
node3启动:
etcd --name node3 --data-dir /opt/etcd/xuanchi.etcd --initial-advertise-peer-urls https://192.168.187.162:2380 --listen-peer-urls https://192.168.187.162:2380 --listen-client-urls https://192.168.187.162:2379,https://127.0.0.1:2379 --advertise-client-urls https://192.168.187.162:2379 --initial-cluster-token 9b611e964585185921a72b792ba3ccfa --initial-cluster node1=https://192.168.187.159:2380,node2=https://192.168.187.161:2380,node3=https://192.168.187.162:2380 --initial-cluster-state new --client-cert-auth --cert-file=/home/yufeiliu/work/ssl/server.pem --key-file=/home/yufeiliu/work/ssl/server-key.pem --peer-client-cert-auth --peer-trusted-ca-file=/home/yufeiliu/work/ssl/ca.pem --trusted-ca-file=/home/yufeiliu/work/ssl/ca.pem --peer-cert-file=/home/yufeiliu/work/ssl/server.pem --peer-key-file=/home/yufeiliu/work/ssl/server-key.pem
测试:
root@ubuntu16server:~# etcdctl --ca-file=/home/yufeiliu/work/ssl/ca.pem --cert-file=/home/yufeiliu/work/ssl/server.pem --key-file=/home/yufeiliu/work/ssl/server-key.pem --endpoints=https://127.0.0.1:2379  get key
Error:  100: Key not found (/key) [8]
root@ubuntu16server:~#
root@ubuntu16server:~#
root@ubuntu16server:~#
root@ubuntu16server:~# etcdctl --ca-file=/home/yufeiliu/work/ssl/ca.pem --cert-file=/home/yufeiliu/work/ssl/server.pem --key-file=/home/yufeiliu/work/ssl/server-key.pem --endpoints=https://127.0.0.1:2379 set key value
value
root@ubuntu16server:~# etcdctl --ca-file=/home/yufeiliu/work/ssl/ca.pem --cert-file=/home/yufeiliu/work/ssl/server.pem --key-file=/home/yufeiliu/work/ssl/server-key.pem --endpoints=https://127.0.0.1:2379  get key
value
6.4 开机自启动
node1配置文件(/etc/systemd/system/etcd.service):
[Unit]
Description=Etcd Server
After=network-online.target firewalld.service
Wants=network-online.target


[Service]
Type=notify
ExecStart=/usr/bin/etcd \
        --name node1 \
        --data-dir /opt/etcd/xuanchi.etcd \
        --initial-advertise-peer-urls https://192.168.187.159:2380 \
        --listen-peer-urls https://192.168.187.159:2380 \
        --listen-client-urls https://192.168.187.159:2379,https://127.0.0.1:2379 \
        --advertise-client-urls https://192.168.187.159:2379 \
        --initial-cluster-token 9b611e964585185921a72b792ba3ccfa \
        --initial-cluster node1=https://192.168.187.159:2380,node2=https://192.168.187.161:2380,node3=https://192.168.187.162:2380 \
        --initial-cluster-state new \
        --client-cert-auth \
        --cert-file=/home/yufeiliu/work/ssl/server.pem \
        --key-file=/home/yufeiliu/work/ssl/server-key.pem \
        --peer-client-cert-auth \
        --peer-trusted-ca-file=/home/yufeiliu/work/ssl/ca.pem \
        --trusted-ca-file=/home/yufeiliu/work/ssl/ca.pem \
        --peer-cert-file=/home/yufeiliu/work/ssl/server.pem \
        --peer-key-file=/home/yufeiliu/work/ssl/server-key.pem
Restart=on-failure
LimitNOFILE=65536


[Install]
WantedBy=multi-user.target
node2配置文件(/etc/systemd/system/etcd.service):
[Unit]
Description=Etcd Server
After=network.target
After=network-online.target
Wants=network-online.target


[Service]
Type=notify
ExecStart=/usr/bin/etcd --name node2 --data-dir /opt/etcd/xuanchi.etcd --initial-advertise-peer-urls https://192.168.187.161:2380 --listen-peer-urls https://192.168.187.161:2380 --listen-client-urls https://192.168.187.161:2379,https://127.0.0.1:2379 --advertise-client-urls https://192.168.187.161:2379 --initial-cluster-token 9b611e964585185921a72b792ba3ccfa --initial-cluster node1=https://192.168.187.159:2380,node2=https://192.168.187.161:2380,node3=https://192.168.187.162:2380 --initial-cluster-state new --client-cert-auth --cert-file=/home/yufeiliu/work/ssl/server.pem --key-file=/home/yufeiliu/work/ssl/server-key.pem --peer-client-cert-auth --peer-trusted-ca-file=/home/yufeiliu/work/ssl/ca.pem --trusted-ca-file=/home/yufeiliu/work/ssl/ca.pem --peer-cert-file=/home/yufeiliu/work/ssl/server.pem --peer-key-file=/home/yufeiliu/work/ssl/server-key.pem
Restart=on-failure
LimitNOFILE=65536


[Install]
WantedBy=multi-user.target
node3配置文件(/etc/systemd/system/etcd.service):
[Unit]
Description=Etcd Server
After=network.target
After=network-online.target
Wants=network-online.target


[Service]
Type=notify
ExecStart=/usr/bin/etcd --name node3 --data-dir /opt/etcd/xuanchi.etcd --initial-advertise-peer-urls https://192.168.187.162:2380 --listen-peer-urls https://192.168.187.162:2380 --listen-client-urls https://192.168.187.162:2379,https://127.0.0.1:2379 --advertise-client-urls https://192.168.187.162:2379 --initial-cluster-token 9b611e964585185921a72b792ba3ccfa --initial-cluster node1=https://192.168.187.159:2380,node2=https://192.168.187.161:2380,node3=https://192.168.187.162:2380 --initial-cluster-state new --client-cert-auth --cert-file=/home/yufeiliu/work/ssl/server.pem --key-file=/home/yufeiliu/work/ssl/server-key.pem --peer-client-cert-auth --peer-trusted-ca-file=/home/yufeiliu/work/ssl/ca.pem --trusted-ca-file=/home/yufeiliu/work/ssl/ca.pem --peer-cert-file=/home/yufeiliu/work/ssl/server.pem --peer-key-file=/home/yufeiliu/work/ssl/server-key.pem
Restart=on-failure
LimitNOFILE=65536


[Install]
WantedBy=multi-user.target
每台机器上需要执行:
chmod a+x /etc/systemd/system/etcd.service
systemctl enable etcd.service
7、docker跨主机通信
这是k8s必须要解决的问题之一,默认情况下在同一台宿主机docker容器是可以通信的
注意:
1、下面需要下载镜像,在国内还是需要切换镜像源,参考这篇文章:https://blog.csdn.net/weixin_37893887/article/details/90047826
2、容器中很干净,需要安装一些ifconfig这些基础网络命令
apt-get update && apt-get upgrade
apt-get install net-tools
apt-get install inetutils-ping
apt-get install procps
apt install curl
我们下面验证宿主机上的容器可以互相ping通,但是端口不会telnet通:
root@ubuntu16server:~# docker images
REPOSITORY          TAG                 IMAGE ID            CREATED             SIZE
nginx               1.0                 0290bc274da2        59 seconds ago      109MB
nginx               latest              62c261073ecf        2 days ago          109MB
ubuntu              latest              7698f282e524        3 weeks ago         69.9MB

其中nginx:1.0是在nginx:latest基础上安装了一些网络基础命令之后commit的镜像
root@ubuntu16server:~# docker run --name nginx1 -p 8081:80 -d nginx:1.0
76230e55de447182e73523a262ca88d14c863c7ef3db20437748c662411bab7a
root@ubuntu16server:~# docker run --name nginx2 -p 8082:80 -d nginx:1.0
93cd1f4a066225b1c5cf53296c4f80fed2dd37803c14e2a373cdfdc47cb38b62
root@ubuntu16server:~# docker ps -a
CONTAINER ID        IMAGE               COMMAND                  CREATED             STATUS              PORTS                  NAMES
93cd1f4a0662        nginx:1.0           "nginx -g 'daemon of…"   3 seconds ago       Up 3 seconds        0.0.0.0:8082->80/tcp   nginx2
76230e55de44        nginx:1.0           "nginx -g 'daemon of…"   12 seconds ago      Up 12 seconds       0.0.0.0:8081->80/tcp   nginx1
首先我们启动了两个容器,启动这两个容器内部ip地址:
nginx1:
root@76230e55de44:/# ifconfig
eth0: flags=4163<UP,BROADCAST,RUNNING,MULTICAST>  mtu 1500
        inet 172.17.0.2  netmask 255.255.0.0  broadcast 172.17.255.255
        ether 02:42:ac:11:00:02  txqueuelen 0  (Ethernet)
        RX packets 2656  bytes 9115772 (8.6 MiB)
        RX errors 0  dropped 0  overruns 0  frame 0
        TX packets 1946  bytes 109303 (106.7 KiB)
        TX errors 0  dropped 0 overruns 0  carrier 0  collisions 0
lo: flags=73<UP,LOOPBACK,RUNNING>  mtu 65536
        inet 127.0.0.1  netmask 255.0.0.0
        loop  txqueuelen 1  (Local Loopback)
        RX packets 0  bytes 0 (0.0 B)
        RX errors 0  dropped 0  overruns 0  frame 0
        TX packets 0  bytes 0 (0.0 B)
        TX errors 0  dropped 0 overruns 0  carrier 0  collisions 0
nginx2:
root@93cd1f4a0662:/# ifconfig
eth0: flags=4163<UP,BROADCAST,RUNNING,MULTICAST>  mtu 1500
        inet 172.17.0.3  netmask 255.255.0.0  broadcast 172.17.255.255
        ether 02:42:ac:11:00:03  txqueuelen 0  (Ethernet)
        RX packets 1771  bytes 8505729 (8.1 MiB)
        RX errors 0  dropped 0  overruns 0  frame 0
        TX packets 1211  bytes 68778 (67.1 KiB)
        TX errors 0  dropped 0 overruns 0  carrier 0  collisions 0
lo: flags=73<UP,LOOPBACK,RUNNING>  mtu 65536
        inet 127.0.0.1  netmask 255.0.0.0
        loop  txqueuelen 1  (Local Loopback)
        RX packets 0  bytes 0 (0.0 B)
        RX errors 0  dropped 0  overruns 0  frame 0
        TX packets 0  bytes 0 (0.0 B)
        TX errors 0  dropped 0 overruns 0  carrier 0  collisions 0
由于两个docker容器的网段是一样的,所以他们之间是可以ping的,我们下面验证一下http端口是否可以telnet通
root@76230e55de44:/# ifconfig
eth0: flags=4163<UP,BROADCAST,RUNNING,MULTICAST> mtu 1500
inet 172.17.0.2 netmask 255.255.0.0 broadcast 172.17.255.255
ether 02:42:ac:11:00:02 txqueuelen 0 (Ethernet)
RX packets 5316 bytes 15911168 (15.1 MiB)
RX errors 0 dropped 0 overruns 0 frame 0
TX packets 4160 bytes 234935 (229.4 KiB)
TX errors 0 dropped 0 overruns 0 carrier 0 collisions 0
lo: flags=73<UP,LOOPBACK,RUNNING> mtu 65536
inet 127.0.0.1 netmask 255.0.0.0
loop txqueuelen 1 (Local Loopback)
RX packets 0 bytes 0 (0.0 B)
RX errors 0 dropped 0 overruns 0 frame 0
TX packets 0 bytes 0 (0.0 B)
TX errors 0 dropped 0 overruns 0 carrier 0 collisions 0
root@76230e55de44:/# curl -XGET 192.168.187.159:8081
<!DOCTYPE html>
<html>
<head>
<title>Welcome to nginx!</title>
<style>
body {
width: 35em;
margin: 0 auto;
font-family: Tahoma, Verdana, Arial, sans-serif;
}
</style>
</head>
<body>
<h1>Welcome to nginx!</h1>
<p>If you see this page, the nginx web server is successfully installed and
working. Further configuration is required.</p>
<p>For online documentation and support please refer to
<a href="http://nginx.org/">nginx.org</a>.<br/>
Commercial support is available at
<a href="http://nginx.com/">nginx.com</a>.</p>
<p><em>Thank you for using nginx.</em></p>
</body>
</html>
root@76230e55de44:/# curl -XGET 172.17.0.2:80
<!DOCTYPE html>
<html>
<head>
<title>Welcome to nginx!</title>
<style>
body {
width: 35em;
margin: 0 auto;
font-family: Tahoma, Verdana, Arial, sans-serif;
}
</style>
</head>
<body>
<h1>Welcome to nginx!</h1>
<p>If you see this page, the nginx web server is successfully installed and
working. Further configuration is required.</p>
<p>For online documentation and support please refer to
<a href="http://nginx.org/">nginx.org</a>.<br/>
Commercial support is available at
<a href="http://nginx.com/">nginx.com</a>.</p>
<p><em>Thank you for using nginx.</em></p>
</body>
</html>
root@76230e55de44:/#
root@76230e55de44:/#
root@76230e55de44:/# curl -XGET 172.17.0.3:80
<!DOCTYPE html>
<html>
<head>
<title>Welcome to nginx!</title>
<style>
body {
width: 35em;
margin: 0 auto;
font-family: Tahoma, Verdana, Arial, sans-serif;
}
</style>
</head>
<body>
<h1>Welcome to nginx!</h1>
<p>If you see this page, the nginx web server is successfully installed and
working. Further configuration is required.</p>
<p>For online documentation and support please refer to
<a href="http://nginx.org/">nginx.org</a>.<br/>
Commercial support is available at
<a href="http://nginx.com/">nginx.com</a>.</p>
<p><em>Thank you for using nginx.</em></p>
</body>
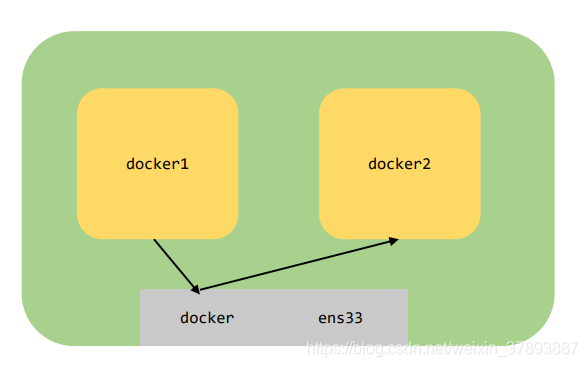
</html>我首先访问宿主机发现获得结果,再使用docker容器内部ip访问,也同样可以获得结果,这说明一个问题:docker只是创建一个虚拟网卡,并给每一个容器分配了一个子网ip,容器之间并没有添加限制。我们使用-p参数打通宿主机网络其关键技术就是iptables
root@ubuntu16server:~# iptables --list
Chain INPUT (policy ACCEPT)
target     prot opt source               destination


Chain FORWARD (policy DROP)
target     prot opt source               destination
DOCKER-USER  all  --  anywhere             anywhere
DOCKER-ISOLATION-STAGE-1  all  --  anywhere             anywhere
ACCEPT     all  --  anywhere             anywhere             ctstate RELATED,ESTABLISHED
DOCKER     all  --  anywhere             anywhere
ACCEPT     all  --  anywhere             anywhere
ACCEPT     all  --  anywhere             anywhere


Chain OUTPUT (policy ACCEPT)
target     prot opt source               destination


Chain DOCKER (1 references)
target     prot opt source               destination
ACCEPT     tcp  --  anywhere             172.17.0.2           tcp dpt:http
ACCEPT     tcp  --  anywhere             172.17.0.3           tcp dpt:http


Chain DOCKER-ISOLATION-STAGE-1 (1 references)
target     prot opt source               destination
DOCKER-ISOLATION-STAGE-2  all  --  anywhere             anywhere
RETURN     all  --  anywhere             anywhere


Chain DOCKER-ISOLATION-STAGE-2 (1 references)
target     prot opt source               destination
DROP       all  --  anywhere             anywhere
RETURN     all  --  anywhere             anywhere


Chain DOCKER-USER (1 references)
target     prot opt source               destination
RETURN     all  --  anywhere             anywhere
这就是docker网络中我们需要理解:
1、docker为了做到网络隔离,添加了一个docker0的网卡,使用docker0为这台宿主机的容器进行分配ip地址
2、-p 8081:80核心做法就是访问ens33网卡的8081端口,使用iptables命令转发给docker0对应容器上的80端口
3、同一台宿主机容器之间没有做访问限制
4、容器的声明周期很短,重启之后ip地址会重新分配,所以为了满足容器通信,docker提供了两种方式。第一种是使用映射到宿主机,宿主机的ip地址一般情况下是不会发生变化的,所以这种方式如果我们采用静态部署基本是上可以满足我们的需求。第二种方式是--link,这种方式打通了容器使用localhost就可以互相访问。这种做法原理很简单,docker容器通过声明的方式告诉dockerManger本容器的端口映射是多少,A-->B时底层路由添加策略进行拦截再使用iptables进行强制转发就可以完成这一点。
5、对于k8s来说,pod是可以随意部署到任何一台宿主机上的,这时候不会做任何限制,每一台宿主机的网络都不同,所以如何做到跨主机网络访问就非常关键。A0/B0在主机0上,A1/B1在主机1上,限制A0需要访问A1,B0需要访问A0、A1、B1。目前情况下如果我们采用宿主机NAT映射,那么就是在A0/B0/A1/B1服务就需要静态的配置对应的ip:port,如果存在机器重启和容器调度变成了:A0/A1在主机0上,B0/B1在主机1上,那就完蛋了,有可能出现A0/A1端口冲突,地址变化之后访ip:port也就会发生变化。
7.1 安装flannel
安装包: https://github.com/coreos/flannel/releases/download/v0.9.1/flannel-v0.9.1-linux-amd64.tar.gz
安装过程:
1、启动flannel,这时候会出现一个flannel的网卡
2、修改docker子网配置,使其指向flannel的子网并重启docker
3、重复以上步骤在其他节点执行
下载安装包:
root@ubuntu16server:/home/yufeiliu/work/flannel# ll
total 33696
drwxr-xr-x 2 root     root         4096 Jun  8 05:00 ./
drwxrwxr-x 7 yufeiliu yufeiliu     4096 Jun  8 05:01 ../
-rwxr-xr-x 1     1001     1001 34491768 Nov 17  2017 flanneld*
-rwxr-xr-x 1     1001     1001     2139 Mar 18  2017 mk-docker-opts.sh*
启动脚本:
root@ubuntu16server:/home/yufeiliu/work/flannel# cat /etc/systemd/system/flannel.service
[Unit]
Description=Flanneld overlay address etcd agent
After=network-online.target network.target
Before=docker.service


[Service]
Type=notify
ExecStart=/home/yufeiliu/work/flannel/flanneld --ip-masq --etcd-endpoints=https://192.168.187.159:2379,https://192.168.187.161:2379,https://192168.187.162:2379 -etcd-cafile=/home/yufeiliu/work/ssl/ca.pem -etcd-certfile=/home/yufeiliu/work/ssl/server.pem -etcd-keyfile=/home/yufeiliu/work/ssl/server-key.pem
ExecStartPost=/home/yufeiliu/work/flannel/mk-docker-opts.sh -k DOCKER_NETWORK_OPTIONS -d /run/flannel/subnet.env
Restart=on-failure


[Install]
WantedBy=multi-user.target

初始化etcd配置:

etcdctl --ca-file=/home/yufeiliu/work/ssl/ca.pem --cert-file=/home/yufeiliu/work/ssl/server.pem --key-file=/home/yufeiliu/work/ssl/server-key.pem --endpoints=https://127.0.0.1:2379 set /coreos.com/network/config '{ "Network": "172.17.0.0/16", "Backend": {"Type": "vxlan"}}'


root@ubuntu16server:/home/yufeiliu/work/flannel# etcdctl --ca-file=/home/yufeiliu/work/ssl/ca.pem --cert-file=/home/yufeiliu/work/ssl/server.pem --key-file=/home/yufeiliu/work/ssl/server-key.pem --endpoints=https://127.0.0.1:2379 get /coreos.com/network/config

{ "Network": "172.17.0.0/16", "Backend": {"Type": "vxlan"}}
启动flannel:
systemctl enable flannel.service
systemctl start flannel.service
验证:
root@ubuntu16server:/home/yufeiliu/work/flannel# ifconfig
docker0   Link encap:Ethernet  HWaddr 02:42:a0:3a:56:e6
          inet addr:172.17.0.1  Bcast:172.17.255.255  Mask:255.255.0.0
          inet6 addr: fe80::42:a0ff:fe3a:56e6/64 Scope:Link
          UP BROADCAST MULTICAST  MTU:1500  Metric:1
          RX packets:7396 errors:0 dropped:0 overruns:0 frame:0
          TX packets:9882 errors:0 dropped:0 overruns:0 carrier:0
          collisions:0 txqueuelen:0
          RX bytes:315838 (315.8 KB)  TX bytes:33583529 (33.5 MB)


ens33     Link encap:Ethernet  HWaddr 00:0c:29:32:76:69
          inet addr:192.168.187.159  Bcast:192.168.187.255  Mask:255.255.255.0
          inet6 addr: fe80::20c:29ff:fe32:7669/64 Scope:Link
          UP BROADCAST RUNNING MULTICAST  MTU:1500  Metric:1
          RX packets:584112 errors:0 dropped:0 overruns:0 frame:0
          TX packets:479900 errors:0 dropped:0 overruns:0 carrier:0
          collisions:0 txqueuelen:1000
          RX bytes:219486701 (219.4 MB)  TX bytes:53998728 (53.9 MB)


flannel.1 Link encap:Ethernet  HWaddr 36:dc:7a:7f:8e:bd
          inet addr:172.17.21.0  Bcast:0.0.0.0  Mask:255.255.255.255
          inet6 addr: fe80::34dc:7aff:fe7f:8ebd/64 Scope:Link
          UP BROADCAST RUNNING MULTICAST  MTU:1450  Metric:1
          RX packets:0 errors:0 dropped:0 overruns:0 frame:0
          TX packets:0 errors:0 dropped:8 overruns:0 carrier:0
          collisions:0 txqueuelen:0
          RX bytes:0 (0.0 B)  TX bytes:0 (0.0 B)


lo        Link encap:Local Loopback

          inet addr:127.0.0.1  Mask:255.0.0.0

          inet6 addr: ::1/128 Scope:Host

          UP LOOPBACK RUNNING  MTU:65536  Metric:1

          RX packets:2427 errors:0 dropped:0 overruns:0 frame:0

          TX packets:2427 errors:0 dropped:0 overruns:0 carrier:0

          collisions:0 txqueuelen:1

          RX bytes:181726 (181.7 KB)  TX bytes:181726 (181.7 KB)
首先这里有一个flannel的网卡,网卡地址是172.17.21.0
其次,为docker配置的文件地址:
root@ubuntu16server:/home/yufeiliu/work/flannel# cat /run/flannel/subnet.env
DOCKER_OPT_BIP="--bip=172.17.21.1/24"
DOCKER_OPT_IPMASQ="--ip-masq=false"
DOCKER_OPT_MTU="--mtu=1450"
DOCKER_NETWORK_OPTIONS=" --bip=172.17.21.1/24 --ip-masq=false --mtu=1450"

将docker的网络切入flannel,使得docker网络数据包走flannel,这样就可以跨机器网络通信了

root@ubuntu16server:/home/yufeiliu/work/flannel# cat /etc/systemd/system/docker.service
[Unit]
Description=Docker Application Container Engine
Documentation=https://docs.docker.com
After=network-online.target firewalld.service
Wants=network-online.target


[Service]
Type=notify
# the default is not to use systemd for cgroups because the delegate issues still
# exists and systemd currently does not support the cgroup feature set required
# for containers run by docker
EnvironmentFile=/run/flannel/subnet.env
ExecStart=/usr/bin/dockerd $DOCKER_NETWORK_OPTIONS
ExecReload=/bin/kill -s HUP $MAINPID
# Having non-zero Limit*s causes performance problems due to accounting overhead
# in the kernel. We recommend using cgroups to do container-local accounting.
LimitNOFILE=infinity
LimitNPROC=infinity
LimitCORE=infinity
# Uncomment TasksMax if your systemd version supports it.
# Only systemd 226 and above support this version.
#TasksMax=infinity
TimeoutStartSec=0
# set delegate yes so that systemd does not reset the cgroups of docker containers
Delegate=yes
# kill only the docker process, not all processes in the cgroup
KillMode=process
# restart the docker process if it exits prematurely
Restart=on-failure
StartLimitBurst=3
StartLimitInterval=60s


[Install]
WantedBy=multi-user.target
重启一下服务器:
root@ubuntu16server:/home/yufeiliu/work/flannel# ifconfig
docker0   Link encap:Ethernet  HWaddr 02:42:a0:3a:56:e6
          inet addr:172.17.21.1  Bcast:172.17.21.255  Mask:255.255.255.0
          inet6 addr: fe80::42:a0ff:fe3a:56e6/64 Scope:Link
          UP BROADCAST MULTICAST  MTU:1500  Metric:1
          RX packets:7396 errors:0 dropped:0 overruns:0 frame:0
          TX packets:9882 errors:0 dropped:0 overruns:0 carrier:0
          collisions:0 txqueuelen:0
          RX bytes:315838 (315.8 KB)  TX bytes:33583529 (33.5 MB)

ens33     Link encap:Ethernet  HWaddr 00:0c:29:32:76:69
          inet addr:192.168.187.159  Bcast:192.168.187.255  Mask:255.255.255.0
          inet6 addr: fe80::20c:29ff:fe32:7669/64 Scope:Link
          UP BROADCAST RUNNING MULTICAST  MTU:1500  Metric:1
          RX packets:596079 errors:0 dropped:0 overruns:0 frame:0
          TX packets:491879 errors:0 dropped:0 overruns:0 carrier:0
          collisions:0 txqueuelen:1000
          RX bytes:220829342 (220.8 MB)  TX bytes:55361775 (55.3 MB)


flannel.1 Link encap:Ethernet  HWaddr 36:dc:7a:7f:8e:bd
          inet addr:172.17.21.0  Bcast:0.0.0.0  Mask:255.255.255.255
          inet6 addr: fe80::34dc:7aff:fe7f:8ebd/64 Scope:Link
          UP BROADCAST RUNNING MULTICAST  MTU:1450  Metric:1
          RX packets:0 errors:0 dropped:0 overruns:0 frame:0
          TX packets:0 errors:0 dropped:8 overruns:0 carrier:0
          collisions:0 txqueuelen:0
          RX bytes:0 (0.0 B)  TX bytes:0 (0.0 B)

lo        Link encap:Local Loopback
          inet addr:127.0.0.1  Mask:255.0.0.0
          inet6 addr: ::1/128 Scope:Host
          UP LOOPBACK RUNNING  MTU:65536  Metric:1
          RX packets:2471 errors:0 dropped:0 overruns:0 frame:0
          TX packets:2471 errors:0 dropped:0 overruns:0 carrier:0
          collisions:0 txqueuelen:1
          RX bytes:184014 (184.0 KB)  TX bytes:184014 (184.0 KB)
我这里是想回归验证一次etcd、flannel、docker,同样可以使用systemctl重启docker命令
验证:
root@ubuntu16server:~# ifconfig
docker0   Link encap:Ethernet  HWaddr 02:42:b8:67:e6:5a
          inet addr:172.17.39.1  Bcast:172.17.39.255  Mask:255.255.255.0
          UP BROADCAST MULTICAST  MTU:1500  Metric:1
          RX packets:0 errors:0 dropped:0 overruns:0 frame:0
          TX packets:0 errors:0 dropped:0 overruns:0 carrier:0
          collisions:0 txqueuelen:0
          RX bytes:0 (0.0 B)  TX bytes:0 (0.0 B)

ens33     Link encap:Ethernet  HWaddr 00:0c:29:a1:26:91
          inet addr:192.168.187.162  Bcast:192.168.187.255  Mask:255.255.255.0
          inet6 addr: fe80::20c:29ff:fea1:2691/64 Scope:Link
          UP BROADCAST RUNNING MULTICAST  MTU:1500  Metric:1
          RX packets:4115 errors:0 dropped:0 overruns:0 frame:0
          TX packets:4181 errors:0 dropped:0 overruns:0 carrier:0
          collisions:0 txqueuelen:1000
          RX bytes:568522 (568.5 KB)  TX bytes:540022 (540.0 KB)


flannel.1 Link encap:Ethernet  HWaddr 42:1f:0d:f3:b9:5e
          inet addr:172.17.39.0  Bcast:0.0.0.0  Mask:255.255.255.255
          inet6 addr: fe80::401f:dff:fef3:b95e/64 Scope:Link
          UP BROADCAST RUNNING MULTICAST  MTU:1450  Metric:1
          RX packets:4 errors:0 dropped:0 overruns:0 frame:0
          TX packets:4 errors:0 dropped:8 overruns:0 carrier:0
          collisions:0 txqueuelen:0
          RX bytes:336 (336.0 B)  TX bytes:336 (336.0 B)


lo        Link encap:Local Loopback
          inet addr:127.0.0.1  Mask:255.0.0.0
          inet6 addr: ::1/128 Scope:Host
          UP LOOPBACK RUNNING  MTU:65536  Metric:1
          RX packets:55 errors:0 dropped:0 overruns:0 frame:0
          TX packets:55 errors:0 dropped:0 overruns:0 carrier:0
          collisions:0 txqueuelen:1
          RX bytes:10380 (10.3 KB)  TX bytes:10380 (10.3 KB)

root@ubuntu16server:~# ping 172.17.21.1
PING 172.17.21.1 (172.17.21.1) 56(84) bytes of data.
64 bytes from 172.17.21.1: icmp_seq=1 ttl=64 time=0.536 ms
64 bytes from 172.17.21.1: icmp_seq=2 ttl=64 time=1.55 ms
64 bytes from 172.17.21.1: icmp_seq=3 ttl=64 time=1.61 ms
^C

--- 172.17.21.1 ping statistics ---
3 packets transmitted, 3 received, 0% packet loss, time 2007ms
rtt min/avg/max/mdev = 0.536/1.235/1.612/0.495 ms
我们看到路由表:
root@ubuntu16server:~# route
Kernel IP routing table
Destination     Gateway         Genmask         Flags Metric Ref    Use Iface
default         192.168.187.2   0.0.0.0         UG    0      0        0 ens33
172.17.21.0     172.17.21.0     255.255.255.0   UG    0      0        0 flannel.1
172.17.33.0     172.17.33.0     255.255.255.0   UG    0      0        0 flannel.1
172.17.39.0     *               255.255.255.0   U     0      0        0 docker0
192.168.187.0   *               255.255.255.0   U     0      0        0 ens33
这上面说172.17.21.1走flannel.1网卡,所以数据包转给flannel.1之后就使用隧道协议转发给172.17.21.1所在的宿主机,然后经过flannel.1在拆包最终经过TCP/IP协议栈给到应用程序。
8、下载k8s安装包
https://github.com/kubernetes/kubernetes/blob/master/CHANGELOG-1.14.md#server-binaries
这个安装包需要vpn才可以下载,花了半天的时间下载这个文件。
root@ubuntu16server:/home/yufeiliu/work/kubernetes/server/bin# ls
apiextensions-apiserver              hyperkube                  kube-apiserver.tar                  kubectl                kube-proxy.tar             mounter
cloud-controller-manager             kubeadm                    kube-controller-manager             kubelet                kube-scheduler
cloud-controller-manager.docker_tag  kube-apiserver             kube-controller-manager.docker_tag  kube-proxy             kube-scheduler.docker_tag
cloud-controller-manager.tar         kube-apiserver.docker_tag  kube-controller-manager.tar         kube-proxy.docker_tag  kube-scheduler.tar
将可执行文件放到bin下,方便调用:
cp kubectl /usr/local/bin/
cp hyperkube  /usr/local/bin/
cp kube-apiserver  /usr/local/bin/
cp kube-controller-manager  /usr/local/bin/
cp kubelet  /usr/local/bin/
cp kube-proxy  /usr/local/bin/
cp kube-scheduler  /usr/local/bin/
8.1 启动kube-apiServer
生成token文件:
echo "8afdf3c4eb7c74018452423c29433609,kubelet-bootstrap,10001,\"system:kubelet-bootstrap\"" > token.csv
说明:
这里面的字符串需要自己替换,使用date | mdsum生成即可
# cat /etc/systemd/system/kube-api-server.service
[Unit]
Description=Kubernetes API Server
Documentation=https://github.com/GoogleCloudPlatform/kubernetes
After=network.target


[Service]
User=root
ExecStart=/usr/local/bin/kube-apiserver \
  --admission-control=NamespaceLifecycle,LimitRanger,ServiceAccount,DefaultStorageClass,ResourceQuota,NodeRestriction \
  --kubelet-https=true \
  --bind-address=192.168.187.159 \
  --secure-port=6443 \
  --authorization-mode=Node,RBAC \
  --runtime-config=api/all \
  --enable-bootstrap-token-auth \
  --token-auth-file=/home/yufeiliu/work/k8s-config/token.csv \
  --tls-cert-file=/home/yufeiliu/work/ssl/server.pem \
  --tls-private-key-file=/home/yufeiliu/work/ssl/server-key.pem \
  --client-ca-file=/home/yufeiliu/work/ssl/ca.pem \
  --service-account-key-file=/home/yufeiliu/work/ssl/ca-key.pem \
  --etcd-cafile=/home/yufeiliu/work/ssl/ca.pem \
  --etcd-certfile=/home/yufeiliu/work/ssl/server.pem \
  --etcd-keyfile=/home/yufeiliu/work/ssl/server-key.pem \
  --service-cluster-ip-range=10.25.0.0/16 \
  --etcd-servers=https://192.168.187.159:2379,https://192.168.187.161:2379,https://192.168.187.162:2379 \
  --enable-swagger-ui=true \
  --allow-privileged=true \
  --audit-log-maxage=30 \
  --audit-log-maxbackup=3 \
  --audit-log-maxsize=100 \
  --audit-log-path=/var/lib/audit.log \
  --cors-allowed-origins='.*' \
  --v=2
Restart=on-failure
RestartSec=5
Type=notify
LimitNOFILE=65536


[Install]
WantedBy=multi-user.target
注意:
1、不要忘记自启动
8.2 启动kube-controller-manger
# cat /etc/systemd/system/kube-controller-manger.service
[Unit]
Description=Kubernetes Controller Manager
Documentation=https://github.com/GoogleCloudPlatform/kubernetes


[Service]
ExecStart=/usr/local/bin/kube-controller-manager \
  --master=https://192.168.187.159:6443 \
  --service-cluster-ip-range=10.25.0.0/16 \
  --cluster-name=kubernetes \
  --leader-elect=true \
  --cluster-signing-cert-file=/home/yufeiliu/work/ssl/ca.pem \
  --cluster-signing-key-file=/home/yufeiliu/work/ssl/ca-key.pem \
  --service-account-private-key-file=/home/yufeiliu/work/ssl/server-key.pem \
  --root-ca-file=/home/yufeiliu/work/ssl/ca.pem \
  --v=2
Restart=on-failure
RestartSec=5


[Install]
WantedBy=multi-user.target
注意:
1、不要忘记自启动
8.3 启动kube-scheduler.service
# cat /etc/systemd/system/kube-scheduler.service
[Unit]
Description=Kubernetes Scheduler
Documentation=https://github.com/GoogleCloudPlatform/kubernetes


[Service]
ExecStart=/usr/local/bin/kube-scheduler \
  --master=https://192.168.187.159:6443 \
  --leader-elect=true \
  --v=2
Restart=on-failure
RestartSec=5


[Install]
WantedBy=multi-user.target
注意:
1、不要忘记自启动
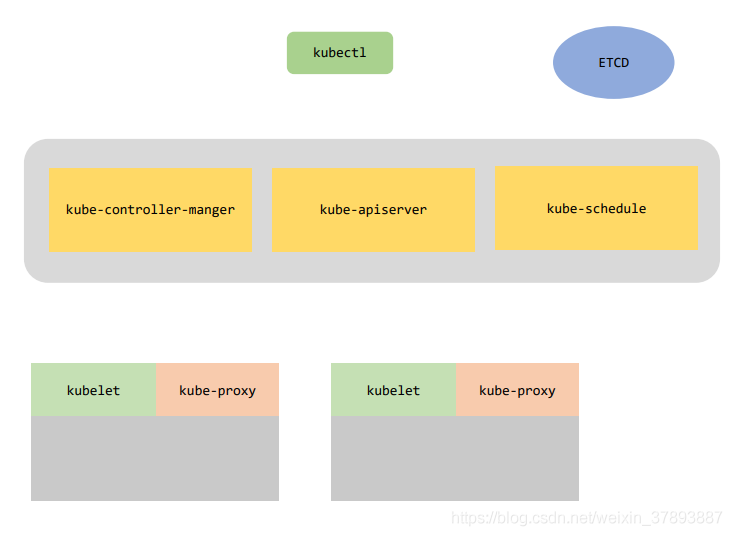
启动了kube-apiserver/kube-controller-manger/kube-schedule三件套,master结点就算启动成功了:
[root@ubuntu16server ubuntu16server /home/yufeiliu/work/ssl]
# ps -aux | grep kube
root     50454  6.7 22.1 405340 223264 ?       Ssl  00:28   0:53 /usr/local/bin/kube-apiserver --admission-control=NamespaceLifecycle,LimitRanger,ServiceAccount,DefaultStorageClass,ResourceQuota,NodeRestriction --kubelet-https=true --bind-address=192.168.187.159 --secure-port=6443 --authorization-mode=Node,RBAC --runtime-config=api/all --enable-bootstrap-token-auth --token-auth-file=/home/yufeiliu/work/k8s-config/token.csv --tls-cert-file=/home/yufeiliu/work/ssl/server.pem --tls-private-key-file=/home/yufeiliu/work/ssl/server-key.pem --client-ca-file=/home/yufeiliu/work/ssl/ca.pem --service-account-key-file=/home/yufeiliu/work/ssl/ca-key.pem --etcd-cafile=/home/yufeiliu/work/ssl/ca.pem --etcd-certfile=/home/yufeiliu/work/ssl/server.pem --etcd-keyfile=/home/yufeiliu/work/ssl/server-key.pem --service-cluster-ip-range=10.25.0.0/16 --etcd-servers=https://192.168.187.159:2379,https://192.168.187.161:2379,https://192.168.187.162:2379 --enable-swagger-ui=true --allow-privileged=true --audit-log-maxage=30 --audit-log-maxbackup=3 --audit-log-maxsize=100 --audit-log-path=/var/lib/audit.log --cors-allowed-origins=.* --v=2
root     51007  1.0  6.1 215864 61856 ?        Ssl  00:35   0:03 /usr/local/bin/kube-controller-manager --master=https://192.168.187.159:6443 --service-cluster-ip-range=10.25.0.0/16 --cluster-name=kubernetes --leader-elect=true --cluster-signing-cert-file=/home/yufeiliu/work/ssl/ca.pem --cluster-signing-key-file=/home/yufeiliu/work/ssl/ca-key.pem --service-account-private-key-file=/home/yufeiliu/work/ssl/server-key.pem --root-ca-file=/home/yufeiliu/work/ssl/ca.pem --v=2
root     51382  4.0  3.8 141508 38268 ?        Ssl  00:39   0:04 /usr/local/bin/kube-scheduler --master=https://192.168.187.159:6443 --leader-elect=true --v=2
root     51535  0.0  0.0  12944   928 pts/1    S+   00:41   0:00 grep --color=auto kube
9、启动node结点
9.1 kube-proxy
root@ubuntu16server:/home/yufeiliu/work/kubernetes# cat /etc/systemd/system/kube-proxy.service
[Unit]
Description=Kubernetes Kube-Proxy Server
Documentation=https://github.com/GoogleCloudPlatform/kubernetes
After=network.target


[Service]
ExecStart=/usr/local/bin/kube-proxy \
  --logtostderr=false \
  --v=2 \
  --master=https://192.168.187.159:6443 \
  --hostname-override=192.168.187.161 \
  --proxy-mode=iptables
Restart=on-failure
RestartSec=5
LimitNOFILE=65536


[Install]
WantedBy=multi-user.target
9.2 kubelet
root@ubuntu16server:/home/yufeiliu/work/kubernetes# cat /etc/systemd/system/kubelet.service
[Unit]
Description=Kubernetes Kubelet
Documentation=https://github.com/GoogleCloudPlatform/kubernetes
After=docker.service
Requires=docker.service


[Service]
ExecStart=/usr/local/bin/kubelet \
  --logtostderr=true \
  --v=2 \
  --address=192.168.187.161 \
  --port=10250 \
  --hostname-override=192.168.187.161 \
  --allow-privileged=false  \
  --cgroup-root=/opt \
  --fail-swap-on=false \
  --pod-infra-container-image=registry.cn-hangzhou.aliyuncs.com/google-containers/pause-amd64:3.0" \
  --cert-dir=/opt/
Restart=on-failure
RestartSec=5


[Install]
WantedBy=multi-user.target
10、验证集群可用
1、安装docker
2、安装etcd集群
3、安装flannel
4、安装master三件套
5、安装node两件套


 564
564


 被折叠的 条评论
为什么被折叠?
被折叠的 条评论
为什么被折叠?
 到【灌水乐园】发言


