


本项目在GitHub上可以下载源代码,欢迎大家指点。谢谢
GitHub地址:点击进入
开发IED使用IntelliJ IDEA
目前仅仅在架构运用层解析框架如何使用,后续在此项目完结后会剖析所用到的所有架构的底层原理技术,额,比较倾向于,先学会简单使用,再剖析其底层原理的学习模式。
1 项目构建
新建一个maven项目,这里就不多说了,给大家看下我这边项目的结构:
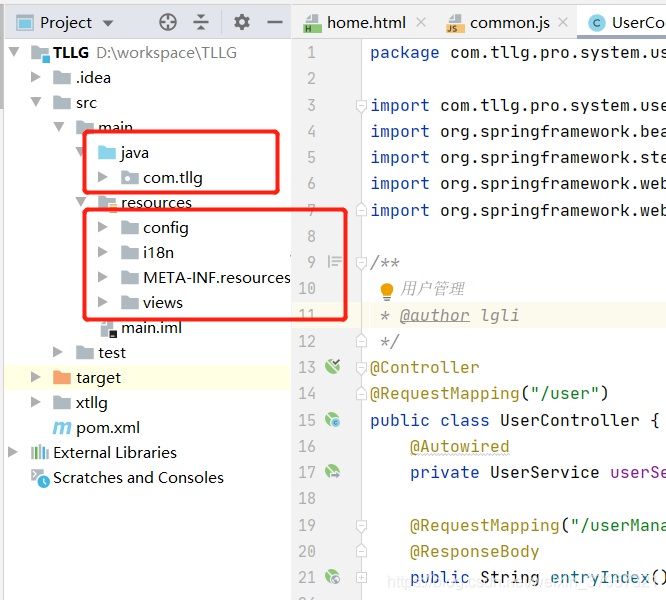
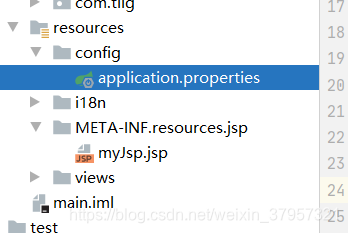
config:主要存放配置文件资源,我这里目前比较简单,就一个application.properties,当然也可以是推荐的springboot推荐的application.yml
i18n:主要存放国际化语言文件,这里需要在application.properties中指定其文件路径和位置
即:
# i18n
spring.messages.encoding=utf-8
spring.messages.basename=i18n/index
META-INF:目前可不需要,我这里是想要以后可能会写一些jsp文件,所以在这里也支持下,配置的jsp文件就会在这里文件夹中
views主要是前端代码了,比如html、js等等
我们先来看后端
首先是pom.xml中jar包的引入:
springboot项目,必要的,必须继承其父项目
<!--支持全栈式Web开发,包括Tomcat和spring-webmvc-->
<dependency>
	<groupId>org.springframework.boot</groupId>
	<artifactId>spring-boot-starter-web</artifactId>
</dependency>

<!-- spring boot 集成spring security-->
<dependency>
	<groupId>org.springframework.boot</groupId>
	<artifactId>spring-boot-starter-security</artifactId>
</dependency>

<!--支持常规的测试依赖,包括JUnit、Hamcrest、Mockito以及spring-test模块-->
<dependency>
	<groupId>org.springframework.boot</groupId>
	<artifactId>spring-boot-starter-test</artifactId>
	<scope>test</scope>
</dependency>

<!-- 支持JDBC数据库 -->
<!-- https://mvnrepository.com/artifact/org.springframework.boot/spring-boot-starter-jdbc -->
<dependency>
	<groupId>org.springframework.boot</groupId>
	<artifactId>spring-boot-starter-jdbc</artifactId>
	<version>2.0.4.RELEASE</version>
</dependency>


<!--mybatis-spring适配器-->
<dependency>
	<groupId>org.mybatis</groupId>
	<artifactId>mybatis-spring</artifactId>
	<version>1.3.0</version>
</dependency>

<!--mybatis-->
<dependency>
	<groupId>org.mybatis</groupId>
	<artifactId>mybatis</artifactId>
	<version>3.4.0</version>
</dependency>

<!--mysql连接数据库驱动-->
<dependency>
	<groupId>mysql</groupId>
	<artifactId>mysql-connector-java</artifactId>
	<version>8.0.11</version>
</dependency>

<!-- https://mvnrepository.com/artifact/commons-dbcp/commons-dbcp -->
<!-- dbcp常见主流数据库连接池工具 -->
<dependency>
	<groupId>commons-dbcp</groupId>
	<artifactId>commons-dbcp</artifactId>
	<version>1.4</version>
</dependency>

<!-- https://mvnrepository.com/artifact/commons-pool/commons-pool -->
<dependency>
	<groupId>commons-pool</groupId>
	<artifactId>commons-pool</artifactId>
	<version>1.6</version>
</dependency>

<!-- aop切面支持 -->
<dependency>
	<groupId>org.springframework.boot</groupId>
	<artifactId>spring-boot-starter-aop</artifactId>
</dependency>

<!--支持Thymeleaf模板引擎,包括与Spring的集成-->
<dependency>
	<groupId>org.springframework.boot</groupId>
	<artifactId>spring-boot-starter-thymeleaf</artifactId>
</dependency>

<dependency>
	<groupId>net.sourceforge.nekohtml</groupId>
	<artifactId>nekohtml</artifactId>
	<version>1.9.22</version>
</dependency>

<!-- 标准Java库无法提供足够的方法来处理其核心类。Apache Commons Lang提供了这些额外的方法。-->
<dependency>
	<groupId>org.apache.commons</groupId>
	<artifactId>commons-lang3</artifactId>
	<version>3.7</version>
</dependency>

<!-- XML操作jar包-->
<dependency>
	<groupId>dom4j</groupId>
	<artifactId>dom4j</artifactId>
	<version>1.6.1</version>
</dependency>
后端使用mybatis操作数据库增、删、改、查,Thymeleaf模板引擎进行页面渲染,项目使用mysql做数据库支撑
这里还需要解决,IDE工具编译java文件时,不编译.xml文件及其他资源文件(字体等等)的问题,需要设置:
<resources>
    <!---解决字体问题-->
    <resource>
        <directory>src/main/resources</directory>
        <filtering>true</filtering>
        <excludes>
            <exclude>**/fonts/**</exclude>
            <exclude>**/**.ico</exclude>
        </excludes>
    </resource>
    <resource>
        <directory>src/main/resources</directory>
        <filtering>false</filtering>
        <includes>
            <include>**/fonts/**</include>
            <include>**/**.ico</include>
        </includes>
    </resource>
    <resource>
        <directory>src/main/java</directory>
        <includes>
            <include>**/*.xml</include>
        </includes>
    </resource>
</resources>
看下application.properties:
# service port
server.port=8080
# close favicon
spring.mvc.favicon.enabled=false
# database
default.datasource.driverClassName=com.mysql.cj.jdbc.Driver
default.datasource.url=jdbc:mysql://localhost:3306/xttl?useUnicode=true&characterEncoding=utf-8&serverTimezone=GMT&useSSL=false
default.datasource.username=root
default.datasource.password=soft01
# thymeleaf
spring.thymeleaf.prefix=classpath:/views/
spring.thymeleaf.check-template-location=true
spring.thymeleaf.suffix=.html
spring.thymeleaf.encoding=UTF-8
spring.thymeleaf.content-type=text/html
spring.thymeleaf.mode=LEGACYHTML5
spring.thymeleaf.cache=false
# jsp
spring.mvc.view.prefix=/jsp/
spring.mvc.view.suffix=.jsp
# i18n
spring.messages.encoding=utf-8
spring.messages.basename=i18n/index
8.0版本的mysql默认连接数据库会使用useSSL,这里我们需要禁掉,否则会出现Establishing SSL connection without server’s identity verification is not recommended的警告,同时我们需要设置时区,即:serverTimezone,否则会出现Could not get JDBC Connection; nested exception is java.sql.SQLException: The server time zone value ‘XXX’ is unrecognized or represents more than one time zone. You must configure either the server or JDBC driver (via the serverTimezone configuration property) to use a more specifc time zone value if you want to utilize time zone support的错误信息。这里目前先随便设置个时区(serverTimezone=GMT,这表示格林威治中央区时区),后面来看,其实还是有问题的,请看后续分解。这儿不再详述。
thymeleaf模板引擎配置:由于前段使用VUE+ElementUI,使得会在html标签上存在一些非常规html规范的写法,会导致模板解析报错,所以这里引入了JAR包nekohtml解决这个问题,同时spring.thymeleaf.mode配置需要更改为LEGACYHTML5。SpringBoot默认模板放在resource下templates中的,可以看出我们的项目结构并不是这样子,所以这里需要指定模板路径spring.thymeleaf.prefix=classpath:/views/
2 SpringBoot整合SpringSecurity
继承org.springframework.security.config.annotation.web.configuration.WebSecurityConfigurerAdapter,重写configure方法,这里直接贴入楼主的整个类文件
package com.tllg.sysset.mvcconfig.security;

import com.tllg.sysset.mvcconfig.auth.MyAuthProvider;
import com.tllg.sysset.mvcconfig.user.MyUserDetailsService;
import com.tllg.sysset.mvcconfig.handler.MyFailHandler;
import com.tllg.sysset.mvcconfig.handler.MySuccessHandler;
import org.springframework.beans.factory.annotation.Autowired;
import org.springframework.context.annotation.Configuration;
import org.springframework.security.config.annotation.authentication.builders.AuthenticationManagerBuilder;
import org.springframework.security.config.annotation.web.builders.HttpSecurity;
import org.springframework.security.config.annotation.web.builders.WebSecurity;
import org.springframework.security.config.annotation.web.configuration.EnableWebSecurity;
import org.springframework.security.config.annotation.web.configuration.WebSecurityConfigurerAdapter;

/**
 * @author lgli
 * 安全信息配置
 * 项目基本配置信息,主要包括登录拦截,静态资源访问
 */
@Configuration
@EnableWebSecurity
public class WebSecurityConfig extends WebSecurityConfigurerAdapter {

    @Autowired
    private MyUserDetailsService myUserDetailsService;

    @Autowired
    private MyAuthProvider myAuthProvider;

    @Override
    public void configure(WebSecurity web){
        //定义登录页面的静态资源(包括js)
        web.ignoring().antMatchers("/login/**",//登录界面及其资源
                "/login.html",//登录界面及其资源
                "/base/js/**",//主要js,jquery及其vue
                "/*.ico"//图标
        );
    }

    @Override
    protected void configure(HttpSecurity http) throws Exception {
        http
            .formLogin()//定义需要用户登录时,跳转到登录页面
            .loginPage("/login.html")//定义登录页面
            .usernameParameter("username").passwordParameter("password")//定义登录界面传参
            .loginProcessingUrl("/login_to_sys")//登录接口,该接口被SpringSecurity执行;
            .permitAll()//表示不需要拦截,全部通过
            .failureHandler(new MyFailHandler())//登录失败处理handler
            .successHandler(new MySuccessHandler())//登录成功处理handler
            .and().headers().frameOptions().sameOrigin()//保证同源iframe中可访问,不拦截
            .and().authorizeRequests().anyRequest().authenticated()
            .and().csrf().disable()
        ;
    }

    @Override
    protected void configure(AuthenticationManagerBuilder auth) throws Exception {
        auth.userDetailsService(myUserDetailsService);
        auth.authenticationProvider(myAuthProvider);
//        auth.eraseCredentials(true);
    }
}
web.ignoring().antMatchers过滤不需要拦截的一些资源文件,如登录所用到的所有html及js文件。
configure(HttpSecurity http)方法主要是拦截设置,其代码主要含义,也有明确的注释,设置frameOptions().sameOrigin()主要是因为项目前端通过iframe嵌套访问后端请求,否则请求将访问异常。
此外,我们需要实现org.springframework.security.core.userdetails.UserDetailsService的loadUserByUsername方法,进行自定义验证信息,也可以不实现,那样就直接默认不处理了。我这里实现了改方法,并组装了登录成功验证后的一些资源信息,核心代码如下《所涉及到的其他相关代码,见GitHub》
if(UtilBase.STRING.isBlank(name)){
	throw new UsernameNotFoundException("请传入用户名");
}
logger.info("传入用户名为{}的试图登录",name);
UserBaseInfo user = userMapper.selectUserByUserUniqueSign(name, "0");
if(user == null){
	throw new UsernameNotFoundException("无效用户");
}
UserBaseSys userBaseSys = new UserBaseSys(user);
//获取用户角色
userBaseSys.setUserResource((List<ResourceInfo>)dealWithCascade(
		userMapper.selectUserResourcesByUserUniqueSign(name, StaticEnum.ZERO.getValue()),ResourceInfo.class
));
//获取用户资源
userBaseSys.setUserRoles((List<RoleBaseInfo >)dealWithCascade(
		userMapper.selectUserRolesByUserUniqueSign(name),RoleBaseInfo.class
));
logger.info("获取到用户数据,返回userDetail");
return userBaseSys;
configure方法设定了登录验证失败或者成功的处理handler,这里需要实现各自的接口
失败,需要实现org.springframework.security.web.authentication.AuthenticationFailureHandler的onAuthenticationFailure方法,这里就简单的返回登录页面:
package com.tllg.sysset.mvcconfig.handler;

import org.slf4j.Logger;
import org.slf4j.LoggerFactory;
import org.springframework.security.core.AuthenticationException;
import org.springframework.security.web.authentication.AuthenticationFailureHandler;


import javax.servlet.http.HttpServletRequest;
import javax.servlet.http.HttpServletResponse;
import java.io.IOException;
import java.util.Date;

/**
 * @author lgli
 * 登录失败处理handler
 *
 */
public class MyFailHandler implements AuthenticationFailureHandler {

    private Logger logger = LoggerFactory.getLogger(MyFailHandler.class);

    @Override
    public void onAuthenticationFailure(HttpServletRequest request, HttpServletResponse response,
                                        AuthenticationException e) throws IOException {
        logger.error("本次操作出现认证异常:"+new Date());
        response.sendRedirect("/login.html?error="+e.getMessage());//返回登录页面,重新登录
    }
}
成功需要实现org.springframework.security.web.authentication.AuthenticationSuccessHandler的onAuthenticationSuccess方法,这里登录成功直接进入系统首页
package com.tllg.sysset.mvcconfig.handler;

import org.springframework.security.core.Authentication;
import org.springframework.security.web.authentication.AuthenticationSuccessHandler;

import javax.servlet.ServletException;
import javax.servlet.http.HttpServletRequest;
import javax.servlet.http.HttpServletResponse;
import java.io.IOException;

/**
 * @author lgli
 * 实现自定义的用户成功登陆处理
 * 登录成功处理handler
 *
 */
public class MySuccessHandler implements AuthenticationSuccessHandler {
    @Override
    public void onAuthenticationSuccess(HttpServletRequest request, HttpServletResponse response,
                                        Authentication authentication) throws IOException, ServletException {
        response.sendRedirect("home/entryHomeIndex");
    }
}
3.SpringBoot整合Mybatis
由于长时间没有仔细回顾Mybatis原理了,所以这里采用@Configuration方式,一步步回顾mybatis,这里也只做步骤层解析,不做底层原理解读。
package com.tllg.sysset.datasource;

import com.tllg.util.PropertyUtil;
import org.apache.ibatis.datasource.pooled.PooledDataSource;
import org.apache.ibatis.session.SqlSessionFactory;
import org.mybatis.spring.SqlSessionFactoryBean;
import org.mybatis.spring.SqlSessionTemplate;
import org.slf4j.Logger;
import org.slf4j.LoggerFactory;
import org.springframework.beans.factory.annotation.Autowired;

import org.springframework.context.annotation.Bean;
import org.springframework.context.annotation.Configuration;
import org.springframework.core.io.support.PathMatchingResourcePatternResolver;
import org.springframework.jdbc.datasource.DataSourceTransactionManager;
import org.springframework.transaction.PlatformTransactionManager;
import org.springframework.transaction.annotation.EnableTransactionManagement;
import org.springframework.transaction.annotation.TransactionManagementConfigurer;

import java.io.IOException;


/**
 * @author lgli
 * 初始化主数据源
 * 数据源连接池 --> 会话工厂sqlSessionFactoryBean --> 自动扫描对象关系映射 --> 事务管理
 */
@Configuration
@EnableTransactionManagement//支持事物
public class MainSource implements TransactionManagementConfigurer {

    private static final Logger log = LoggerFactory.getLogger(MainSource.class);

    @Autowired
    private PropertyUtil propertyUtil;

    private PooledDataSource datasource;

    private SqlSessionFactory sessionFactory;

    @Override
    public PlatformTransactionManager annotationDrivenTransactionManager() {
        initDataSource();
        return new DataSourceTransactionManager(datasource);
    }

    /**
     * 初始化数据源及其连接
     */
    @Bean(name="mainDatasource")
    public PooledDataSource initDataSource(){
        try {
            PooledDataSource datasource = new PooledDataSource();
            //设置连接驱动-数据库类型
            datasource.setDriver(propertyUtil.getValueByKey("default.datasource.driverClassName"));
            //设置URL
            datasource.setUrl(propertyUtil.getValueByKey("default.datasource.url"));
            //设置用户名
            datasource.setUsername(propertyUtil.getValueByKey("default.datasource.username"));
            //设置密码
            datasource.setPassword(propertyUtil.getValueByKey("default.datasource.password"));
            //连接池其他信息默认PooledDataSource中的属性
            this.datasource = datasource;
            return datasource;
        }catch (Exception e){
            log.error("初始化主数据源连接池失败,"+e,e);
            throw new RuntimeException("初始化主数据源连接池失败异常"+e);
        }
    }


    /**
     * 注册sqlSessionFactoryBean
     *
     */
    @Bean(name="mainSqlSessionFactory")
    public SqlSessionFactory registerSqlSessionFactory(){
        SqlSessionFactoryBean sqlSessionFactoryBean = new SqlSessionFactoryBean();
        sqlSessionFactoryBean.setDataSource(this.datasource);//设置数据源
        PathMatchingResourcePatternResolver resolver = new PathMatchingResourcePatternResolver();
        try {
            //指定xml配置文件路径
            sqlSessionFactoryBean.setMapperLocations(resolver.getResources("classpath:com/tllg/**/mapper/xml/*.xml"));
            this.sessionFactory = sqlSessionFactoryBean.getObject();
            return this.sessionFactory;
        }catch (IOException ioe){
            log.error("主数据源配置Mapper映射文件不存在"+ioe,ioe);
            throw new RuntimeException("配置Mapper映射文件不存在"+ioe);
        }catch (Exception ex){
            log.error("主数据源注册sqlSessionFactoryBean异常"+ex,ex);
            throw new RuntimeException("主数据源注册sqlSessionFactoryBean异常"+ex);
        }
    }

    /**
     * 注册sqlSessionTemplate
     * @param factory SqlSessionFactory
     * @return
     */
    @Bean(name="mainSqlSessionTemplate")
    public SqlSessionTemplate setSqlSessionTemplate(SqlSessionFactory factory){
        return new SqlSessionTemplate(factory);
    }
}

-------------------------------------------------


package com.tllg.sysset.datasource;

import org.mybatis.spring.mapper.MapperScannerConfigurer;
import org.springframework.boot.autoconfigure.AutoConfigureAfter;
import org.springframework.context.annotation.Bean;
import org.springframework.context.annotation.Configuration;

@Configuration
@AutoConfigureAfter(MainSource.class)
public class MainMapper {
    /**
     * 注册Mapper映射文件信息
     */
    @Bean(name="mainMapperScannerConfigurer")
    public MapperScannerConfigurer registerMapperConfig(){
        MapperScannerConfigurer mapper = new MapperScannerConfigurer();
        //指定sqlSessionFactory
        mapper.setSqlSessionFactoryBeanName("mainSqlSessionFactory");
        //指定dao接口配置文件路径
        mapper.setBasePackage("com.tllg.**.mapper");
        return mapper;
    }
}
代码简单描述下:
mybatis主要行动轨迹是,连接数据库–>SqlSessionFactoryBuilder–>SqlSessionFactory–>SqlSession–>do Something -->return result
mybatis通过读取配置文件信息,得到数据库连接,由连接配置对象,得到当前数据库连接的会话工厂SqlSessionFactoryBuilder对象,由SqlSessionFactoryBuilder对象得到SqlSessionFactory实例,由SqlSessionFactory得到SqlSession实例,SqlSession可以执行我们的sql了。所有对象实例,使用单例模式。当然一般来说,必须使用的单例模式,否则创建多了,数据库连接会被占满了。
registerSqlSessionFactory()方法主要是SqlSessionFactory的一些配置信息,比如数据源,及其sql文件。
setSqlSessionTemplate()方法则是通过代理执行获取SqlSession实例,内部封装了其事物信息,不需要我们手动去调用SqlSessionFactory获取SqlSession来执行sql了,即前面描述的后续过程交给SqlSessionTemplate处理了。
这里有2个@Configuration配置文件,其中前面一个主要是mybatis行动轨迹过程代码化,后面一个主要是设置映射关系文件,注意@AutoConfigureAfter注解,表示改配置文件需要先执行其他的配置文件,设置映射关系,我们需要得到SqlSessionFactory,所以第二个配置文件执行在第一个配置文件之后。
4 Resolver整合
我们需要重写org.springframework.web.servlet.config.annotation.WebMvcConfigurerAdapter的addResourceHandlers方法,使其可以访问静态资源文件
package com.tllg.sysset.mvcconfig.resolver;


import org.springframework.stereotype.Component;
import org.springframework.web.servlet.config.annotation.ResourceHandlerRegistry;
import org.springframework.web.servlet.config.annotation.WebMvcConfigurerAdapter;

/**
 * @author lgli
 * 资源路径的配置信息
 * 指定访问资源路径
 */
@Component
public class SourceResolverConfig extends WebMvcConfigurerAdapter {

    /**
     * 添加目录配置
     * 默认配置/**
     * 可以多次使用 addResourceLocations 添加目录
     * 优先级先添加的高于后添加的
     * @param registry registry
     */
    @Override
    public void addResourceHandlers(ResourceHandlerRegistry registry) {
        registry.addResourceHandler("/**")
                .addResourceLocations("classpath:/views/");
        super.addResourceHandlers(registry);
    }
}
此时,基本后台配置就差不多了,项目也是可以跑起来了。
目前先到这儿了,下一节,将继续前端代码的引入。
每天温习一点点,学习才能进步
有喜欢的朋友可以关注下我的公众号,不定期更新一些学习分享经验。纯属个人所学总结,希望大家可以指出不正确的地方,共同学习成长。

代码之路之长,因为喜欢,所以坚持。


 643
643


 被折叠的 条评论
为什么被折叠?
被折叠的 条评论
为什么被折叠?
 到【灌水乐园】发言


