


阿里云(虚拟机)建站Discuz_X3.4
这里当然可以选宝塔系统或者专门的Discuz3.2系统,截至笔者写这篇文章看到的最新系统。我其实主要想学习下怎么搭建环境,按照官网的步骤来,所以单独选了ubuntu 14.04 32的操作系统。
教程主要参考: Discuz官网搭建教程
首先我们需要先弄明白我们需要什么软件,分别是做什么用的
1、Apache 版本是httpd-2.4.34.tar 下载地址为 http://archive.apache.org/dist/httpd/
准备,安装过程部分从源码编译安装,需要gcc 和g++环境,ubuntu14 默认带有gcc环境,需要额外装g++, apt-get install g++
1、安装MySQL
2、mysql 参考 https://blog.csdn.net/xiaojin21cen/article/details/104018079
1、下载:
下载地址:https://dev.mysql.com/downloads/mysql/5.7.html
2、2、解压、移动安装
解压myql
复制并重命名
tar -xf mysql-5.7.29-linux-glibc2.12-i686.tar
tar zxf mysql-5.7.29-linux-glibc2.12-i686.tar.gz -C  /usr/local/
mv /usr/local/mysql-5.7.29-linux-glibc2.12-i686/  /usr/local/mysql
3、mysql用户组、权限配置
groupadd mysql
useradd -r -g mysql mysql
mkdir -p  /data/mysql                #创建目录
chown mysql:mysql -R /data/mysql     #赋予权限
4、配置 my.cnf :
vim /etc/my.cnf

[mysqld]
bind-address=0.0.0.0
port=3306
user=mysql
basedir=/usr/local/mysql
datadir=/data/mysql
socket=/tmp/mysql.sock
log-error=/data/mysql/mysql.err
pid-file=/data/mysql/mysql.pid
#character config
character_set_server=utf8mb4
symbolic-links=0
explicit_defaults_for_timestamp=true
5、初始化数据库
cd /usr/local/mysql/bin/
./mysqld  --defaults-file=/etc/my.cnf --basedir=/usr/local/mysql/ --datadir=/data/mysql/ --user=mysql --initialize
6、查看mysql 初始化密码(随机生成的)
cat /data/mysql/mysql.err
2020-06-12T16:57:48.449384Z 0 [Warning] InnoDB: New log files created, LSN=45790
2020-06-12T16:57:48.581584Z 0 [Warning] InnoDB: Creating foreign key constraint system tables.
2020-06-12T16:57:48.645911Z 0 [Warning] No existing UUID has been found, so we assume that this is the first time that this server has been started. Generating a new UUID: d85cdc91-accd-11ea-ad08-00163e0aa807.
2020-06-12T16:57:48.647524Z 0 [Warning] Gtid table is not ready to be used. Table 'mysql.gtid_executed' cannot be opened.
2020-06-12T16:57:50.927509Z 0 [Warning] CA certificate ca.pem is self signed.
2020-06-12T16:57:51.676507Z 1 [Note] A temporary password is generated for root@localhost: ve)Qwyjlb1Vi
这里是 ve)Qwyjlb1Vi
7、启动mysql
cp  /usr/local/mysql/support-files/mysql.server  /etc/init.d/mysql

service mysql start
8、修改密码
./mysql -u root -p密码    #登录
/usr/local/mysql/bin# ./mysql -u root -pve)Qwyjlb1Vi
-bash: syntax error near unexpected token `)'
这里特尴尬,密码是ve)Qwyjlb1Vi 会报错,但是,遇到这种情况,我们可以./mysql -u root -p,然后再输入密码,就可以登陆进去了。
./mysql -u root -p
Enter password:
Welcome to the MySQL monitor.  Commands end with ; or \g.
Your MySQL connection id is 6
Server version: 5.7.29

Copyright (c) 2000, 2020, Oracle and/or its affiliates. All rights reserved.

Oracle is a registered trademark of Oracle Corporation and/or its
affiliates. Other names may be trademarks of their respective
owners.

Type 'help;' or '\h' for help. Type '\c' to clear the current input statement.

mysql>
mysql> set password = password('1234@root');
Query OK, 0 rows affected, 1 warning (0.00 sec)

mysql> alter user 'root'@'localhost' password expire never;
Query OK, 0 rows affected (0.00 sec)

mysql> flush privileges;
Query OK, 0 rows affected (0.00 sec)
密码被更新为1234@root
9、远程连接
mysql> use mysql;
Reading table information for completion of table and column names
You can turn off this feature to get a quicker startup with -A

Database changed
mysql> update user set host = '%'  where  user = 'root';
Query OK, 1 row affected (0.00 sec)
Rows matched: 1  Changed: 1  Warnings: 0

mysql> flush privileges;
Query OK, 0 rows affected (0.00 sec)
10.10、将mysql bin添加的系统bin中
mysql> quit
Bye
#ln -s  /usr/local/mysql/bin/mysql /usr/bin
至此,MySQL安装完毕。
2、安装Apache
1、先安装依赖的东西
4) libz g++
apt-get update
apt-get install g++
apt-get install zlib1g-dev
1) apr
```powershell
tar -jxf apr-1.6.3.tar.bz2
cd apr-1.6.3
./configure --prefix=/usr/local/apr
make && make install
configure 会报错rm: cannot remove ‘libtoolT’: No such file or directory
修改configure文件找到以下部分注释掉
RM"cfgfile"
- apr-util
tar -zxf apr-util-1.5.1.tar.gz
cd apr-util-1.5.1
./configure --prefix=/usr/local/apr-util --with-apr=/usr/local/apr/bin/apr-1-config
make && make install
- pcre
tar -zxf pcre-8.41.tar.gz
cd pcre-8.41
./configure --prefix=/usr/local/pcre            #需要g++
make  && make install
1、解压:
在这里插入代码片
#httpd依赖apr,安装
tar -jxf httpd-2.4.43.tar.bz2
cd httpd-2.4.34/
./configure --prefix=/usr/local/apache --enable-module=rewrite --disable-access --disable-auth --disable-charset-lite --disable-include --disable-log-config --disable-env --disable-setenvif --disable-mime --disable-status --disable-autoindex --disable-asis --disable-cgid --disable-cgi --disable-negotiation --disable-dir --disable-actions --disable-userdir --disable-alias --enable-so --enable-mods-shared='access auth auth_anon auth_dbm auth_digest dav dav_fs actions alias asis autoindex cache cern_meta cgi charset_lite deflate dir disk_cache env expires file_cache headers include info log_config logio mime mime_magic negotiation rewrite setenvif speling status unique_id userdir usertrack vhost_alias' --with-apr=/usr/local/apr --with-apr-util=/usr/local/apr-util   --with-pcre=/usr/local/pcre  #安装到 --prefix=/usr/local/apache

make && make install
cp /usr/local/apache/conf/httpd.conf /usr/local/apache/conf/httpd.conf.old
#下面的教程是缺失的,只能走一步看一部了
cp -f  /usr/local/apache/conf/httpd.conf  /etc/init.d/httpd.conf
chmod 755 /etc/init.d/httpd.conf
3、安装PHP
准备工作
apt-get install libxml2-dev openssl libssl-dev libssl0.9.8 curl libcurl4-gnutls-dev libjpeg-dev
libpng-dev libfreetype6-dev libtool libsqlite3-dev autoconf
wget http://ftp.gnu.org/pub/gnu/libiconv/libiconv-1.14.tar.gz
tar -zxf libiconv-1.14.tar.gz
cd libiconv-1.14
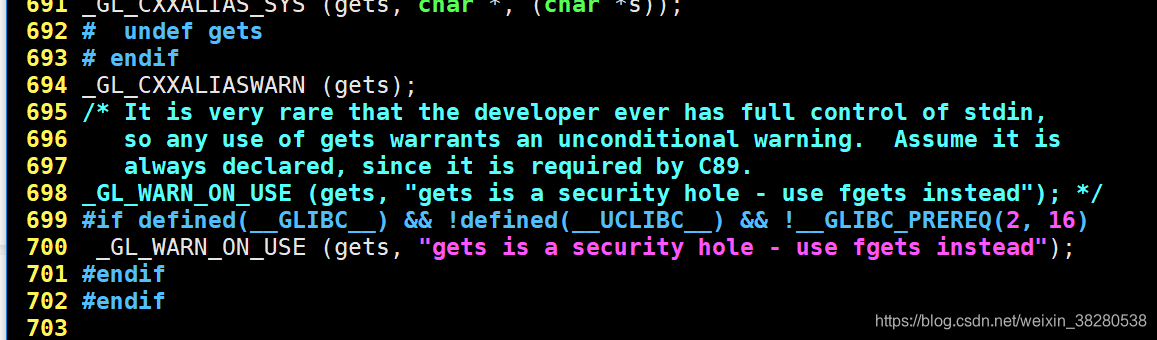
vim +700 srclib/stdio.in.h 修改内容见下图,否则会有报错
./configure --prefix=/usr/local && make && make install
修改 srclib/stdio.in.h
wget https://github.com/kkos/oniguruma/archive/v6.9.4.tar.gz -O oniguruma-6.9.4.tar.gz
tar -zxf oniguruma-6.9.4.tar.gz
cd oniguruma-6.9.4

./autogen.sh && ./configure --prefix=/usr
make && make install
配置
tar -zxf php_v7.4.7.tar.gz
cd php-7.4.7/
#编译安装
./configure --prefix=/usr/local/php7 --with-config-file-path=/usr/local/etc --enable-mbstring --enable-ftp --with-gd --with-jpeg-dir=/usr --with-png-dir=/usr --enable-magic-quotes --with-mysql=/usr/local/mysql --with-pear --enable-sockets --with-ttf --with-freetype-dir=/usr --enable-gd-native-ttf --with-zlib --enable-sysvsem --enable-exif --enable-sysvshm --with-libxml-dir=/usr --with-apxs2=/usr/local/apache/bin/apxs --with-iconv=/usr/local/libiconv --with-iconv-dir=/usr/local --with-xmlrpc --enable-xml --enable-shmop --enable-zip --with-mhash --with-mcrypt --enable-discard-path --enable-bcmath --enable-inline-optimization --with-curl --with-curlwrappers --enable-mbregex --with-openssl

configure: WARNING: unrecognized options: --with-gd, --with-jpeg-dir, --with-png-dir, --enable-magic-quotes, --with-mysql, --with-ttf, --with-freetype-dir, --enable-gd-native-ttf, --with-libxml-dir, --enable-zip, --with-mcrypt, --enable-discard-path, --with-curlwrappers

make && make install

libtool --finish /root/php-7.2.31/libs

cp php.ini-production   /usr/local/etc/php.ini

tar -zxf APC-3.1.13.tgz
cd APC-3.1.13/
/usr/local/php7/bin/phpize
./configure --enable-apc --enable-mmap --enable-apc-spinlocks --disable-apc-pthreadmutex --with-php-config=/usr/local/php7/bin/php-config
配置Apache支持PHP
vim /usr/local/apache/conf/httpd.conf
#添加
257 <IfModule dir_module>
258     DirectoryIndex index.html index.php
259 </IfModule>


394     AddType application/x-compress .Z
395     AddType application/x-gzip .gz .tgz
396     AddType application/x-httpd-php .php
重新运行apache
/usr/local/apache/bin/apachectl restart
测试
vim /usr/local/apache/htdocs/info.php  添加一i行啊内容保存退出
<?php
        phpinfo();
?>
在浏览里输入 IP/info.php,如果是纯文本,则失败,是PHP相关信息则成功。
4、安装Discuz_X3.4
下载加压cp到apache的目录下面去,
unzip Discuz_X3.4_SC_GBK【20200818】.zip
cp -arf upload/*    /usr/local/apache/htdocs/
浏览器输入IP地址进入安装页面,点我同意进行下一步

页面会提示那些条件不满足,按照条件做出相应的修改,主要是一些文件不存在,或者没有读写权限,以及不支持
mysqli_connect() 不支持 advice_mysqli_connect
cd /usr/local/apache/htdocs/
cp config/config_global_default.php  config/config_global.php
cp config/config_ucenter_default.php  config/config_ucenter.php
chmod 777 -R config/
chmod 777 -R data/
 chmod 777 -R ./uc_client/data/cache
chmod 777 -R ./uc_server/data/
关于 mysqli_connect() 不支持 advice_mysqli_connect,最早在阿里云服务器上解决了,百度蛮花了一点时间就没有写博客了,这次是在自己的虚拟机上面装,同时准备把这个问题解决了。
查找mysql_config 在那里
root@ubuntu:/usr/local# find ./ -name  mysql_config
./mysql/bin/mysql_config
用这个重新编译安装PHP7,新增配置如下
--with-php-config=/usr/local/php7/bin/php-config --with-mysqli=/usr/local/mysql/bin/mysql_config

增加配置后,configure会报错
cd  /home/linus/soft/php-7.4.7
cd ext/mysql
/usr/local/php7/bin/phpize
./configure --with-php-config=/usr/local/php7/bin/php-config --with-mysqli=/usr/local/mysql/bin/mysql_config
make && make install
这部分make编译会报错,解决方
#错误1
/home/linus/soft/php-7.4.7/ext/mysqli/mysqli_api.c:34:47: fatal error: ext/mysqlnd/mysql_float_to_double.h: No such file or directory
#解决方法
vim +36 mysqli_api.c
#include "ext/mysqlnd/mysql_float_to_double.h"
#修改成绝对路径
#include "/home/linus/soft/php-7.4.7/ext/mysqlnd/mysql_float_to_double.h"
这个地方出错的原因时,可能考虑是在源码根目录编译的,所以相对路径是以ext开头,如果修改成相对路径 “…/mysqlnd/mysql_float_to_double.h”,则在根目录下面编译又会出错。
vim /usr/local/etc/php.ini
找到;extension=mysqli 修改如下
extension=mysqli
重启Apache服务
/usr/local/apache/bin/apachectl restart
重新编译安装PHP安装,因为之前在它的子目录下面编过,现在直接编译会导致出错,所以重新解压一份源码编译,带上mysql_config 的配置编译即可,又对以下库的依赖,创建软连接
cd /usr/local/mysql/lib/
ln -s libmysqlclient.so libmysqlclient_r.so
#回到http 目录重新编译
./configure --prefix=/usr/local/php7 --with-config-file-path=/usr/local/etc  --with-mysqli=/usr/local/mysql/bin/mysql_config --enable-mbstring --enable-ftp --with-gd --with-jpeg-dir=/usr --with-png-dir=/usr --enable-magic-quotes --with-mysql=/usr/local/mysql --with-pear --enable-sockets --with-ttf --with-freetype-dir=/usr --enable-gd-native-ttf --with-zlib --enable-sysvsem --enable-exif --enable-sysvshm --with-libxml-dir=/usr --with-apxs2=/usr/local/apache/bin/apxs --with-iconv=/usr/local/libiconv --with-iconv-dir=/usr/local --with-xmlrpc --enable-xml --enable-shmop --enable-zip --with-mhash --with-mcrypt --enable-discard-path --enable-bcmath --enable-inline-optimization --with-curl --with-curlwrappers --enable-mbregex --with-openssl

make && make install

cd /usr/local/apache/htdocs
rm -rf ./*
cp -arf /home/linus/soft/upload/*  ./
安装,注意数据库的账户和密码 root 1234@root 必须填对,否则,安装会失败。
到此完成,周后附上访问的页面。


 被折叠的 条评论
为什么被折叠?
被折叠的 条评论
为什么被折叠?
 到【灌水乐园】发言


