


这次我完成的内容首先是一个简单自定义数字键盘的实现。


内容包括两个java文件,分别控制实现了页面布局和自定义键盘构造及监听。number.xml中编写了数字键盘的内容。
number.xml文件:数字键盘1-9、删除键、完成键:
<Row>
    <Key android:codes="49" android:keyLabel="1" />
    <Key android:codes="50" android:keyLabel="2" />
    <Key android:codes="51" android:keyLabel="3" />
</Row>

<Row>
    <Key android:codes="52" android:keyLabel="4" />
    <Key android:codes="53" android:keyLabel="5" />
    <Key android:codes="54" android:keyLabel="6" />
</Row>

<Row>
    <Key android:codes="55" android:keyLabel="7" />
    <Key android:codes="56" android:keyLabel="8" />
    <Key android:codes="57" android:keyLabel="9" />
</Row>

<Row>
    <Key android:codes="-5"  android:keyIcon="@drawable/del" />
    <Key android:codes="48" android:keyLabel="0" />
    <Key android:codes="-3" android:keyLabel="完成" />
</Row>
布局文件的编写,包括一个文本输入框和自定义键盘
<EditText
    android:id="@+id/my_editText"
    android:layout_width="match_parent"
    android:layout_height="wrap_content"
    android:layout_weight="1"
    android:background="@android:color/white"/>


<android.inputmethodservice.KeyboardView
    android:id="@+id/keyboard_view_my"
    android:layout_width="match_parent"
    android:layout_height="wrap_content"
    android:layout_alignParentBottom="true"
    android:focusable="true"
    android:focusableInTouchMode="true"
    android:keyPreviewHeight="@dimen/x280"
    android:keyPreviewLayout="@layout/key_preview_layout"
    android:keyPreviewOffset="@dimen/x1"
    android:visibility="invisible"
    tools:visibility="visible" />
NumboardUtil中实现了Numboard的构造方法,因为在未来我们需要实现的是将手写字母的图片输出在文本编辑框内,所以在此我传入了Resourses参数,便于获得存在系统中的资源文件。
public NumboardUtil(Activity act, EditText editText, KeyboardView keyboardViews, Resources resourses) {
    this.res = resourses;
    this.ed = editText;
    this.keyboardView = keyboardViews;
    k = new Keyboard(act.getApplication(), R.xml.number);//传入的number决定了键盘
    keyboardView.setKeyboard(k);
    keyboardView.setEnabled(true);
    keyboardView.setPreviewEnabled(false);//是否显示隐藏点击pop布局bufen
    keyboardView.setOnKeyboardActionListener(listener);
}
接下来编写一个监听器继承自OnKeyboardActionListener,用于监听键盘动作并针对不同动作有不同的实现,在OnKey方法中我们将图片放入文本框中,这些图片将来即为存储的用户手写体图片。
public void onKey(int i, int[] ints) {
    Editable editable = ed.getText();
    int start = ed.getSelectionStart();
    if (i == Keyboard.KEYCODE_DELETE) {// 回退
        if (editable != null && editable.length() > 0) {
            if (start > 0) {
                editable.delete(start - 1, start);
            }
        }
    } else if (i == Keyboard.KEYCODE_CANCEL) {// 完成
        hideKeyboard();
    } else { //将要输入的数字输出在编辑框中
        Drawable drawable = res.getDrawable(R.drawable.keyboard_backspace);
        drawable.setBounds(0, 0, drawable.getIntrinsicWidth(),
                drawable.getIntrinsicHeight());
        SpannableString spannable = new SpannableString(editable
                .toString() + " ");
        ImageSpan span = new ImageSpan(drawable, ImageSpan.ALIGN_BASELINE);
        spannable.setSpan(span,editable.length(),
                editable.length() + " ".length(),
                Spannable.SPAN_INCLUSIVE_INCLUSIVE);
        ed.append(spannable);
        //ed.setText(spannable);
    }
}
最后在MainActivity中调用NumboardUtil类,并将系统键盘隐藏,再让自定义的键盘仅在点击了文本框后出现。
public void hideSystemKeyBoard() {
    InputMethodManager imm = (InputMethodManager) this.getSystemService(Context.INPUT_METHOD_SERVICE);
    imm.hideSoftInputFromWindow(editText.getWindowToken(), 0);
}

public boolean onTouchEvent(MotionEvent event) {
    if (event.getAction() == MotionEvent.ACTION_DOWN) {
        if (getCurrentFocus() != null && getCurrentFocus().getWindowToken() != null) {
            numboardUtil.hideKeyboard();
        }
    }
    return super.onTouchEvent(event);
}
通过实现数字键盘,我了解如何自定义键盘。在此基础上,我又添加了符号键盘的布局
<?xml version="1.0" encoding="utf-8"?>
<Keyboard
    xmlns:android="http://schemas.android.com/apk/res/android"
    android:keyHeight="60dp"
    android:keyWidth="10%p"
    android:horizontalGap="1%p"
    android:verticalGap="1dp"
    >
    <Row>
        <Key
            android:keyWidth="8.9%p" android:codes="33" android:keyLabel="!" android:keyEdgeFlags="left"
            />
        <Key android:keyWidth="8.9%p" android:codes="64" android:keyLabel="@string/keyboard_key1" /><!--@-->
        <Key android:keyWidth="8.9%p" android:codes="35" android:keyLabel="#" />
        <Key android:keyWidth="8.9%p" android:codes="36" android:keyLabel="$" />
        <Key android:keyWidth="8.9%p" android:codes="37" android:keyLabel="%" />
        <Key android:keyWidth="8.9%p" android:codes="94" android:keyLabel="^" />
        <Key android:keyWidth="8.9%p" android:codes="38" android:keyLabel="@string/keyboard_key2" /><!--&-->
        <Key android:keyWidth="8.9%p" android:codes="42" android:keyLabel="*" />
        <Key android:keyWidth="8.9%p" android:codes="40" android:keyLabel="(" />
        <Key android:keyWidth="8.9%p" android:codes="41" android:keyLabel=")" android:keyEdgeFlags="right" />
    </Row>

    <Row>
        <Key android:horizontalGap="4.9%p" android:keyWidth="8.9%p" android:codes="39"
            android:keyEdgeFlags="left" android:keyLabel="'" />
        <Key android:keyWidth="8.9%p" android:codes="34" android:keyLabel="@string/keyboard_key3" /> <!--"-->
        <Key android:keyWidth="8.9%p" android:codes="61" android:keyLabel="=" />
        <Key android:keyWidth="8.9%p" android:codes="95" android:keyLabel="_" />
        <Key android:keyWidth="8.9%p" android:codes="58" android:keyLabel=":" />
        <Key android:keyWidth="8.9%p" android:codes="59" android:keyLabel=";" />
        <Key android:keyWidth="8.9%p" android:codes="63" android:keyLabel="\?" />
        <Key android:keyWidth="8.9%p" android:codes="126" android:keyLabel="~" />
        <Key android:keyWidth="8.9%p" android:codes="124" android:keyEdgeFlags="right" android:keyLabel="|" />
    </Row>

    <Row>
        <Key android:horizontalGap="3.5%p" android:keyWidth="9%p" android:codes="43" android:keyLabel="+" />
        <Key android:keyWidth="9%p" android:codes="45" android:keyLabel="-" />
        <Key android:keyWidth="9%p" android:codes="92" android:keyLabel="\\" />
        <Key android:keyWidth="9%p" android:codes="47" android:keyLabel="/" />
        <Key android:keyWidth="9%p" android:codes="91" android:keyLabel="[" />
        <Key android:keyWidth="9%p" android:codes="93" android:keyLabel="]" />
        <Key android:keyWidth="9%p" android:codes="123" android:keyLabel="{" />
        <Key android:keyWidth="9%p" android:codes="125" android:keyLabel="}" />
        <Key android:horizontalGap="3.5%p" android:keyWidth="13%p" android:codes="-5"
            android:isRepeatable="true"
            android:keyIcon="@drawable/keyboard_delete" />
    </Row>

    <Row android:rowEdgeFlags="bottom">
        <Key android:keyWidth="13%p" android:codes="-2"
            android:keyLabel="123" />
        <Key android:keyWidth="9%p" android:horizontalGap="2%p" android:codes="44" android:keyLabel="," />
        <Key android:keyWidth="9%p" android:codes="46" android:keyLabel="." />
        <Key android:keyWidth="9%p" android:codes="60" android:keyLabel="@string/keyboard_key4" />
        <!--<-->
        <!-->-->
        <Key android:keyWidth="9%p" android:codes="62" android:keyLabel="@string/keyboard_key5" />
        <Key android:keyWidth="9%p" android:codes="8364" android:keyLabel="€" />
        <Key android:keyWidth="9%p" android:codes="163" android:keyLabel="£" />
        <Key android:keyWidth="9%p" android:codes="165" android:keyLabel="¥" />
        <Key android:keyWidth="13%p" android:codes="90001" android:horizontalGap="2%p"
            android:keyEdgeFlags="right" android:keyLabel="ABC" />
    </Row>
</Keyboard>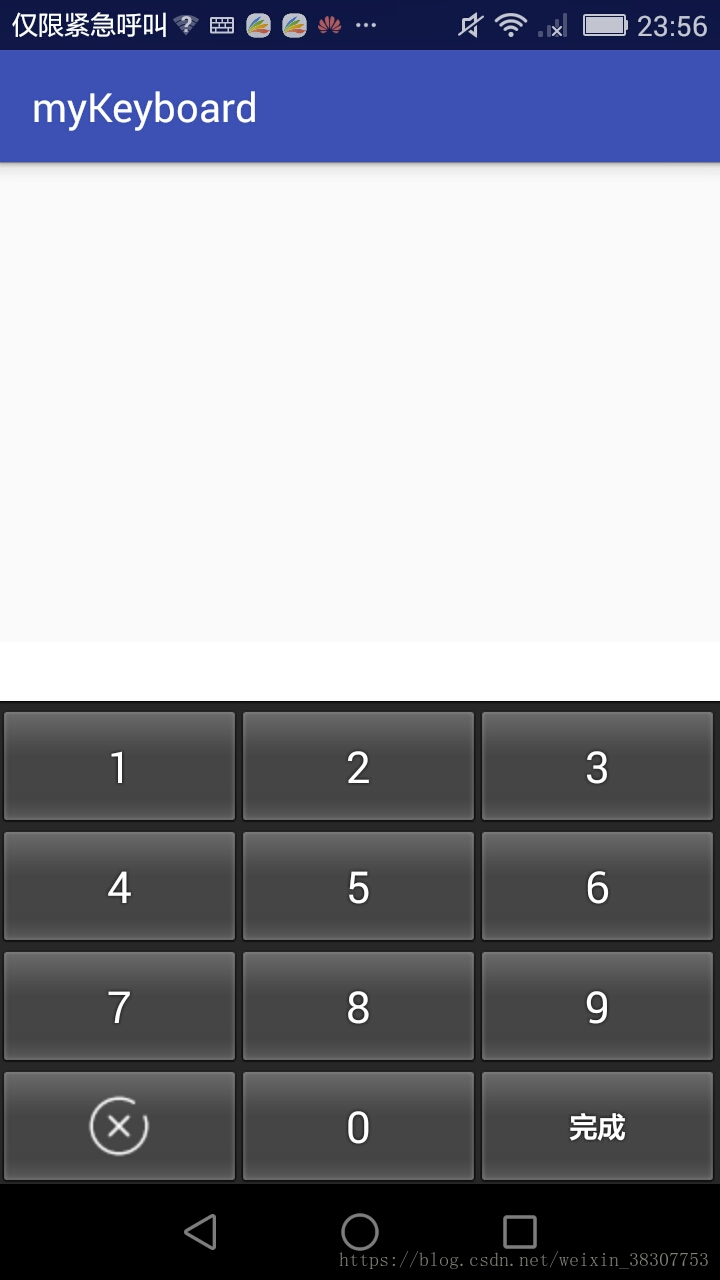


 370
370

 被折叠的 条评论
为什么被折叠?
被折叠的 条评论
为什么被折叠?
 到【灌水乐园】发言


