优雅的SSM框架
一、Spring框架简介
1.Spring是一个开源的轻量级的应用开发框架。
2.目的是简化企业级应用程序开发,降低侵入性(程序间的耦合性)。
3.Spring是以IOC(控制反转)和AOP(面向切面)为核心的轻量级容器。
4.Spring本质是管理软件中的对象,即创建对象和维护对象之间的关系。
5.Spring对常用的API做了封装和简化
二、Spring的作用
1.管理对象(主要功能)
Spring提供了一个容器,帮助创建对象以及管理对象之间的依赖关系,降低了对象之间的耦合度,方便代码的维护。
---什么是Spring容器:Spring容器是spring框架中最核心的一个模块,用于管理对象。
2.集成其他的框架
Spring可以把其他的框架集成起来,和其他的框架联合使用
三、对Spring容器的操作—标题1
1.启动Spring容器
导包:在pom.xml文件的<dependencies></dependencies>里面配置<dependency</dependency>对
,进行导包

spring框架Maven依赖
2.用Spring容器创建对象(三种方法)
1.构造器new关键字
2.静态工厂方法:getInstance()
//启动Spring容器--默认情况下自动加载xml文件中的bean,根据每一个bean创建实例,且只创建一个对象
简单的配置applicationContext.xml文件
<bean id="demo01" class="com.wyq.spring.SpringDemo02"></bean>
<!--
使用静态工厂方式创建对象
factory-method 指定一个静态方法
Spring容器会调用这个这个静态方法来创建对象
-->
<bean id="calendar "class="java.util.Calendar" factory-method="getInstance"></bean>
然后再java文件中用getBean()方法调用获得对象
ApplicationContext ac= new ClassPathXmlApplicationContext("applicationContext.xml");
SpringDemo02demo02=ac.getBean("demo01",SpringDemo02.class);
3.使用实例工厂
<!--
使用实例化工厂创建对象
factory-bean:指定工厂bean的id
factory—method:指定一个方法,Spring容器会调用这个bean对应的方法创建对象
-->
<bean id="calendar "class="java.util.Calendar" factory-method="getInstance"></bean>
<bean id="date" factory-bean="calendar" factory-method="getTime"></bean>
四、Spring容器的设计模式—单例模式和模型模式
1.创建对象的参数配置:
<!--
scope:设置创建对象的参数
scope属性:用来配置作用域,缺省值是singleton(即一个bean只创建一个实例)
如果值为prototype(即每次都会创建一个新的实例)
默认:singleton单例模式(饿汉式)只创建一个对象在加载xml文件时就把所有能够创建的对象都创建出来
prototype原型模式(懒加载),可以创建多个对象在要用的时候才加载对象
这里产生一个问题--怎样解决在创建对象是按需求创建对象。
--解决方法:
<!--
lazy-init:懒加载lazy-init="true"(default==false)调用的时候创建对象延时加载
在启动Spring容器时不会自动创建对象
-->
-->
<bean id="stu" class="com.wyq.spring.Stu" scope="prototype"></bean>
2.对象的生命周期配置:
对象的生命周期:new--init---service---destory
创建对象Spring容器自动创建,init方法
<!--init-method属性:创建emp对象后直接调用init()方法-->
<!--
destroy-method:销毁时执行的方法destory()
//关闭Spring容器销毁创建的对象只在单例模式下才会执行销毁
//在原型模式下是不会销毁对象
-->
<bean id="emp" class="com.wyq.spring.Emp" init-method="init" destroy-method="destory" scope="prototype"></bean>
3.对象的销毁:
对象的销毁 关闭Spring容器销毁对象 关闭Spring容器的方法:
((ClassPathXmlApplicationContext)applicationContext).close();
五、Spring对于对象的解耦操作 IOC
1.IOC(控制反转):
IOC:spring的核心---控制反转 由容器来管理对象之间的依赖关系
DI:依赖注入:容器通过调用对象提供的set方法或者构造器来建立依赖关系。
IDC是目标 DI是手段
2.IOC注入方式:set注入、构造器、自动装载
1.Set注入:
配置文件
<!--
property:特性属性
注入:ref:连接对应id的bean创建对象指向id值id值是唯一的
怎么注入:property元素使用set方法来注入依赖
怎么调用set方法??把name的属性值首字母大写并转化为对应的方法名setA
该setA和B.class里面的setA方法名一样这样就找到了相对应的方法
-->
<bean id="a" class="com.wyq.test.A"></bean>
<bean id="b" class="com.wyq.test.B">
<property name="a"ref="a"></property>
</bean>
A类
public class A {
publicA(){
System.out.println("A --- A");
}
public voidf1(){
System.out.println("A --- f1");
}
}
B类
public class B {
private A a;
publicB(){
System.out.println("B -- B");
}
public voidsetA(A a) {
this.a = a;
}
public voidexecute(){
a.f1();
}
}
测试类
@Test
public void test01(){
ApplicationContext applicationContext= new ClassPathXmlApplicationContext("applicationContext.xml");
applicationContext.getBean("b",B.class).execute();
}
set注入的使用步骤:提供set方法-----配置<property>元素的属性 name, ref, value
2.构造器注入:
配置文件
<!--
构造器注入:
1.添加对应的构造方法
2.配置constructor-arg元素
-->
<bean id="m" class="com.wyq.test02.Man"></bean>
<bean id="w" class="com.wyq.test02.Woman"></bean>
<bean id="person" class="com.wyq.test02.Person">
<constructor-arg index="0" ref="m"></constructor-arg>
<constructor-arg index="1" ref="w"></constructor-arg>
</bean>
Peson类
public class Person{
private Man man;
private Woman woman;
Public Person(){
System.out.println("person");
}
public Person (Manman,Womanwoman){
this.man=man;
this.woman=woman;
}
public void execute(){
man.m();
woman.w();
}
}
Man类
public class Man{
public Man(){
System.out.println("m");
}
public void m(){
System.out.println("man---f");
}
}
Woman类
public class Woman{
public Woman(){
System.out.println("w");
}
public void w(){
System.out.println("woman---f");
}
}
@Test
public void test02(){
ApplicationContext applicationContext= new ClassPathXmlApplicationContext("applicationContext.xml");
applicationContext.getBean("person",Person.class).execute();
}
3.自动装配:
配置文件
<!--
自动装配 autowire:不常用
byName:通过自动调用set方法完成调用,底层的实现是set注入,
根据id查找并将id的首字母大写,找到相应的set方法,找到唯一的对象
byType:
constructor:
default:
-->
<bean id="teacher" class="com.wyq.test03.Teacher"></bean>
<bean id="student" class="com.wyq.test03.Student" autowire="byName"></bean>
Teacher类
public class Teacher {
publicTeacher(){
}
public voidteach(){
System.out.println("teacher -- teach");
}
}
Student类
public class Student {
privateTeacher teacher;
public voidsetTeacher(Teacher teacher){
this.teacher = teacher;
}
public voidexecute(){
teacher.teach();
}
}
@Test
public void test03(){
ApplicationContext applicationContext = newClassPathXmlApplicationContext("applicationContext.xml");
applicationContext.getBean("student", Student.class).execute();
}
3.Spring的参数注入和基于注解的组件扫描
1.参数注入:依赖于getter和setter方法
1.getter、setter方法:
<!--
根据<property>标签里面的name属性找到对应的set方法,然后将标签里面的value的值赋值给相应的属性
实际上name属性的值对应的就是类中的属性的引用
<value/>元素可以通过字符串指定属性或构造器参数的值,也可以通过value属性指定基本值
1.给参数赋值
2.给集合赋值 list:<list> set:<set> map:<map> properties:<props>
-->
<bean id="value" class="com.wyq.test04.ValueBean">
<!--1.给参数赋值-->
<property name="age" value="13"></property>
<property name="name" value="www"></property>
<!--2.给集合赋值-->
<property name="list">
<list>
<value>张三</value>
<value>李四</value>
<value>王五</value>
</list>
</property>
<property name="set">
<set>
<value>321</value>
<value>534</value>
<value>4354</value>
</set>
</property>
<property name="map">
<map>
<entry key="name" value="李四"></entry>
<entry key="sex" value="男"></entry>
<entry key="age" value="43"></entry>
</map>
</property>
<property name="properties">
<props>
<prop key="name">张三</prop>
<prop key="age">23</prop>
</props>
</property>
</bean>
/**
* 给基本数据注入赋值
*/
public class ValueBean {
//给基本数据类型注入值
int age;
//给字符串注入值
String name;
//给list集合注入值
private List<String> list;
//给set集合注入值
private Set<String> set;
//给map集合注入值
private Map<String,String> map;
//给Properties注入值
private Properties properties;
getter();
setter();
toString();
}
/**
* 测试参数注入
*/
@Test
public void test04(){
ApplicationContext applicationContext = new ClassPathXmlApplicationContext("applicationContext.xml");
ValueBean value = applicationContext.getBean("value", ValueBean.class);
System.out.println(value);
}
2.引用注入:
<!--
引用注入
设置id,根据id找相应的内容,<util:list>相当于一个对象
-->
<util:list id="list1">
<value>1</value>
<value>2</value>
<value>3</value>
<value>4</value>
</util:list>
<util:properties id="pro">
<prop key="name">www</prop>
<prop key="sex">m</prop>
<prop key="age">33</prop>
</util:properties>
<bean id="value2" class="com.wyq.test04.ValueBean">
<property name="list" ref="list1"></property>
<property name="properties" ref="pro"></property>
</bean>
读取properties文件中的配置内容
<!--
读取properties文件
classpath属性: properties文件对应的路径,一般直接写配置的名称和类型
读取文件的内容返回properties对象
1.创建properties文件
2.配置xml文件
3.启动spring容器获得properties对象
-->
<util:properties id="pro2" location="classpath:config.properties">
</util:properties>
3.Spring表达式:
<!--
spring表达式 #{}
通过Spring表达式获取properties文件中的值向对象中的属性注入值
-->
<util:properties id="pro2" location="classpath:config.properties">
</util:properties>
<bean id="propertiesBean" class="com.wyq.test04.PropertiesBean">
<property name="name" value="#{pro2.name}"></property>
<property name="age" value="#{pro2.age}"></property>
<property name="sex" value="#{pro2.sex}"></property>
</bean>
//测试用的类
public class PropertiesBean {
private String name;
private String age;
private String sex;
public void setAge(String age) {
this.age = age;
}
public void setName(String name) {
this.name = name;
}
public void setSex(String sex) {
this.sex = sex;
}
@Override
public String toString() {
return "properties name="+name+" age="+age+" sex="+sex;
}
}
2.注解扫描:减少xml文件的书写量
1.注解扫描:
/**
* 注解扫描 组件扫描
* 什么是组件扫描:指定一个包路径,Spring会自动扫描包及其子包所有的组件类
* 当发现组件定义前有特定的注解标记时,
* 就将该组件纳入到Spring容器,等价于原有XML配置中的<bean>定义功能
* 组件扫描可以替代大量XML配置的<bean>定义
*

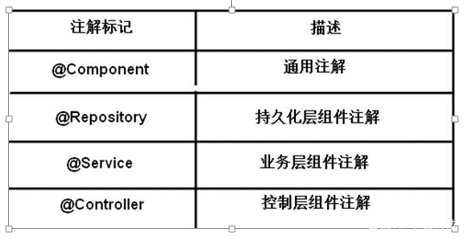
常用注解
2.注解步骤及常用注解:
<!--
注解的第一步
1.打开spring注解扫描
base-package:指定要扫描的包,Spring会自动扫描该包以及其子包的路径
如果该包下面有特定的注解,则Spring容器会将其纳入容器进行管理,相当于配置一个bean类
当一个组件在扫描扫描过程中被检测到时,会生成一个默认id值,
默认id为小写开头的类名,也可以在注解标记中自定义id,
-->
<context:component-scan base-package="com.wyq.test05"></context:component-scan>
----注解实例:
@Scope("prototype")//注解成原型模式 不加这个注解默认是单例模式
@Component("emp")//创建对象的注解 ("emp")表示自定义的id
@Lazy(true)//懒加载的注解
public class Emp {
private Dept dept;
@Resource(name = "dept") //具有依赖关系的Bean对象的注解
public void setDept(Dept dept) {
System.out.println("set依赖注入---"+dept);
this.dept = dept;
}
//1.使用组件扫描,首先需要在XML配置中指定扫描路径
public Emp(){
System.out.println("emp --- 组件扫描");
}
//2.当一个组件在扫描过程中被检测到时,会生成一个默认id值,
//默认id为小写开头的类名,也可以在注解标记中自定义id,
//3.开启Spring容器 根据id获取到相应的对象
@Override
public String toString() {
return "emp 组件扫描";
}
@PostConstruct //注解生成初始化方法
public void init(){
System.out.println("init 方法 初始化");
}
@PreDestroy //注解生成销毁方法
public void destory(){
/**
* 原型模式下不能进行调用销毁方法
* 单例模式下可以进行调用
*/
System.out.println("销毁的方法");
}
}
/**
*指定依赖注入的关系
*/
@Component("dept")//将类添加进Spring进行管理
public class Dept {
public Dept(){
System.out.println("dept -- dept");
}
@Override
public String toString() {
return "dept 的toString方法";
}
}


 6784
6784


 被折叠的 条评论
为什么被折叠?


