


文章目录
概要
软件测试是一个很宏大的概念,单元测试、集成测试、系统测试、黑盒测试、白盒测试、功能测试、性能测试、基准测试、压力测试等等都是软件测试下面的一种子概念。作为一名开发者,我们并不要理解每一种测试概念,但基准测试和单元测试在软件编写过程中还是必须的,特别是单元测试。
单元测试是指对软件中的最小可测试单元进行检查和验证。至于单元测试的范围并没有一个明确定义,可以是一个函数、方法、类、功能模块或子系统,但在编写时单元测试内容往往是函数或方法。
我们之所以要做单元测试,主要是因为几点:
- 满足可测试性的代码在设计上大概率是良好的(比如函数功能不会包罗万象,导致一个函数上百行代码的地狱场景),从而以较低的成本驱动开发者实现软件编写的高质量;
- 保证软件在迭代过程中质量的稳定性,即一个函数进行优化或功能变化,单元测试可以保证变更后问题及时发现及时解决;
- 单元测试往往由开发人员编写,属于最严格的软件测试手段,是最接近代码底层实现的验证手段,可以在软件开发的早期以最小的成本保证局部代码的质量;
- 有利于后续集成测试、系统测试的稳定推进,想一想开发者把一个不充分自测的软件交付到测试人员手上,是多么可怕的事情,问题进行合理的左移是非常有必要的。
一、测试框架
要想快速的写出优雅的单元测试就必须要了解Go语言相关的框架,以下是说明:
| 框架 | 简介 |
|---|---|
| testing | 内置测试库,用于单元测试、基准测试、模糊测试 |
| cweill/gotests | 表驱动的测试方式,支持基于模板生成单测,在goland,vs code中都有集成,可以直接使用,提高了单测书写效率 |
| stretchr/testify | 具体断言机制( testify/require 和 testify/assert),大大简化单元测试的写法,可以替代 t.Fatalf 和 t.Errorf,而且代码实现更为简短、优雅 |
| smartystreets/goconvey | 提供了丰富的断言机制,相比stretchr/testify,可以使单测看起来更加优雅,并支持断言嵌套 |
| onsi/ginkgo | 一个基于BDD思想的测试框架,提供了Describe、Context和It等函数,具有丰富的表达能力,可以帮助开发人员更好地组织测试用例,使测试代码更易于阅读和维护 |
以一个下面的函数对上述框架使用进行说明
func div(a, b int) int {
	return a / b
}
func add(a, b int) int {
	return a + b
}
1.1、testing
func TestDiv(t *testing.T) {
	res := div(10, 2)
	if res != 1 {
		t.Error("test div is err")
	}
}
[root@pigfu ~]# go test -v -run TestDiv
=== RUN   TestDiv
    helper_test.go:33: test div is err
--- FAIL: TestDiv (0.00s)
FAIL
exit status 1
FAIL    app/test        0.348s
1.2、stretchr/testify
func TestDiv(t *testing.T) {
	res := div(10, 2)
	require.Equal(t, 1, res, "test div")
}
[root@pigfu ~]# go test -v -run TestDiv
=== RUN   TestDiv
    helper_test.go:38:
                Error Trace:    F:/WWW/GO/ThinkGin/test/helper_test.go:38
                Error:          Not equal:
                                expected: 1
                                actual  : 5
                Test:           TestDiv
                Messages:       test div is err
--- FAIL: TestDiv (0.00s)
FAIL
exit status 1
FAIL    app/test        0.566s
可以看到,编码上更简洁了,友好得写出if xxx { t.Error() } 并且输出更加优美。
ps:注意assert与require区别:require在测试失败以后,所有测试都会停止执行,assert不会
1.3、smartystreets/goconvey
func TestDiv(t *testing.T) {
	res := div(10, 2)
	Convey("test div", t, func() {
		So(res, ShouldEqual, 1)
	})
}
[root@pigfu ~]# go test -v -run TestDiv
=== RUN   TestDiv

  test div x


Failures:

  * F:/WWW/GO/ThinkGin/test/helper_test.go
  Line 44:
  Expected: '1'
  Actual:   '5'
  (Should be equal)


1 total assertion

--- FAIL: TestDiv (0.00s)
FAIL
exit status 1
FAIL    app/test        0.233s
输出结果相比stretchr/testify更加优美,并且支持断言嵌套。
func TestAll(t *testing.T) {
	Convey("test div", t, func() {
		So(div(10, 2), ShouldEqual, 5)
		Convey("test add", func() {
			So(add(5, 6), ShouldEqual, 11)
		})
	})
}
ps:注意同一个根Convey在第一个断言失败后,其他的测试都会停止执行
func TestAll(t *testing.T) {
	Convey("test div", t, func() {
		So(div(10, 2), ShouldEqual, 1)
		So(add(5, 6), ShouldEqual, 11)
		Convey("test add", func() {
			So(add(5, 6), ShouldEqual, 11)
		})
	})
}
[root@pigfu ~]# go test -v -run TestAll
=== RUN   TestAll

  test div x


Failures:

  * F:/WWW/GO/ThinkGin/test/helper_test.go
  Line 49:
  Expected: '1'
  Actual:   '5'
  (Should be equal)


1 total assertion

--- FAIL: TestAll (0.00s)
FAIL
exit status 1
FAIL    app/test        0.293s
可以看到test add并没有被执行,可以采用如下方式避免
func TestAll(t *testing.T) {
	Convey("test div", t, func() {
		So(div(10, 2), ShouldEqual, 1)
	})
	Convey("test add", t, func() {
			So(add(5, 6), ShouldEqual, 11)
  })
}
1.4、cweill/gotests
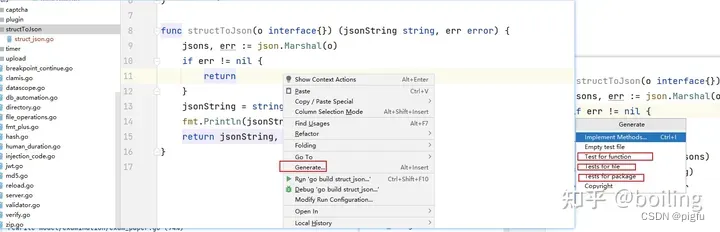
这个工具可以与前三个做配合,自动生成表驱动的测试代码,其太goland中是有被集成的,鼠标点一下就可以了,非常方便,当然了,也可以命令行执行 gotests -h。
goland使用如下:
如下图,鼠标右键点击要单测的函数,可以看到三个选项,依次是只测试这个方法、测试整个文件中方法、测试整个包中的方法,一般选择测试function
生成代码如下:
func Test_add(t *testing.T) {
	type args struct {
		a int
		b int
	}
	tests := []struct {
		name string
		args args
		want int
	}{
		// TODO: Add test cases.
	}
	for _, tt := range tests {
		t.Run(tt.name, func(t *testing.T) {
			if got := add(tt.args.a, tt.args.b); got != tt.want {
				t.Errorf("add() = %v, want %v", got, tt.want)
			}
		})
	}
}
可以看到只需要填充测试数据即可。默认是基于内置测试库生成的,我们也可以基于stretchr/testify或smartystreets/goconvey定义自己的模板。
命令行如下:
[root@pigfu ~]# gotests -h
Usage of D:\gopath\bin\gotests.exe:
  -all  #对指定文件中的函数和方法都生成测试代码
        generate tests for all functions and methods
  -excl string        #要排除的函数或方法
        regexp. generate tests for functions and methods that don't match. Takes precedence over -only, -exported, and -all
  -exported #为导出的函数和方法生成go测试,优先级高于 -only和-all
        generate tests for exported functions and methods. Takes precedence over -only and -all
  -i    print test inputs in error messages #在错误消息中打印测试输入
  -nosubtests #禁用子测试生成。仅适用于Go 1.7+
        disable generating tests using the Go 1.7 subtests feature
  -only string  #指定要单测的函数或方法
        regexp. generate tests for functions and methods that match only. Takes precedence over -all
  -template_dir string    #指定模板目录
        optional. Path to a directory containing custom test code templates
  -w    write output to (test) files instead of stdout   #指定生成代码的文件,默认stdout
例如:gotests -only div -w herper_test.go helper.go,其他指令自行探索
1.5、onsi/ginkgo
Ginkgo是一个 Go 语言的 BDD 测试框架,支持通过Given-When-Then这种story格式组织test case,作者推荐onsi/gomega作为断言工具,看个人爱好了。
其常用的模块:It、Context、Describe、BeforeEach、AfterEach、JustBeforeEach、BeforeSuite、AfterSuite、By、Fail
- It是测试用例的基本单位,即It包含的代码就算一个测试用例;
- Context和Describe的功能都是将一个或多个测试用例归类;
- BeforeEach是每个测试用例执行前执行该段代码;
- AfterEach是每个测试用例执行后执行该段代码;
- JustBeforeEach是在BeforeEach执行之后,测试用例执行之前执行;
- BeforeSuite是在该测试集执行前执行,即该文件夹内的测试用例执行之前;
- AfterSuite是在该测试集执行后执行,即该文件夹内的测试用例执行完后;
- By是打印信息,内容只能是字符串,只会在测试例失败后打印,一般用于调试和定位问题;
- Fail是标志该测试例运行结果为失败,并打印里面的信息;
- Specify,It属于其简写;
1.4小节描述了表驱动的测试用例,借用onsi/ginkgo有了一种更友好的书写方式
import (
	. "github.com/onsi/ginkgo"
	. "github.com/onsi/ginkgo/extensions/table"
	"github.com/onsi/gomega"
)

//test case
var _ = Describe("Math", func() {
		DescribeTable("the > inequality",
			func(x int, y int, expected bool) {
				gomega.Expect(x > y).To(gomega.Equal(expected))
			},
			Entry("x > y", 1, 0, true), //三个表驱动案例
			Entry("x == y", 0, 0, false),//三个表驱动案例
			Entry("x < y", 0, 1, true),//三个表驱动案例,这个案例通不过
		)
	})

func TestGinkgo(t *testing.T) {
	gomega.RegisterFailHandler(Fail)
	// 启动测试套件
	RunSpecs(t, "Ginkgo Suite")
}
运行输出如下:
[root@pigfu ~]#  go test -v -run=TestGinkgo
=== RUN   TestGinkgo
Running Suite: Ginkgo Suite
===========================
Random Seed: 1700988184
Will run 3 of 3 specs

++
------------------------------
+ Failure [0.000 seconds]
Math
F:/WWW/GO/ThinkGin/test/mock_test.go:119
  the > inequality
  F:/WWW/GO/ThinkGin/test/mock_test.go:120
    x < y [It]
    F:/WWW/GO/ThinkGin/test/mock_test.go:126

    Expected
        <bool>: false
    to equal
        <bool>: true

    F:/WWW/GO/ThinkGin/test/mock_test.go:122
------------------------------
Summarizing 1 Failure:

[Fail] Math the > inequality [It] x < y
F:/WWW/GO/ThinkGin/test/mock_test.go:122

Ran 3 of 3 Specs in 0.000 seconds
FAIL! -- 2 Passed | 1 Failed | 0 Pending | 0 Skipped
--- FAIL: TestGinkgo (0.00s)

FAIL
更加复杂的组织方式:
type Book struct {
	Title  string  `json:"title"`
	Author string  `json:"author"`
	Pages  float64 `json:"pages"`
}

func JsonToBook(str string) (Book, error) {
	var book Book
	err := json.Unmarshal([]byte(str), &book)
	fmt.Println("111111111111 JsonToBook 1111111111")
	return book, err
}

func (book *Book) AuthorLastName() string {
	names := strings.SplitN(book.Author, " ", 2)
	return names[len(names)-1]
}

//test case
_ = Describe("Book", func() {
		var (
			book     Book
			err      error
			bookJson string
		)
		BeforeEach(func() {
			bookJson = `{
			"title":"Les Miserables",
			"author":"Victor Hugo",
			"pages":1488
		}`
		})

		JustBeforeEach(func() {
			book, err = JsonToBook(bookJson)
		})

		AfterEach(func() {
			By("End One Test")
		})

		Describe("loading from JSON", func() {
			Context("when the JSON parses successfully", func() {
				It("should populate the fields correctly", func() {
					gomega.Expect(book.Title).To(gomega.Equal("Les Miserables"))
					gomega.Expect(book.Author).To(gomega.Equal("Victor Hugo"))
					gomega.Expect(book.Pages).To(gomega.Equal(1488))
				})
				It("should not error", func() {
					gomega.Expect(err).NotTo(gomega.HaveOccurred())
				})
			})
			Context("when the JSON fails to parse", func() {
				BeforeEach(func() {
					bookJson = `{
					"title":"Les Miserables",
					"author":"Victor Hugo",
					"pages":1488oops
				}`
				})
				It("should return the zero-value for the book", func() {
					gomega.Expect(book).To(gomega.BeZero())
				})
				It("should error", func() {
					if err != nil {
						Fail("This Case Failed")
					}
				})
			})
		})
		Describe("Extracting the author's last name", func() {
			It("should correctly identify and return the last name", func() {
				gomega.Expect(book.AuthorLastName()).To(gomega.Equal("Hugo22"))
			})
		})
	})

func TestGinkgo(t *testing.T) {
	gomega.RegisterFailHandler(Fail)
	// 启动测试套件
	RunSpecs(t, "Ginkgo Suite")
}
个人感觉其更偏向于集成测试,在单测中没必要引入了。
二、打桩和mock
我们在编写单元测试的时候,如果有第三方依赖怎么办?比如当创建订单的时候,需要写数据库。为了解决这种场景,可以使用打桩或mock的方式,其本质就是能指定依赖方的输入输出,可以理解为提前插入的固定数据,如此,流程就能正常跑起来。
主要试用场景如下:
- 依赖的服务返回不确定的结果,如获取当前时间;
- 依赖的服务返回状态中有的难以重建或复现,比如模拟网络错误;
- 依赖的服务搭建环境代价高,速度慢,需要一定的成本,比如数据库,web服务,RPC服务;
- 依赖的服务行为多变。
2.1、打桩
打桩简单地来说就是对一些代码片段(全局变量,函数,方法)进行替换。
这种方式主要有两个库prashantv/gostub和agiledragon/gomonkey。前者并不友好,详见本文,这里主要以后者举例:
const DateLayout = "2006-01-02"

func StartToday() int64 {
	date := time.Now().Format(DateLayout)
	t, _ := time.ParseInLocation(DateLayout, date, time.Local)
	return t.UnixMilli()
}
func TestStartToday(t *testing.T) {
	patch := gomonkey.ApplyFunc(time.Now, func() time.Time {
		return time.Date(2023, 12, 20, 20, 32, 11, 0, time.Local)
	})//替换time.Now函数
	defer patch.Reset()//结束后重置time.Now函数
	Convey("StartToday", t, func() {
		So(StartToday(), ShouldEqual, 1703001600000)
	})
}
[root@pigfu ~]# go test -v -run TestStartToday
=== RUN   TestStartToday

  start .


1 total assertion

--- PASS: TestStartToday (0.03s)
PASS
ok      app/test        0.369s
可以看到 time.Now函数被替换成了 func() time.Time {return time.Date(2023, 12, 20, 20, 32, 11, 0, time.Local)}函数,时间被固定下来了,我们就可以得心应手的写单元测试代码了。
除了ApplyFunc,还有ApplyMethod、ApplyGlobalVar、ApplyFuncSeq等接口,可以自行探索。
2.2、mock
mock通过替换接口来实现对强依赖的处理。
这种方式主要有两个库vektra/mockery和golang/mock。前者是基于stretchr/testify/mock实现的,本文不做过多描述,详见本文。后者是Golang 官方开发维护的测试框架,实现了较为完整的基于 interface 的 Mock 功能,能够与Golang 内置的 testing 包良好集成,也能用于其它的测试环境中。GoMock 测试框架包含了 gomock包和mockgen 工具两部分,其中 gomock 包完成对桩对象生命周期的管理,mockgen 工具用来基于定义的 interface 生成对应的 Mock 类源文件,用来辅助生成测试代码。
二者对比有:
- stretchr/testify/mock 对应 golang/mock/gomock;
- vektra/mockery 对应 golang/mock/mockgen 。
2.2.1、mockgen
mockgen 有两种操作模式:源文件模式和反射模式。其命令如下
mockgen 工具支持的选项如下:
-source:指定接口的源文件。

-destinatio:mock类代码的输出文件,如果没有设置本选项,代码将被输出到标准输出。-destination选项输入太长,因此推荐使用重定向符号>将输出到标准输出的内容重定向到某个文件,并且mock类代码的输出文件的路径必须是绝对路径。

-packag:指定 mock 类源文件的包名,如果没有设置本选项,则包名由 mock_ 和输入文件的包名级联而成。

-aux_fi:附加文件列表用于解析嵌套定义在不同文件中的 interface,指定元素列表以逗号分隔,元素形式为foo=bar/baz.go,其中bar/baz.go是源文件,foo是-source选项指定的源文件用到的包名。

-build_flags:传递给 build 工具的参数。

-imports:依赖的需要 import 的包,在生成的源代码中应该使用的一个显式导入列表,指定为一个以逗号分隔的元素列表,形式为foo=bar/baz,其中bar/baz是被导入的包,foo是生成的源代码中包使用的标识符。

-mock_names:自定义生成 mock 文件的列表,使用逗号分割。如 IPay=MockPay,IMan=MockMan。IPay、IMan为接口,MockPay,MockMan为相应的 mock结构体名称 。

-self_package:生成代码的完整包导入路径,这个标志的目的是通过尝试包含它自己的包来防止生成代码中的导入死循环。如果 mock 的包被设置为它的一个输入(通常是主输入),并且输出是 stdio,因此 mockgen 无法检测到最终的输出包,就会发生这种情况,设置这个标志将告诉 mockgen 要排除哪个导入。

-copyright_file:用于向生成的源代码中添加版权头的版权文件。

-debug_parser:只打印解析器结果。

-exec_only:(反射模式)如果设置,执行反射程序。

-prog_only:(反射模式)只生成反射程序,将其写入stdout并退出。

-write_package_comment:如果为true,编写包文档注释(godoc),默认为true。
2.2.1、示例
假设有一个支付接口,依赖第三方的http服务,如下:
type IPay interface {
	Pay(id string, money float64) error
	Refund(id string, money float64) error
	QueryPayResult(id string) (float64, error)
}

type WxPay struct {
	Url       string
	AppKey    string
	AppSecret string
}

func (pay *WxPay) sign() string {
	//签名 sign(AppKey,AppSecret)
	return "sign result"
}
func (pay *WxPay) Pay(id string, money float64) error {
	//简单的示例代码,着重强调走了http,依赖第三方服务
	b, err := json.Marshal(map[string]any{"opr": "pay", "id": id, "money": money})
	if err != nil {
		return err
	}
	rsp, err := http.Post(pay.Url, "application/json", bytes.NewReader(b))
	defer func() {
		_ = rsp.Body.Close()
	}()
	return err
}
func (pay *WxPay) Refund(id string, money float64) error {
	//简单的示例代码,着重强调走了http,依赖第三方服务
	b, err := json.Marshal(map[string]any{"opr": "refund", "id": id, "money": money})
	if err != nil {
		return err
	}
	rsp, err := http.Post(pay.Url, "application/json", bytes.NewReader(b))
	defer func() {
		_ = rsp.Body.Close()
	}()
	return err
}
func (pay *WxPay) QueryPayResult(id string) (float64, error) {
	//简单的示例代码,着重强调走了http,依赖第三方服务
	b, err := json.Marshal(map[string]any{"opr": "query_pay_result", "id": id})
	if err != nil {
		return 0, err
	}
	rsp, err := http.Post(pay.Url, "application/json", bytes.NewReader(b))
	if err != nil {
		return 0, err
	}
	defer func() {
		_ = rsp.Body.Close()
	}()
	body, err := io.ReadAll(rsp.Body)
	if err != nil {
		return 0, err
	}
	rspMap := make(map[string]any)
	err = json.Unmarshal(body, &rspMap)
	if err != nil {
		return 0, err
	}
	return rspMap["money"].(float64), err
}

func GetPayResult(id string, pay IPay) (float64, error) {
	//业务代码...
	money, err := pay.QueryPayResult(id)
	//业务代码...
	return money, err
}
现在我们要对GetPayResult函数写单元测试,可以这样做:
使用mockgen生成一个对IPay接口mock的结构体,mockgen -destination=./mocks/mock_pay.go -package=mocks -source mock.go -mock_names IPay=MockPay。
./mocks/mock_pay.go文件内容如下:
// Code generated by MockGen. DO NOT EDIT.
// Source: mock.go

// Package mocks is a generated GoMock package.
package mocks

import (
	reflect "reflect"

	gomock "github.com/golang/mock/gomock"
)
// MockPay is a mock of IPay interface.
type MockPay struct {
	ctrl     *gomock.Controller
	recorder *MockPayMockRecorder
}

// MockPayMockRecorder is the mock recorder for MockPay.
type MockPayMockRecorder struct {
	mock *MockPay
}

// NewMockPay creates a new mock instance.
func NewMockPay(ctrl *gomock.Controller) *MockPay {
	mock := &MockPay{ctrl: ctrl}
	mock.recorder = &MockPayMockRecorder{mock}
	return mock
}

// EXPECT returns an object that allows the caller to indicate expected use.
func (m *MockPay) EXPECT() *MockPayMockRecorder {
	return m.recorder
}

// Pay mocks base method.
func (m *MockPay) Pay(id string, money float64) error {
	m.ctrl.T.Helper()
	ret := m.ctrl.Call(m, "Pay", id, money)
	ret0, _ := ret[0].(error)
	return ret0
}

// Pay indicates an expected call of Pay.
func (mr *MockPayMockRecorder) Pay(id, money interface{}) *gomock.Call {
	mr.mock.ctrl.T.Helper()
	return mr.mock.ctrl.RecordCallWithMethodType(mr.mock, "Pay", reflect.TypeOf((*MockPay)(nil).Pay), id, money)
}

// QueryPayResult mocks base method.
func (m *MockPay) QueryPayResult(id string) (float64, error) {
	m.ctrl.T.Helper()
	ret := m.ctrl.Call(m, "QueryPayResult", id)
	ret0, _ := ret[0].(float64)
	ret1, _ := ret[1].(error)
	return ret0, ret1
}

// QueryPayResult indicates an expected call of QueryPayResult.
func (mr *MockPayMockRecorder) QueryPayResult(id interface{}) *gomock.Call {
	mr.mock.ctrl.T.Helper()
	return mr.mock.ctrl.RecordCallWithMethodType(mr.mock, "QueryPayResult", reflect.TypeOf((*MockPay)(nil).QueryPayResult), id)
}

// Refund mocks base method.
func (m *MockPay) Refund(id string, money float64) error {
	m.ctrl.T.Helper()
	ret := m.ctrl.Call(m, "Refund", id, money)
	ret0, _ := ret[0].(error)
	return ret0
}

// Refund indicates an expected call of Refund.
func (mr *MockPayMockRecorder) Refund(id, money interface{}) *gomock.Call {
	mr.mock.ctrl.T.Helper()
	return mr.mock.ctrl.RecordCallWithMethodType(mr.mock, "Refund", reflect.TypeOf((*MockPay)(nil).Refund), id, money)
}
现在就引入./mocks/mock_pay.go文件,就可以写单测了。
//go:generate go test -v -run TestMock2
func TestGetPayResult(t *testing.T) {
	mc := gomock.NewController(t)
	defer mc.Finish()
	entry := mocks.NewMockPay(mc)
	entry.EXPECT().QueryPayResult("123423454345").Return(100.01, nil)
	Convey("start", t, func() {
		money, _ := GetPayResult("123423454345", entry)
		So(money, ShouldEqual, 100.11)
	})
}
三、基准测试和模糊测试
go test 命令如下:
-convey-json
        When true, emits results in JSON blocks. Default: 'false'
  -convey-silent
        When true, all output from GoConvey is suppressed.
  -convey-story
        When true, emits story output, otherwise emits dot output. When not provided, this flag mirrors the value of the '-test.v' flag
  -test.bench regexp
         run only benchmarks matching regexp
  -test.benchmem
        print memory allocations for benchmarks
  -test.benchtime d  #基准测试多久(3s)或多少次(300x)
        run each benchmark for duration d (default 1s)
  -test.blockprofile file
        write a goroutine blocking profile to file
  -test.blockprofilerate rate
        set blocking profile rate (see runtime.SetBlockProfileRate) (default 1)
  -test.count n  #基准测试多少轮
        run tests and benchmarks n times (default 1)
  -test.coverprofile file
        write a coverage profile to file
  -test.cpu list
        comma-separated list of cpu counts to run each test with
  -test.cpuprofile file
        write a cpu profile to file
  -test.failfast
        do not start new tests after the first test failure
  -test.fuzz regexp
        run the fuzz test matching regexp
  -test.fuzzcachedir string
        directory where interesting fuzzing inputs are stored (for use only by cmd/go)
  -test.fuzzminimizetime value
        time to spend minimizing a value after finding a failing input (default 1m0s)
  -test.fuzztime value
        time to spend fuzzing; default is to run indefinitely
  -test.fuzzworker
        coordinate with the parent process to fuzz random values (for use only by cmd/go)
  -test.gocoverdir string
        write coverage intermediate files to this directory
  -test.list regexp
        list tests, examples, and benchmarks matching regexp then exit
  -test.memprofile file
        write an allocation profile to file
  -test.memprofilerate rate
        set memory allocation profiling rate (see runtime.MemProfileRate)
  -test.mutexprofile string
        run at most n tests in parallel (default 4)
  -test.run regexp
        run only tests and examples matching regexp
  -test.short
        run smaller test suite to save time
  -test.shuffle string
        randomize the execution order of tests and benchmarks (default "off")
  -test.skip regexp
        do not list or run tests matching regexp
  -test.testlogfile file
        write test action log to file (for use only by cmd/go)
  -test.timeout d
        panic test binary after duration d (default 0, timeout disabled)
  -test.trace file
        write an execution trace to file
  -test.v    #列出详情
        verbose: print additional output
3.1、基准测试
基准测试我们常常来测试一个函数的时间,CPU,内存的使用,来衡量该函数性能是否满足要求
func BinarySearch(n int, f func(int) int) int {
	i, j := 0, n-1
	for i <= j {
		m := int(uint(i+j) >> 1)
		flag := f(m)
		if flag == 0 {
			return m
		}
		if flag < 0 {
			i = m + 1
		} else {
			j = m - 1
		}
	}
	return -1
}
func BenchmarkBinarySearch(b *testing.B) {
	data := []struct {
		Key string
		//...
	}{{Key: "key1"}, {Key: "key2"}, {Key: "key"}, {Key: "key4"}, {Key: "key5"}, {Key: "key6"}, {Key: "key7"}, {Key: "key8"}, {Key: "key9"}, {Key: "key10"},
		{Key: "key11"}, {Key: "key12"}, {Key: "key13"}, {Key: "key14"}, {Key: "key15"}}
	for i := 0; i < b.N; i++ {
		BinarySearch(len(data), func(i int) int {
			return strings.Compare("key", data[i].Key)
		})
	}
}
[root@pigfu ~]# go test -v -bench=BenchmarkBinarySearch -run=none -benchtime=200x #运行200次
goos: linux
goarch: amd64
pkg: app/test
cpu: Intel(R) Core(TM) i5-7500 CPU @ 3.40GHz
BenchmarkBinarySearch
BenchmarkBinarySearch-4              200               137.5 ns/op
PASS
ok      app/test        0.246s
3.2、模糊测试
回想一下,我们写了单元测试,但上线依旧会战战兢兢,主要是因为在测试设计中,我们人工提供的测试用例总是有限的,而错误很可能就发生在被忽略的角落。模糊测试就是为解决这种场景而来的。
模糊测试本质是通过枚举测试用例,不停的调用函数来帮助开发者发现问题,可以进一步保障和提高应用程序的安全性,比如发现边界问题,及时修复,避免panic。在Go1.18彻底加入go的testing库中,之前是一个github项目dvyukov/go-fuzz。
这里以div函数为例,其显然没有考虑到参数b为0的问题,通过模糊测试就可以发现该问题。
func FuzzDiv(f *testing.F) {
	testcases := []struct {
		a, b int
	}{
		{10, 2},
		{5, 3},
		{-6, 3},
		{-6, -3},
	}
	for _, v := range testcases {
		f.Add(v.a, v.b)
	}
	f.Fuzz(func(t *testing.T, a, b int) {
		fmt.Println(a, b)
		div(a, b)
	})
}
或者没有预置参数,这种情况下,不指定时间会无休止的运行,直至panic,比如当b=0的时候。
func FuzzDiv(f *testing.F) {
	f.Fuzz(func(t *testing.T, a, b int) {
		div(a, b)
	})
}
go test -v -fuzz=^FuzzDiv$ -fuzztime=5s
四、总结
4.1、小结
本文总结了Go语言常用的多种测试框架,它们在不同的场景具有不同的应用。个人认为无论什么时候都可以用Convey+So的组合优雅地实现测试用例嵌套和断言,而testify适合最基本的测试(少许测试用例)。gomonkey可以实现对全局变量,函数,方法的替换,gomock作为官方mock库,可以对接口进行很好的替换。因此推荐goconvey、goconvey+gomonkey、goconvey+gomock、goconvey+gomonkey+gomock,这四种组合基本可以覆盖99%的单测场景。
4.2、好的单测?
要想写好的单测要遵循以下标准:
- 简短——只有一个测试目的,可以精确地定位某一个问题;
- 快速——可以快速执行,运行耗时少;
- 独立——不依赖特定环境,数据库,外部文件,网络接口,或者任何长时间运行或不稳定的任务,可以随时随地重复执行;
- 自动——自动化运行(往往集成在devops中),不需要要人为介入运行,只需最后输出结果报告即可;
借助前几节分享的单测工具,编写出符合上述准则的测试代码即可。
4.3、其他
DATA-DOG/go-sqlmock实现了database/sql/driver,帮助我们做到无数据库测试,符合 TDD 工作流。所有基于 go 标准库database/sql/driver的 orm 框架也都支持,比如 gorm。
alicebob/miniredis是一个实现 Redis Server 的包,专门用于 Go 的单元测试,目前支持 Redis6 的几乎所有开发会用到的命令。
golang官方库net/http/httptest可以解决http的三方依赖。
GRPC 生成的 client stub 都是 Interface,所以可以使用gomock来解决对其的依赖。
4.4、参考资料
1]:Go测试库
2]:Go单元测试:stub与mock
3]:mockery v2的介绍和使用
4]:GoMock框架使用指南
5]:Go语言工具包之gomock
6]:基于 Ginkgo 框架进行单元测试实践
7]BDD: Ginkgo测试框架
8]:ginkgo 测试库
9]:Ginkgo 简介及实践
10]:单元测试的五个主要准则
11]:如何编写好的单元测试
12]:好的单元测试
13]:手把手教你实战TDD
14]:全方位对比TDD和BDD


 1526
1526


 被折叠的 条评论
为什么被折叠?
被折叠的 条评论
为什么被折叠?
 到【灌水乐园】发言


