


code小生 一个专注大前端领域的技术平台公众号回复Android加入安卓技术群
作者:灰丨色
链接:https://www.jianshu.com/p/a87e59967704
声明:本文已获灰丨色授权发表,转发等请联系原作者授权
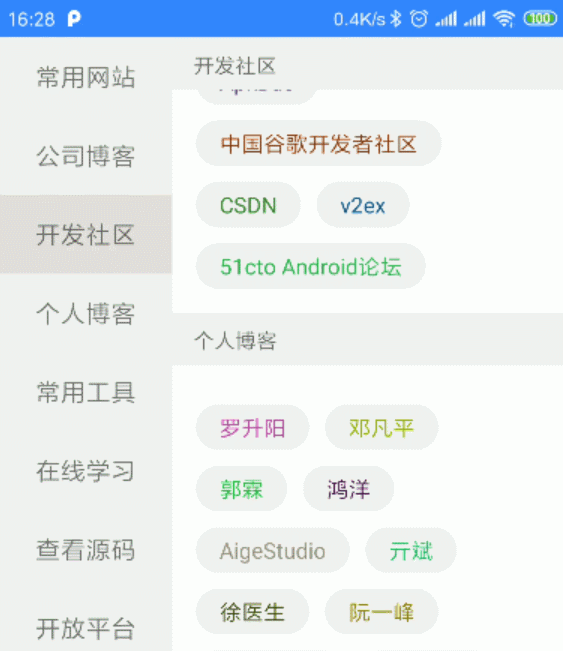
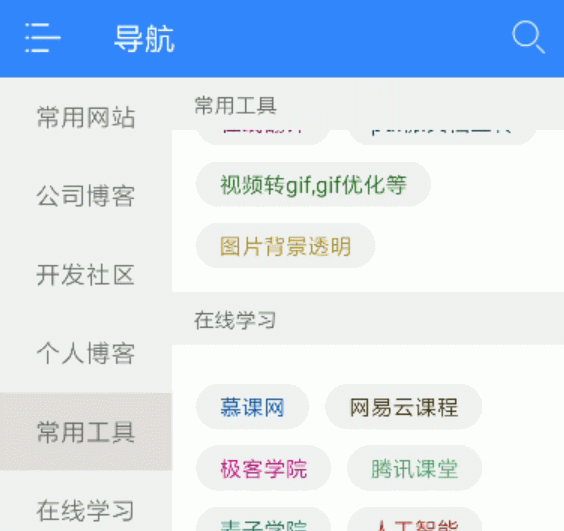
Recyclerview 联动效果其实在各种App内都能经常看见,比如常见的淘宝、京东的商品分类等。其实这种效果实现起来有多种方式,这里我用的是常见的左右两个recyclerview联动的方式,实现起来比较简单。效果如下:
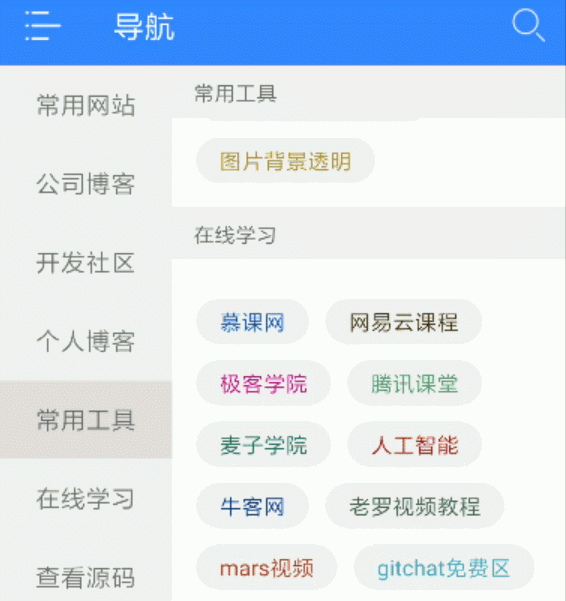
一.联动效果
1.fragment内代码:
class NavigationFragment : Fragment() {

    var leftList = mutableListOf<NavigationBean>()

    //初始化左侧recyclerview的adapter
    private val leftNavigationAdapter: LeftNavigationAdapter by lazy {
        LeftNavigationAdapter(context as Activity)
    }

   //初始化右侧recyclerview的adapter
    private val rightNavigationAdapter: RightNavigationAdapter by lazy {
        RightNavigationAdapter(context as Activity)
    }

    override fun onCreateView(inflater: LayoutInflater, container: ViewGroup?, savedInstanceState: Bundle?): View? {
        getNavi()
        return inflater.inflate(R.layout.fragment_navigation, null)
    }

    override fun onActivityCreated(savedInstanceState: Bundle?) {
        rvLeft.adapter = leftNavigationAdapter
        rvRight.adapter = rightNavigationAdapter
        recyclerViewLinkage()
        super.onActivityCreated(savedInstanceState)
    }

    /**
     * 左右两个RecyclerView联动
     */
    private fun recyclerViewLinkage() {
        val manager = rvRight.layoutManager as LinearLayoutManager
        //左边联动右边
        leftNavigationAdapter.setOnItemClickListener { _, _, position ->
            leftNavigationAdapter.setChoose(position)
            manager.scrollToPositionWithOffset(position, 0)
//            TopLinearSmoothScroller(context as Activity).apply {
//                targetPosition = position
//                manager.startSmoothScroll(this)
//            }
        }

        //右边联动左边
        rvRight.addOnScrollListener(object : RecyclerView.OnScrollListener() {
            override fun onScrolled(recyclerView: RecyclerView, dx: Int, dy: Int) {
                super.onScrolled(recyclerView, dx, dy)
                val firstItemPosition = manager.findFirstVisibleItemPosition()
                if (firstItemPosition != -1) {
                    rvLeft.smoothScrollToPosition(firstItemPosition)
                    leftNavigationAdapter.setChoose(firstItemPosition)
                }
            }

        })
    }

    /**
     * 获取导航数据
     */
    private fun getNavi() {
        NetWorkManager.getNetApi().getNavi()
            .subscribeOn(Schedulers.io())
            .observeOn(AndroidSchedulers.mainThread())
            .subscribe(object : Observer<BaseBean<MutableList<NavigationBean>>> {
                override fun onSubscribe(d: Disposable) {

                }

                override fun onNext(baseBean: BaseBean<MutableList<NavigationBean>>) {
                    leftList = baseBean.data
                    //默认左侧第一个为选中状态
                    leftList[0].isChoose = true
                    //分别给左右两个adapter填充数据
                    leftNavigationAdapter.datas = leftList
                    rightNavigationAdapter.datas = baseBean.data
                    //右侧recyclerview悬浮置顶效果
                    val top = TopItemDecoration(context as Activity).apply {
                        this.tagListener = {
                            leftList[it].name.toString()
                        }
                    }
                    rvRight.addItemDecoration(top)
                }

                override fun onError(e: Throwable) {
                    context?.toastError(e)
                }

                override fun onComplete() {

                }
            })
    }
}
2.布局文件
<?xml version="1.0" encoding="utf-8"?>
<LinearLayout xmlns:android="http://schemas.android.com/apk/res/android"
    xmlns:app="http://schemas.android.com/apk/res-auto"
    android:layout_width="match_parent"
    android:layout_height="match_parent"
    android:background="@color/white"
    android:orientation="horizontal">

    <androidx.recyclerview.widget.RecyclerView
        android:id="@+id/rvLeft"
        android:layout_width="110dp"
        android:layout_height="wrap_content"
        android:orientation="vertical"
        app:layoutManager="androidx.recyclerview.widget.LinearLayoutManager" />

    <androidx.recyclerview.widget.RecyclerView
        android:id="@+id/rvRight"
        android:layout_width="match_parent"
        android:layout_height="match_parent"
        android:orientation="vertical"
        app:layoutManager="androidx.recyclerview.widget.LinearLayoutManager" />

</LinearLayout>
先声明一点,这里的网络数据是根据 玩Android 网站提供的,非常感谢作者。因为在这里直接在xml文件内给recyclerview定义LayoutManager及滑动方向了,所以就不需要再去代码里定义了。两个adapter的代码就不贴了,就是普通adapter实现方式。其中setChoose()方法就是将当前item设置为选中状态,然后改变它的背景颜色。
fun setChoose(position: Int) {
    mDatas.forEach {
       it.isChoose = false
    }
    mDatas[position].isChoose = true
    notifyDataSetChanged()
 }
主要是看recyclerViewLinkage()方法的实现
  //左边联动右边
val manager = rvRight.layoutManager as LinearLayoutManager
 leftNavigationAdapter.setOnItemClickListener { _, _, position ->
      leftNavigationAdapter.setChoose(position)
      manager.scrollToPositionWithOffset(position, 0)
//       TopLinearSmoothScroller(context as Activity).apply {
//       targetPosition = position
//       manager.startSmoothScroll(this)
//    }
   }
当点击时,将左侧的recyclerview点击的item设置为选中状态,这没什么好说的。
对于右边的recyclerview来说,它也要相应的滚动到第几个,这里有两种方式滚动:一种是直接定位到第几个,没有滚动动画,manager.scrollToPositionWithOffset(position, 0)。
一种是有滚动动画的,就是上边代码注释掉的那三句,只不过需要重写一个类继承LinearSmoothScroller,然后重写getVerticalSnapPreference()方法,将其方法的返回值写为固定的SNAP_TO_START即可。
 //右边联动左边
rvRight.addOnScrollListener(object : RecyclerView.OnScrollListener() {
   override fun onScrolled(recyclerView: RecyclerView, dx: Int, dy: Int) {
       super.onScrolled(recyclerView, dx, dy)
       val firstItemPosition = manager.findFirstVisibleItemPosition()
       if (firstItemPosition != -1) {
            rvLeft.smoothScrollToPosition(firstItemPosition)
            leftNavigationAdapter.setChoose(firstItemPosition)
          }
      }
  })
当在右侧滑动时,因其显示内容实时在变化,所以需要根据当前屏幕最上方显示的内容来判断其属于左侧哪个item内的,以此来显示左侧item被选中状态。
其中manager.findFirstVisibleItemPosition()方法看名字就能大致知道其意思了,返回值就是右侧这个recyclerview在当前屏幕上第一个可见的item内容(并不需要全部可见)在这个适配器内的位置。因为左右是一一对应的,所以当右侧第几个item可见时,意味着,它是属于左侧第几个item的内容的,这个时候就可以调用 rvLeft.smoothScrollToPosition(firstItemPosition),来进行滚动,同时设置为选中状态。
对于
smoothScrollToPosition()方法来说,如果要滚动的位置已经处于可见状态了,它是不会滚动的;如果要滚动的位置处于屏幕的上方,那么它就会滚动到相应的位置,并且将该位置置为顶部,即可见item的第一个;如果要滚动的位置处于屏幕的下方,那么它就会滚动到底部,并将相应位置的item置为可见item的最后一个
到此为止,左右两个recyclerview已经可以联动了,只是还差个悬浮置顶的效果。对于悬浮置顶的效果,大部分都是利于recyclerview的ItemDecoration来实现的,少数是根据滑动的距离来控制布局的显示隐藏来实现的。我这也是利用ItemDecoration来实现的。
二.悬浮置顶
1.自定义ItemDecoration
class TopItemDecoration(context: Context) : RecyclerView.ItemDecoration() {

    //间隔高度
    private val mHeight = 100
    //矩形画笔
    private val mPaint: Paint = Paint()
    //标签画笔
    private val textPaint: Paint = Paint(Paint.ANTI_ALIAS_FLAG)
    private val mContext: Context = context
    private val mRound: Rect = Rect()

    override fun onDraw(c: Canvas, parent: RecyclerView, state: RecyclerView.State) {
        super.onDraw(c, parent, state)
        mPaint.apply {
            color = ContextCompat.getColor(mContext, R.color.color_f2)
        }
        textPaint.apply {
            color = ContextCompat.getColor(mContext, R.color.color_6)
            textSize = 40f
        }
        val left = parent.paddingLeft.toFloat()
        val right = (parent.width - parent.paddingRight).toFloat()
        val childCount = parent.childCount
        for (i in 0 until childCount) {
            val childView = parent.getChildAt(i)
            val bottom = childView.top.toFloat()
            val top = bottom - mHeight
            //绘制灰底矩形间隔
            c.drawRect(left, top, right, bottom, mPaint)
            //根据位置获取当前item的标签
            val tag = tagListener(parent.getChildAdapterPosition(childView))
            //绘制标签文本内容
            textPaint.getTextBounds(tag, 0, tag.length, mRound)
            c.drawText(tag, left + textPaint.textSize, bottom - mHeight / 2 + mRound.height() / 2, textPaint)
        }
    }

    override fun getItemOffsets(outRect: Rect, view: View, parent: RecyclerView, state: RecyclerView.State) {
        super.getItemOffsets(outRect, view, parent, state)
        //设置间隔高度
        outRect.top = mHeight
    }

    override fun onDrawOver(c: Canvas, parent: RecyclerView, state: RecyclerView.State) {
        super.onDrawOver(c, parent, state)
        val left = parent.paddingLeft.toFloat()
        val right = (parent.width - parent.paddingRight).toFloat()
        val manager = parent.layoutManager as LinearLayoutManager
        //第一个可见item位置
        val index = manager.findFirstVisibleItemPosition()
        if (index != -1) {
           //获取指定位置item的View信息
            val childView = parent.findViewHolderForLayoutPosition(index)!!.itemView
            val top = parent.paddingTop.toFloat()
            val tag = tagListener(index)
            var bottom = parent.paddingTop + mHeight.toFloat()
            //悬浮置顶判断,其实也就是一直在绘制一个矩形加文本内容(上滑时取值bottom,下滑时取值childView.bottom.toFloat())
            bottom = min(childView.bottom.toFloat(), bottom)
            c.drawRect(0f, top, right, bottom, mPaint)
            textPaint.getTextBounds(tag, 0, tag.length, mRound)
            c.drawText(tag, left + textPaint.textSize, bottom - mHeight / 2 + mRound.height() / 2, textPaint)
        }
    }

    /**
     * 获取悬停标签
     */
    lateinit var tagListener: (Int) -> String

}
对于ItemDecoration,很多博文结合图文都说的非常清楚,这里就不在叙述了,只是简单说明下重写的三个方法的作用:
onDraw():在已设置的间隔内自定义绘制内容,简单理解为自定义view里的绘制。
getItemOffsets(): 设置单个item上下左右间隔,可以简单理解为为item增加了一个margin,可以根据实际需要给某些符合条件的item增加间隔。
onDrawOver():这个是最后绘制的,也是自定义绘制一些内容,但它绘制的内容是会覆盖在这个item内容之上的,就像帧布局中后加的控件会覆盖在之前的控件上一样。
对于一些注解,都在代码里注释了,其实也就是画了一个矩形和一个text。然后就是获取悬浮标签,也就是把上面左侧的recyclerview内item的内容绘制到间隔内。因为用的Kotlin,所以比较简单,java可以用接口回调的方式获取。
val top = TopItemDecoration(context as Activity).apply {
       this.tagListener = {
              leftList[it].name.toString()
            }
       }
rvRight.addItemDecoration(top)
相关阅读
1 商品详情页RecyclerView与TabLayout的联动定位
2 用RecyclerView的LayoutManager实现grid整页翻页效果
3 RecyclerView点击item图片,从点击位置,放大到全屏,再次点击关闭
4 Android瀑布流优化,解决Recyclerview展示大批量图片时Item自动切换、闪烁、空白等问题
5 仿房产销冠 APP 销控表界面-多 RecyclerView 同步滚动

如果你想要跟大家分享你的文章


 1330
1330

 被折叠的 条评论
为什么被折叠?
被折叠的 条评论
为什么被折叠?
 到【灌水乐园】发言


