


前言
为了弥补java向上类加载机制的缺陷:上层提供接口,具体的实现有子类提供;为了将这种方式加载到java的虚拟机中,java提供了一种SPI机制(service provider interface),可以加载到类加载机制无法加载的实现类,利用这个机制进行类加载的方案有很多,如jdbc加载Driver,Dubbo的SPI机制,Spring的自动装配等;下面将封装一个Starter,然后被另外一个服务引用,在服务启动的时候会通过SpringBoot的SpringBootApplication中的EnableAutoConfiguration下的@Import(AutoConfigurationImportSelector.class)注解自动装配一个Starter。
手写一个Starter
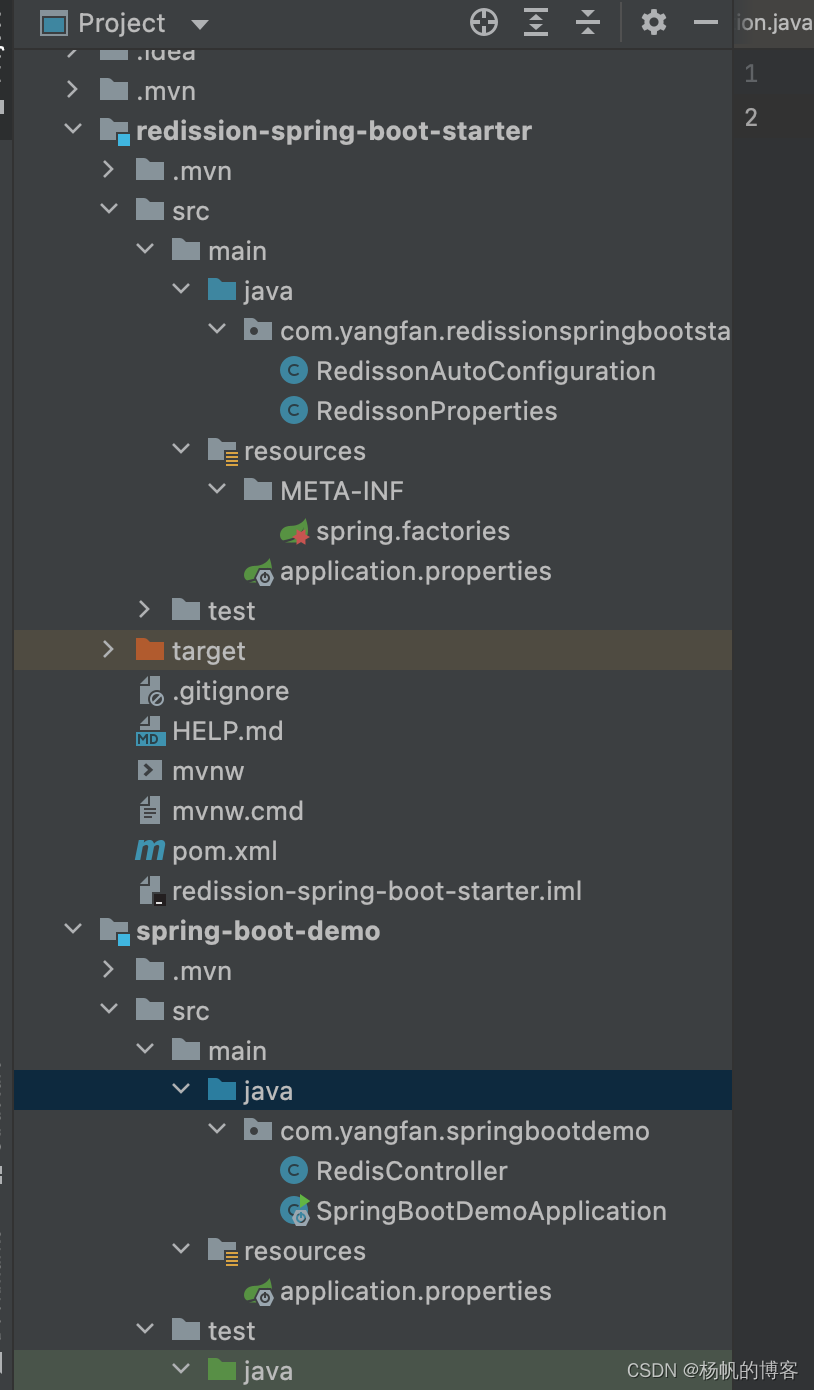
首先需要建一个多moudle工程,在该工程下建立两个module,一个redission-spring-boot-starter另外一个是引用改starter的spring-boot-demo,具体的项目结构如下图,下面分别介绍如何建立这两个工程;
redission-spring-boot-starter
1、pom文件
pom文件中redisson依赖,具体内容如下
<dependency>
    <groupId>org.springframework.boot</groupId>
    <artifactId>spring-boot-starter</artifactId>
</dependency>
<dependency>
    <groupId>junit</groupId>
    <artifactId>junit</artifactId>
    <version>4.11</version>
    <scope>test</scope>
</dependency>
<dependency>
    <groupId>org.springframework.boot</groupId>
    <artifactId>spring-boot-starter</artifactId>
    <version>2.1.6.RELEASE</version>
    <optional>true</optional>
</dependency>
<dependency>
    <groupId>org.redisson</groupId>
    <artifactId>redisson</artifactId>
    <version>3.13.2</version>
</dependency>
2、在resource目录下建立一个META-INF的目录,并在目录下建立一个spring-factories的文件,文件的内容是有两部分组成,其实相当于一个key结构,
key是:org.springframework.boot.autoconfigure.EnableAutoConfiguration
value是具体自动配置的类:com.yangfan.redissionspringbootstarter.RedissonAutoConfiguration
key和value之间用=\进行分割,具体内容如下
org.springframework.boot.autoconfigure.EnableAutoConfiguration =\
com.yangfan.redissionspringbootstarter.RedissonAutoConfiguration
3、RedissonProperties
RedissonProperties是一个读取yml或者apollo里面配置信息的类,具体内容如下:
@ConfigurationProperties(prefix = "yang.redisson")
public class RedissonProperties {
    private String host = "localhost";
    private int port = 6379;
    private int timeout;// 超时时间
    private boolean ssl;

    public String getHost() {
        return host;
    }

    public void setHost(String host) {
        this.host = host;
    }

    public int getPort() {
        return port;
    }

    public void setPort(int port) {
        this.port = port;
    }

    public int getTimeout() {
        return timeout;
    }

    public void setTimeout(int timeout) {
        this.timeout = timeout;
    }

    public boolean isSsl() {
        return ssl;
    }

    public void setSsl(boolean ssl) {
        this.ssl = ssl;
    }
}
4、RedissonAutoConfiguration是一个自动装配redission的配置类,具体内容如下
@Configuration
//条件装配,用于控制bean是否被加载
@ConditionalOnClass(Redisson.class)
//RedissonProperties注入到Spring ioc容器中
@EnableConfigurationProperties(RedissonProperties.class)
public class RedissonAutoConfiguration {

    @Bean
    public RedissonClient redissonClient(RedissonProperties redissonProperties){
        Config config =  new Config();
        String prefix = "redis://";
        if (redissonProperties.isSsl()){
            prefix = "rediss://";
        }
        config.useSingleServer().setAddress(prefix+redissonProperties.getHost()+":"+redissonProperties.getPort()).setConnectTimeout(redissonProperties.getTimeout());
        return Redisson.create(config);
    }
}
spring-boot-demo
1、首先要在pom文件中引入redission-spring-boot-starter,pom文件的具体内容如下
<dependency>
    <groupId>org.springframework.boot</groupId>
    <artifactId>spring-boot-starter-web</artifactId>
    <version>2.3.1.RELEASE</version>
</dependency>

<dependency>
    <groupId>com.example</groupId>
    <artifactId>redission-spring-boot-starter</artifactId>
    <version>0.0.1-SNAPSHOT</version>
</dependency>
2、在application.properties文件中配置redis需要的域名及端口
yang.redisson.host=127.0.0.1
yang.redisson.port=6379
3、写一个controller进行验证一下自动装配是否成功
@RestController
@RequestMapping
public class RedisController {

    @Autowired
    private RedissonClient redissonClient;

    @GetMapping("/test")
    public String test(){
        RBucket bucket = redissonClient.getBucket("name");
        if(bucket.get() == null){
            bucket.set("com.yang.redisson");
        }else {
            bucket.expire(1, TimeUnit.SECONDS);
        }
        return bucket.get()+"";
    }

}
启用服务之前需要先对redission-spring-boot-starter进行install一下,这样才能被第二个服务引用到,如果install时报Unable to find main class,那么需要将redission-spring-boot-starter的build去掉;

通过http请求看到如下信息就证明自动装配成功了

SPI原理分析
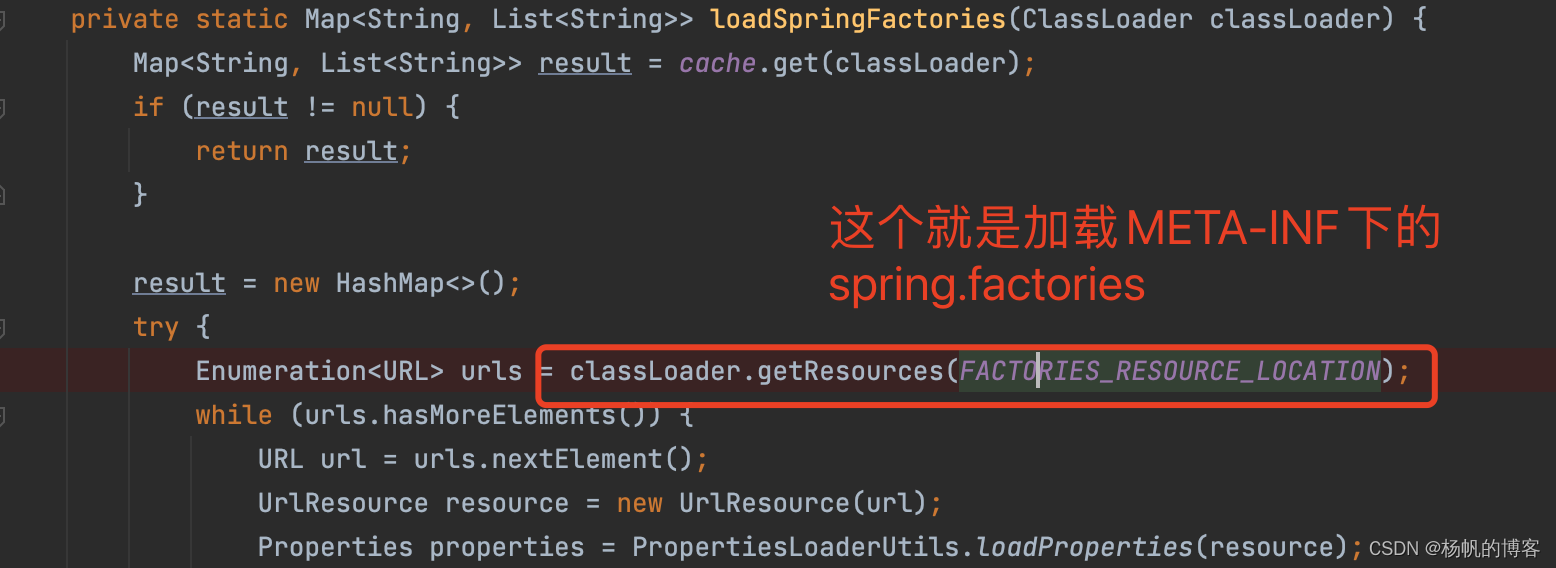
首先我们看下这个方法:getAutoConfigurationEntry该方法是获取META-INF/spring.factories中的内容加载到java虚拟机中;
org.springframework.boot.autoconfigure.AutoConfigurationImportSelector#getAutoConfigurationEntry
接下来我们看一下getCandidateConfigurations这个方法,核心是这个加载方法:loadSpringFactories


 1049
1049


 被折叠的 条评论
为什么被折叠?
被折叠的 条评论
为什么被折叠?
 到【灌水乐园】发言


