


目录
先了解一下什么是 starter:一个 starter其实就是对一个功能的集成封装,然后对外提供一个依赖,让业务去使用,像我们熟悉的 Redis,mongo,mybatis 等均属于。
编写完starter后,可以提交到公司私有仓库供其他项目组进行调用。
一、命名规范
由于任何人都可以编写自己的 starter,为了区分官方的 starter 和个人的 starter,通常在命名上面会有一个规范。SpringBoot 官方提出规范如下:
官方命名
作为前缀:spring-boot-starter-xxx
比如:spring-boot-starter-web…
(第三方)自定义命名
作为后缀:xxx-spring-boot-starter
比如:test-spring-boot-starter
自动装配首先要有一个配置类,其次还要有 spring.factories 文件,所以这两步是必不可少的
二、starter代码编写
1、引入自动装配依赖
编写配置类首先要添加一个自动装配的依赖,然后再编写对应的配置类和业务实现类,在 pom 中添加如下依赖
	<!--定义公共资源版本,资源依赖及版本控制的父根-->
    <parent>
        <groupId>org.springframework.boot</groupId>
        <artifactId>spring-boot-starter-parent</artifactId>
        <version>2.2.4.RELEASE</version>
    </parent>

    <modelVersion>4.0.0</modelVersion>
    <groupId>com.example</groupId>
    <artifactId>mydateutil-spring-boot-starter</artifactId>
    <version>1.0</version>

    <dependencies>
        <dependency>
            <groupId>org.springframework.boot</groupId>
            <artifactId>spring-boot-autoconfigure</artifactId>
            <version>2.7.1</version>
        </dependency>
        <!--工具类-->
        <dependency>
            <groupId>org.apache.commons</groupId>
            <artifactId>commons-lang3</artifactId>
            <version>3.9</version>
        </dependency>
        <!-- 日志处理-->
        <dependency>
            <groupId>org.springframework.boot</groupId>
            <artifactId>spring-boot-starter-logging</artifactId>
        </dependency>
    </dependencies>
2、编写配置类
我们要编写一个提供被springboot管理的自动配置的stater,首先我们要做的是编写配置类
package com.example.starter.config;

import com.example.starter.service.MyStaterTemplate;
import org.springframework.beans.factory.annotation.Autowired;
import org.springframework.boot.autoconfigure.condition.ConditionalOnClass;
import org.springframework.boot.autoconfigure.condition.ConditionalOnMissingBean;
import org.springframework.boot.context.properties.EnableConfigurationProperties;
import org.springframework.context.annotation.Bean;
import org.springframework.context.annotation.Configuration;

@Configuration
@ConditionalOnClass({MyStaterTemplate.class})
@EnableConfigurationProperties(MyStaterProperties.class)
public class MyStaterAutoConfiguration {

    @Autowired
    MyStaterProperties myStaterProperties;

    @Bean
    @ConditionalOnMissingBean(MyStaterTemplate.class)
    public MyStaterTemplate myJsonService() {
        MyStaterTemplate myStaterTemplate = new MyStaterTemplate();
        myStaterTemplate.setPrefix(myStaterProperties.getProPre());
        return myStaterTemplate;
    }

}
3、属性类
package com.example.starter.config;

import org.springframework.boot.context.properties.ConfigurationProperties;

@ConfigurationProperties(prefix = "nata.prac")
public class MyStaterProperties {

    private String proPre;

    public String getProPre() {
        return proPre;
    }

    public void setProPre(String proPre) {
        this.proPre = proPre;
    }
}
4、业务实现类
编写一个 指定年月获取月份最后一天日期 的功能,同时返回调用
package com.example.starter.service;

import com.example.starter.utils.BaseController;
import org.apache.commons.lang3.StringUtils;
import java.text.SimpleDateFormat;
import java.util.Calendar;

public class MyStaterTemplate extends BaseController {

    public static final String FORMAT_DATE_YEAR_MONTH_DAY = "yyyy-MM-dd";//年月日
    private String prefix;

    /**
     * 指定年月获取月份最后一天日期
     * @param dateTime
     * @return
     */
    public String getLastDayOfMonth(String dateTime) {
        if (StringUtils.isBlank(dateTime) || dateTime.length() > 7) {
            return "时间为空或不符合规范,时间格式应为:YYYY-MM";
        }
        //格式化日期
        SimpleDateFormat sdf = new SimpleDateFormat(FORMAT_DATE_YEAR_MONTH_DAY);
        Calendar calendar = Calendar.getInstance();
        try {
            int year = Integer.parseInt(dateTime.substring(0,4));
            int month = Integer.parseInt(dateTime.substring(5,7));
            //设置年份
            calendar.set(Calendar.YEAR, year);
            //设置月份
            calendar.set(Calendar.MONTH, month-1);
            //获取某月最大天数
            int last_day = calendar.getActualMaximum(Calendar.DATE);
            //设置日历中月份的最大天数
            calendar.set(Calendar.DAY_OF_MONTH, last_day);
        } catch (Exception e) {
            logger.error("指定年月获取月份最后一天日期获取异常" + e.getMessage());
        }
        return this.prefix + "---" + sdf.format(calendar.getTime());
    }

    public void setPrefix(String prefix) {
        this.prefix = prefix;
    }

}
简单说明一下上面三个类都是干什么的
(1)MyHashTemplate 该类是实际业务需要注入的类,用来对入参进行 MD5 摘要,然后返回一个拼接了前缀的字符串给业务。这个前缀是通过 application.properties 中配置
ziyou.hash.hashPre=JavaGeekTech666 配置后传递过来的。
(2)MyHashProperties是接受属性值的类
(3)MyHashAutoConfiguration 则是自动装配类,这个类会根据条件进行 MyHashTemplateBean 的初始化,并将前缀进行赋值
5、增加配置文件
定义完配置类后,需要将这个bean暴露出来。这么做的原因也是因为被@SpringbootApplication标注的类,除非定义了扫描的包路径,不然默认是扫描被@SpringbootApplication标注的类所在的包路径。
这也是为什么官方建议启动类放置在最外层的包,是为了保证当前项目中定义的bean都能被springboot扫描并加载。
最后还需要在 resource 文件中编写一个 META-INF/spring.factories 文件,内容如下
org.springframework.boot.autoconfigure.EnableAutoConfiguration=com.example.starter.config.MyStaterAutoConfiguration
前面的 Key 是固定写法,后面的 value 就是配置类的全路径引用地址。
补充
1、为什么加了**@Configuration注解还是要配置META-INF/spring.factories呢?因为springboot项目默认只会扫描本项目下的带@Configuration注解的类**,如果自定义starter,不在本工程中,是无法加载的,所以要配置META-INF/spring.factories配置文件。
2、为什么配置了META-INF/spring.factories配置文件就可以加载?这里才是springboot实现starter的关键点,springboot的这种配置加载方式是一种类SPI(Service
Provider
Interface)的方式,SPI可以在META-INF/services配置接口扩展的实现类,springboot中原理类似,只是名称换成了spring.factories而已。
三、在项目中使用
编写完了 starter 过后,我们再创建一个新的 web 应用,在其中增加我们编写的 starter 来验证是否成功。
1、在 pom 文件中增加依赖
		<dependency>
            <groupId>com.example</groupId>
            <artifactId>mydateutil-spring-boot-starter</artifactId>
            <version>1.0</version>
        </dependency>
2、controller层
package com.example.demo.controller;

import com.example.demo.service.HelloService;
import org.springframework.beans.factory.annotation.Autowired;
import org.springframework.web.bind.annotation.GetMapping;
import org.springframework.web.bind.annotation.RequestParam;
import org.springframework.web.bind.annotation.RestController;

@RestController
public class HelloController {

    @Autowired
    private HelloService helloService;

    @GetMapping(value = "/getLastDayOfMonth")
    public String getLastDayOfMonth(@RequestParam("dateTime") String dateTime) {
        return helloService.getLastDayOfMonth(dateTime);
    }

}
3、实现层
package com.example.demo.service;

import com.example.starter.service.MyStaterTemplate;
import org.springframework.beans.factory.annotation.Autowired;
import org.springframework.stereotype.Service;

@Service
public class HelloService {

    @Autowired
    private MyStaterTemplate myStaterTemplate;

    public String getLastDayOfMonth(String dateTime) {
        return myStaterTemplate.getLastDayOfMonth(dateTime);
    }

}
4、在 application.properties 文件中增加如下配置
nata.prac.proPre=PropertiesInfo
5、启动项目
我们访问地址 http://127.0.0.1:8080/getLastDayOfMonth?dateTime=2022-08
可以看到效果如下。
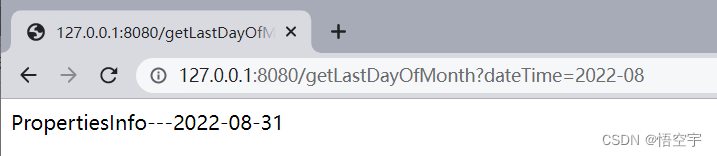
自己编写的 starter 已经成功生效了,只不过功能目前很单一,我们完全可以根据自己需要的实际功能来实现一个复杂一点的 starter 来提供开箱即用的效果。
在一些大公司特别是一些中间件或者中台团队,很多时候都是提供各种工具的 starter 来给业务团队使用的,毕竟很多重复的功能如果每个业务团队都自己开发的话,完全是浪费资源,通过中台团队统一封装 starter,让各个业务团队拿来就用快速搭建业务即可。
四、应用场景举例
(1)发送邮件、短信验证码等常用功能可以统一成一个starter,其他项目要使用时直接依赖即可调用
(2)数据库mapper层可以抽取封装成一个starter,其他项目需要使用数据库时直接依赖即可,不在需要每个项目单独提供数据库链接配置类
(3)登录、鉴权之类的公共功能同样可以抽取封装成一个starter,这样就不用每个项目都写一遍了
五、补充
@ConditionalOnBean 仅在当前上下文中存在某个bean时,才会实例化这个bean
@ConditionalOnClass 某个class位于类路径上,才会实例化这个Bean
@ConditionOnExpression 当表达式为true的时候,才会实例化这个Bean
@ConditionalOnMissBean 仅在上下文中不存在某个Bean时才会实例化这个Bean
@ConditionalOnMissClass 某个class类路径上不存在,才会实例化这个Bean
@ConditionalOnNotWebApplication,不是web应用时才会实例化这个Bean
@ConditionalOnProperty,指定的属性是否有指定的值
@ConditionalOnResource,类路径是否有指定的值
@AutoConfigureAfter,在某个bean完成自动配置后实例化这个bean
@AutoConfigureBefore,在某个bean完成自动配置前实例化这个bean
@EnableConfigurationProperties(MyStaterProperties.class),自动注入属性文件
六、总结
Starter的核心主要就是@Import和@Conditional
(1) @Import负责引入配置类
(2) @Conditional负责引入的类,初始化成对象的条件.


 1045
1045


 被折叠的 条评论
为什么被折叠?
被折叠的 条评论
为什么被折叠?
 到【灌水乐园】发言


