


简介-注解驱动开发
当我们还在使用Spring、SpringMVC、Mybatis三大框架来整合开发的时候,我们会写大量的xml文件来进行配置;然而在Springboot和SpringCloud兴起之后,学习Spring的注解驱动及其原理那将会是非常有必要的了;因为在Springboot和SpringCloud里面会使用到大量的注解来进行配置;当我们熟练掌握了Spring的注解驱动,那当我们在学习Springboot和SpringCloud框架的时候,那将会更加的轻松自如;让我们一起来开启Spring注解驱动开发的学习之旅吧!
组件注册-@Configuration&@Bean给容器中注册组件
创建一个Maven项目:spring-annotation
导入 spring-context jar包 – 这个就是Spring核心环境所有依赖的jar包
Maven仓库中的spring-context
<?xml version="1.0" encoding="UTF-8"?>
<project xmlns="http://maven.apache.org/POM/4.0.0"
         xmlns:xsi="http://www.w3.org/2001/XMLSchema-instance"
         xsi:schemaLocation="http://maven.apache.org/POM/4.0.0 http://maven.apache.org/xsd/maven-4.0.0.xsd">
    <modelVersion>4.0.0</modelVersion>

    <groupId>com.ldc</groupId>
    <artifactId>spring-annotation</artifactId>
    <version>1.0-SNAPSHOT</version>

    <dependencies>
        <!-- https://mvnrepository.com/artifact/org.springframework/spring-context -->
        <dependency>
            <groupId>org.springframework</groupId>
            <artifactId>spring-context</artifactId>
            <version>4.3.12.RELEASE</version>
        </dependency>
    </dependencies>

</project>
- xml文件配置的方式
先按照我们以前配置的方式来使用Spring:
首先有一个Person类:public class Person { private String name; private Integer age; public Person() { } public Person(String name, Integer age) { this.name = name; this.age = age; } public String getName() { return name; } public void setName(String name) { this.name = name; } public Integer getAge() { return age; } public void setAge(Integer age) { this.age = age; } @Override public String toString() { return "Person{" + "name='" + name + '\'' + ", age=" + age + '}'; } }我们再写上一个Spring的xml配置文件:
<?xml version="1.0" encoding="UTF-8"?>
<beans xmlns="http://www.springframework.org/schema/beans"
	   xmlns:xsi="http://www.w3.org/2001/XMLSchema-instance"
	   xsi:schemaLocation="http://www.springframework.org/schema/beans http://www.springframework.org/schema/beans/spring-beans.xsd">

	<bean id="person" class="com.ldc.bean.Person">
		<property name="age" value="18"></property>
		<property name="name" value="张三"></property>
	</bean>
</beans>
测试类来测试:
public class MainTest {
    public static void main(String[]args){
        ApplicationContext applicationContext = new ClassPathXmlApplicationContext("beans.xml");
        Person person = (Person) applicationContext.getBean("person");
        System.out.println(person);
    }
}
输出结果为:Person{name=‘张三’, age=18}
- 注解的方式:
首先我们先写一个配置类:等同于xml配置文件
/**
 * @Description 配置类就等同以前的配置文件
 */
@Configuration //告诉Spring这是一个配置类
public class MainConfig {

    //相当于xml配置文件中的<bean>标签,告诉容器注册一个bean
    //之前xml文件中<bean>标签有bean的class类型,那么现在注解方式的类型当然也就是返回值的类型
    //之前xml文件中<bean>标签有bean的id,现在注解的方式默认用的是方法名来作为bean的id
    @Bean
    public Person person() {
        return new Person("lisi",20);
    }

}
现在,我们来测试一下:
public class MainTest {
    public static void main(String[]args){
        /**
         * 这里是new了一个AnnotationConfigApplicationContext对象,以前new的ClassPathXmlApplicationContext对象
         * 的构造函数里面传的是配置文件的位置,而现在AnnotationConfigApplicationContext对象的构造函数里面传的是
         * 配置类的类型
         */
        ApplicationContext applicationContext = new AnnotationConfigApplicationContext(MainConfig.class);
        Person person = applicationContext.getBean(Person.class);
        System.out.println(person);
    }
}
测试结果如下:
Person{name=‘lisi’, age=20}
我们也可以通过ApplicationContext的一些方法来获取容器里面bean的一些信息,比如我们可以获取Person这个bean在IOC容器里面的名字,也是相当于是xml配置文件里面标签里面的id属性;
public class MainTest {
    public static void main(String[]args){
        /**
         * 这里是new了一个AnnotationConfigApplicationContext对象,以前new的ClassPathXmlApplicationContext对象
         * 的构造函数里面传的是配置文件的位置,而现在AnnotationConfigApplicationContext对象的构造函数里面传的是
         * 配置类的类型
         */
        ApplicationContext applicationContext = new AnnotationConfigApplicationContext(MainConfig.class);
        Person person = applicationContext.getBean(Person.class);
        System.out.println(person);

        //我们可以来获取bean的定义信息
        String[] namesForType = applicationContext.getBeanNamesForType(Person.class);
        for (String name : namesForType) {
            System.out.println(name);
        }
    }
}
测试结果如下:
Person{name=‘lisi’, age=20}
person
Spring注解的方式默认是以配置的方法名来作为这个bean的默认id,如果我们不想要方法名来作为bean的id,我们可以在@Bean这个注解的value属性来进行指定:
@Configuration //告诉Spring这是一个配置类
public class MainConfig {

    //相当于xml配置文件中的<bean>标签,告诉容器注册一个bean
    //之前xml文件中<bean>标签有bean的class类型,那么现在注解方式的类型当然也就是返回值的类型
    //之前xml文件中<bean>标签有bean的id,现在注解的方式默认用的是方法名来作为bean的id
    @Bean(value = "person")//通过这个value属性可以指定bean在IOC容器的id
    public Person person01() {
        return new Person("lisi",20);
    }

}
我们再来运行这个测试类:
public class MainTest {
    public static void main(String[]args){
        /**
         * 这里是new了一个AnnotationConfigApplicationContext对象,以前new的ClassPathXmlApplicationContext对象
         * 的构造函数里面传的是配置文件的位置,而现在AnnotationConfigApplicationContext对象的构造函数里面传的是
         * 配置类的类型
         */
        ApplicationContext applicationContext = new AnnotationConfigApplicationContext(MainConfig.class);
        Person person = applicationContext.getBean(Person.class);
        System.out.println(person);

        //我们可以来获取bean的定义信息
        String[] namesForType = applicationContext.getBeanNamesForType(Person.class);
        for (String name : namesForType) {
            System.out.println(name);
        }
    }
}
那么现在的测试结果如下:bean在IOC容器的名字就是@Bean这个注解的value属性的值,而不是默认的id是方法名person01
Person{name=‘lisi’, age=20}
person
组件注册-@ComponentScan-自动扫描组件&指定扫描规则
在xml文件配置的方式,我们可以这样来进行配置:
    <!-- 包扫描、只要标注了@Controller、@Service、@Repository,@Component -->
    <context:component-scan base-package="com.ldc"/>
以前是在xml配置文件里面写包扫描,现在我们可以在配置类里面写包扫描:
/**
 * @Description 配置类就等同以前的配置文件
 */
@Configuration //告诉Spring这是一个配置类
@ComponentScan(value = "com.ldc")//相当于是xml配置文件里面的<context:component-scan base-package="com.ldc"/>
public class MainConfig {

    //相当于xml配置文件中的<bean>标签,告诉容器注册一个bean
    //之前xml文件中<bean>标签有bean的class类型,那么现在注解方式的类型当然也就是返回值的类型
    //之前xml文件中<bean>标签有bean的id,现在注解的方式默认用的是方法名来作为bean的id
    @Bean(value = "person")//通过这个value属性可以指定bean在IOC容器的id
    public Person person01() {
        return new Person("lisi",20);
    }

}
我们创建BookController、BookService、BookDao这几个类,分别添加了@Controller、@Service、@Repository注解:
@Controller
public class BookController {
}
@Service
public class BookService {
}
@Repository
public class BookDao {
}
我们可以引入junit的jar包来进行测试:
    <dependency>
        <groupId>junit</groupId>
        <artifactId>junit</artifactId>
        <version>4.12</version>
        <scope>test</scope>
    </dependency>
我们来进行单元测试:
    @Test
    public void test01() {
        ApplicationContext applicationContext = new AnnotationConfigApplicationContext(MainConfig.class);
        String[] definitionNames = applicationContext.getBeanDefinitionNames();
        for (String name : definitionNames) {
            System.out.println(name);
        }
    }
测试结果如下:除开IOC容器自己要装配的一些组件外,还有是我们自己装配的组件
org.springframework.context.annotation.internalConfigurationAnnotationProcessor
org.springframework.context.annotation.internalAutowiredAnnotationProcessor
org.springframework.context.annotation.internalRequiredAnnotationProcessor
org.springframework.context.annotation.internalCommonAnnotationProcessor
org.springframework.context.event.internalEventListenerProcessor
org.springframework.context.event.internalEventListenerFactory
mainConfig
bookController
bookDao
bookService
person
从上面的测试结果我们可以发现主配置类 MainConfig 也是IOC容器里面的组件,也被纳入了IOC容器的管理:
/**
 * @Description 配置类就等同以前的配置文件
 */
@Configuration //告诉Spring这是一个配置类
@ComponentScan(value = "com.ldc")//相当于是xml配置文件里面的<context:component-scan base-package="com.ldc"/>
public class MainConfig {

    //相当于xml配置文件中的<bean>标签,告诉容器注册一个bean
    //之前xml文件中<bean>标签有bean的class类型,那么现在注解方式的类型当然也就是返回值的类型
    //之前xml文件中<bean>标签有bean的id,现在注解的方式默认用的是方法名来作为bean的id
    @Bean(value = "person")//通过这个value属性可以指定bean在IOC容器的id
    public Person person01() {
        return new Person("lisi",20);
    }

}
我们从@Configuration 这个注解点进去就可以发现这个注解上也标注了 @Component 的这个注解,也纳入到IOC容器中作为一个组件:
@Target(ElementType.TYPE)
@Retention(RetentionPolicy.RUNTIME)
@Documented
@Component
public @interface Configuration {

	/**
	 * Explicitly specify the name of the Spring bean definition associated
	 * with this Configuration class. If left unspecified (the common case),
	 * a bean name will be automatically generated.
	 * <p>The custom name applies only if the Configuration class is picked up via
	 * component scanning or supplied directly to a {@link AnnotationConfigApplicationContext}.
	 * If the Configuration class is registered as a traditional XML bean definition,
	 * the name/id of the bean element will take precedence.
	 * @return the specified bean name, if any
	 * @see org.springframework.beans.factory.support.DefaultBeanNameGenerator
	 */
	String value() default "";

}
我们在 @ComponentScan 这个注解上,也是可以指定要排除哪些包或者是只包含哪些包来进行管理:里面传是一个Filter[]数组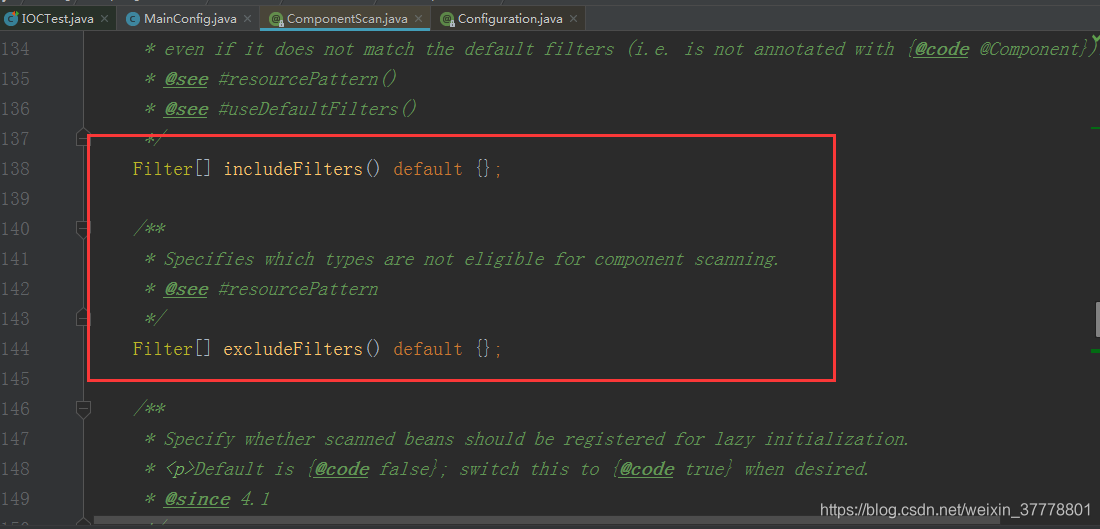
我们从这个excludeFilters方法点过去,就到了@Filter这个注解:
@Retention(RetentionPolicy.RUNTIME)
@Target({})
@interface Filter {
/**
* The type of filter to use.
* <p>Default is {@link FilterType#ANNOTATION}.
* @see #classes
* @see #pattern
*/
//这个是要排除的规则:是按注解来进行排除还是按照类来进行排除还是按照正则表达式来来进行排除
FilterType type() default FilterType.ANNOTATION;
/**
* Alias for {@link #classes}.
* @see #classes
*/
@AliasFor("classes")
Class<?>[] value() default {};
/**
* The class or classes to use as the filter.
* <p>The following table explains how the classes will be interpreted
* based on the configured value of the {@link #type} attribute.
* <table border="1">
* <tr><th>{@code FilterType}</th><th>Class Interpreted As</th></tr>
* <tr><td>{@link FilterType#ANNOTATION ANNOTATION}</td>
* <td>the annotation itself</td></tr>
* <tr><td>{@link FilterType#ASSIGNABLE_TYPE ASSIGNABLE_TYPE}</td>
* <td>the type that detected components should be assignable to</td></tr>
* <tr><td>{@link FilterType#CUSTOM CUSTOM}</td>
* <td>an implementation of {@link TypeFilter}</td></tr>
* </table>
* <p>When multiple classes are specified, <em>OR</em> logic is applied
* — for example, "include types annotated with {@code @Foo} OR {@code @Bar}".
* <p>Custom {@link TypeFilter TypeFilters} may optionally implement any of the
* following {@link org.springframework.beans.factory.Aware Aware} interfaces, and
* their respective methods will be called prior to {@link TypeFilter#match match}:
* <ul>
* <li>{@link org.springframework.context.EnvironmentAware EnvironmentAware}</li>
* <li>{@link org.springframework.beans.factory.BeanFactoryAware BeanFactoryAware}
* <li>{@link org.springframework.beans.factory.BeanClassLoaderAware BeanClassLoaderAware}
* <li>{@link org.springframework.context.ResourceLoaderAware ResourceLoaderAware}
* </ul>
* <p>Specifying zero classes is permitted but will have no effect on component
* scanning.
* @since 4.2
* @see #value
* @see #type
*/
@AliasFor("value")
Class<?>[] classes() default {};
/**
* The pattern (or patterns) to use for the filter, as an alternative
* to specifying a Class {@link #value}.
* <p>If {@link #type} is set to {@link FilterType#ASPECTJ ASPECTJ},
* this is an AspectJ type pattern expression. If {@link #type} is
* set to {@link FilterType#REGEX REGEX}, this is a regex pattern
* for the fully-qualified class names to match.
* @see #type
* @see #classes
*/
String[] pattern() default {};
}
这个时候,我们就可以这样来配置:
@Configuration
@ComponentScan(value = "com.ldc",excludeFilters = {
        //这里面是一个@Filter注解数组,FilterType.ANNOTATION表示的排除的规则 :按照注解的方式来进行排除
        //classes = {Controller.class,Service.class}表示的是标有这些注解的类给排除掉
        @Filter(type = FilterType.ANNOTATION,classes = {Controller.class,Service.class})
})
public class MainConfig {

    @Bean(value = "person")
    public Person person01() {
        return new Person("lisi",20);
    }

}
我们再来测试一下:
public class IOCTest {

    @Test
    public void test01() {
        ApplicationContext applicationContext = new AnnotationConfigApplicationContext(MainConfig.class);
        String[] definitionNames = applicationContext.getBeanDefinitionNames();
        for (String name : definitionNames) {
            System.out.println(name);
        }
    }

}
这个时候的测试结果如下:这个时候,bookService、bookController这两个组件就已经被排除掉了,不再被IOC容器给管理:
org.springframework.context.annotation.internalConfigurationAnnotationProcessor
org.springframework.context.annotation.internalAutowiredAnnotationProcessor
org.springframework.context.annotation.internalRequiredAnnotationProcessor
org.springframework.context.annotation.internalCommonAnnotationProcessor
org.springframework.context.event.internalEventListenerProcessor
org.springframework.context.event.internalEventListenerFactory
mainConfig
bookDao
person
我们也可以来配置includeFilters:指定在扫描的时候,只需要包含哪些组件
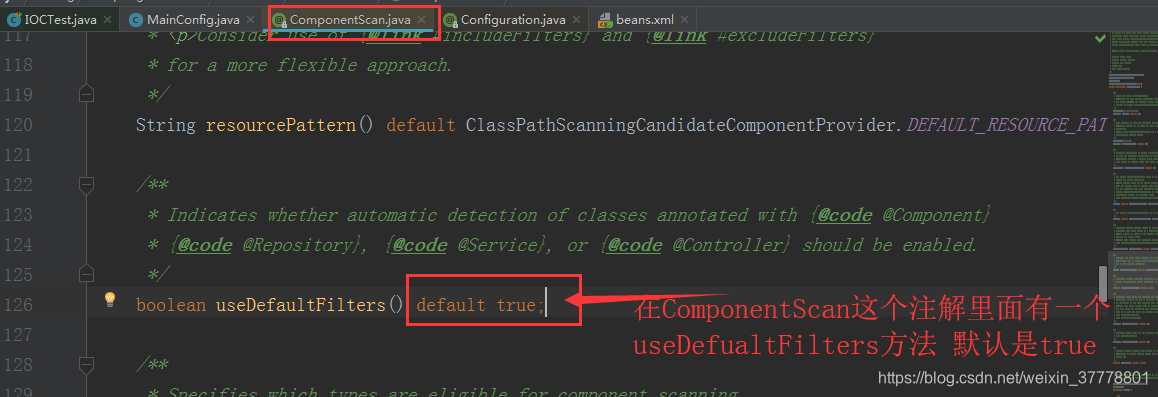
在用xml文件配置的方式来进行配置的时候,还要禁用掉默认的配置规则,只包含哪些组件的配置才能生效
<context:component-scan base-package=“com.ldc” use-default-filters=“false”/>
这个时候,我们就可以这样来写:
@Configuration
//excludeFilters = Filter[];指定在扫描的时候按照什么规则来排除脑哪些组件
//includeFilters = Filter[];指定在扫描的时候,只需要包含哪些组件
@ComponentScan(value = "com.ldc",includeFilters = {
        //这里面是一个@Filter注解数组,FilterType.ANNOTATION表示的排除的规则 :按照注解的方式来进行排除
        //classes = {Controller.class}表示的是标有这些注解的类给纳入到IOC容器中
        @Filter(type = FilterType.ANNOTATION, classes = {Controller.class})
},useDefaultFilters = false)
public class MainConfig {

    @Bean(value = "person")
    public Person person01() {
        return new Person("lisi",20);
    }

}
测试类:
public class IOCTest {

    @Test
    public void test01() {
        ApplicationContext applicationContext = new AnnotationConfigApplicationContext(MainConfig.class);
        String[] definitionNames = applicationContext.getBeanDefinitionNames();
        for (String name : definitionNames) {
            System.out.println(name);
        }
    }

}
这个时候,测试结果如下:这个时候是按照标有注解来进行包含的,现在就只有一个bookController被纳入到IOC容器进行管理
org.springframework.context.annotation.internalConfigurationAnnotationProcessor
org.springframework.context.annotation.internalAutowiredAnnotationProcessor
org.springframework.context.annotation.internalRequiredAnnotationProcessor
org.springframework.context.annotation.internalCommonAnnotationProcessor
org.springframework.context.event.internalEventListenerProcessor
org.springframework.context.event.internalEventListenerFactory
mainConfig
bookController
person
@ComponentScan这个注解是可以重复定义的:来指定不同的扫描策略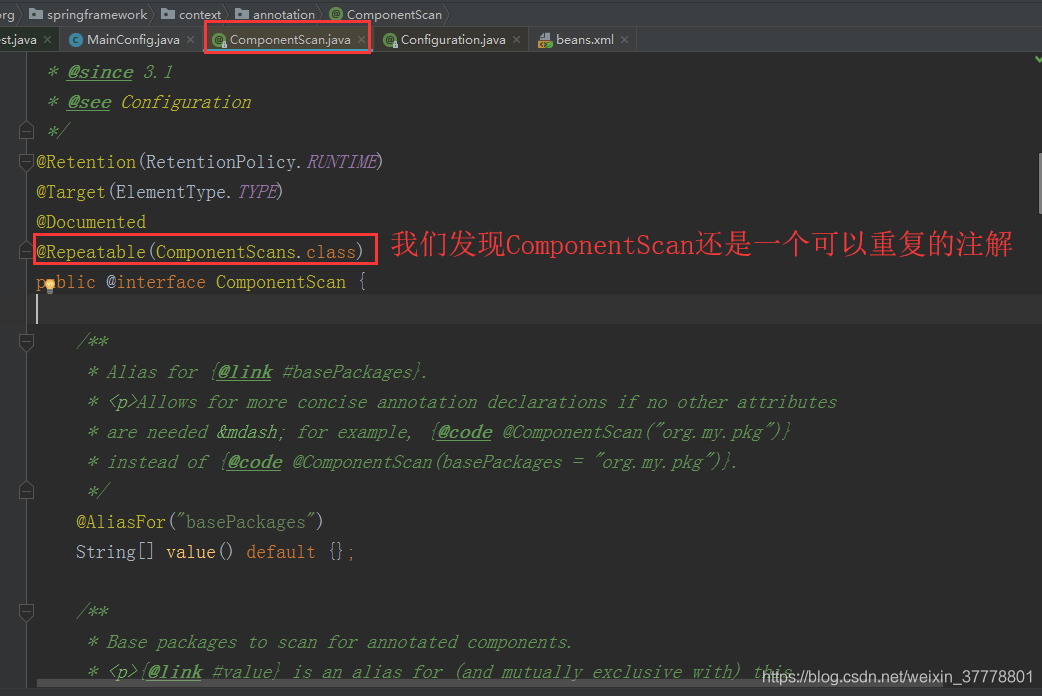
我们还可以用 @ComponentScans来定义多个扫描规则:里面是@ComponentScan规则的数组
@Configuration
//excludeFilters = Filter[];指定在扫描的时候按照什么规则来排除脑哪些组件
//includeFilters = Filter[];指定在扫描的时候,只需要包含哪些组件
@ComponentScans(value = {
    @ComponentScan(value = "com.ldc",includeFilters = {
            //这里面是一个@Filter注解数组,FilterType.ANNOTATION表示的排除的规则 :按照注解的方式来进行排除
            //classes = {Controller.class}表示的是标有这些注解的类给纳入到IOC容器中
            @Filter(type = FilterType.ANNOTATION, classes = {Controller.class})
    },useDefaultFilters = false),
    @ComponentScan(value = "com.ldc")
})
public class MainConfig {

    @Bean(value = "person")
    public Person person01() {
        return new Person("lisi",20);
    }

}
也可以直接这样来配置多个@ComponentScan注解:但是这样写的话,就必须要java8及以上的支持
@Configuration
//excludeFilters = Filter[];指定在扫描的时候按照什么规则来排除脑哪些组件
//includeFilters = Filter[];指定在扫描的时候,只需要包含哪些组件
@ComponentScan(value = "com.ldc",includeFilters = {
        //这里面是一个@Filter注解数组,FilterType.ANNOTATION表示的排除的规则 :按照注解的方式来进行匹配
        //classes = {Controller.class}表示的是标有这些注解的类给纳入到IOC容器中
        @Filter(type = FilterType.ANNOTATION, classes = {Controller.class})
},useDefaultFilters = false)

@ComponentScan(value = "com.ldc")
public class MainConfig {

    @Bean(value = "person")
    public Person person01() {
        return new Person("lisi",20);
    }

}
组件注册-自定义TypeFilter指定过滤规则
我们可以来看看有哪几种过滤规则:
public enum FilterType {

	/**
	 * Filter candidates marked with a given annotation.
	 * @see org.springframework.core.type.filter.AnnotationTypeFilter
	 */
	ANNOTATION,

	/**
	 * Filter candidates assignable to a given type.
	 * @see org.springframework.core.type.filter.AssignableTypeFilter
	 */
	ASSIGNABLE_TYPE,

	/**
	 * Filter candidates matching a given AspectJ type pattern expression.
	 * @see org.springframework.core.type.filter.AspectJTypeFilter
	 */
	ASPECTJ,

	/**
	 * Filter candidates matching a given regex pattern.
	 * @see org.springframework.core.type.filter.RegexPatternTypeFilter
	 */
	REGEX,

	/** Filter candidates using a given custom
	 * {@link org.springframework.core.type.filter.TypeFilter} implementation.
	 */
	CUSTOM

}
我们可以这样来匹配,来指定不同的匹配规则:
@Configuration
//excludeFilters = Filter[];指定在扫描的时候按照什么规则来排除脑哪些组件
//includeFilters = Filter[];指定在扫描的时候,只需要包含哪些组件
@ComponentScans(value = {
        @ComponentScan(value = "com.ldc",includeFilters = {
                //这里面是一个@Filter注解数组,FilterType.ANNOTATION表示的排除的规则 :按照注解的方式来进行匹配
                //classes = {Controller.class}表示的是标有这些注解的类给纳入到IOC容器中

                // FilterType.ANNOTATION 按照注解来进行匹配
                // FilterType.ASSIGNABLE_TYPE 按照给定的类型来进行匹配
                @Filter(type = FilterType.ANNOTATION, classes = {Controller.class}),
                //按照给定的类型来进行匹配
                @Filter(type = FilterType.ASSIGNABLE_TYPE, classes = {BookService.class})
        },useDefaultFilters = false)
})

public class MainConfig {

    @Bean(value = "person")
    public Person person01() {
        return new Person("lisi",20);
    }

}
测试结果如下:
org.springframework.context.annotation.internalConfigurationAnnotationProcessor
org.springframework.context.annotation.internalAutowiredAnnotationProcessor
org.springframework.context.annotation.internalRequiredAnnotationProcessor
org.springframework.context.annotation.internalCommonAnnotationProcessor
org.springframework.context.event.internalEventListenerProcessor
org.springframework.context.event.internalEventListenerFactory
mainConfig
bookController
bookService
person
bookService组件又重新的被IOC容器给管理了;
下面的这两种是我们最常用的匹配规则:
FilterType.ANNOTATION 按照注解来进行匹配
FilterType.ASSIGNABLE_TYPE 按照给定的类型来进行匹配
我们还可以来写上一个 FilterType.ASPECTJ表达式来进行匹配,这个不常用;
我们也可以按照正则表达式FilterType.REGEX的方式来进行匹配:
我们来说说最后一种:自定义匹配规则FilterType.CUSTOM
我们可以自己来写一个匹配规则的类:MyTypeFilter,这个类要实现TypeFilter这个接口
public class MyTypeFilter implements TypeFilter {
    /**
     *
     * @param metadataReader  the metadata reader for the target class 读取到当前正在扫描的类的信息
     * @param metadataReaderFactory a factory for obtaining metadata readers 可以获取到其他任何类的信息
     * @return
     * @throws IOException
     */
    @Override
    public boolean match(MetadataReader metadataReader, MetadataReaderFactory metadataReaderFactory) throws IOException {
        //获取到当前类注解的信息
        AnnotationMetadata annotationMetadata = metadataReader.getAnnotationMetadata();
        //获取当前类的资源的信息(比如类的路径)
        Resource resource = metadataReader.getResource();

        //获取到当前正在扫描的类的信息
        ClassMetadata classMetadata = metadataReader.getClassMetadata();
        String className = classMetadata.getClassName();
        System.out.println("通过自定义的匹配规则--->"+className);
        return false;
    }
}
这个时候,我们就可以这样来用了:使用FilterType.CUSTOM
@Configuration
//excludeFilters = Filter[];指定在扫描的时候按照什么规则来排除脑哪些组件
//includeFilters = Filter[];指定在扫描的时候,只需要包含哪些组件
@ComponentScans(value = {
        @ComponentScan(value = "com.ldc",includeFilters = {
                //自定义匹配的规则
                @Filter(type = FilterType.CUSTOM, classes = {MyTypeFilter.class})
        },useDefaultFilters = false)
})

public class MainConfig {

    @Bean(value = "person")
    public Person person01() {
        return new Person("lisi",20);
    }

}
现在的测试结果如下:
通过自定义的匹配规则—>com.ldc.test.IOCTest
通过自定义的匹配规则—>com.ldc.bean.Person
通过自定义的匹配规则—>com.ldc.config.MyTypeFilter
通过自定义的匹配规则—>com.ldc.controller.BookController
通过自定义的匹配规则—>com.ldc.dao.BookDao
通过自定义的匹配规则—>com.ldc.MainTest
通过自定义的匹配规则—>com.ldc.service.BookService
org.springframework.context.annotation.internalConfigurationAnnotationProcessor
org.springframework.context.annotation.internalAutowiredAnnotationProcessor
org.springframework.context.annotation.internalRequiredAnnotationProcessor
org.springframework.context.annotation.internalCommonAnnotationProcessor
org.springframework.context.event.internalEventListenerProcessor
org.springframework.context.event.internalEventListenerFactory
mainConfig
person
由于,我的自定义的规则类里面返回的是false,所有一个都没有匹配到;
我们可以这样来修改一下,让clsssName里面包含“er”的组件给匹配到:
public class MyTypeFilter implements TypeFilter {
    /**
     *
     * @param metadataReader  the metadata reader for the target class 读取到当前正在扫描的类的信息
     * @param metadataReaderFactory a factory for obtaining metadata readers 可以获取到其他任何类的信息
     * @return
     * @throws IOException
     */
    @Override
    public boolean match(MetadataReader metadataReader, MetadataReaderFactory metadataReaderFactory) throws IOException {
        //获取到当前类注解的信息
        AnnotationMetadata annotationMetadata = metadataReader.getAnnotationMetadata();
        //获取当前类的资源的信息(比如类的路径)
        Resource resource = metadataReader.getResource();

        //获取到当前正在扫描的类的信息
        ClassMetadata classMetadata = metadataReader.getClassMetadata();
        String className = classMetadata.getClassName();
        System.out.println("通过自定义的匹配规则--->"+className);

        if (className.contains("er")) {
            return true;
        }
        return false;
    }
}
通过自定义的匹配规则—>com.ldc.test.IOCTest
通过自定义的匹配规则—>com.ldc.bean.Person
通过自定义的匹配规则—>com.ldc.config.MyTypeFilter
通过自定义的匹配规则—>com.ldc.controller.BookController
通过自定义的匹配规则—>com.ldc.dao.BookDao
通过自定义的匹配规则—>com.ldc.MainTest
通过自定义的匹配规则—>com.ldc.service.BookService
org.springframework.context.annotation.internalConfigurationAnnotationProcessor
org.springframework.context.annotation.internalAutowiredAnnotationProcessor
org.springframework.context.annotation.internalRequiredAnnotationProcessor
org.springframework.context.annotation.internalCommonAnnotationProcessor
org.springframework.context.event.internalEventListenerProcessor
org.springframework.context.event.internalEventListenerFactory
mainConfig
person
myTypeFilter
bookController
bookService
这个时候,包含“er”的组件就给添加到了IOC容器中了;只要在包扫描里面的包里面的每一个类都会进入到这个自定义的匹配规则进行匹配;
组件注册-@Scope-设置组件作用域
首先有一个配置类:
@Configuration
public class MainConfig2 {

    //默认是单实例的
    @Bean("person")
    public Person person() {
        return new Person();
    }

}
测试方法:
    @Test
    public void test02() {
        ApplicationContext applicationContext = new AnnotationConfigApplicationContext(MainConfig2.class);
        String[] definitionNames = applicationContext.getBeanDefinitionNames();
        for (String name : definitionNames) {
            System.out.println(name);
        }
        //默认是单实例的
        Person person1 = (Person) applicationContext.getBean("person");
        Person person2 = (Person) applicationContext.getBean("person");
        System.out.println(person1==person2);
    }
测试结果如下:
org.springframework.context.annotation.internalConfigurationAnnotationProcessor
org.springframework.context.annotation.internalAutowiredAnnotationProcessor
org.springframework.context.annotation.internalRequiredAnnotationProcessor
org.springframework.context.annotation.internalCommonAnnotationProcessor
org.springframework.context.event.internalEventListenerProcessor
org.springframework.context.event.internalEventListenerFactory
mainConfig2
person
true
说明这个bean的实例是单例的;
我们可以用@Scope这个注解来指定作用域的范围:这个就相当于在xml文件中配置的<bean>标签里面指定scope=“prototype” 属性;
@Target({ElementType.TYPE, ElementType.METHOD})
@Retention(RetentionPolicy.RUNTIME)
@Documented
public @interface Scope {

	/**
	 * Alias for {@link #scopeName}.
	 * @see #scopeName
	 */
	@AliasFor("scopeName")
	String value() default "";

	/**
	 * Specifies the name of the scope to use for the annotated component/bean.
	 * <p>Defaults to an empty string ({@code ""}) which implies
	 * {@link ConfigurableBeanFactory#SCOPE_SINGLETON SCOPE_SINGLETON}.
	 * @since 4.2
	 * @see ConfigurableBeanFactory#SCOPE_PROTOTYPE
	 * @see ConfigurableBeanFactory#SCOPE_SINGLETON
	 * @see org.springframework.web.context.WebApplicationContext#SCOPE_REQUEST
	 * @see org.springframework.web.context.WebApplicationContext#SCOPE_SESSION
	 * @see #value
	 */
	@AliasFor("value")
	String scopeName() default "";

	/**
	 * Specifies whether a component should be configured as a scoped proxy
	 * and if so, whether the proxy should be interface-based or subclass-based.
	 * <p>Defaults to {@link ScopedProxyMode#DEFAULT}, which typically indicates
	 * that no scoped proxy should be created unless a different default
	 * has been configured at the component-scan instruction level.
	 * <p>Analogous to {@code <aop:scoped-proxy/>} support in Spring XML.
	 * @see ScopedProxyMode
	 */
	ScopedProxyMode proxyMode() default ScopedProxyMode.DEFAULT;

}
从源码的注释上,我们可以知道scopeName可以取下面这些值:前两个用的比较多,我们就来看看前面两个可以取的值
ConfigurableBeanFactory#SCOPE_PROTOTYPE
ConfigurableBeanFactory#SCOPE_SINGLETON
org.springframework.web.context.WebApplicationContext#SCOPE_REQUEST
org.springframework.web.context.WebApplicationContext#SCOPE_SESSION
我们可以点到ConfigurableBeanFactory接口去看一下:
public interface ConfigurableBeanFactory extends HierarchicalBeanFactory, SingletonBeanRegistry {
    String SCOPE_SINGLETON = "singleton";
    String SCOPE_PROTOTYPE = "prototype";

    void setParentBeanFactory(BeanFactory var1) throws IllegalStateException;

    void setBeanClassLoader(ClassLoader var1);

    ClassLoader getBeanClassLoader();

    void setTempClassLoader(ClassLoader var1);

    ClassLoader getTempClassLoader();

    void setCacheBeanMetadata(boolean var1);

    boolean isCacheBeanMetadata();

    void setBeanExpressionResolver(BeanExpressionResolver var1);

    BeanExpressionResolver getBeanExpressionResolver();

    void setConversionService(ConversionService var1);

    ConversionService getConversionService();

    void addPropertyEditorRegistrar(PropertyEditorRegistrar var1);

    void registerCustomEditor(Class<?> var1, Class<? extends PropertyEditor> var2);

    void copyRegisteredEditorsTo(PropertyEditorRegistry var1);

    void setTypeConverter(TypeConverter var1);

    TypeConverter getTypeConverter();

    void addEmbeddedValueResolver(StringValueResolver var1);

    boolean hasEmbeddedValueResolver();

    String resolveEmbeddedValue(String var1);

    void addBeanPostProcessor(BeanPostProcessor var1);

    int getBeanPostProcessorCount();

    void registerScope(String var1, Scope var2);

    String[] getRegisteredScopeNames();

    Scope getRegisteredScope(String var1);

    AccessControlContext getAccessControlContext();

    void copyConfigurationFrom(ConfigurableBeanFactory var1);

    void registerAlias(String var1, String var2) throws BeanDefinitionStoreException;

    void resolveAliases(StringValueResolver var1);

    BeanDefinition getMergedBeanDefinition(String var1) throws NoSuchBeanDefinitionException;

    boolean isFactoryBean(String var1) throws NoSuchBeanDefinitionException;

    void setCurrentlyInCreation(String var1, boolean var2);

    boolean isCurrentlyInCreation(String var1);

    void registerDependentBean(String var1, String var2);

    String[] getDependentBeans(String var1);

    String[] getDependenciesForBean(String var1);

    void destroyBean(String var1, Object var2);

    void destroyScopedBean(String var1);

    void destroySingletons();
}
我们来指定一个多实例的:
@Configuration
public class MainConfig2 {
    //singleton:单实例的
    //prototype:多实例的
    //request:同一次请求创建一个实例
    //session:同一个session创建的一个实例
    @Scope("prototype")
    //默认是单实例的
    @Bean("person")
    public Person person() {
        return new Person();
    }

}
现在,我们再来测试一次:
    @Test
    public void test02() {
        ApplicationContext applicationContext = new AnnotationConfigApplicationContext(MainConfig2.class);
        String[] definitionNames = applicationContext.getBeanDefinitionNames();
        for (String name : definitionNames) {
            System.out.println(name);
        }
        //默认是单实例的
        Person person1 = (Person) applicationContext.getBean("person");
        Person person2 = (Person) applicationContext.getBean("person");
        System.out.println(person1==person2);
    }
这个时候的测试结果如下:
org.springframework.context.annotation.internalConfigurationAnnotationProcessor
org.springframework.context.annotation.internalAutowiredAnnotationProcessor
org.springframework.context.annotation.internalRequiredAnnotationProcessor
org.springframework.context.annotation.internalCommonAnnotationProcessor
org.springframework.context.event.internalEventListenerProcessor
org.springframework.context.event.internalEventListenerFactory
mainConfig2
person
false
这个时候,bean的实例就多实例的,每调用一次getBean()方法就会创建一个实例;
我们来看看当bean的作用域为单例的时候,它在IOC容器中是何时创建的:
@Configuration
public class MainConfig2 {

    @Scope
    @Bean("person")
    public Person person() {
        System.out.println("给IOC容器中添加Person...");
        return new Person();
    }

}
首先,我们先启动IOC容器,但是不调用getBean方法来获取Person实例:
    @Test
    public void test02() {
        ApplicationContext applicationContext = new AnnotationConfigApplicationContext(MainConfig2.class);
    }
测试结果如下:
给IOC容器中添加Person…
这个时候,我们就可以发现,当作用域为单例的时候,IOC容器在启动的时候,就会将容器中所有作用域为单例的bean的实例给创建出来;以后的每次获取,就直接从IOC容器中来获取,相当于是从map.get()的一个过程;
然而,当我们的bean的作用域改成多实例的时候,我们再看看结果:
@Configuration
public class MainConfig2 {

    @Scope("prototype")
    @Bean("person")
    public Person person() {
        System.out.println("给IOC容器中添加Person...");
        return new Person();
    }

}
当我们再运行的时候:
    @Test
    public void test02() {
        ApplicationContext applicationContext = new AnnotationConfigApplicationContext(MainConfig2.class);
    }
我们可以发现,控制台没有任何的输出结果;在IOC容器创建的时候,没有去创建这个作用域为多实例的bean;
这个时候,我们来调用getBean()方法来获取一下:
    @Test
    public void test02() {
        ApplicationContext applicationContext = new AnnotationConfigApplicationContext(MainConfig2.class);
        System.out.println("IOC容器创建完成...");
        Person person = (Person) applicationContext.getBean("person");
    }
这个时候,控制台打印了:
IOC容器创建完成…
给IOC容器中添加Person…
同时, 如果我多次获取:
    @Test
    public void test02() {
        ApplicationContext applicationContext = new AnnotationConfigApplicationContext(MainConfig2.class);
        System.out.println("IOC容器创建完成...");
        Person person = (Person) applicationContext.getBean("person");
        Person person1 = (Person) applicationContext.getBean("person");
    }
测试结果如下:
IOC容器创建完成…
给IOC容器中添加Person…
给IOC容器中添加Person…
我们可以发现,我们用getBean方法获取几次,就创建几次bean的实例;
也就是说当bean是作用域为多例的时候,IOC容器启动的时候,就不会去创建bean的实例的,而是当我们调用getBean()获取的时候去创建bean的实例;而且每次调用的时候,都会创建bean的实例;


 2176
2176


 被折叠的 条评论
为什么被折叠?
被折叠的 条评论
为什么被折叠?
 到【灌水乐园】发言


