


SpringBoot整合数据库版本管理工具Liquibase
背景
日常开发中,大家有没有遇到一个问题,随着系统越来越复杂,业务模块越来越多,数据库脚本维护变成一个难题,特别是系统版本多起来了,有定制化的需求后,不同版本的数据库脚本维护更加难了,每次发版都需要整理测试环境新增的脚本到生产环境,这无疑是非常痛苦的,这个时候我们就需要一款数据库版本维护工具来维护我们的数据库脚本。
提示:以下是本篇文章正文内容,仅供参考
一、什么是数据库版本管理工具?
数据库版本管理工具主要特性
- 从迁移脚本中创建新的数据库
- 检查数据库状态
- 从一个版本快速到达另外一个版本
什么是数据库版本管理工具
数据库版本管理工具顾名思义是用来管理数据库版本的,像我们的代码有svn和git管理,那么数据库版本怎么来控制呢?当然是用数据库版本管理工具来了,目前主流的数据库管理工具有Flyway和Liquibase,这里我们选择使用Liquibase。
Flyway和Liquibase对比及选型
共同点:
数据库迁移工具很多,Flyway和Liquibase之所以比较常用是因为springboot内置集成了这两个工具,使用起来比较方面。
差异点:
Flyway的好处在于简单,而且直接书写SQL并不需要额外的学习,直接将你需要执行的SQL语句保存为文件,放入应用中执行即可,缺点在于如果项目切换了数据库类型,原来维护的sql也就需要改动了。
Liquibase相对就复杂,优点在于兼容多数据库,不需要重新写sql。
两款数据库迁移工具其实定位上是差别的,一般来说,整体变动不大的小项目用Flyway,而大应用和企业应用用Liquibase更合适。
二、Liquibase整合步骤
1.引入pom依赖
代码如下(示例):
<dependency>
    <groupId>org.liquibase</groupId>
    <artifactId>liquibase-core</artifactId>
</dependency>
2.配置application.yml
配置如下(示例):
spring:
  liquibase:
    change-log: classpath:liquibase/master.xml #指定master.xml文件的位置
3.新建master.xml(用于配置你的增量脚本)
master.xml配置如下(示例):
<?xml version="1.0" encoding="utf-8"?>
<databaseChangeLog
        xmlns="http://www.liquibase.org/xml/ns/dbchangelog"
        xmlns:xsi="http://www.w3.org/2001/XMLSchema-instance"
        xsi:schemaLocation="http://www.liquibase.org/xml/ns/dbchangelog
        http://www.liquibase.org/xml/ns/dbchangelog/dbchangelog-3.4.xsd">

    <include file="classpath:liquibase/init/init_table.xml" relativeToChangelogFile="false"/>
    <include file="classpath:liquibase/v1.0/user.xml" relativeToChangelogFile="false"/>

</databaseChangeLog>
生成初始数据文件init_table.xml方式如下:
引入maven插件
<plugin>
    <groupId>org.liquibase</groupId>
    <artifactId>liquibase-maven-plugin</artifactId>
    <version>3.4.2</version>
    <configuration>
        <changeLogFile>${basedir}/src/main/resources/liquibase/init/init_table.xml</changeLogFile>
        <!--changelog文件生成位置-->
        <outputChangeLogFile>${basedir}/src/main/resources/liquibase/init/init_table.xml</outputChangeLogFile>
        <!--数据库连接-->
        <driver>com.mysql.jdbc.Driver</driver>
        <url>jdbc:mysql://192.168.40.129:13306/wework-chat-db</url>
        <username>root</username>
        <password>123456</password>
        <!--输出文件编码-->
        <outputFileEncoding>UTF-8</outputFileEncoding>
        <!--执行的时候是否显示详细的参数信息-->
        <verbose>true</verbose>
        <!--连接非本地数据库是否弹出提示框-->
        <promptOnNonLocalDatabase>false</promptOnNonLocalDatabase>
        <!--生成changelog文件内容-->
        <diffTypes>tables, views, columns, indexs,foreignkeys, primarykeys, uniqueconstraints, data</diffTypes>
    </configuration>
</plugin>
点击生成初始化文件
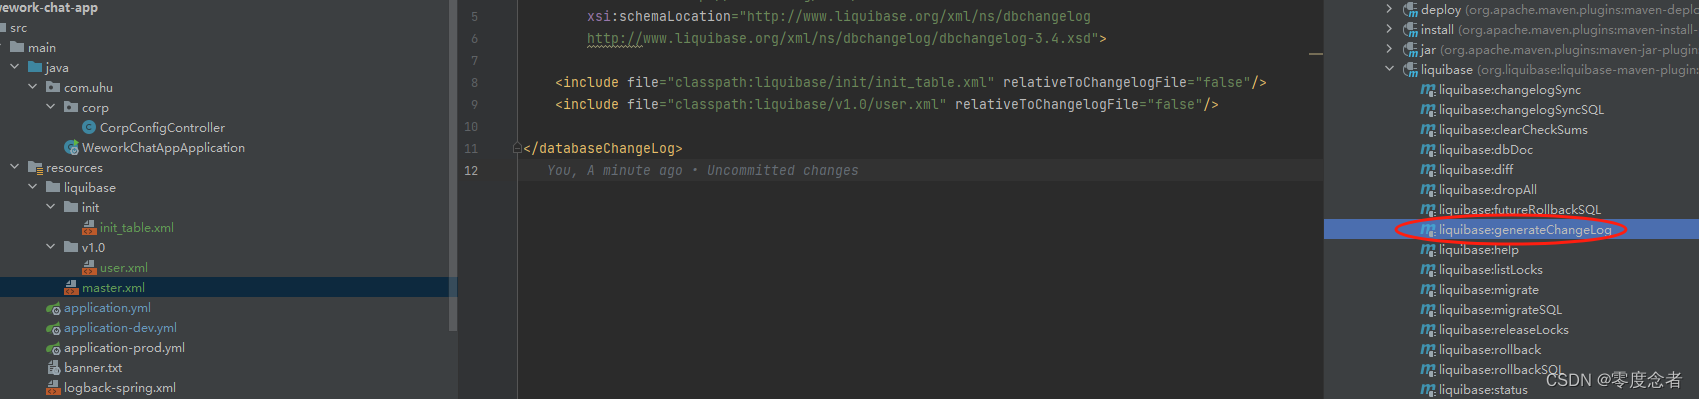
查看生成的init_table.xml
<?xml version="1.0" encoding="UTF-8" standalone="no"?>
<databaseChangeLog xmlns="http://www.liquibase.org/xml/ns/dbchangelog" xmlns:ext="http://www.liquibase.org/xml/ns/dbchangelog-ext" xmlns:xsi="http://www.w3.org/2001/XMLSchema-instance" xsi:schemaLocation="http://www.liquibase.org/xml/ns/dbchangelog-ext http://www.liquibase.org/xml/ns/dbchangelog/dbchangelog-ext.xsd http://www.liquibase.org/xml/ns/dbchangelog http://www.liquibase.org/xml/ns/dbchangelog/dbchangelog-3.4.xsd">
    <changeSet author="Administrator (generated)" id="1699021847622-1">
        <createTable tableName="t_corp_config">
            <column name="corp_id" remarks="设置企业微信的corpId" type="VARCHAR(32)">
                <constraints nullable="false"/>
            </column>
            <column name="corp_name" remarks="设置企业名称" type="VARCHAR(50)">
                <constraints nullable="false"/>
            </column>
            <column name="agent_id" remarks="设置企业微信应用的AgentId" type="INT"/>
            <column name="secret" remarks="设置企业微信应用的Secret" type="VARCHAR(100)"/>
            <column name="token" remarks="设置企业微信应用的token" type="VARCHAR(100)"/>
            <column name="aes_key" remarks="设置企业微信应用的EncodingAESKey" type="VARCHAR(100)"/>
        </createTable>
    </changeSet>
    <changeSet author="Administrator (generated)" id="1699021847622-2">
        <addPrimaryKey columnNames="corp_id" constraintName="PRIMARY" tableName="t_corp_config"/>
    </changeSet>
</databaseChangeLog>
后续有新的sql脚本就添加到master.xml,比如v1.0/user.xml
总结
提示:这里对文章进行总结:
例如:以上就是今天要讲的内容,本文仅仅简单介绍了Liquibase的使用,希望对你有帮助。


 345
345


 被折叠的 条评论
为什么被折叠?
被折叠的 条评论
为什么被折叠?
 到【灌水乐园】发言


