


 本文围绕React框架展开,涵盖面试要点、环境搭建、目录结构、JSX语法等知识点。对比了Vue与React,介绍组件传值、生命周期等内容。着重阐述Redux工作流程、创建方法及进阶应用,还提及Redux-thunk、Redux-saga和React-Redux的配置与运用,助力掌握React开发技能。
面试
Redux基本理念.(说下action dispatch state啥的,单向数据流)
拓展文件添加
Redux DevTools
react
知识点
基于数据编程的声明式开发。可以与其他框架并存,在public/index.html中可以知道整个项目的运行都是基于在<div id="root"></div>下运行。 函数式的开发为自动化测试提供了便利


框架比较(vue/react)
React: 灵活性,适用复杂业务
Vue: 丰富API,适用复杂度低
环境搭建
npx: npm install -g npx
yarn: npm install -g yarn 版本 yarn --version
目录结构
yarn.lock — 项目依赖安装包版本号
src/indexjs — 入口文件
src/App.test.js ---- 自动化测试文件
public/manifest.json — 网页生成放到桌面显示的配置
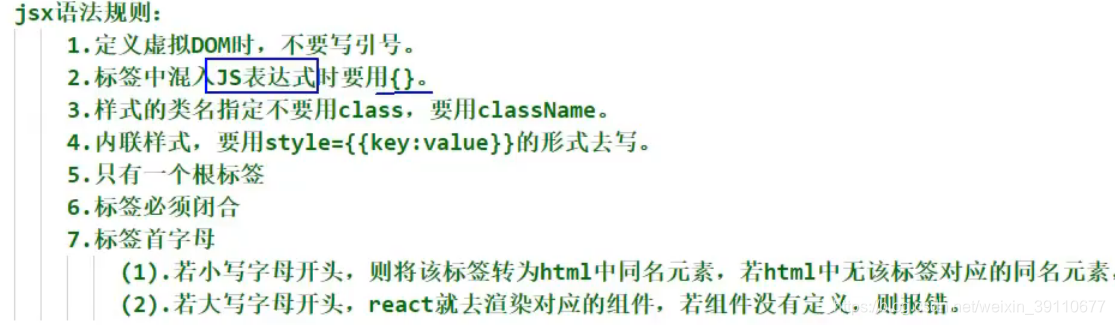
JSX语法
babel 去解析成jsx浏览器能够识别的 JS代码
- 组件首字母大写
- return 内容需要一个大的容器包裹,如果我们无需增加一个大的容器,可以用
Fragment进行包裹,编译后就没有更多的htmlDom树了 - 注释写法
{/* 下面inout框 */} - html 里写样式类名,需要写成
className="input"才能识别 - 如果输出的富文本能够识别html标签只要
dangerouslySetInnerHTML = {{__html:item}} - 聚集光标原本for是跟循环冲突,需要写成
htmlFor - JSX编译 JSX —>createElement ----> 虚拟DOM(JS对象 )—> 真实的 DOM
- 如果使用了JSX语法需要引入
import React from 'react'; - 组件
写法
- react没有双向绑定,需要更改值得基于this.setState({}) 进行改变视图
// 常规写法,prevState为初始数据
this.setState((prevState) => ({ }))

// 动态化定义参数
onChange = {this.saveFtom('userName')} //会导致自执行函数,通过设置return避免
 saveFtom = (datType) => {
    return (event) => {
         this.setState({   [datType]: 'xxx'   })
    }
}
- 定义的方法找不到this,需要基于bind找到定义的class的this值
- 循环的数据都需要自行添加key值,包括组件写法,循环都得基于js方法实现
map
<TodoItem
    key={index}
    content={item}
    index={index}
    deleteItem={this.handleDelit}
  />
拆分组件和组件之间的传值
react具有单向数据流的概念,父组件可以往子组件传值,但是子组件不能去更改这个值
父组件传值给子组件
// 属性传值
// 父组件
<TodoItem content={item}/>
// 子组件
<div>{this.props.content}</div>
子组件调用父组件的方法
// 父组件
<TodoItem
  content={item}
  index={index}
  deleteItem={this.handleDelit.bind(this)}
/>
handleDelit(index) {
   const list = [...this.state.list];
   list.splice(index,1);
   this.setState({
     list : list
   })
 }
// 子组件
 constructor(props) {
    super(props);
    this.handleDelit = this.handleDelit.bind(this)
 }
 render() {
   return (
     <div onClick={this.handleDelit}>{this.props.content}</div>
   )
 }
 handleDelit() {
   this.props.deleteItem(this.props.index)
 }
PropTypes和defaultProps 类型规范,默认值
子组件接收到父组件的值以后,进行类型规范化
// 对传入的值进行类型规范,isRequired 是必传的限定
import PropTypes from 'prop-types'
TodoItem.propTypes = {
	test:PropTypes.string.isRequired,
}
// defaultProps 默认值,即使父级没传也能用默认的占位
TodoItem.defaultProps = {
  test: '默认值'
}
执行
render
render 数据发生改变,那么会重新执行reder函数,页面便会跟着渲染。
当组件的state或者props发生改变的时候,render函数就会重新执行。
虚拟DOM能够被多端编译识别,那么容易兼容多端转换


虚拟DOM 本质是Object类型的对象
diff算法
- setState
异步执行,提升react的底部性能,如遇到多次调用那么真正执行的成最后一次更新DOM - 同层比对,算法简单提高性能
- key值 选以
稳定性的代表值,如果key是以index下标那么在增删的时候,index的值就会发生变化,那么就很不稳定。
常用方法
ref使用
字符串形式
<div ref='input1'></div>
取出真正的节点数: this.refs.input1
回调形式
函数式的ref(如下)执行完就被释放了,再次render回调又是一个新的函数,但是ref为了避免前一次调用的影响,会先传个null进去执行,然后再将当前节点放进去(影响忽略不计)
 <ul ref={(ul) => {this.ul = ul}}>  // this.url 就能取都值了
 // // 由于setState是异步执行,那么获取他的调试得等他的回调
this.setState((prevState) => ({
     inputValue: ''
 }),() => { // 由于setState是异步执行,那么获取他的调试得等他的回调
     console.log(this.ul.querySelectorAll('div').length)
 })
进行优化,避免每次render的时候执行ref
ref = {this.saveInput}
saveInput = (e) => {
  this.input = e
}
createRef
 myRef = React.createRef()
 // 获取 this.myRef
 <div ref={this.myRef}></div>
绑定方法传值
 this.handleItemDelete = this.handleItemDelete.bind(this);
 // index 就是我们需要传的参数数据
 <List.Item onClick={(index) => {this.props.handleItemDelete(index)}}>
   {item}
 </List.Item>
生命周期(每个组件都有生命周期函数)
- 页面初始化,做一些设置
- 组件挂载执行
- 数据发生变化页面也会同步,此时分为父组件接收子组件数据变化和本身组件的页面变化
- 移除

 // 组件创建的时候被调用
constructor(props) { }
// 1. 在组件 即将 被挂载到页面的时刻自动执行
  componentWillMount() {
  }
  // 组件被更新之前,他会自动被执行。此处可以通过return去控制是否要更新视图
  shouldComponentUpdate() {
    console.log('shouldComponentUpdate')
    return true
  }
  // 组件被更新之前,他会自动执行,但是他在shouldComponent之后执行,如果
  // shouldComponentUpdate返回true 它才执行,如果返回false,那么就不会执行
  componentWillUpdate() { }
  render() {}
  // 3. 组件被挂载到页面 之后 ,自动被执行
  componentDidMount() {  }
  // 组件更新完成之后,他会被执行
  componentDidUpdate() {  }
  componentWillUnmount() {
   console.log('子组件移除了 componentWillUnmount')
 }

性能优化
shouldComponentUpdate
每次只要更新数据,全部的页面组件都会重新被render一遍,那么设置这个通过比对发生变化才去执行render函数
// 询问组件是否要更新(可避免组件的render的操作)
  shouldComponentUpdate(nextProps,nextState) {
    // 判断content 是否发生变化
    if(nextProps.content !== this.props.content) {
      return true
    } else {
      return false
    }
  }
构造器 constructor
目的: 初始化状态(state), 解决this指向问题
onClick 后面的是事件回调使用,在严格模式下才导致this丢失
componentDidMount
组件被挂载到页面 之后 ,自动被执行,并只执行一次,那么一些页面请求的接口写在此生命周期之下
componentDidMount() {
   axios.post('https://txd.letao.com/api/v1/store/get_index_auth').then(res => {
     console.log(res.data);
   }).catch(err => console.log(err))
 }
数据类型约束
calss Person extends 父级 {
	// 数据定义约束
	static propType = {
	   name: PropTypes.string.isRequired  // 数据必填的,且是string类型约束
	}
	// 默认值赋值
	static defaultProps = {
	   name: '默认值'
	}
}
动画效果
- CSS3 animation属性
- 使用 CSSTransition 插件对单个进行操作
命令:yarn add react-transition-group
资料: CSSTransition .// 相关实现 import { CSSTransition } from 'react-transition-group' {/* <div className = {this.state.show ? 'show':'hide'}>hellow</div> */} {/* unmountOnExit 移除Dom */} {/* onEntered -> 能够通过 JS 改变动画颜色 appear -> 能够产生出场动画,需要相应的添加 fade-appear 在样式表中 */} <CSSTransition in={this.state.show} timeout = {1000} classNames="fade" unmountOnExit onEntered={(el) => {el.style.color ="blue"}} appear = {true} > <div class="Bigsize">hellow</div> </CSSTransition> - TransitionGroup 多个组合动画
import { CSSTransition,TransitionGroup } from 'react-transition-group'
<TransitionGroup>
  {
    this.state.list.map((item,index) => {
      return (
        <CSSTransition
          timeout = {1000}
          classNames="fade"
          unmountOnExit
          onEntered={(el) => {el.style.color ="blue"}}
          appear = {true}
          key={index}
        >
          <div >{item}</div>
        </CSSTransition>
      )
    })
  }
</TransitionGroup>
<button onClick={this.handleAddItem}>增加</button>
Redux

工作流程

借书(蓝色) --> 你要借什么书(黄色) --> 图书馆的管理员(橙色) —> 书架的书籍位置记录,资料库(紫色)
创建redux
- 命令
yarn add redux - 创建store模块 (图书馆管理员 )
import { createStore } from 'redux'; import reducer from './reducer'; //笔记本 const store = createStore(reducer); export default store; - 创建reducer模块 (资料库记载)
// 笔记本传输 const defaultState = { inputValue: '111', list: [] } const calculate = (state = defaultState ,action) => { return state; } export default calculate - 页面展示 (借书人)
import store from '../store'
constructor(props) {
	console.log(store.getState())
}
Redux 传值 & 改变视图层
谷歌可以引入 Redux DevTools 查看错误
流程: 改变数据 —> dispatch()发送数值 —> store reducer 接收数据通过深拷贝赋值新数据抛出 —> 页面上通过store.subscribe()触发更新方法 —> this.setState更新页面数据视图
实现:
// 页面
import store from '../store'
constructor(props) {
	super(props);
    this.state= {
      getStore:store.getState()
    }
	this.handleInputChange = this.handleInputChange.bind(this) // input 数据
	store.subscribe(this.handleStoreChange) // 监听store是否改变,一旦改变则执行(解决store改变,界面层未更新)
}
render() {
	return(
		<Input
            placeholder="Basic usage"
             value={this.state.getStore.inputValue}
             style={{width: '300px',marginRight: '20px'}}
             onChange={this.handleInputChange}
         />
	)
}
//  监听输入框数据
handleInputChange(e) {
   const action = {
     type: 'change_input_value', // 随便定义一个标识,目的是为了store去检测他有没改变而已
     value: e.target.value
   }
   //  发送传值
   store.dispatch(action)
   console.log(e.target.value)
}
//  监听store数据改变,让视图层更改
handleStoreChange() {
  this.setState({// 重新获取store的数据,再进行赋值同步
    getStore:store.getState()
  })
  console.log('change')
}
// store 页面
const defaultState = {
  inputValue: '正在输入',
  list: []
}
// reducer 可以接收state,但是绝对不能修改
const calculate = (state = defaultState ,action) => {
    if(action.type === 'change_input_value') {
      // 深拷贝
      const newState = JSON.parse(JSON.stringify(state));
      newState.inputValue = action.value;
      return newState; //此处结束后只能让store更新了,但是界面数据未更新
    }
     return state;
}
分拆式管理,标签化封装
- actionTypes
拆分,目的就是为了避免更改代码的时候自定义的类型拼写错误导致的低级错误而找不到
- actionCreators
目的是将redux相关的操作提取出来封装,便于维护
Redux API
- createStore
- store.dispatch
- store.getState
- store.subscribe
Redux 进阶
UI组件(渲染处理)和容器组件(逻辑处理)
结构化页面,UI组件当成是一个子组件的形式传入,只负责html页面书写,而容器组件还是页面,在写法上按照父传子即可实现,如:
// 页面 list
import React, {Component} from 'react';
class NewTodo extends Component {
constructor(props) {
    super(props);
    this.state= {
      getStore:store.getState()
    }
    this.handleInputChange = this.handleInputChange.bind(this)
    this.sumit = this.sumit.bind(this)
    store.subscribe(this.handleStoreChange) // 监听store是否改变,一旦改变则执行(解决store改变,界面层未更新)
  }
}
render() {
    return (
        <NewTodoUI
            inputValue={this.state.getStore.inputValue}
            handleInputChange={this.handleInputChange}
            sumit={this.sumit}
        />
    )
  }
// 组件 listUI
import React, {Component,Fragment} from 'react';
import { List,Button,Input} from 'antd';
class NewTodoUI extends Component {
  render() {
    return (
      <Fragment>
       <h1>Todo 新版,Ui组件引用</h1>
       <div>
          <Input
              placeholder="Basic usage"
              value={this.props.inputValue}
              style={{width: '300px',marginRight: '20px'}}
              onChange={this.props.handleInputChange}
          />
          <Button type="primary" onClick={this.props.sumit}>提交</Button>
       </div>
      <div style={{marginTop: '30px',width: '600px'}}>
         <List
            header={<div class="list">记录本</div>}
            bordered
            dataSource={this.props.list}
            renderItem={(item,index) => (
              <List.Item onClick={(index) => {this.props.handleItemDelete(index)}}>
                {item}
              </List.Item>
            )}
          />
      </div>
      </Fragment>
    )
  }
}
无状态组件
UI 容器中就只有一个render可以进行使用,性能性更高,因为类函数执行起来有它的生命周期函数执行比起无状态就会产生更多的浪费
class NewTodoUI extends Component {
	render()
}
// 进行更换(无状态)
const NewTodoUI=(props) => {
}
Redux-thunk
使用 Redux-thunk 中间件实现ajax数据请求
原因: 复杂的逻辑代码或是异步请求在组件上实现会显得整个代码很难维护,不便于管理
解决: 进行统一管理,增加可维护性
优势: thunk的环境 可以支持我们在action上写异步代码,封装的方法调用即使返回的是函数,也是能够发回去给store
需要引入使用 Redux-thunk,redux-devtools-extension.
配置
结合以上的引入,我们重写了store里的index数据
import { createStore, applyMiddleware , compose} from 'redux';
import thunk from 'redux-thunk';
import reducer from './reducer'; //笔记本
// 将资料 reducer 传给管理员 抛出
const composeEnhancers =
  typeof window === 'object' && window.__REDUX_DEVTOOLS_EXTENSION_COMPOSE__ ?
    window.__REDUX_DEVTOOLS_EXTENSION_COMPOSE__({ }) : compose;
const enhancer = composeEnhancers(
  applyMiddleware(thunk),
);

const store = createStore(reducer,enhancer)
// redux中间件
// ,window.__REDUX_DEVTOOLS_EXTENSION__ && window.__REDUX_DEVTOOLS_EXTENSION__() // 如果你的页面window下有安装__REDUX_DEVTOOLS_EXTENSION__,那么我就会去运行你这块代码

export default store;
运用
// list
// 组件被挂载到页面 之后 ,自动被执行
  componentDidMount() {
    const action = getInitList() // 可进行异步请求
    store.dispatch(action)
}
// actionCreators
import axios from 'axios'
export const getInitList = (data) => ({
  type: INIT_LIST,
  data
})
export const getTodoList = () => {//#endregion
   return (dispatch) => {
     axios.get('/list.json').then(res => {
       const data = res.data;
       const action = getInitList(data);
       dispatch(action)
     })
   }
}
什么是Redux的中间件

中间:Action(对象)和Store 之间
Redux 带来的是Action可以成为函数, 主要是在Dispatch做封装升级,根据参数不同执行不同操作,如果是函数那么会先执行再传给Store
Redux-saga
配置
安装: redux-saga. yarn add redux-saga
配置(路径: /store/index.js)
import createSagaMiddleware from 'redux-saga' // redux-saga中间件创建
const sagaMiddleware = createSagaMiddleware();

const enhancer = composeEnhancers(
  // applyMiddleware(thunk),
  applyMiddleware(sagaMiddleware),
);
执行
// NewTodo.js 中派发出去以后,会在reducer和sagas中做了接收
componentDidMount() {
    const action = getInitList() // 可进行异步请求
    store.dispatch(action)
}
// sagas.js
// generator 函数
function* mySaga() {
  yield takeEvery(INIT_LIST, getInitListArr); // 通过takeEvery 去捕获每次派发出来的 INIT_LIST
}
function* getInitListArr() {
	// 处理NewTodo.js派发出来的执行命令,那么在此处可以实现异步处理的诉求
	 try {
		     const res = yield axios.get('/list'); // 等yield执行完后再执行下面的代码
		     const action = getInitList(res.data);
		     yield put(action)

		  } catch(e) {
		    console.log('请求失败')
		  }
	}
yield put(action) 此处陷入了死循环
React-Redux
亮点
- 打破传统的UI和方法实现的分开执行,通过connect做连接,形成一个容器。
- 通过引用
Provider将需要的组件写在里面,实现store能够直接给到Provider下全部的组件,可以让全局无需传入store调用 - 通过将组件挂载在
connect上,分离出 数据层 和 方法层 实现
实现
- 引入
react-redux中的Provider的方法,目的是统一植入store数据供<NewTodo2 />使用
// index.js
//
import NewTodo2 from './NewTodo2/NewTodo2'
import { Provider } from 'react-redux'
const App = (
  // 通过 Provider 连接 store 使让 Provider 下的组件都有能力获取到store内容
   <Provider store={store}>
    <NewTodo2 />
  </Provider>
)
// JSX语法
ReactDOM.render( App,document.getElementById('root'));
- 规范标识命名接收
// actionTypes.js
export const  CHANGE_INPUT_VALUE = "change_input_value";
export const  ADD_ITEM = "add_item";
- 执行操作的方法抛出,统一化管理传值格式
// actionCreators.js
import {CHANGE_INPUT_VALUE,ADD_ITEM} from './actionTypes'
export const creatorInputValue = (value) => ({
  type: CHANGE_INPUT_VALUE,
  value
})
export const creatorHandleClick = () => ({
  type: ADD_ITEM,
})
- 实现UI,数据,方法分层处理,形成一个由connect连接起来的容器
// NewTodo2.js
 import {connect} from 'react-redux'
 import {creatorInputValue,creatorHandleClick,creatorDeletItem} from '../store/actionCreators'

 // UI层 => 无状态组件,提高性能
 const TodoList = (props) => {
   const { changeInputValue,inputValue,handleClick,list,handleDelete} = props
    return (
      <div>
        <div>
          <input value={inputValue} onChange ={changeInputValue}/>
          <button onClick={handleClick}>提交</button>
        </div>
        <ul>
          {
            list.map((item,index) => {
              return  <li key={index} index={index} onClick={() => {handleDelete(index)}}>{item}</li>
            })
          }
        </ul>
      </div>
    )
}

// 数据接收层  => 做连接的规则,而state 就是 store里的数据
const mapStateToProps = (state) => {
   return  {
     inputValue: state.inputValue,
     list: state.list
   }
}

// 方法处理层 => store.dispatch方法挂载到 props方法上
const mapDispatchToProps = (dispatch) => {
  return {
    changeInputValue(e) {
      const action = creatorInputValue(e.target.value);
      dispatch(action);
    },
    handleClick() {
      const action = creatorHandleClick()
      dispatch(action);
    },
  }
}

// 连接处理处理层  => 让 TodoList 跟 store 做连接。可以不用 constructor 构建,connect的作用就是将ui和实现结合在一起,容器组件
export default connect(mapStateToProps,mapDispatchToProps)(TodoList);
dispatch抛出后做数据处理赋值到 store,在return给视图层使用
import {CHANGE_INPUT_VALUE,ADD_ITEM,DELET_ITEM} from './actionTypes'
const defaultState = {
  inputValue: 'H',
  list: []
}
const calculate =  (state = defaultState ,action) => {
  if(action.type === CHANGE_INPUT_VALUE) {
    const newState = JSON.parse(JSON.stringify(state));
    newState.inputValue = action.value;
    return newState;
  }
  if(action.type === ADD_ITEM) {
    const newState = JSON.parse(JSON.stringify(state));
    newState.list.push(newState.inputValue);
    newState.inputValue = '';
    return newState;
  }
  return state;
}
export default calculate
技能点
- reducer 文件当中 如果涉及
set过多那么可以使用merge替换, ref能够获取真实的dom节点- react 面向数据编程


 1352
1352

 被折叠的 条评论
为什么被折叠?
被折叠的 条评论
为什么被折叠?
 到【灌水乐园】发言


