


 本文详细介绍了CSS3中用于用户界面的相关属性,包括appearance、text-overflow、outline、nav-index、cursor、zoom等,解释了它们的语法、参数、用途及示例,帮助开发者更好地理解和应用这些属性来定制网页交互体验。
一、用户界面相关的属性
- appearance 设置外观按照本地默认样。
- text-overflow 设置文本的溢出后的截断方式。
- outline 轮廓,在border外的(input框选中后,一圈蓝色的那个就是轮廓,不占布局空间)
- nav-index 设置导航方向(该属性将被W3C移除)
- cursor 设置光标的形状
- zoom 设置对象的缩放比例
- box-sizing 设置盒模型的组成模式
- ime-mode (该属性将被W3C移除)
- user-select 设置用户是否能选中文本
- pointer-events 设置能取消超链接的默认事件
1.appearance属性
可以使用该属性改变原本的标签外观。
设置或检索外观按照本地默认样式。
语法
appearance: none | button | button-bevel ....;(110个参数)所有主流浏览器都不支持appearance属性。
要使用必须加前缀。
FireFox2+(-moz-)、chrome4+(-webkit-)、Safari6+(-webkit-)、Opera15+(-webkit-)、
只能改变外观,不能改变功能。
例子
<!DOCTYPE html>
<html lang="en">
<head>
    <meta charset="UTF-8">
    <title>Document</title>
    <style>
        div.none>input{
            -webkit-appearance:none;
            -moz-appearance:none;
            appearance:none;
        }
        div.checkbox>input{
            -webkit-appearance:checkbox;
            -moz-appearance:checkbox;
            appearance:checkbox;
        }
        div.searchfield-cancel-button>input{
            -webkit-appearance:searchfield-cancel-button;
            -moz-appearance:searchfield-cancel-button;
            appearance:searchfield-cancel-button;
        }
        div.sliderthumb-horizontal>input{
            -webkit-appearance:sliderthumb-horizontal;
            -moz-appearance:sliderthumb-horizontal;
            appearance:sliderthumb-horizontal;
        }
        div.sliderthumb-vertical>input{
            -webkit-appearance:sliderthumb-vertical;
            -moz-appearance:sliderthumb-vertical;
            appearance:sliderthumb-vertical;
        }
    </style>
</head>
<body>
    <h3>appearance:none</h3>
    <div class="none">
        <input type="text">
    </div>
    <hr>
    <h3>appearance:checkbox</h3>
    <div class="checkbox">
        <input type="text">
    </div>
    <hr>
    <h3>appearance:searchfield-cancel-button</h3>
    <div class="searchfield-cancel-button">
        <input type="text">
    </div>
    <hr>
    <h3>appearance:sliderthumb-horizontal</h3>
    <div class="sliderthumb-horizontal">
        <input type="text">
    </div>
    <hr>
    <h3>appearance:sliderthumb-vertical</h3>
    <div class="sliderthumb-vertical">
        <input type="text">
    </div>
</body>
</html>
PS:
特别注意,这里改变的只是外观,并不具备对应的功能,实际本体还是原来的那个,就例如单选框点击是不会选中的。
2.text-overflow
当块容器<’overflow’>为非visible时(一般是hidden),定义内联内容溢出其块容器是否截断。
语法
text-overflow:clip | ellipsis参数说明
- clip:当内联内容溢出块容器时,将溢出部分裁切掉(字都可以切成一半。);
- ellipsis:当内联内容溢出块容器时,将溢出部分替换为(。。。)。
该属性一般配合块级元素的
overflow:hidden;
white-space:nowrap;强制不换行。
这两个属性使用。
要text-overflow有效果,需要添加一个overflow属性,设置为非visible的参数,否则无意义。
例子
<!DOCTYPE html>
<html lang="en">
<head>
    <meta charset="UTF-8">
    <title>Document</title>
    <style>
        ul>li>p{
            overflow: hidden;
            white-space: nowrap;
            width: 200px;
            border: 1px solid #000;
        }
        ul>li.clip>p{
            text-overflow: clip;
        }
        ul>li.elipsis>p{
            text-overflow: ellipsis;
        }
    </style>
</head>
<body>
    <ul>
        <li class="clip">
            <h3>clip:溢出的文字会被裁剪</h3>
            <p>苟利国家生死以,起义祸福避趋之!</p>
        </li>
        <li class="elipsis">
            <h3>elipsis:将溢出的文字以(...)显示</h3>
            <p>苟利国家生死以,起义祸福避趋之!</p>
        </li>
    </ul>
</body>
</html>
3.outline 轮廓
合属性,设置或检索对象外的线条轮廓。画在border外面,不占据布局空间,不影响元素尺寸;outlines可能是非矩形;其实就是border之外的一圈边框,是包括在margin中的,但不占用任何空间,不影响容器的大小。可以和其他元素重叠在一起。
语法
outline:<'outline-width'> || <'outline-style'> || <'outline-color'>参数说明:指定轮廓边框的宽度,样式和颜色。
例子
<!DOCTYPE html>
<html lang="en">
<head>
    <meta charset="UTF-8">
    <title>Document</title>
    <style>
        div.main{
            width: 300px;
            height: 200px;
            position: absolute;
            top: 0;
            bottom: 0;
            left: 0;
            right: 0;
            margin: auto;
            border: 10px solid #000;
            outline: 20px solid #F00;
        }
    </style>
</head>
<body>
    <div class="main">
        红色的是轮廓
        黑色的是边框
    </div>
</body>
</html>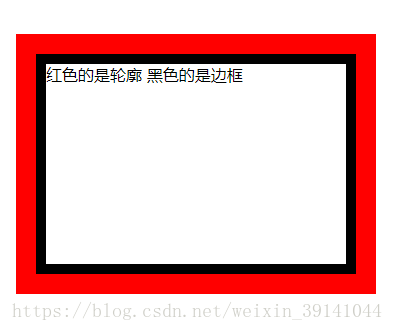
(1)outline-width
outline-width属性:设置或检索对象外的线条轮廓的宽度。
语法:outline-width: | thin | medium | thick;
参数说明:: 用长度值来定义轮廓的厚度,不允许负值;medium:定义默认宽度的轮廓;thin:定义比默认宽度细的轮廓;thick:定义比默认宽度粗的轮廓。自己设置比较好。
(2)outline-color
outline-color属性:设置或检索对象外的线条轮廓的颜色。
语法:outline-color: | invert;
参数说明:: 指定颜色;invert:使用背景色的反色(仅ie和opera有效)
(3)outline-style
outline-style属性:设置或检索对象外的线条轮廓的样式。
语法:outline-style: none | dotted | dashed | solid | double | groove | ridge | inset | outset;
参数说明:无轮廓 | 点状轮廓 | 虚线轮廓 | 实线轮廓 | 双线轮廓 | 3d凹槽 | 3d凸槽 | 3d凹边 | 3d凸边。
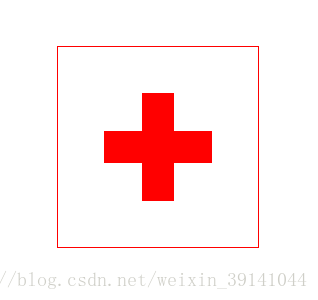
4.outline-offset
注意该属性不是outline的子属性。
设置或检索对象外的线条轮廓偏移容器的值。其实就是设置outline和border之间的空隙距离。border的外边到outline的内边。
语法
outline-offset:<length>参数说明
- length:用长度值来定义轮廓偏移,允许负值。
例子
outline-offset的妙用,实现红十字的标志。
<!DOCTYPE html>
<html lang="en">
<head>
    <meta charset="UTF-8">
    <title>Document</title>
    <style>
        div{
        /*此处写代码*/
        background:white;
        width:200px;
        height:200px;
        margin:200px auto;
        border:1px solid red;
        outline:70px solid red;
        outline-offset:-155px;
        }
    </style>
</head>
<body>
    <div></div>
</body>
</html>
4.nav-index
nav-index属性:设置或检索对象的导航顺序。
语法:nav-index:auto | ;
参数:auto:元素的导航焦点顺序由客户端自动分配;:用浮点数来定义元素的导航焦点顺序,若某元素的该值等于1则意味着该元素最先被导航,当若干个元素的nav-index值相同时,则按照文档的先后顺序进行导航。
主流浏览器都不支持。
nav-up设置或检索对象的导航方向
语法:
nav-up:auto|[current|root|]
auto:默认顺序;:被导航元素的id;,target-name>:框架目标页面间的元素焦点导航。
该属性也有被w3c标准移除的风险。
上右下左nav-up,nav-right,nav-down,nav-left。
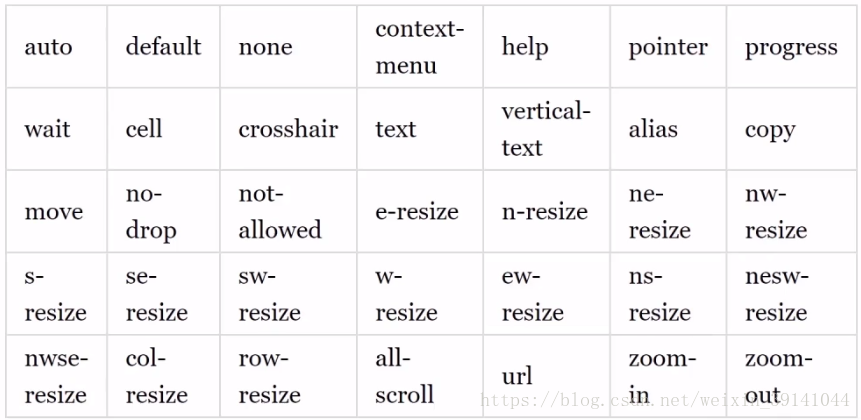
5.cursor
设置或检索在对象上移动的鼠标指针采用何种系统预定义的光标的形状。
例子
<!DOCTYPE html>
<html lang="zh-cmn-Hans">
<head>
<meta charset="utf-8" />
<title>cursor</title>
<style>
.test { width: 400px; border-collapse: collapse; font: 14px/1.5 georgia, arial, serif, sans-serif; }
.test td { padding: 2px 10px; border: 1px solid #ddd; }
.test td:hover { background: #eee; }
.auto { cursor: auto; }
.default { cursor: default; }
.none { cursor: none; }
.context-menu { cursor: context-menu; }
.help { cursor: help; }
.pointer { cursor: pointer; }
.progress { cursor: progress; }
.wait { cursor: wait; }
.cell { cursor: cell; }
.crosshair { cursor: crosshair; }
.text { cursor: text; }
.vertical-text { cursor: vertical-text; }
.alias { cursor: alias; }
.copy { cursor: copy; }
.move { cursor: move; }
.no-drop { cursor: no-drop; }
.not-allowed { cursor: not-allowed; }
.e-resize { cursor: e-resize; }
.n-resize { cursor: n-resize; }
.ne-resize { cursor: ne-resize; }
.nw-resize { cursor: nw-resize; }
.s-resize { cursor: s-resize; }
.se-resize { cursor: se-resize; }
.sw-resize { cursor: sw-resize; }
.w-resize { cursor: w-resize; }
.ew-resize { cursor: ew-resize; }
.ns-resize { cursor: ns-resize; }
.nesw-resize { cursor: nesw-resize; }
.nwse-resize { cursor: nwse-resize; }
.col-resize { cursor: col-resize; }
.row-resize { cursor: row-resize; }
.all-scroll { cursor: all-scroll; }
.zoom-in { cursor: zoom-in; }
.zoom-out { cursor: zoom-out; }
.url { cursor: url(skin/cursor.gif), url(skin/cursor.png), url(skin/cursor.jpg), pointer; }
</style>
</head>
<body>
<table class="test">
    <caption>cursor光标类型</caption>
    <tbody>
        <tr>
            <td class="auto">auto</td>
            <td class="default">default</td>
            <td class="none">none</td>
            <td class="context-menu">context-menu</td>
            <td class="help">help</td>
            <td class="pointer">pointer</td>
            <td class="progress">progress</td>
        </tr>
        <tr>
            <td class="wait">wait</td>
            <td class="cell">cell</td>
            <td class="crosshair">crosshair</td>
            <td class="text">text</td>
            <td class="vertical-text">vertical-text</td>
            <td class="alias">alias</td>
            <td class="copy">copy</td>
        </tr>
        <tr>
            <td class="move">move</td>
            <td class="no-drop">no-drop</td>
            <td class="not-allowed">not-allowed</td>
            <td class="e-resize">e-resize</td>
            <td class="n-resize">n-resize</td>
            <td class="ne-resize">ne-resize</td>
            <td class="nw-resize">nw-resize</td>
        </tr>
        <tr>
            <td class="s-resize">s-resize</td>
            <td class="se-resize">se-resize</td>
            <td class="sw-resize">sw-resize</td>
            <td class="w-resize">w-resize</td>
            <td class="ew-resize">ew-resize</td>
            <td class="ns-resize">ns-resize</td>
            <td class="nesw-resize">nesw-resize</td>
        </tr>
        <tr>
            <td class="nwse-resize">nwse-resize</td>
            <td class="col-resize">col-resize</td>
            <td class="row-resize">row-resize</td>
            <td class="all-scroll">all-scroll</td>
            <td class="url">url</td>
            <td class="zoom-in">zoom-in</td>
            <td class="zoom-out">zoom-out</td>
        </tr>
    </tbody>
</table>
</body>
</html>
6.zoom
设置或检索对象的缩放比例。
语法
zoom:normal | <number> | <percentage>参数说明:
- normal:使用对象的实际尺寸;
- number:用浮点数来定义缩放比例,不允许负值;
- percentage::用百分比来定义缩放比例,不允许负值。以左上角为基点做缩放。
先缩放后布局,可能影响到盒子的计算
7.box-sizing
设置或检索对象的和模型组成模式。
语法
box-sizing:border-box | content-box;参数
- border-box:padding和border包含在定义的width和height之内
- content-box:padding和border不包含在定义的width和height之内 (默认)
8.resize
设置或检索对象的区域是否允许缩放,调节元素尺寸大小。(也就是拖拽div右下角的边框)
语法
resize:none | both | horizontal | vertical;参数:
- none:不允许用户调整元素大小;
- both:用户可以调节元素的宽度和高度;
- horizontal:用户可以调节元素的宽度;
- vertical:用户可以调节元素的高度。
用resize只能拉大,不能缩小。需要设置元素的 overflow 属性(值可以是 auto、hidden 或 scroll)resize属性才会生效,这是resize属性的规则。
ps:放大的原理就是使用更高级的行内样式去改变原始的样式。
9.ime-mode
设置或检索是否允许用户激活输入中文,韩文,日文等的输入法(IME)状态。(就是用点击输入框,自动唤醒输入法)
语法:auto | normal | active | inacive | disabled;
参数:auto:不影响IME(input method editor)的状态;normal:正常的IME状态;active:指定所有使用ime输入的字符,即激活本地语言输入法,用户仍可以撤销激活ime;inactive:指定所有不适用ime输入的字符,即激活非本地语言,用户仍可以撤销激活ime;disabled:完全禁用ime。对于有焦点的控件(如输入框),用户不可以激活ime。
用途不大。建议大家实际中不要使用
10.user-select
设置或检索是否允许用户选中文本。
语法
user-select:none | text | all | element;参数:
- none:文本不能被选择;
- text:可以选择文本;
- all:当所有内容作为一个整体时可以被选择,如果双击或者在上下文上点击子元素,那么被选择的部分将是以该子元素向上回溯的最高祖先元素;
- element:可以选择文本,但选择范围受元素边界的约束。
PS:最常用的就是none,其他三个值用处不大。
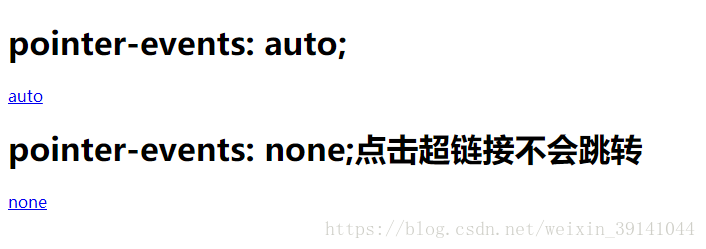
11.pointer-events
该属性能取消超链接的默认事件
语法
pointer-events:auto | none | visiblepainted | visiblefill | visiblestroke | visible | painted | fill | stroke | all;参数:
- auto(默认):与pointer-events属性改为制定时的表现效果相同,在svg内容上与visiblepainted值相同;
- none:元素永远不会成为鼠标事件的target(有链接的话也不会跳转,鼠标也不会发生变化,一切和鼠标有关的事件都不会在这个元素上发生);
- 其他值只能应用在svg上。
例子
<!DOCTYPE html>
<html lang="en">
<head>
<meta charset="UTF-8">
<title>pointer-events</title>
<style type="text/css">
.auto { pointer-events: auto; }
.none { pointer-events: none; }
</style>
</head>
<body>
<h1>pointer-events: auto;</h1>
<a href="http://www.5566.net" class="auto">auto</a>

<h1>pointer-events: none;点击超链接不会跳转</h1>
<a href="http://www.5566.net" class="none">none</a>
</body>
</html>


 145
145

 被折叠的 条评论
为什么被折叠?
被折叠的 条评论
为什么被折叠?
 到【灌水乐园】发言


