


承接前文博客 Kubeflow 快速入门实战(一)
4.2 Kubeflow piplines 示例
1) 生成 pipelines 配置文件
任意 python 环境都成
## 安装依赖
pip install kfp --upgrade
准备流水线代码 simple_pipeline.py
# simple_pipeline.py
# 1. 导入 KFP 库
from kfp import dsl
from kfp import compiler

# 2. 定义组件 (Component)
#    - 使用 @dsl.component 装饰器
#    - 指定基础镜像 (base_image),代码将在这个镜像的容器中运行
#    - 使用 Python 类型提示 (Type Hinting) 定义输入和输出
@dsl.component(base_image='python:3.9')
def add_prefix(text: str) -> str:
  """在输入文本前添加 'Hello, '"""
  # 组件的逻辑代码
  return f"Hello, {text}"

@dsl.component(base_image='python:3.9')
def print_message(message: str):
  """打印传入的消息"""
  # 组件的逻辑代码
  print(f"Received message: {message}")

# 3. 定义流水线 (Pipeline)
#    - 使用 @dsl.pipeline 装饰器
#    - 提供名称 (name) 和描述 (description),会显示在 UI 上
@dsl.pipeline(
    name='simple-greeting-pipeline',
    description='一个简单的打印问候语的流水线示例'
)
def simple_pipeline(recipient: str = 'World'): # 定义流水线参数
  """定义流水线的工作流程"""
  # 4. 在流水线函数内部,实例化组件来创建任务 (Task)
  #    - 调用组件函数 (如 add_prefix()) 会创建一个任务节点
  add_prefix_task = add_prefix(text=recipient) # 将流水线参数传给组件

  # 5. 连接任务:将一个任务的输出作为另一个任务的输入
  #    - 使用 .output 属性来引用上一个任务的返回值
  print_message_task = print_message(message=add_prefix_task.output)

if __name__ == '__main__':
  compiler.Compiler().compile(
      pipeline_func=simple_pipeline,
      package_path='simple_pipeline.yaml'
  )
  print("Pipeline compiled to simple_pipeline.yaml")
## 生成 可供kubeflow识别的yaml文件
python simple_pipeline.py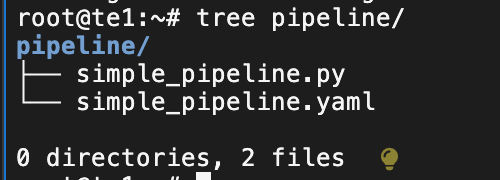
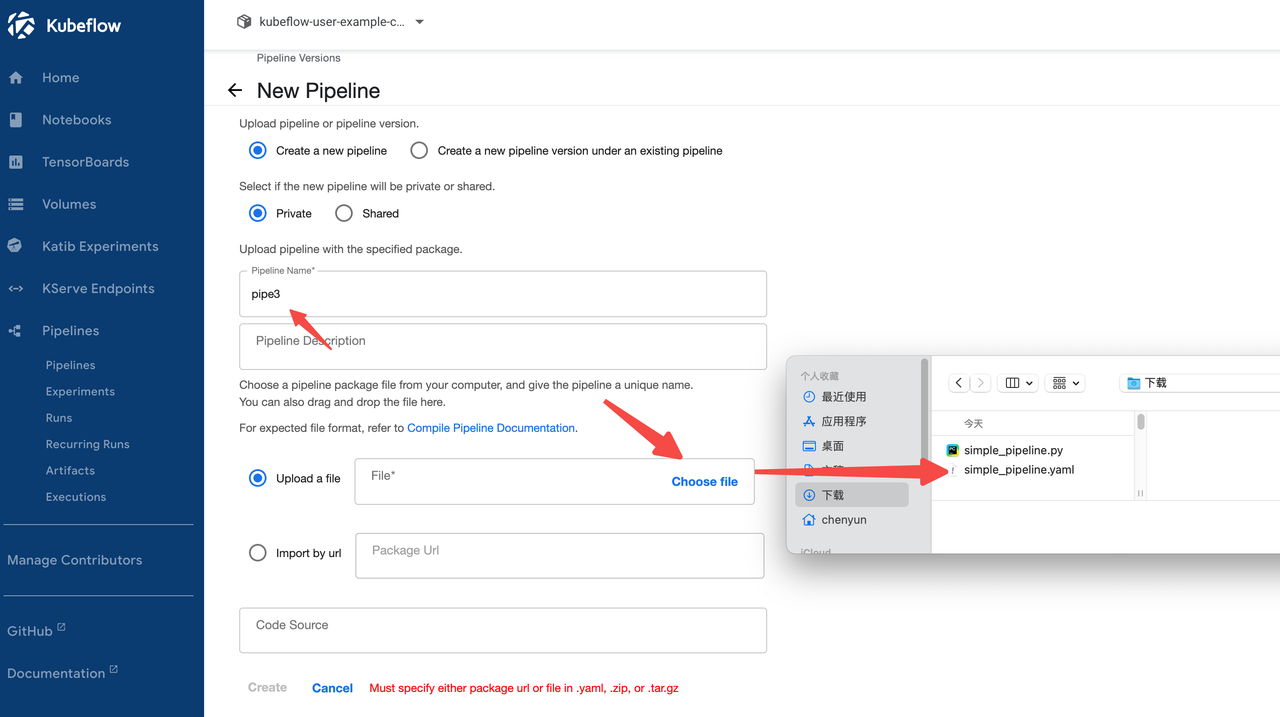
2) UI 控制台 创建pipelines
开始在 UI 控制台上 创建流水线

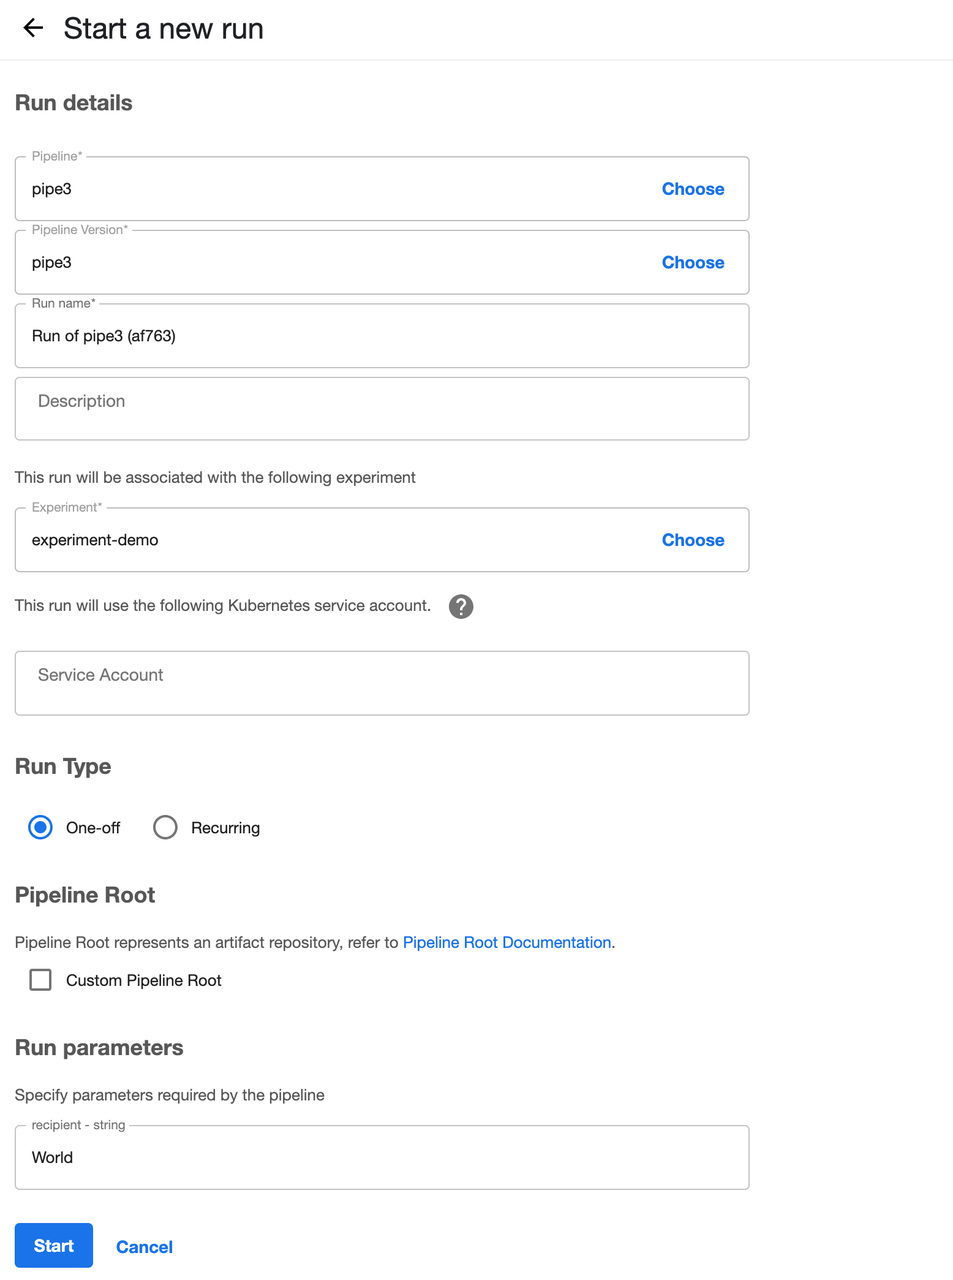
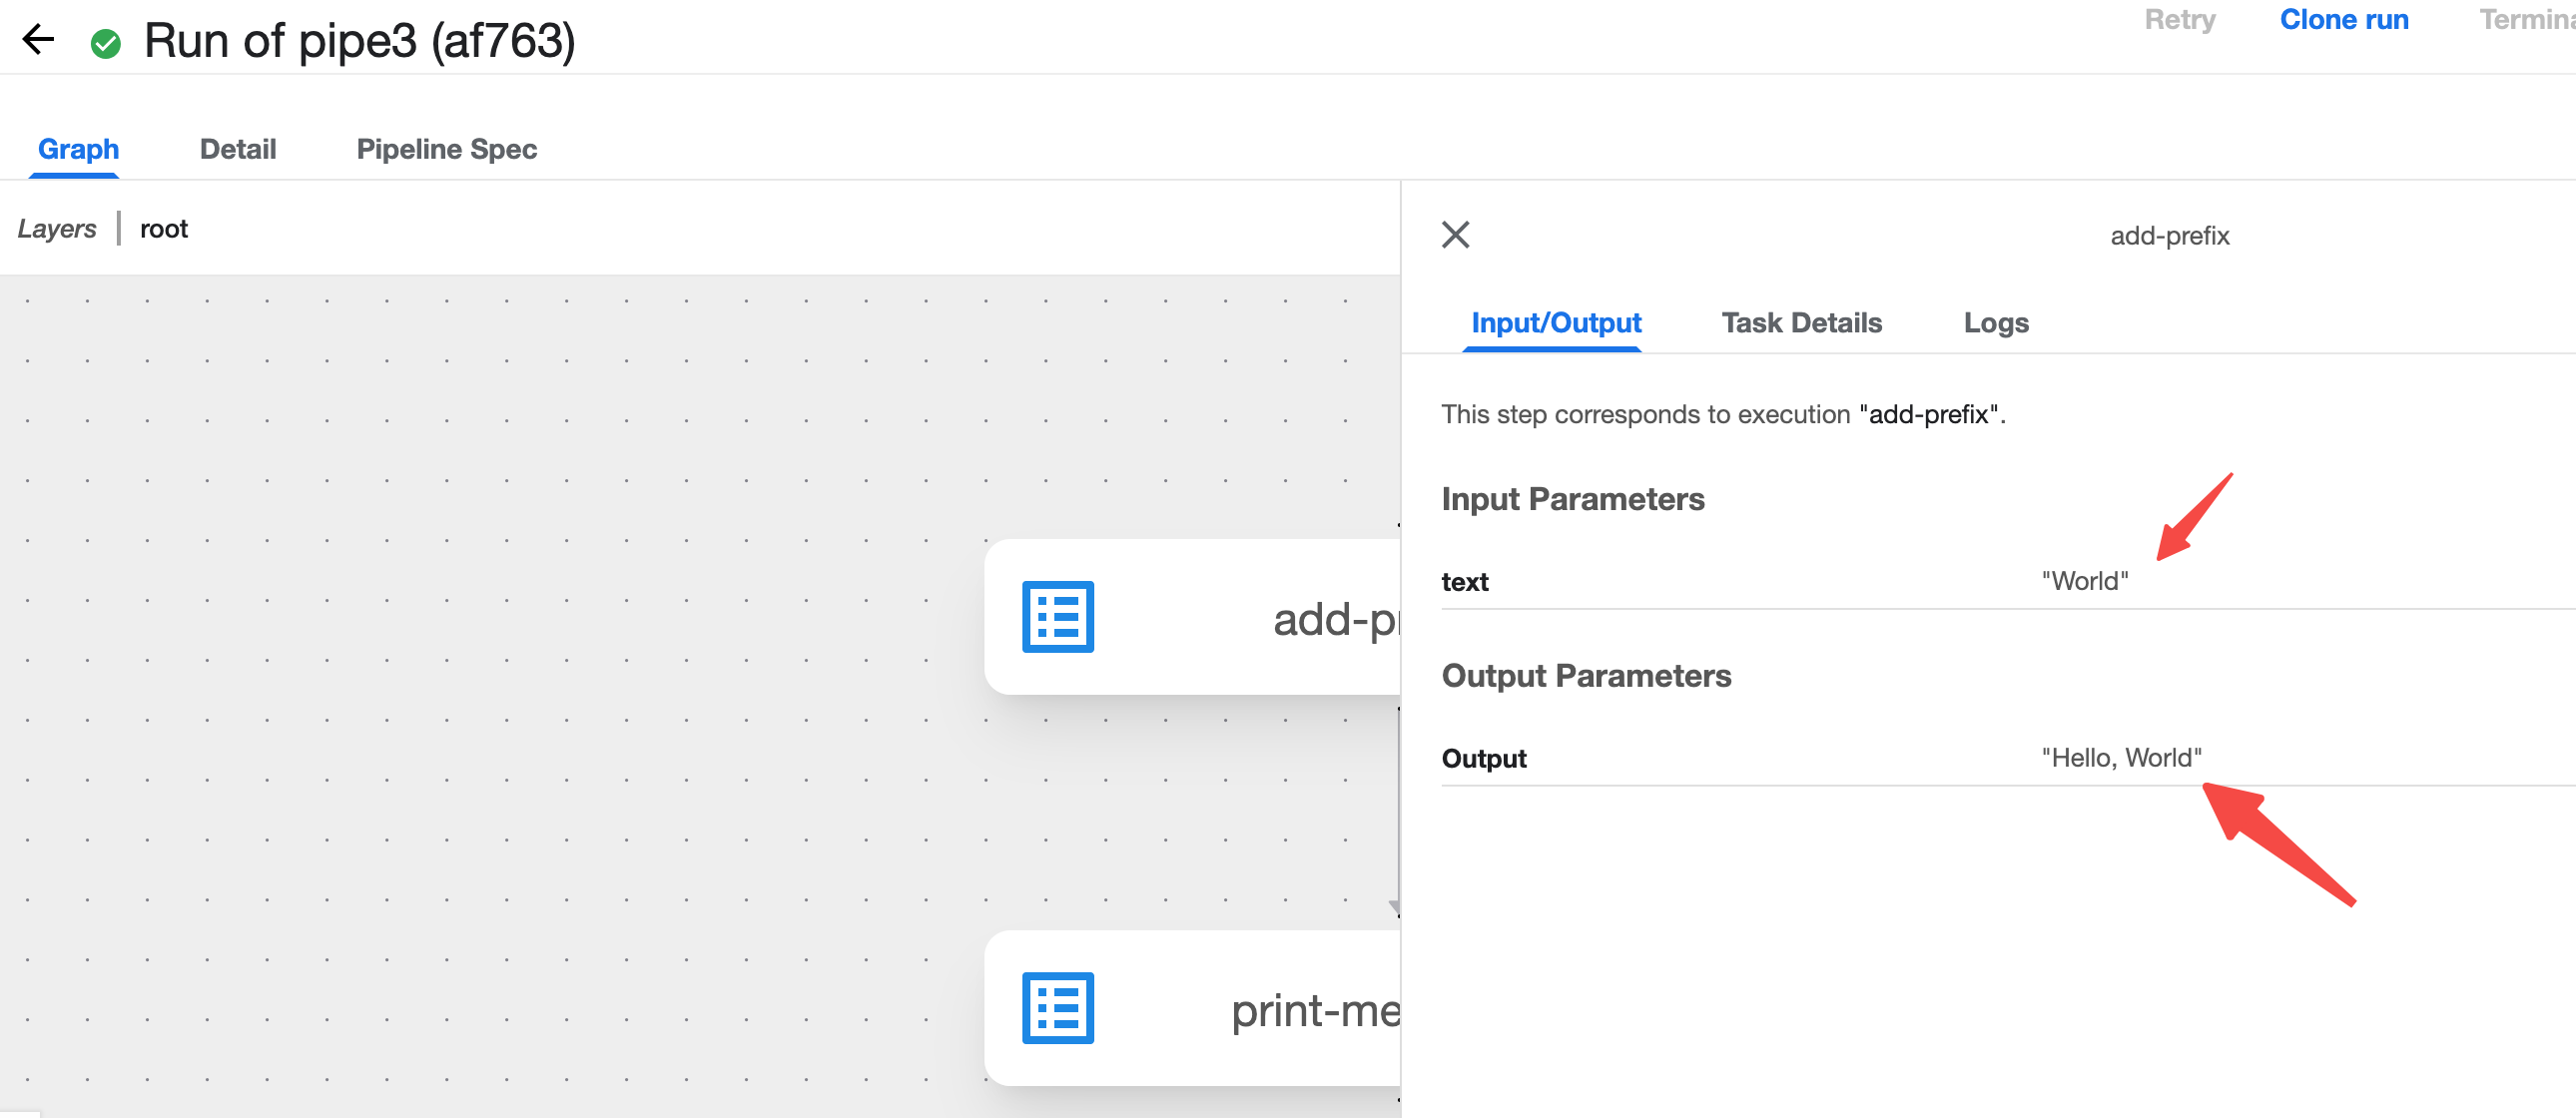
3) UI 控制台 运行pipelines

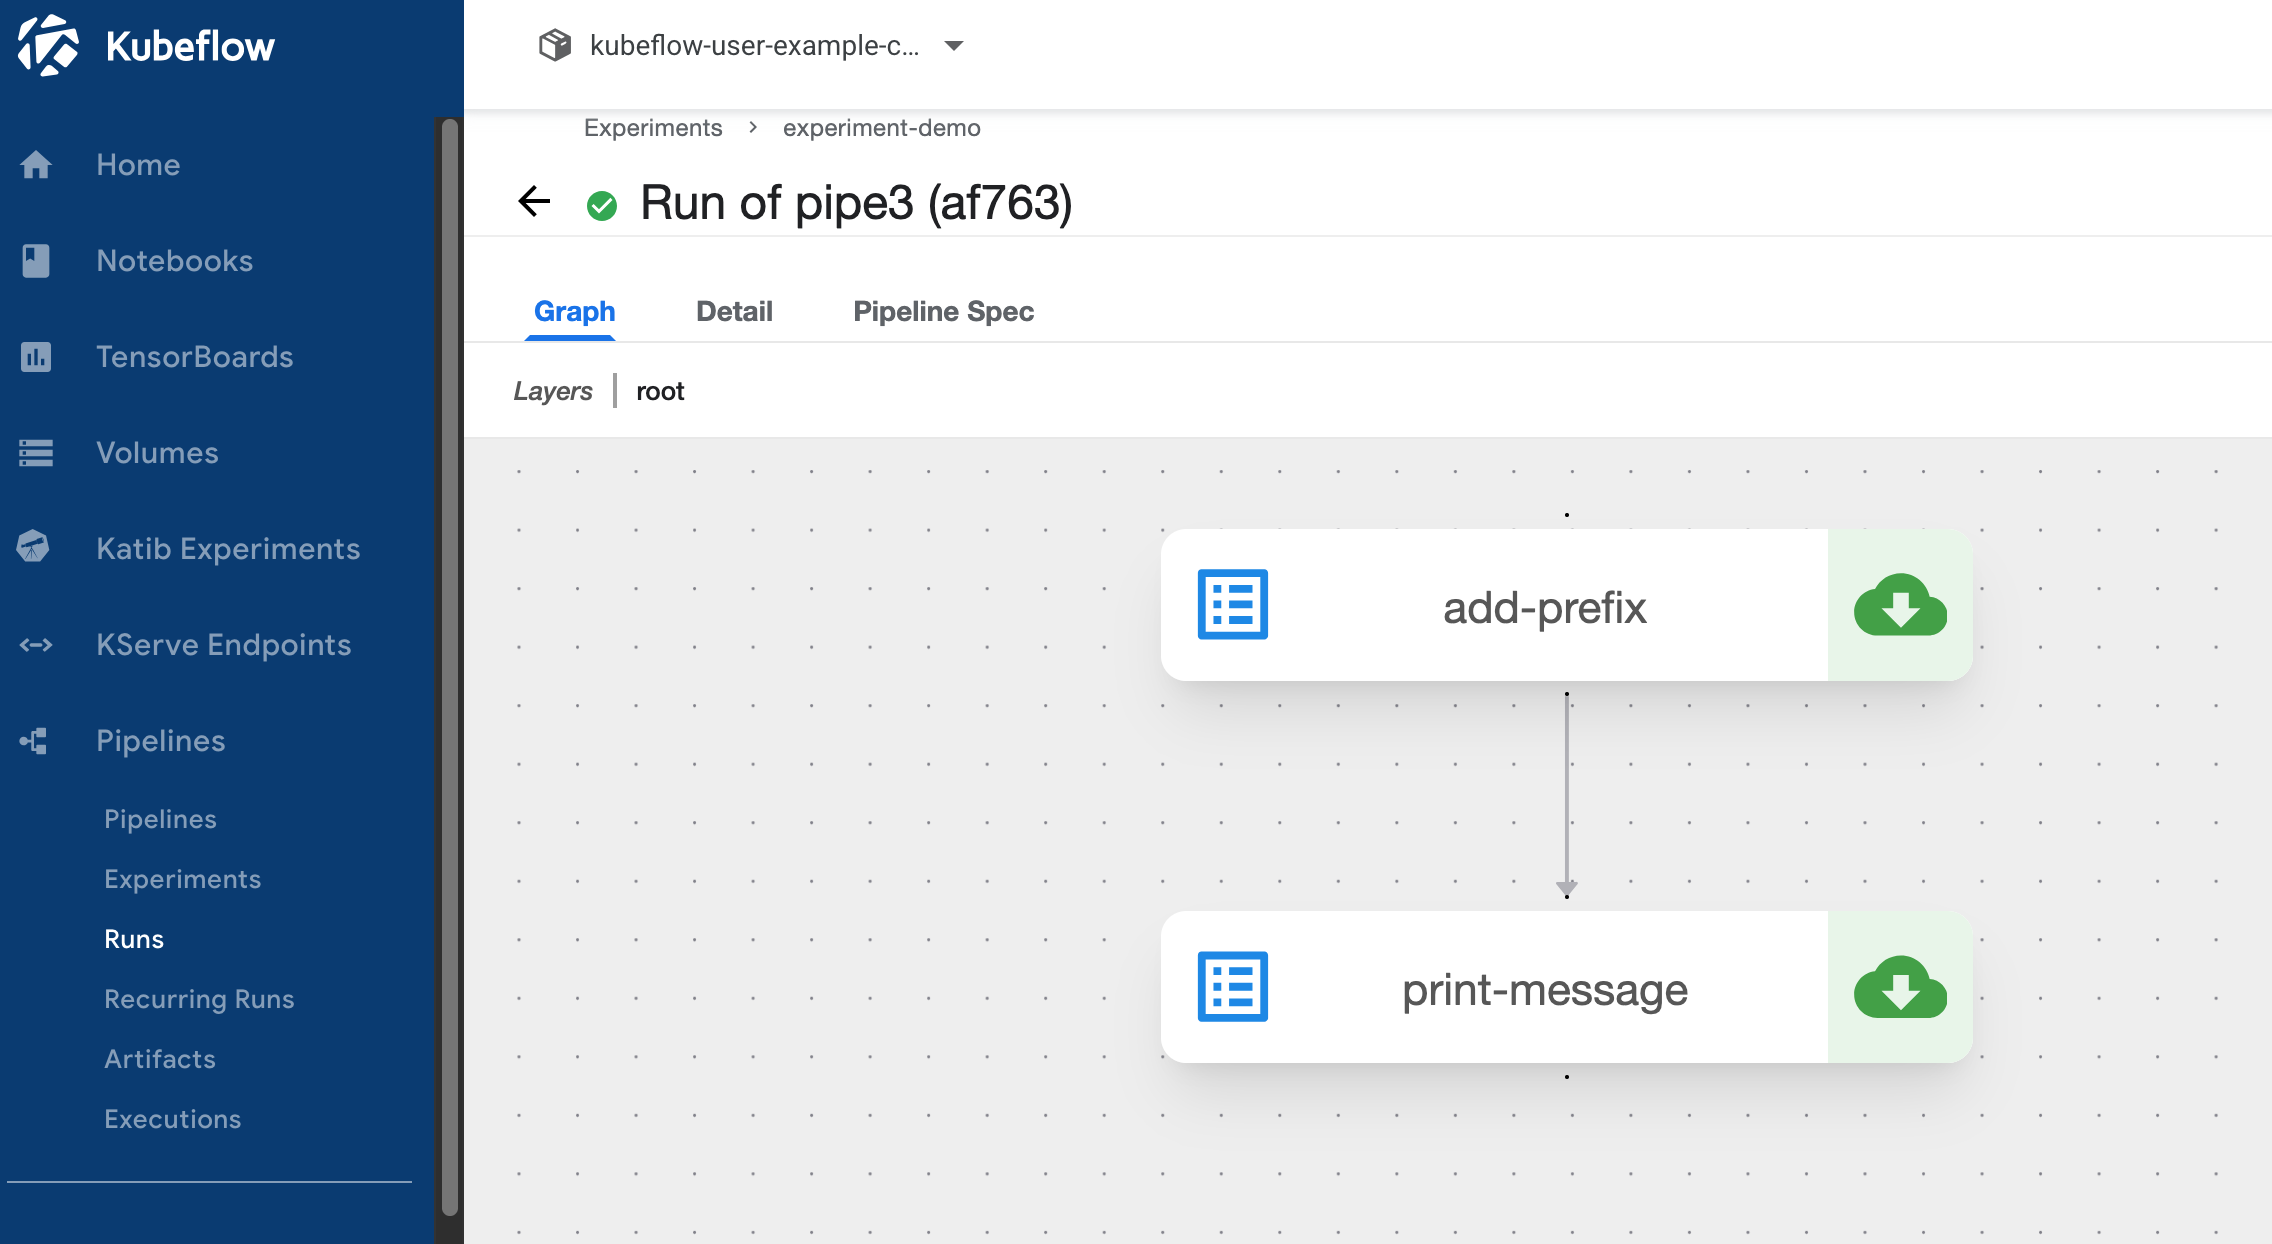
3) UI 控制台 查看pipelines结果


4.3 Kubeflow katib 示例
a) 脚本yaml准备
simple-function-tuning-v2.yaml
apiVersion: "kubeflow.org/v1beta1"
kind: Experiment
metadata:
  namespace: kubeflow-user-example-com
  name: simple-function-tuning-v2
spec:
  objective:
    type: maximize
    goal: 99.9
    objectiveMetricName: Metric

  algorithm:
    algorithmName: random

  parallelTrialCount: 3
  maxTrialCount: 12
  maxFailedTrialCount: 3

  parameters:
    - name: "x"
      parameterType: double
      feasibleSpace:
        min: "-5.0"
        max: "5.0"
    - name: "y"
      parameterType: double
      feasibleSpace:
        min: "-5.0"
        max: "5.0"

  trialTemplate:
    trialParameters:
      - name: "paramX"
        description: Parameter X for the function
        reference: "x"
      - name: "paramY"
        description: Parameter Y for the function
        reference: "y"

    trialSpec:
      apiVersion: batch/v1
      kind: Job
      spec:
        template:
          metadata:
            annotations:
              sidecar.istio.io/inject: "false"
          spec:
            containers:
            - name: trial-container
              image: ubuntu:22.04
              resources:
                requests:
                  memory: "64Mi"
                  cpu: "100m"
                limits:
                  memory: "128Mi"
                  cpu: "500m"
              command:
              - /bin/bash
              - -c
              - |
                set -e
                echo "--- Starting Trial ---"
                echo "Updating package lists..."
                apt-get update > /dev/null && apt-get upgrade -y > /dev/null && apt-get install -y bc > /dev/null
                echo "Packages installed successfully."
                X="${trialParameters.paramX}"
                Y="${trialParameters.paramY}"
                echo "Parameters received: X=$X, Y=$Y"
                echo "Calculating metric..."
                RESULT=$(echo "scale=4; 100 - ($X-3)^2 - ($Y-5)^2" | bc)
                echo "Calculation result: RESULT=$RESULT"
                echo "Reporting metric..."
                echo "Metric=${RESULT}" > /var/log/katib/metrics.log \

            restartPolicy: Never

    primaryContainerName: trial-container

  metricsCollectorSpec:
    collector:
      kind: File
    source:
      fileSystem:
        path: /var/log/katib/metrics.log
      filter:
        metricNameRegex: '^Metric$'
        metricValueRegex: '([+-]?\d*\.?\d+([eE][+-]?\d+)?)'
b) 脚本部署并运行
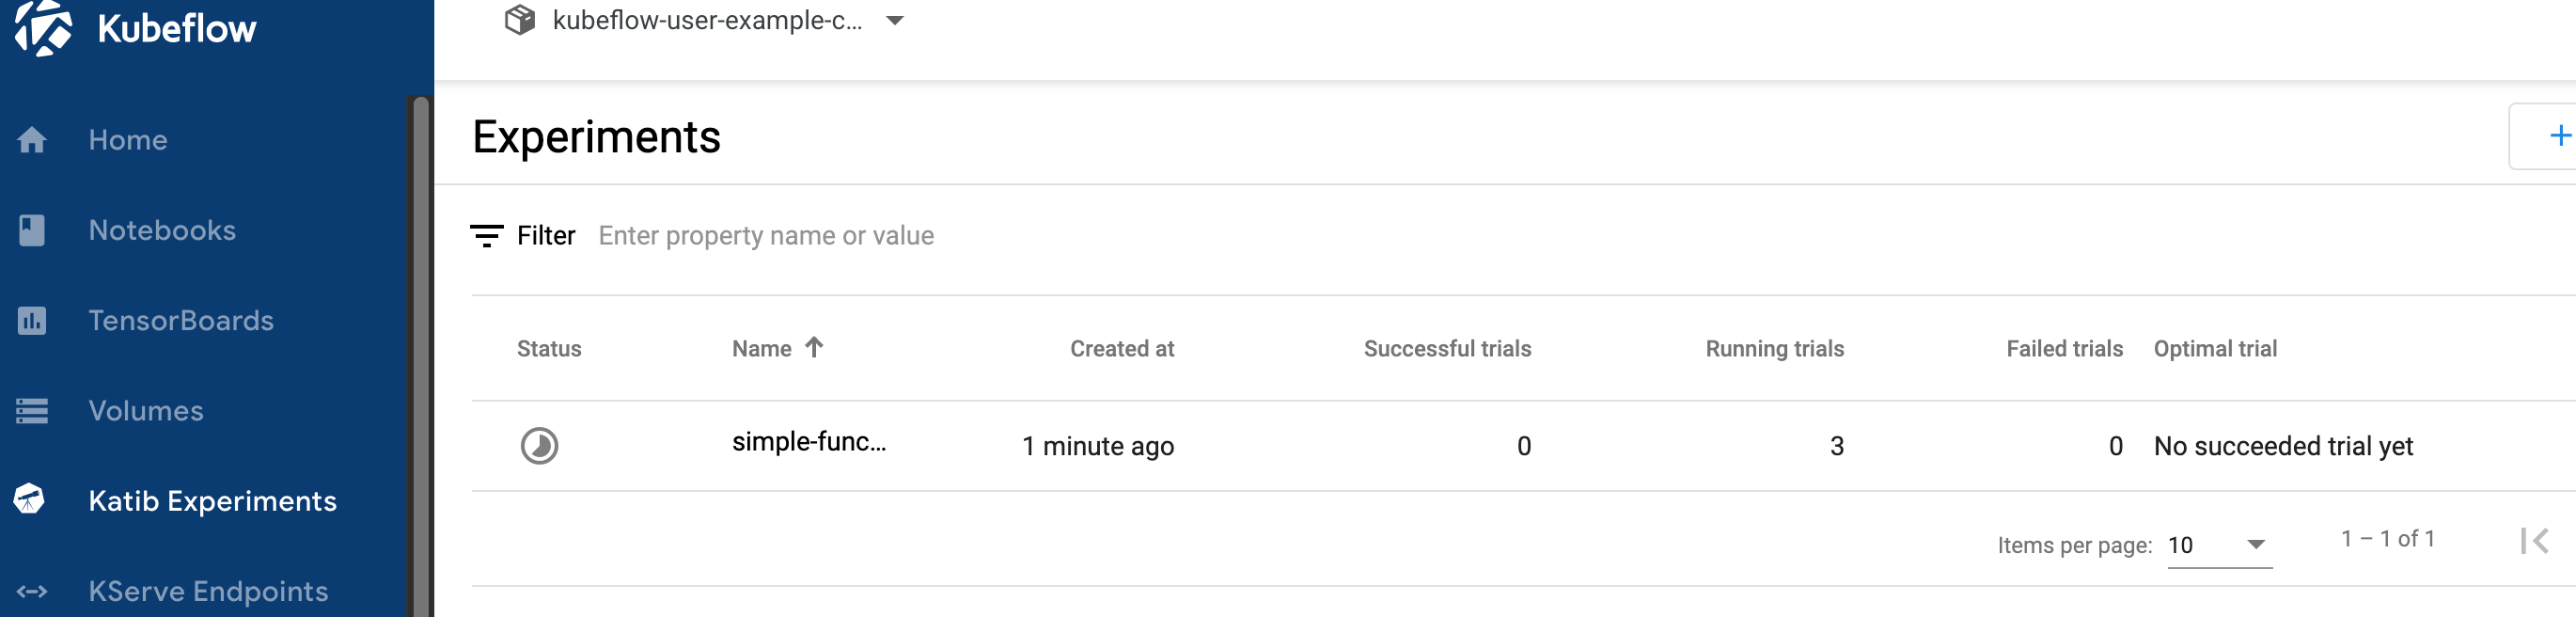
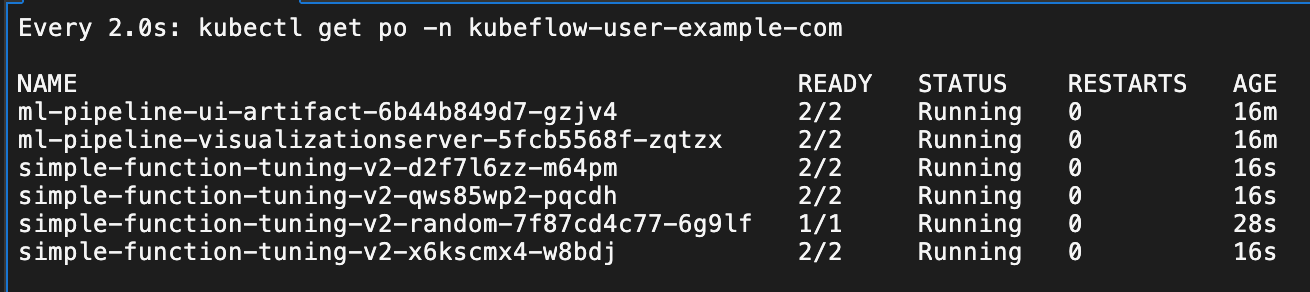
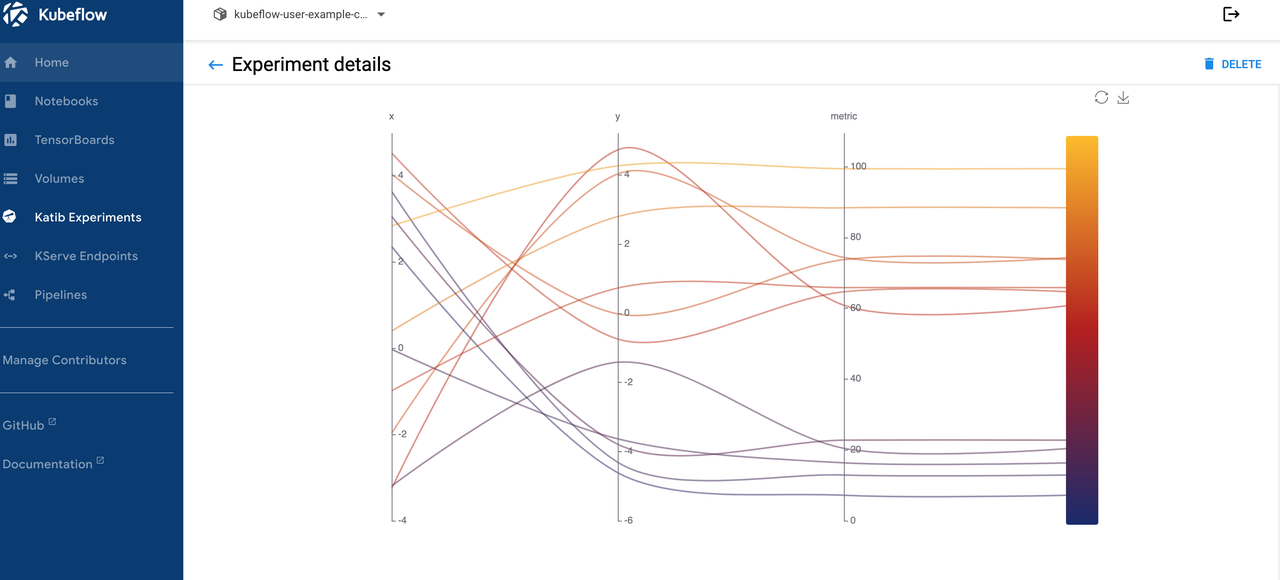
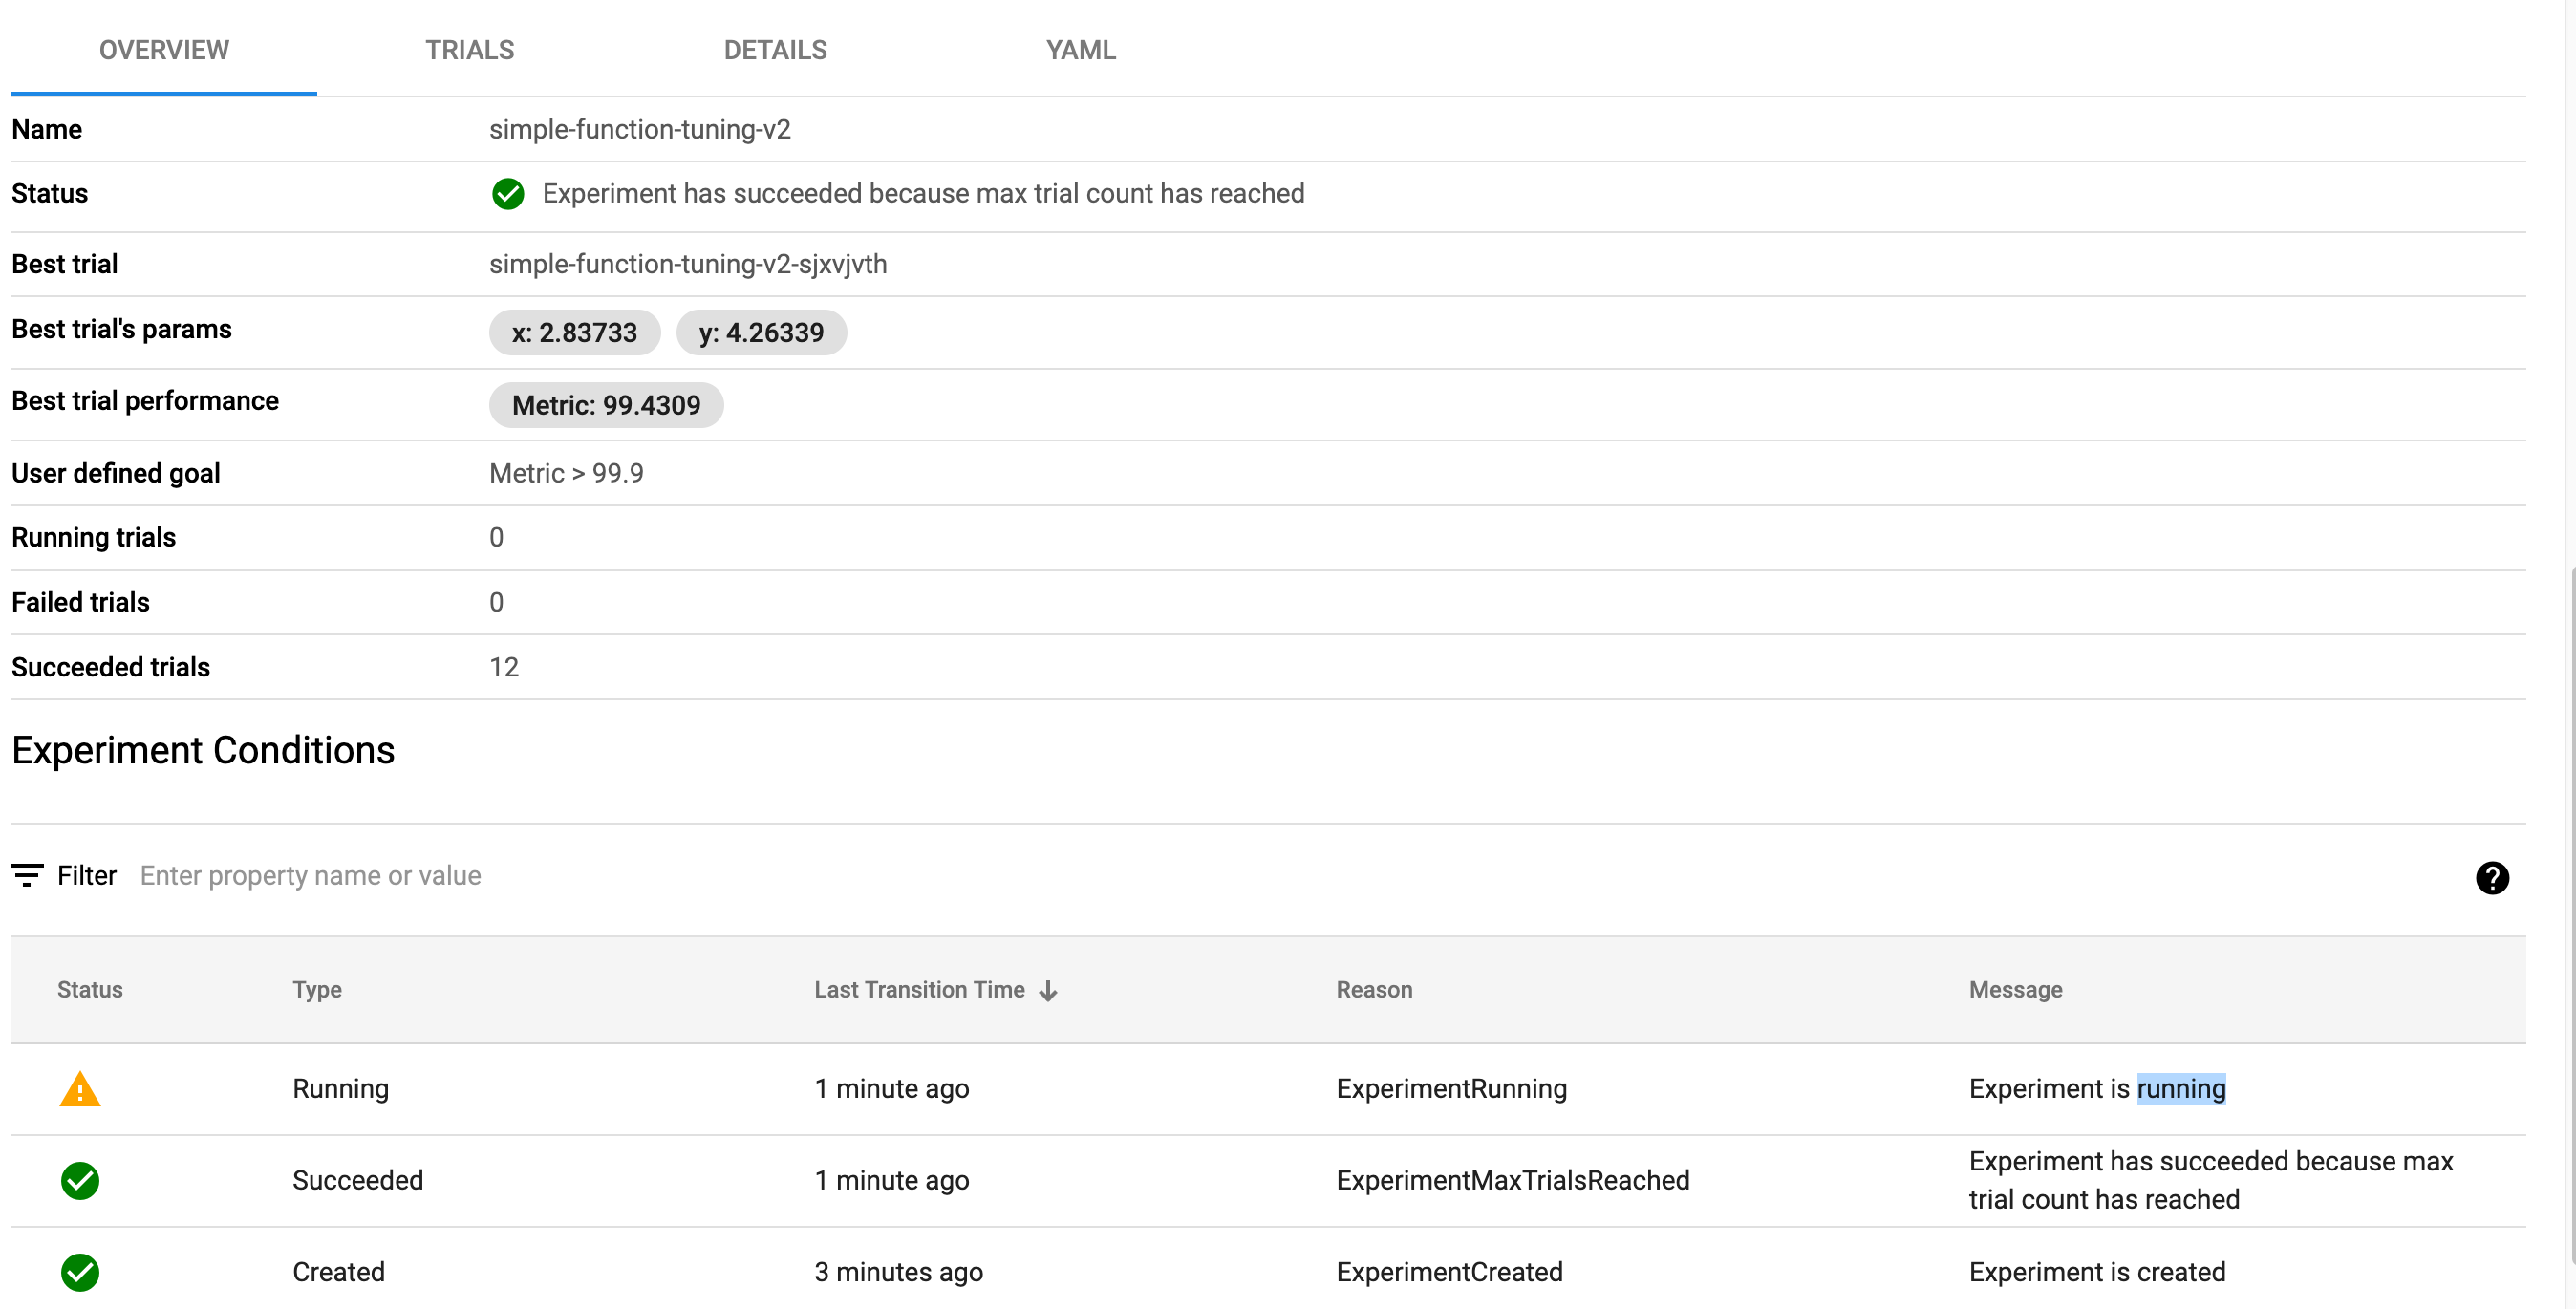
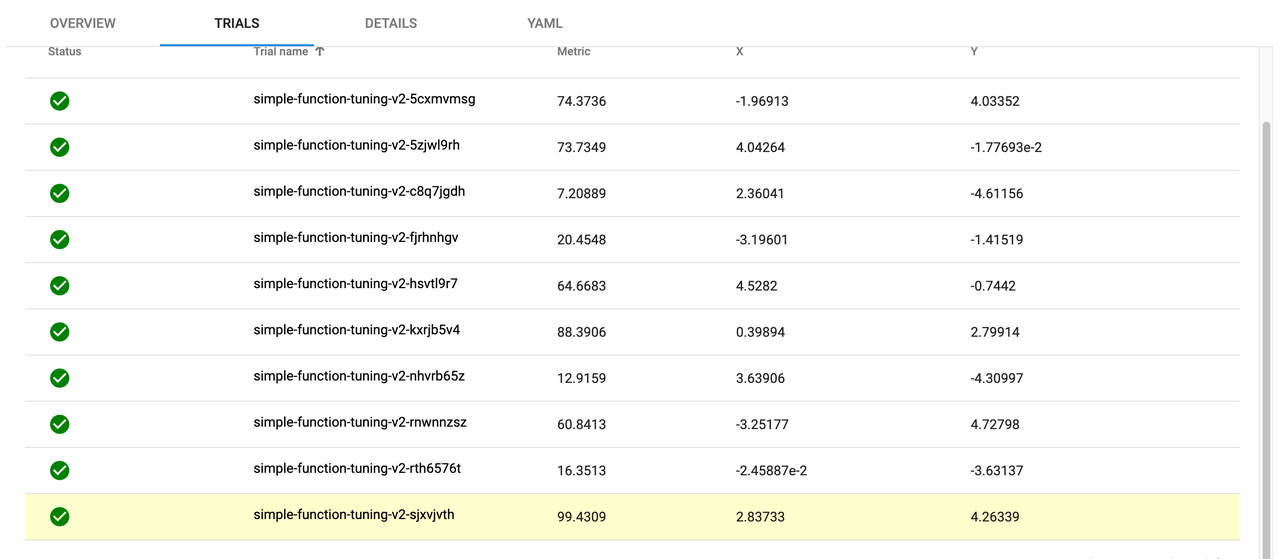
c) 运行结果查看
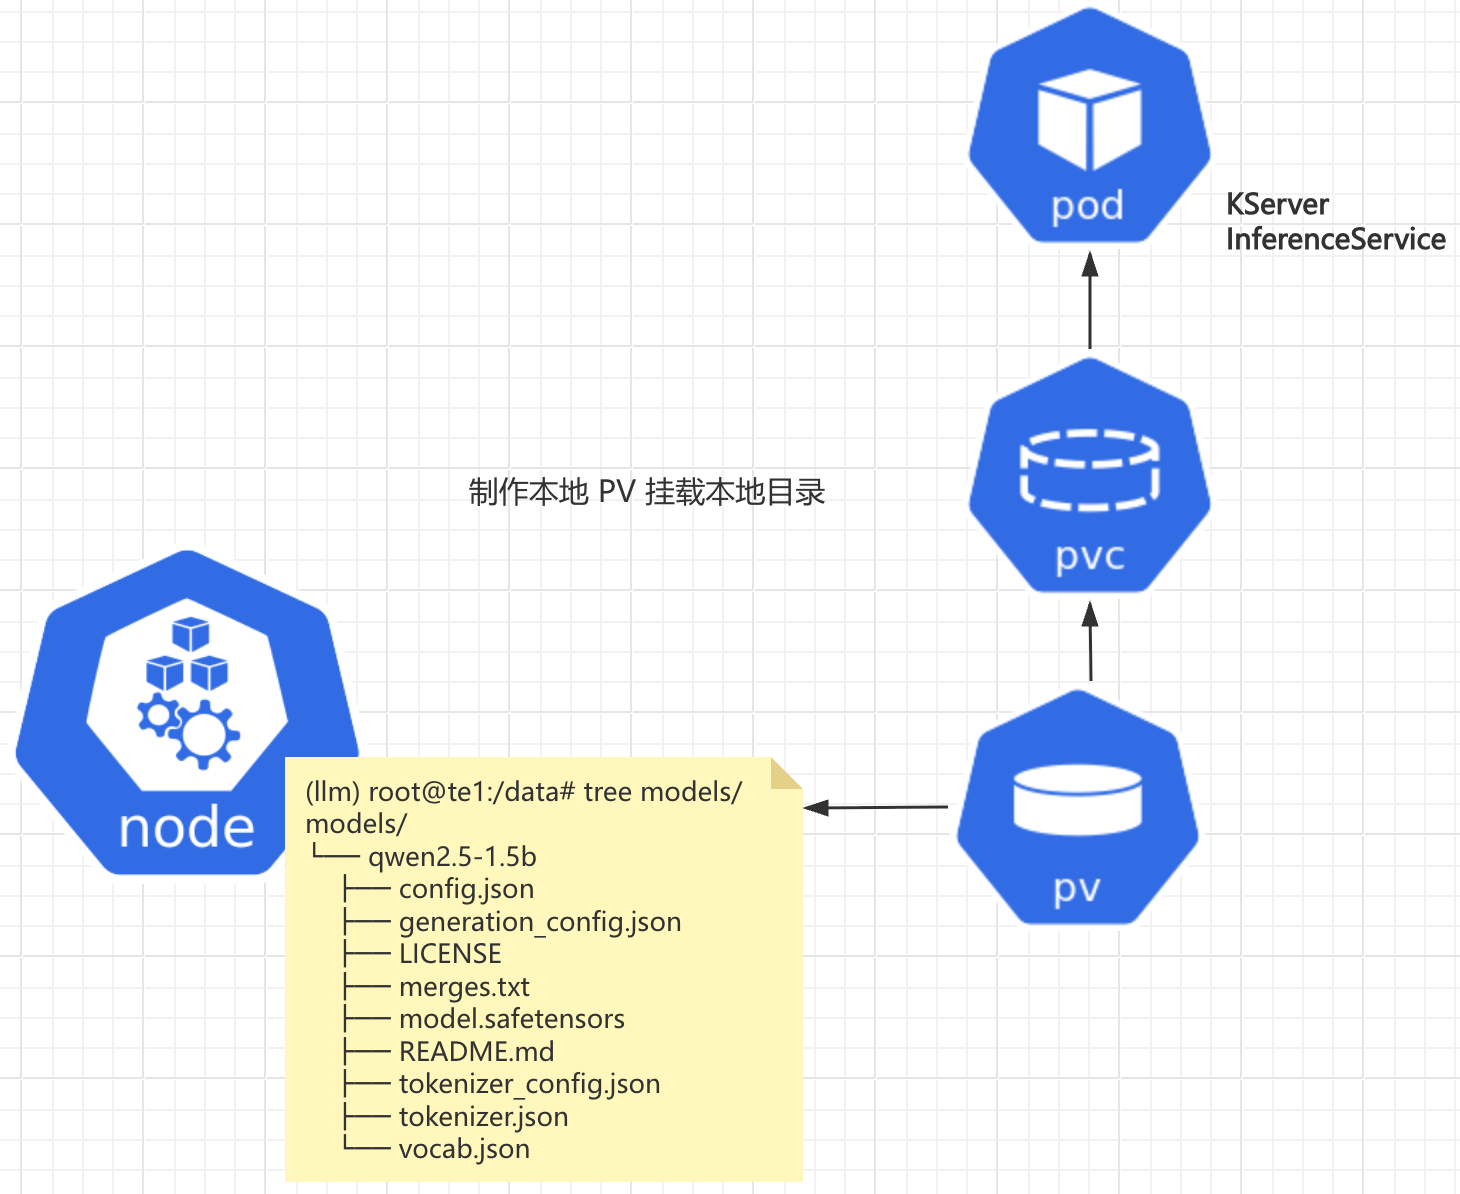
4.4 Kubeflow KServer 示例
这个模块就很复杂了 涉及到的元素特别多。画了一个简易的逻辑架构图
a) 基础环境准备 conda python
mkdir -p /data/models

wget https://repo.anaconda.com/miniconda/Miniconda3-latest-Linux-x86_64.sh -O /data/Miniconda3.sh
bash /data/Miniconda3.sh -b -p /data/miniconda3

echo 'export PATH="/data/miniconda3/bin:$PATH"' >> ~/.bashrc
source /data/miniconda3/bin/activate

conda create -n llm python=3.10 -y
conda activate llm
echo 'conda activate llm' >> ~/.bashrc
source ~/.bashrc

pip install huggingface_hub
huggingface-cli download Qwen/Qwen2.5-1.5B --resume-download --local-dir /data/models/qwen2.5-1.5b
b) 镜像准备
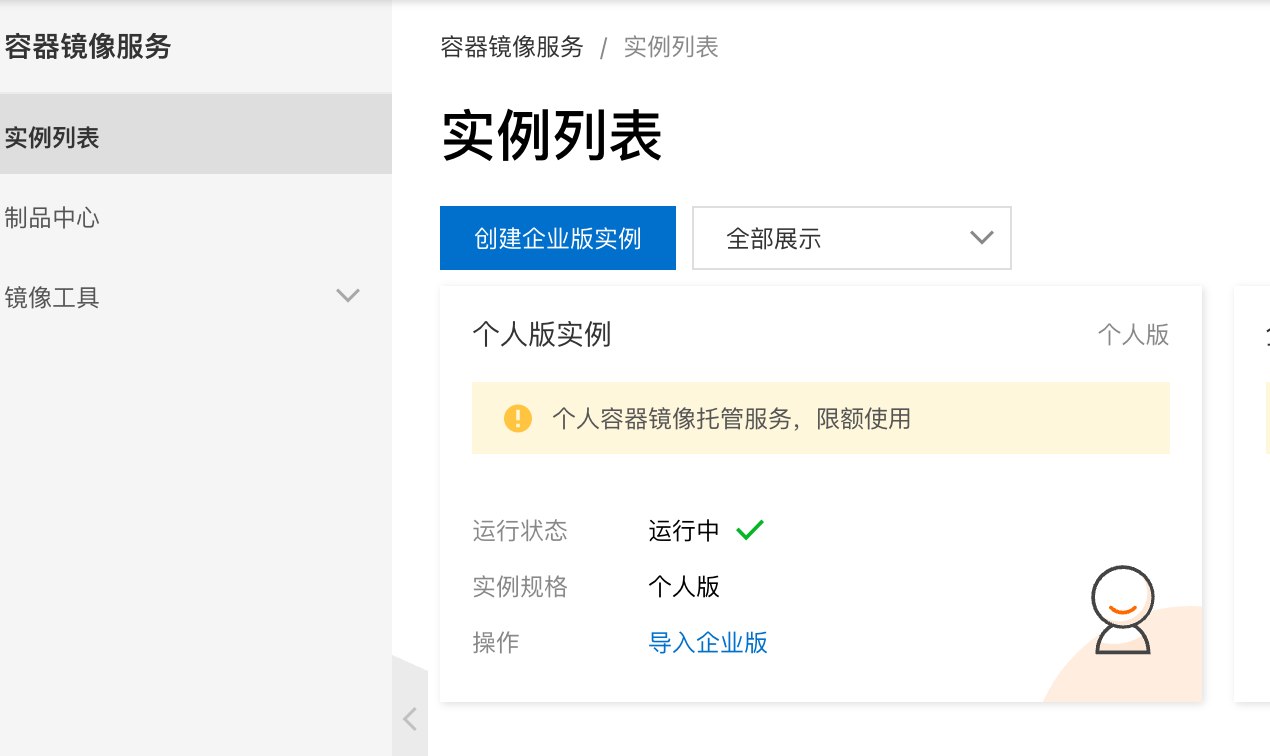
可以白嫖一下阿里云的个人版私有仓库
model_server.py
import os
from fastapi import FastAPI, Request
import torch
from transformers import AutoModelForCausalLM, AutoTokenizer

# 模型加载路径,对应 PV 挂载点
MODEL_DIR = "/data/models/qwen2.5-1.5b" # 这个路径必须和 InferenceService 中 volumeMounts 的 mountPath 一致
MODEL_NAME = "Qwen/Qwen2-1.5B-Instruct" # 可以从环境变量读取或硬编码

# 检查是否有可用的 GPU
device = torch.device("cuda" if torch.cuda.is_available() else "cpu")
print(f"Using device: {device}")

# 加载模型和 Tokenizer
print(f"Loading tokenizer from {MODEL_DIR}...")
tokenizer = AutoTokenizer.from_pretrained(MODEL_DIR, trust_remote_code=True)
print(f"Loading model from {MODEL_DIR}...")
model = AutoModelForCausalLM.from_pretrained(
    MODEL_DIR,
    torch_dtype="auto", # 或者 torch.float16 节省显存
    device_map="auto", # 自动将模型分片到可用设备 (GPU)
    trust_remote_code=True
)
# model.to(device) # 如果 device_map="auto" 不起作用或想强制指定,可以用这个
model.eval() # 设置为评估模式
print("Model loaded successfully.")

# 创建 FastAPI 应用
app = FastAPI()

@app.get('/')
def read_root():
    return {"message": "Qwen Model Server is running"}

# KServe V1 Predict Protocol (可以简化为自定义 /predict 接口)
@app.post('/v1/models/{model_name}:predict')
async def predict(model_name: str, request: Request):
    """
    接收 KServe V1 协议的请求或自定义请求
    预期 JSON: {"instances": [{"text": "your prompt"}]}
    或者简化: {"text": "your prompt"}
    """
    body = await request.json()
    print(f"Received request body: {body}")

    # 兼容 KServe V1 和自定义格式
    if "instances" in body and isinstance(body["instances"], list) and "text" in body["instances"][0]:
        prompt_text = body["instances"][0]["text"]
    elif "text" in body:
        prompt_text = body["text"]
    else:
        return {"error": "Invalid input format. Expecting {'instances': [{'text': '...'}]} or {'text': '...'}"}, 400

    print(f"Generating text for prompt: {prompt_text}")

    try:
        # 构建 Qwen 需要的 messages 格式
        messages = [
            {"role": "system", "content": "You are a helpful assistant."},
            {"role": "user", "content": prompt_text}
        ]
        text = tokenizer.apply_chat_template(
            messages,
            tokenize=False,
            add_generation_prompt=True
        )
        model_inputs = tokenizer([text], return_tensors="pt").to(device)

        generated_ids = model.generate(
            model_inputs.input_ids,
            max_new_tokens=512,         # 控制最大生成长度
            do_sample=True,             # 启用采样策略,而不是贪婪解码
            temperature=0.7,            # 控制随机性,稍小于 1.0 使输出更集中但仍有变化
            top_p=0.9,                  # Nucleus sampling,只考虑概率累积到 0.9 的词
            repetition_penalty=1.1      # 轻微惩罚重复 token,大于 1.0 即可,不要设置过高
        )

        generated_ids = [
            output_ids[len(input_ids):] for input_ids, output_ids in zip(model_inputs.input_ids, generated_ids)
        ]

        response = tokenizer.batch_decode(generated_ids, skip_special_tokens=True)[0]
        print(f"Generated response: {response}")

        # 返回 KServe V1 兼容格式
        return {"predictions": [response]}

    except Exception as e:
        print(f"Error during inference: {e}")
        return {"error": str(e)}, 500

# KServe 要求健康检查端点 (可选,但推荐)
@app.get('/healthz')
def healthz():
    return {"status": "ok"}
requirements.txt
fastapi>=0.100.0
uvicorn>=0.20.0
torch>=2.1.0 --index-url https://download.pytorch.org/whl/cu121
transformers>=4.38.0
accelerate>=0.25.0
sentencepiece
tiktoken
einops
protobuf
dockerfile
FROM pytorch/pytorch:2.1.2-cuda12.1-cudnn8-runtime
WORKDIR /app

COPY requirements.txt .
RUN pip install --no-cache-dir -r requirements.txt

# 复制模型服务代码
COPY model_server.py .

# 暴露端口 (KServe 默认希望容器监听 8080)
EXPOSE 8080

# 设置时区 (可选, 但有助于日志时间戳统一)
ENV TZ=Asia/Shanghai
RUN ln -snf /usr/share/zoneinfo/$TZ /etc/localtime && echo $TZ > /etc/timezone

# 设置入口点,启动 FastAPI 服务
# 使用 uvicorn 运行 FastAPI 应用
CMD ["uvicorn", "model_server:app", "--host", "0.0.0.0", "--port", "8080"]
## 制作镜像
docker build -t registry.ap-southeast-5.aliyuncs.com/xxx/qwen-kserve:0.5b-cu121 .
## 登录阿里云的私有仓库 免费的
docker login
##推送过去
docker push registry.ap-southeast-5.aliyuncs.com/xxx/qwen-kserve:0.5b-cu121 c) 模型准备
huggingface-cli download Qwen/Qwen2.5-1.5B --resume-download --local-dir /data/models/qwen2.5-1.5b
qwen-model-pv.yaml
apiVersion: v1
kind: PersistentVolume
metadata:
  name: qwen-model-pv
  namespace: kubeflow-user-example-com
spec:
  capacity:
    storage: 10Gi
  volumeMode: Filesystem
  accessModes:
    - ReadWriteOnce
  persistentVolumeReclaimPolicy: Retain
  storageClassName: manual
  hostPath:
    path: "/data/models"
qwen-model-pvc.yaml
apiVersion: v1
kind: PersistentVolumeClaim
metadata:
  name: qwen-model-pvc
  namespace: kubeflow-user-example-com
spec:
  accessModes:
    - ReadWriteOnce
  volumeMode: Filesystem
  resources:
    requests:
      storage: 10Gi
  storageClassName: manual
## 部署pv pvc
kubectl apply -f qwen-model-pv.yaml
kubectl apply -f qwen-model-pvc.yaml
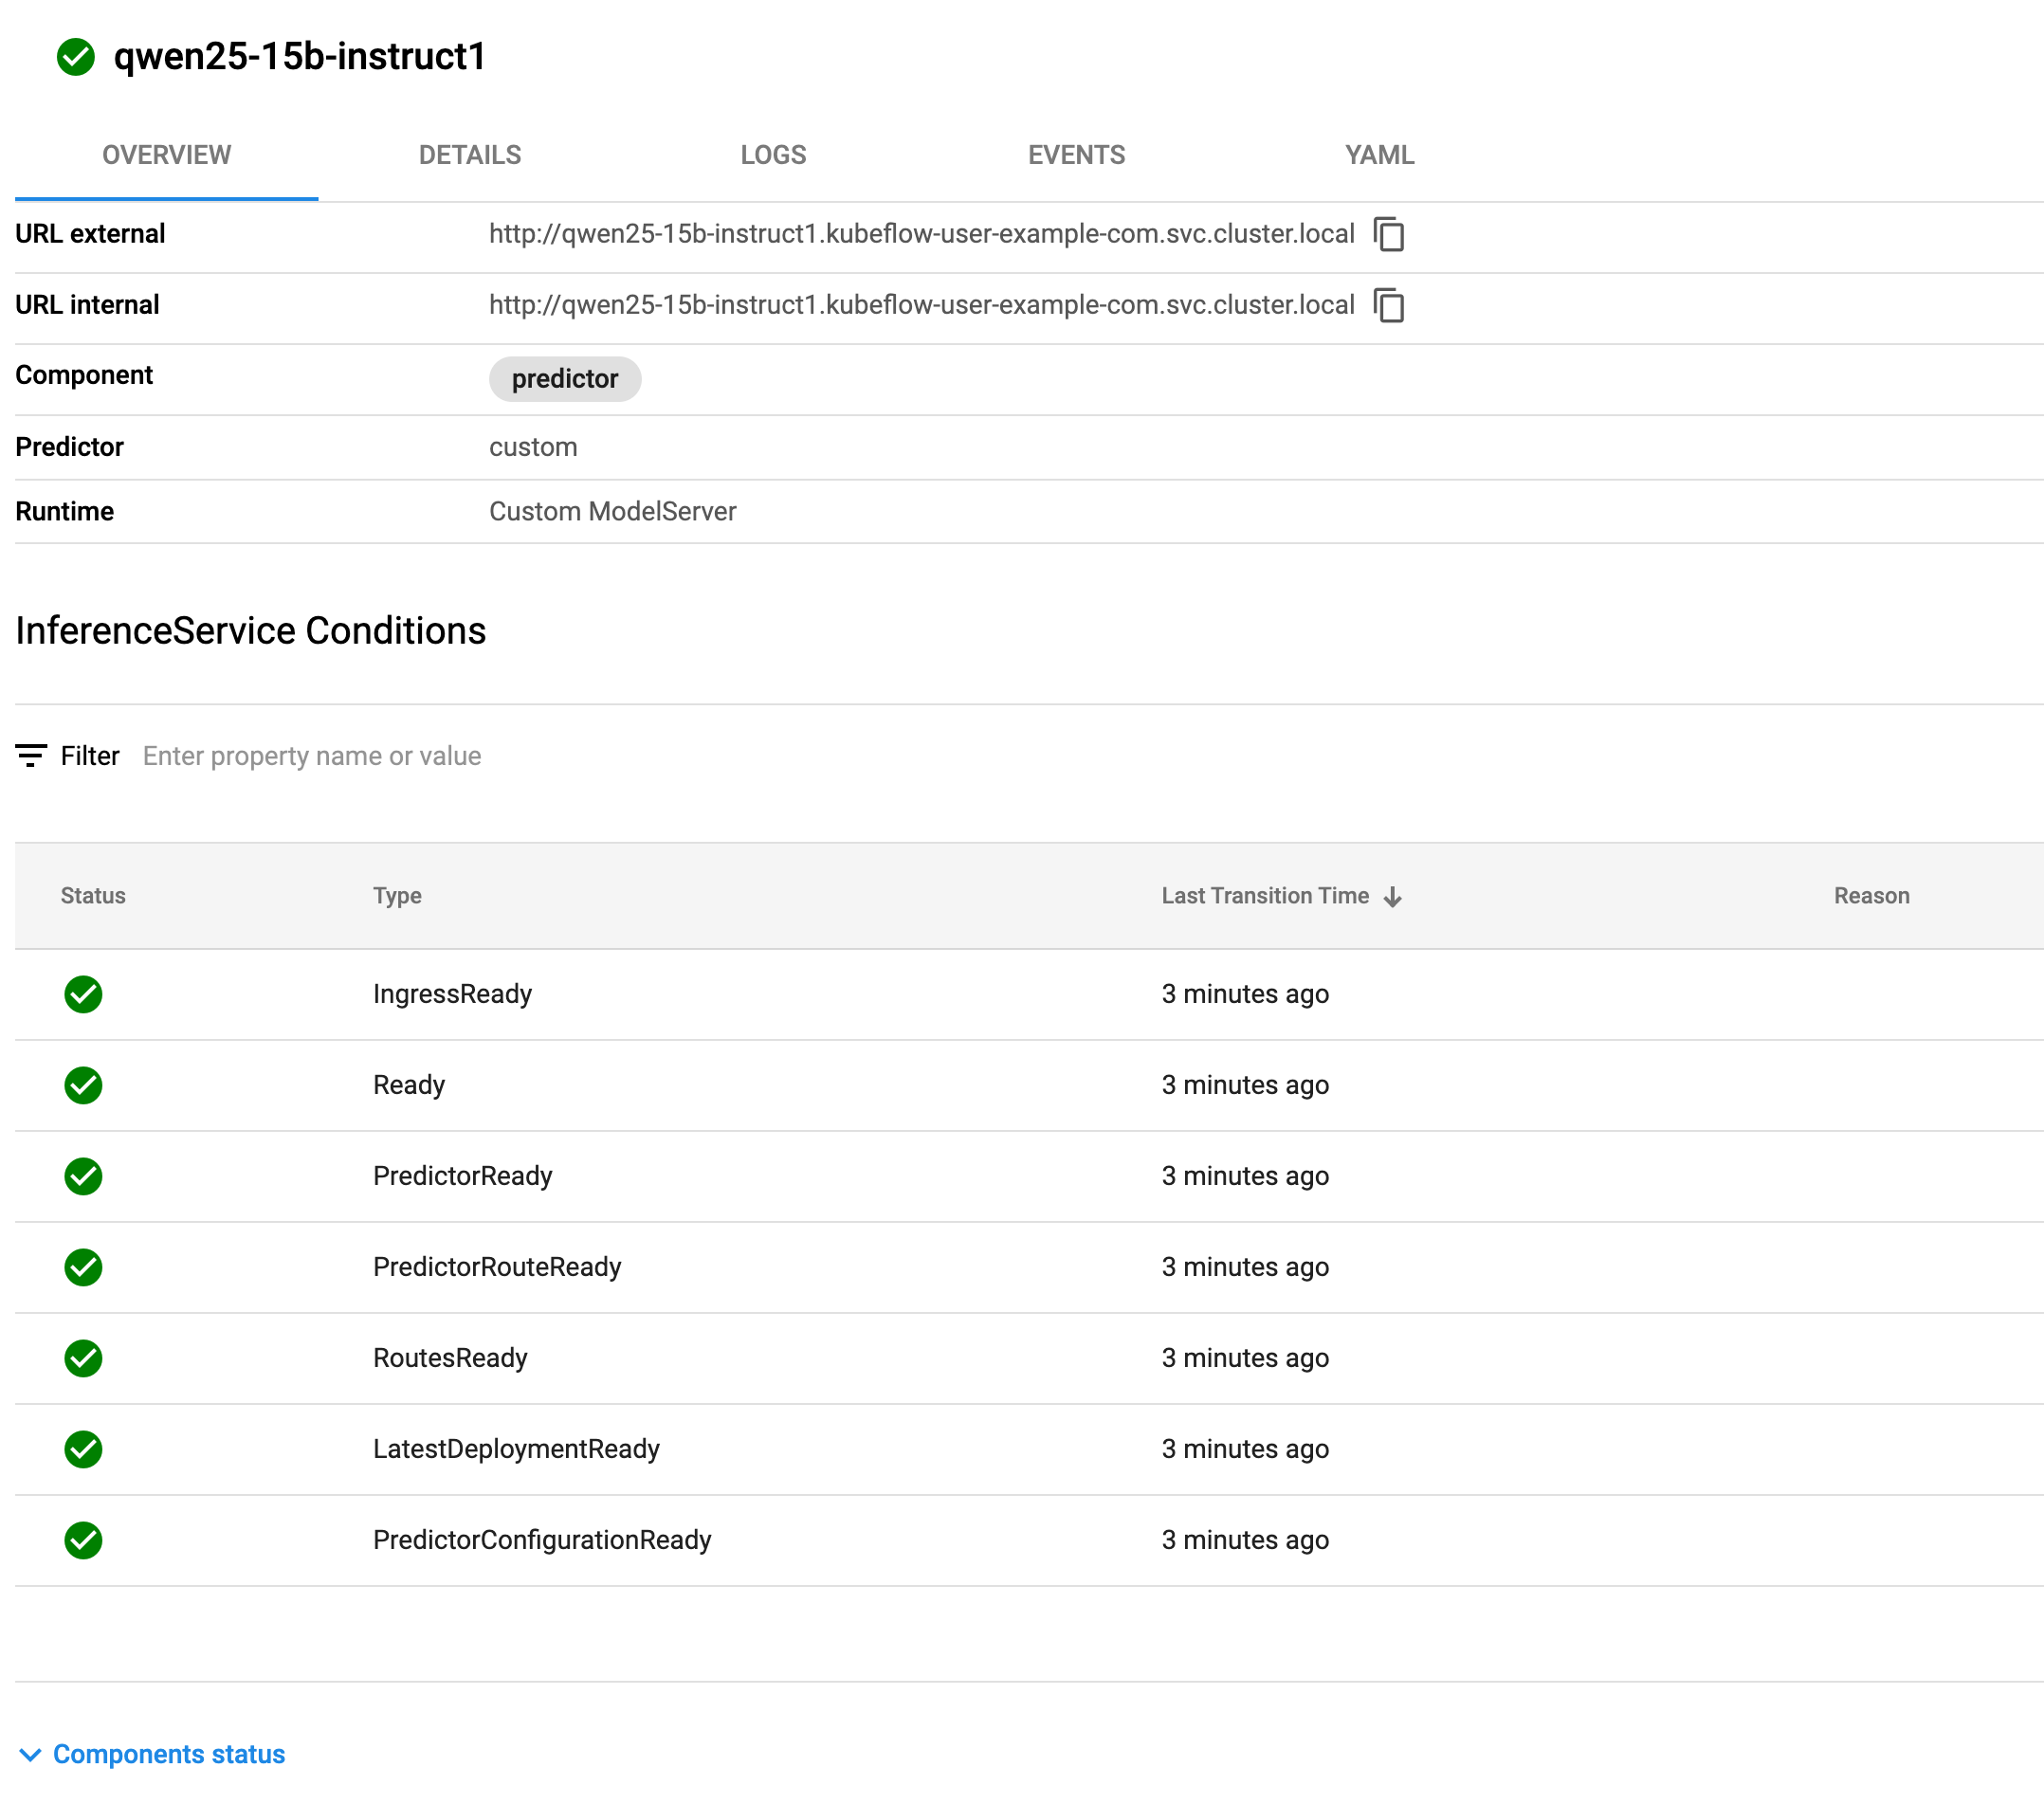
d) InferenceService部署
apiVersion: "serving.kserve.io/v1beta1"
kind: "InferenceService"
metadata:
  name: "qwen25-15b-instruct"
  namespace: kubeflow-user-example-com
spec:
  predictor:
    containers:
      - name: kserve-container
        image: registry.ap-southeast-5.aliyuncs.com/xxxxx/qwen-kserve:0.5b-cu121
        imagePullPolicy: IfNotPresent
        resources:
          requests:
            cpu: "2"
            memory: "8Gi"
            nvidia.com/gpu: "1"
          limits:
            cpu: "4"
            memory: "16Gi"
            nvidia.com/gpu: "1"
        ports:
          - containerPort: 8080
            protocol: TCP
        volumeMounts:
          - name: model-storage
            mountPath: /data/models
            readOnly: true
    volumes:
      - name: model-storage
        persistentVolumeClaim:
          claimName: qwen-model-pvc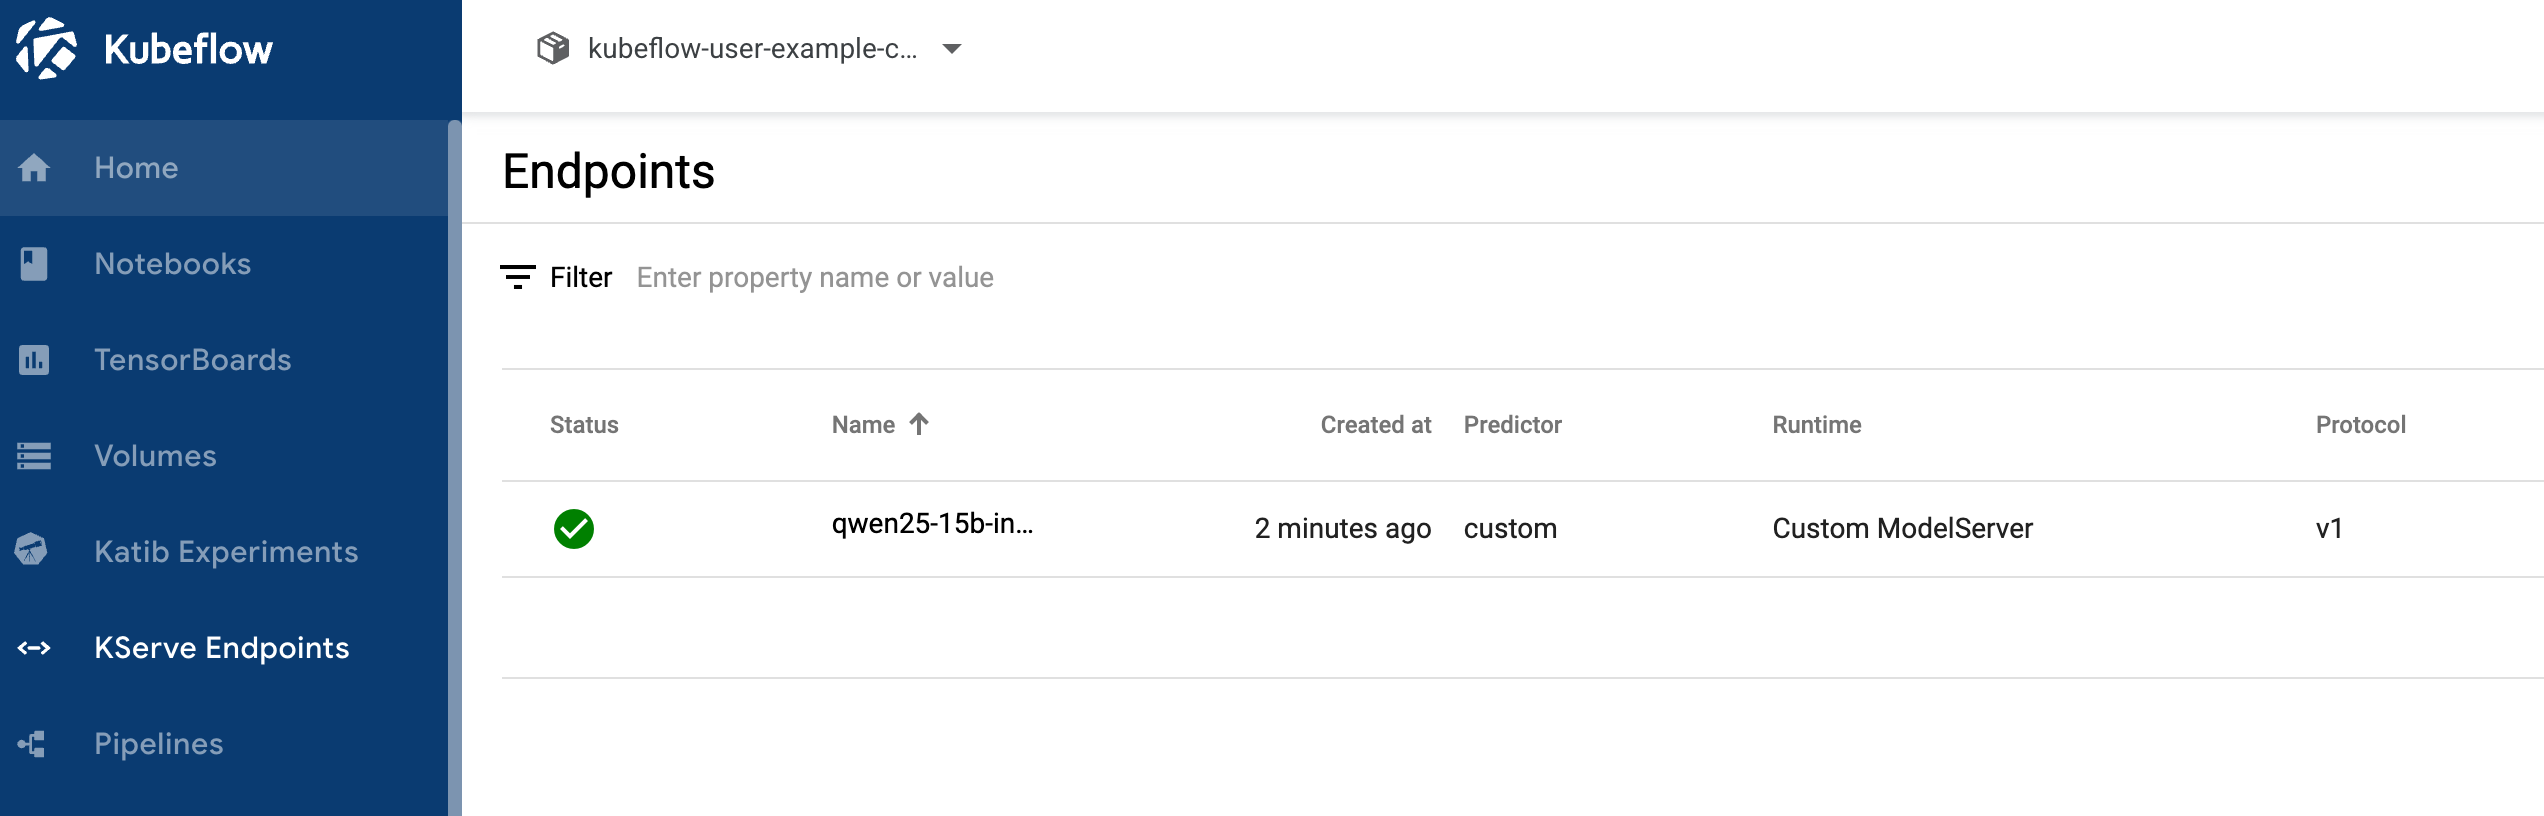
e) 测试


curl -X POST -H "Content-Type: application/json" \
http://127.0.0.1:8080/v1/models/qwen:predict \
-d '{
  "instances": [
    {
      "text": "你好,请简单介绍一下阿里云ECS?"
    }
  ]
}' | jq .


 676
676

 被折叠的 条评论
为什么被折叠?
被折叠的 条评论
为什么被折叠?
 到【灌水乐园】发言


