


1 简要流程
1.1 配置anaconda
- 清华源 下载安装anaconda(不详细讲了)
- 配置anaconda的conda国内加速镜像源 比如
清华 中科大不然pip安装包会特别慢
conda config --add channels https://mirrors.tuna.tsinghua.edu.cn/anaconda/pkgs/free/
conda config --add channels https://mirrors.tuna.tsinghua.edu.cn/anaconda/pkgs/main/
conda config --add channels https://mirrors.tuna.tsinghua.edu.cn/anaconda/cloud/pytorch/
conda config --set show_channel_urls yes#下载时显示文件来源
- conda创造新环境
格式为conda create --name 环境名称 pytohn==python版本
我们可以conda create --name pytorch36 pytohn==3.6 - conda切换到新环境里面配置环境
以刚刚的例子conda activate pytorch36切换环境
1.2 安装pytorch
-
先确定自己安装好
anaconda和numpy库 -
打开官网
https://pytorch.org/
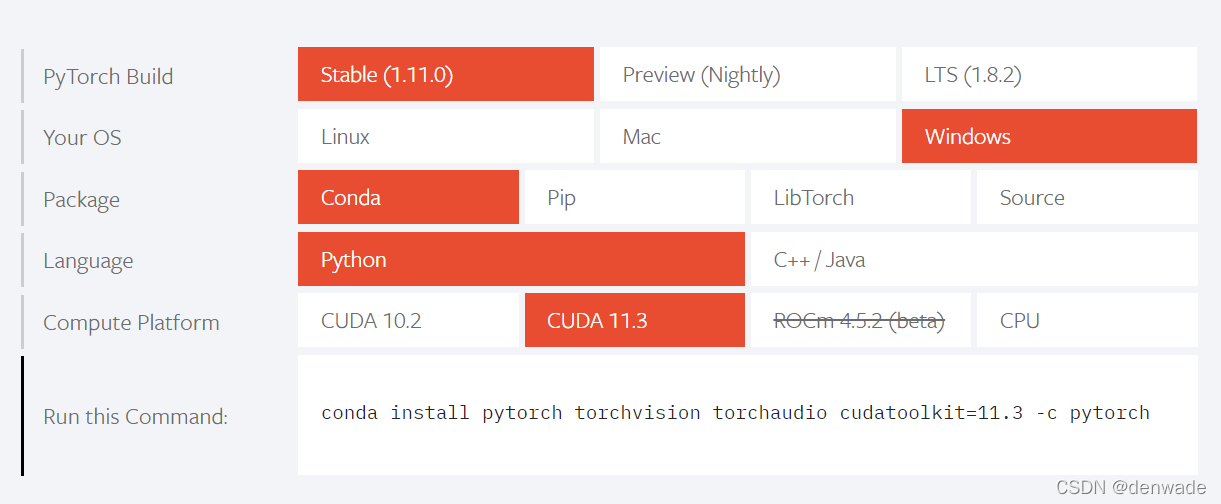
我的配置是Win11+RTX3060+cuda11.5,然后尴尬的发现 pytorch官网cuda版本是11.3,不过问题不大,我们就安装cuda11.3的版本就好
-
我们复制链接
conda install pytorch torchvision torchaudio cudatoolkit=11.3
需要注意 不能带后面的-c pytorch(否则会在官网下载,速度非常慢),一般来说按照前面配置好国内源,就能正常访问清华源 -
我们就正常下载安装,会发现有两个大文件
cudatoolkit 800M和pytorch 1.2G经常断,这时候我们可以选择手动安装
打开https://mirrors.tuna.tsinghua.edu.cn/anaconda/cloud/pytorch/win-64/,按ctrl-F,搜索我们下载失败两个包(下载时会显示具体包名),我的两个包分别为pytorch-1.11.0-py3.7_cuda11.3_cudnn8_0.tar和cudatoolkit-11.3.1-h280eb24_10.tar,直接点击在浏览器里面下载
下载完成后,我们把下载好的两个包移动到你安装Anaconda目录下的pkgs里面,例如我的D:\Programs\Anaconda\pkgs

然后手动顺序安装下载包(记得cd 到对应目录下)
1conda install --use-local pytorch-1.11.0-py3.7_cuda11.3_cudnn8_0.tar
2conda install --use-local cudatoolkit-11.3.1-h280eb24_10.tar
最后再继续执行我们之前未完成的指令conda install pytorch torchvision torchaudio cudatoolkit=11.3即可
其他包安装问题都大同小异,大家知道方法即可
1.3 验证pytorch安装成功
这里不详细讲了,贴两个博客自己看看
检测Pytorch是否安装成功(代码)
pytorch测试GPU是否安装成功


 10万+
10万+


 被折叠的 条评论
为什么被折叠?
被折叠的 条评论
为什么被折叠?
 到【灌水乐园】发言


