


1 说明
====
1.1 Mask R-CNN是一个实例分割(Instance segmentation)算法,可以用来做“目标检测”、“目标实例分割”、“目标关键点检测”。
1.2 即实例分割需要在语义分割的基础上对同类物体进行更精细,给予不同颜色的分割。
1.3 Mask R-CNN是一个非常灵活的框架,可以增加不同的分支完成不同的任务,可以完成目标分类、目标检测、语义分割、实例分割、人体姿势识别等多种任务,真不愧是一个好算法!
2 准备
=====
2.1 环境:python3.8+deepin-linux深度操作系统+微软编辑器vscode。
2.2 软件:opencv4.2.0+numpy1.19.4
2.3 代码来源:对代码进行修改bug,注释,调试,方便大家使用。
https://github.com/spmallick/learnopencv#里的Mask-RCNN文件夹,感谢开源,别忘了给他个星星!# Copyright (C) 2018-2019, BigVision LLC (LearnOpenCV.com), All Rights Reserved. # Author : Sunita Nayak# Article : https://www.learnopencv.com/deep-learning-based-object-detection-and-instance-segmentation-using-mask-r-cnn-in-opencv-python-c/# License: BSD-3-Clause-Attribution (Please read the license file.)# This work is based on OpenCV samples code (https://opencv.org/license.html) 2.4 frozen_inference_graph.pb需要自己下载
#wget http://download.tensorflow.org/models/object_detection/mask_rcnn_inception_v2_coco_2018_01_28.tar.gz#并解压放在代码目录下3 效果图
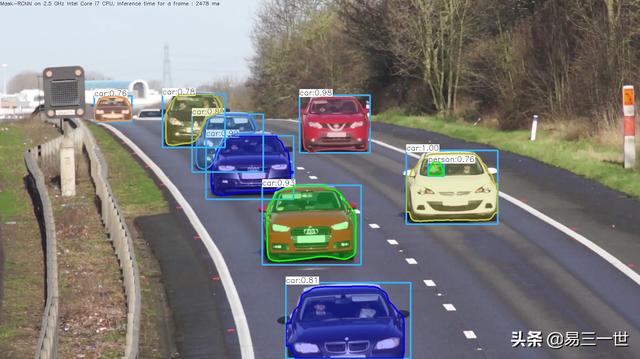
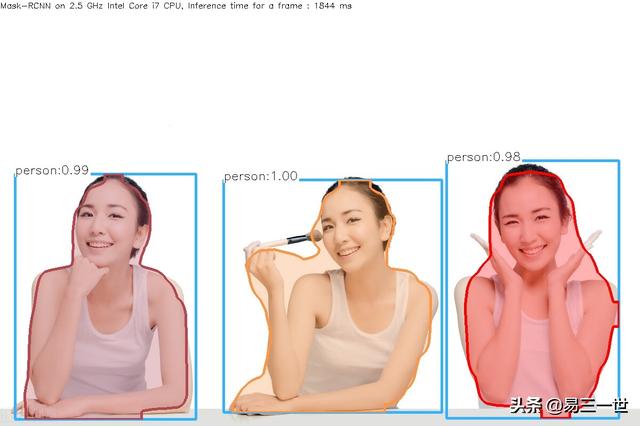
图片效果图
视频效果
4 代码
=====
4.1 操作方法
#本机操作方法,在代码目录下,打开终端,输入即可#图片检测方法#python3.8 11.py --image=12.jpeg#视频mp4文件检测#python3.8 11.py --video=cars.mp4#打开摄像头检测#python3.8 11.py4.2 完整代码:
#第1步:导入模块import cv2 as cvimport argparseimport numpy as npimport os.pathimport sysimport random#第2步:初始参数和终端参数说明和设定# Initialize the parametersconfThreshold = 0.5 # Confidence thresholdmaskThreshold = 0.3 # Mask thresholdparser = argparse.ArgumentParser(description='Use this script to run Mask-RCNN object detection and segmentation')parser.add_argument('--image', help='Path to image file')parser.add_argument('--video', help='Path to video file.')args = parser.parse_args()#第3步:画框函数# Draw the predicted bounding box, colorize and show the mask on the imagedef drawBox(frame, classId, conf, left, top, right, bottom, classMask): # Draw a bounding box. #画框 cv.rectangle(frame, (left, top), (right, bottom), (255, 178, 50), 3) #文字标签 # Print a label of class. label = '%.2f' % conf if classes: assert(classId < len(classes)) label = '%s:%s' % (classes[classId], label) # Display the label at the top of the bounding box labelSize, baseLine = cv.getTextSize(label, cv.FONT_HERSHEY_SIMPLEX, 0.5, 1) top = max(top, labelSize[1]) #画框,天蓝色的框 cv.rectangle(frame, (left, top - round(1.5*labelSize[1])), (left + round(1.5*labelSize[0]), top + baseLine), (255, 255, 255), cv.FILLED) #画框上的文字输出,黑色的字 cv.putText(frame, label, (left, top), cv.FONT_HERSHEY_SIMPLEX, 0.75, (0,0,0), 1) # Resize the mask, threshold, color and apply it on the image classMask = cv.resize(classMask, (right - left + 1, bottom - top + 1)) mask = (classMask > maskThreshold) roi = frame[top:bottom+1, left:right+1][mask] #颜色mask掩膜的可变颜色设定 # color = colors[classId%len(colors)] # Comment the above line and uncomment the two lines below to generate different instance colors colorIndex = random.randint(0, len(colors)-1) color = colors[colorIndex] frame[top:bottom+1, left:right+1][mask] = ([0.3*color[0], 0.3*color[1], 0.3*color[2]] + 0.7 * roi).astype(np.uint8) # Draw the contours on the image mask = mask.astype(np.uint8) #查找边界 #im2, contours, hierarchy = cv.findContours(mask,cv.RETR_TREE,cv.CHAIN_APPROX_SIMPLE) #bug contours, hierarchy = cv.findContours(mask,cv.RETR_TREE,cv.CHAIN_APPROX_SIMPLE) #修改bug,去掉一个im2 #画识别物体的边界 cv.drawContours(frame[top:bottom+1, left:right+1], contours, -1, color, 3, cv.LINE_8, hierarchy, 100)#第4步:预侦测# For each frame, extract the bounding box and mask for each detected objectdef postprocess(boxes, masks): # Output size of masks is NxCxHxW where # N - number of detected boxes # C - number of classes (excluding background) # HxW - segmentation shape numClasses = masks.shape[1] numDetections = boxes.shape[2] frameH = frame.shape[0] frameW = frame.shape[1] for i in range(numDetections): box = boxes[0, 0, i] mask = masks[i] score = box[2] if score > confThreshold: classId = int(box[1]) # Extract the bounding box left = int(frameW * box[3]) top = int(frameH * box[4]) right = int(frameW * box[5]) bottom = int(frameH * box[6]) left = max(0, min(left, frameW - 1)) top = max(0, min(top, frameH - 1)) right = max(0, min(right, frameW - 1)) bottom = max(0, min(bottom, frameH - 1)) # Extract the mask for the object classMask = mask[classId] # Draw bounding box, colorize and show the mask on the image drawBox(frame, classId, score, left, top, right, bottom, classMask)#第5步:加载文件#识别物的分类名文件# Load names of classesclassesFile = "mscoco_labels.names"classes = Nonewith open(classesFile, 'rt') as f: classes = f.read().rstrip('').split('')#模型# Give the textGraph and weight files for the modeltextGraph = "./mask_rcnn_inception_v2_coco_2018_01_28.pbtxt"#缺少这个frozen_inference_graph.pb,下载地址#wget http://download.tensorflow.org/models/object_detection/mask_rcnn_inception_v2_coco_2018_01_28.tar.gzmodelWeights = "./mask_rcnn_inception_v2_coco_2018_01_28/frozen_inference_graph.pb"#加载网络# Load the networknet = cv.dnn.readNetFromTensorflow(modelWeights, textGraph)net.setPreferableBackend(cv.dnn.DNN_BACKEND_OPENCV)net.setPreferableTarget(cv.dnn.DNN_TARGET_CPU)# Load the classescolorsFile = "colors.txt"with open(colorsFile, 'rt') as f: colorsStr = f.read().rstrip('').split('')#颜色列表,可变的colors = [] #[0,0,0]for i in range(len(colorsStr)): rgb = colorsStr[i].split(' ') color = np.array([float(rgb[0]), float(rgb[1]), float(rgb[2])]) colors.append(color)#第6步:窗口设置和保存文件设置winName = 'Mask-RCNN Object detection and Segmentation in OpenCV'cv.namedWindow(winName, cv.WINDOW_NORMAL)#视频保存outputFile = "mask_rcnn_out_py.avi"#判断if (args.image): # Open the image file,图片的 if not os.path.isfile(args.image): print("Input image file ", args.image, " doesn't exist") sys.exit(1) #获取图片和保存 cap = cv.VideoCapture(args.image) outputFile = args.image[:-4]+'_mask_rcnn_out_py.jpg'#视频mp4文件的elif (args.video): # Open the video file if not os.path.isfile(args.video): print("Input video file ", args.video, " doesn't exist") sys.exit(1) cap = cv.VideoCapture(args.video) outputFile = args.video[:-4]+'_mask_rcnn_out_py.avi'else: # Webcam input,摄像头视频 cap = cv.VideoCapture(0)#如果不是图片,需要保存为视频方法# Get the video writer initialized to save the output videoif (not args.image): vid_writer = cv.VideoWriter(outputFile, cv.VideoWriter_fourcc('M','J','P','G'), 28, (round(cap.get(cv.CAP_PROP_FRAME_WIDTH)),round(cap.get(cv.CAP_PROP_FRAME_HEIGHT))))#第7步:循环while cv.waitKey(1) < 0: # Get frame from the video hasFrame, frame = cap.read() # Stop the program if reached end of video if not hasFrame: print("Done processing !!!") print("Output file is stored as ", outputFile) cv.waitKey(3000) break # Create a 4D blob from a frame. blob = cv.dnn.blobFromImage(frame, swapRB=True, crop=False) # Set the input to the network net.setInput(blob) # Run the forward pass to get output from the output layers boxes, masks = net.forward(['detection_out_final', 'detection_masks']) # Extract the bounding box and mask for each of the detected objects postprocess(boxes, masks) # Put efficiency information. t, _ = net.getPerfProfile() label = 'Mask-RCNN on 2.5 GHz Intel Core i7 CPU, Inference time for a frame : %0.0f ms' % abs(t * 1000.0 / cv.getTickFrequency()) cv.putText(frame, label, (0, 15), cv.FONT_HERSHEY_SIMPLEX, 0.5, (0, 0, 0)) #保存判断 # Write the frame with the detection boxes #图片就保存为图片 if (args.image): cv.imwrite(outputFile, frame.astype(np.uint8)) else: #视频就保存为视频 vid_writer.write(frame.astype(np.uint8)) #显示图片和视频标示过程 cv.imshow(winName, frame)自己整理并分享。


 354
354

 被折叠的 条评论
为什么被折叠?
被折叠的 条评论
为什么被折叠?
 到【灌水乐园】发言


