


 本文档详述了在Ubuntu虚拟机中安装和配置BRAT文本标注工具的过程,包括虚拟机的安装、Apache服务器的配置以及BRAT的下载、安装和启动。主要步骤涉及Ubuntu虚拟机的创建、Apache2的安装、BRAT的下载与解压、用户及权限设置,以及最后的测试验证。整个流程旨在为服务器端的文本实体标注提供一个便捷的工具。

最后还是选择了brat,原因有下边几个
- 数据只能放在服务器端,不能导出
- 实体标注操作还算方便
- 没有找到其他更适合的标注工具
今天对brat的安装和部署做一个小结,参考的网页有:
http://brat.nlplab.org/installation.html
https://blog.csdn.net/QFire/article/details/82496718
1. ubuntu虚拟机的安装
由于brat只能部署在类unix系统上,因此这里选择在Windows上安装Ubuntu14.04的虚拟机。会安装虚拟机的小伙伴,直接跳到2。
步骤1 到开源镜像站下载Ubuntu14.04镜像。地址为http://mirrors.163.com/ubuntu-releases/14.04/ubuntu-14.04.6-desktop-amd64.iso直接复制该地址到迅雷即可下载。
步骤2 下载virtualbox虚拟机,安装过程全部点击下一步。地址:https://download.virtualbox.org/virtualbox/6.0.6/VirtualBox-6.0.6-130049-Win.exe直接复制该地址到迅雷即可下载。
步骤3 在虚拟机virtualbox中安装ubuntu14.04。virtualbox点击`新建`输入ubuntu后自动填写后边的选项,这里我输入的是“ubuntu_annotato”,一路下一步,选择内存4G(笔记本内存太小选择2G或1G),选择磁盘空间大小,越大越好,我设置为“128G”。创建好虚拟机后,右键虚拟机图标,点击`设置`->`存储`->分配光驱的光盘图标,选择步骤1下载的光盘镜像。设置好后点击`启动`。选择语言“中文(简体)”,点击`安装Ubuntu`,一路`继续`直到输入姓名等输入项,自行输入,这页的内容最好自己记住,之后就开始自动安装了。这里我设置的用户名为“annotator”,密码为“123456”。安装完成后,重启即可。启动进入系统后,需要安装一下增强功能。设置共享文件夹,以及双向剪贴板。把当前用户添追加到vboxsf组,以使当前用户具有访问权限
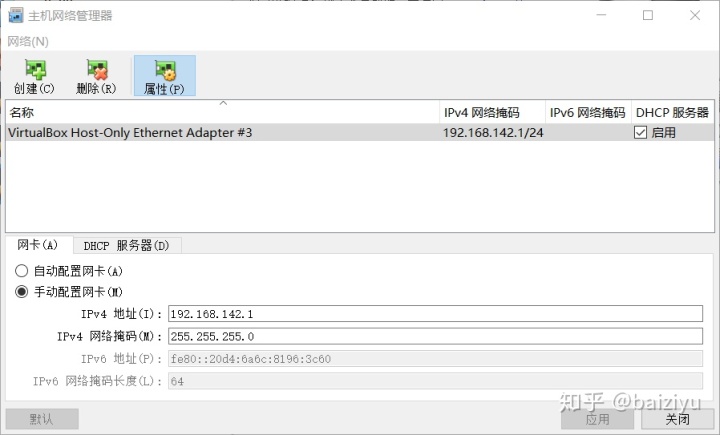
$ sudo usermod -aG vboxsf $(whoami)步骤4 设置静态IP。此步与本次部署没有关系,只是为了以后用windows下的终端连接方便。先使虚拟机处于关闭状态,右击虚拟机图标,点击`设置`->`网络`,网卡1设置为“网络地址转换(NAT)”,网卡2设置为“仅主机(Host-Only)适配器。设置virtualbox“主机网络管理适配器”,点击`管理`->`主机网络管理器`按下图设置
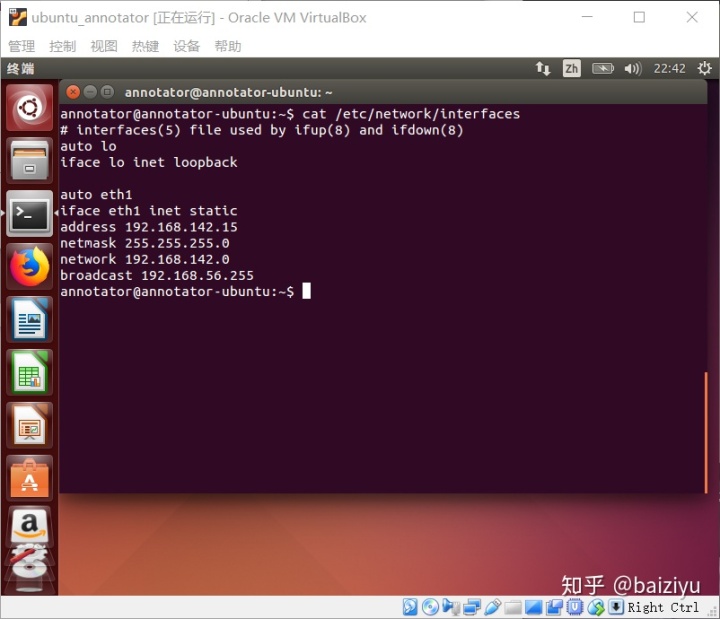
启动虚拟机,编辑/etc/network/interfaces文件。添加下边图中的内容
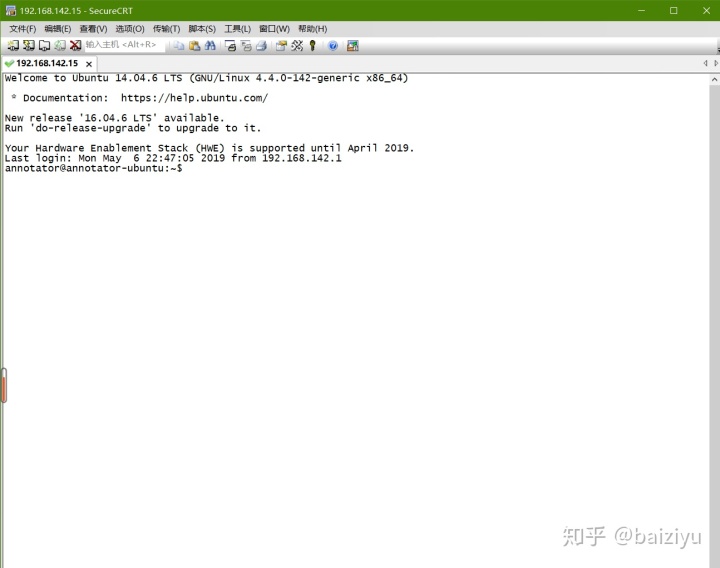
重启。安装远程登陆服务ssh-server,sudo apt-get install openssh-server输入自己在前边设置的密码。完成远程登陆如下图所示
2. 安装apache2.x
由于brat是基于web的,因此需要安装apache服务。
步骤1 安装apache
$ sudo apt-get install apache2注意:apache成功安装后默认根目录为/var/www/html。
步骤2 修改apache配置文件,这里主要是修改配置文件apache2.conf中的“<Directory /var/www/>”这一项,在这一项内部添加brat官网的配置项内容,修改后的内容是下边这样的,这里我就不解释了,因为我也不明白每一项内容代表什么意思,不会Web开发。
$ cd /etc/apache2/先备份一下吧,以免误改后恢复不到原始内容了。
$ sudo cp apache2.conf apache2.conf.bak编辑apache2.conf
$ sudo vi apache2.conf把配置文件apache2.conf中“<Directory /var/www/>”这一部分的内容改成下边的样子
<Directory /var/www/>
    Options Indexes FollowSymLinks
    Require all granted
    AllowOverride Options Indexes FileInfo Limit
    AddType application/xhtml+xml .xhtml
    AddType font/ttf .ttf
    # For CGI support
    AddHandler cgi-script .cgi
    # Comment out the line above and uncomment the line below for FastCGI
    #AddHandler fastcgi-script fcgi
</Directory>
这里如果使用普通cgi就设置普通cgi,如果使用fastcgi就注释掉普通cgi那行,打开fastcgi那行。
在配置文件apache2.conf的结尾添加服务名
ServerName localhost添加服务名的原因是因为在启动服务时总警告说“* Restarting web server apache2
AH00558: apache2: Could not reliably determine the server's fully qualified domain name, using 127.0.1.1. Set the 'ServerName' directive globally to suppress this message”,虽然只是个警告,但是还是添加一下消除掉这个警报吧。
步骤3 使能userdir(为啥不知道)
$ sudo a2enmod userdir
Enabling module userdir.
To activate the new configuration, you need to run:
  service apache2 restart
步骤4 如果使用普通cgi,则启用
$ sudo a2enmod cgi
Your MPM seems to be threaded. Selecting cgid instead of cgi.
Module cgid already enabled
步骤5 如果用FASTCGI支持,则安装并使能rewrite模块((4)、(5)选择一个就行,根据前边配置文件apache2.conf中的设置)
$ sudo apt-get install libapache2-mod-fastcgi
$ sudo a2enmod fastcgi
Module fastcgi already enabled
$ sudo a2enmod rewrite
Enabling module rewrite.
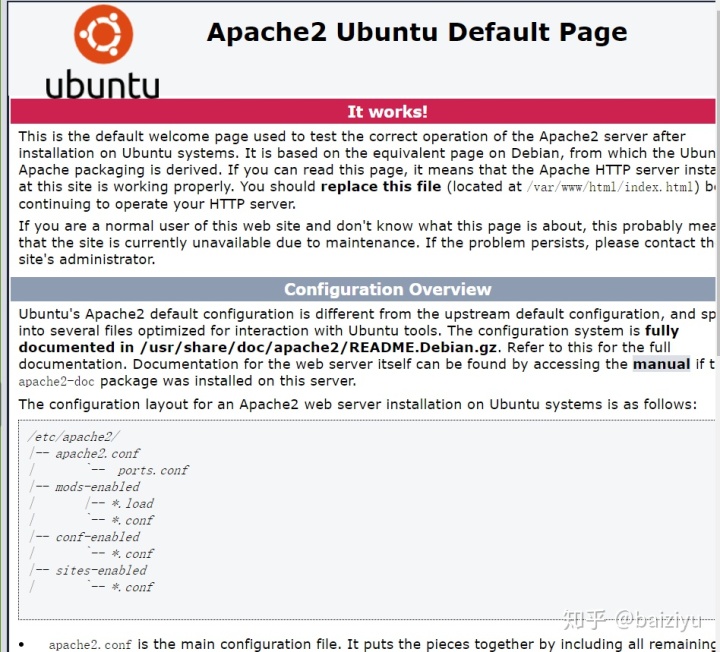
To activate the new configuration, you need to run:步骤6 启动apache服务
$ sudo service apache2 restart
* Restarting web server apache2
   ...done.
如果安装成功,则可以通过http://192.168.142.15 或http://localhost访问apache默认页,如下图所示:ip地址192.168.142.15为虚拟机地址
3. 安装并配置BRAT
步骤1 下载BRAT http://weaver.nlplab.org/~brat/releases/brat-v1.3_Crunchy_Frog.tar.gz
步骤2 将软件安装包复制到apache根目录,解压,修改文件名为brat
$ cd /var/www/html
$ sudo cp /media/sf_Downloads/brat-v1.3_Crunchy_Frog.tar.gz /var/www/html/
$ sudo tar -xvzf brat-v1.3_Crunchy_Frog.tar.gz
$ sudo mv brat-v1.3_Crunchy_Frog brat
步骤3 进入brat目录,并启动安装脚本,输入用户名、密码以及邮箱地址。
$ cd /var/www/html/brat
$ sudo ./install.sh
Please the user name that you want to use when logging into brat
editor
Please enter a brat password (this shows on screen)
annotate
Please enter the administrator contact email
admin@example.com
Assigning owner of the following directories to apache (www-data):
    "/var/www/html/brat/work/" and "/var/www/html/brat/data/"
(this requires sudo; please enter your password if prompted)
The installation has finished, you are almost done.
1.) If you are installing brat on a webserver, make sure you have
    followed the steps described in the brat manual to enable CGI:
    http://brat.nlplab.org/installation.html
2.) Please verify that brat is running by accessing your installation
    using a web browser.
You can automatically diagnose some common installation issues using:
    tools/troubleshooting.sh URL_TO_BRAT_INSTALLATION
If there are issues not detected by the above script, please contact the
brat developers and/or file a bug to the brat bug tracker:
    https://github.com/nlplab/brat/issues
3.) Once brat is running, put your data in the data directory. Or use
    the example data placed there by the installation:
    /var/www/html/brat/data
4.) You can find configuration files to place in your data directory in
    the configurations directory, see the manual for further details:
    /var/www/html/brat/configurations
5.) Then, you (and your team?) are ready to start annotating!
步骤4 查看apache组名(步骤4、步骤5 两步应该不需要,当前版本的brat在安装完成后会自动进行这两步操作)
$ sudo ./apache-group.sh
www-data
步骤5 改变data、work目录及其下所有子目录和文件的所属组为www-data,使得apache可以有权限访问和修改
$ sudo chmod -R g+rwx data work查看是否生效
$ ls -lh | grep data
drwxrwxr-x  4 root www-data 4.0K  5月  6 23:29 data
$ ls -lh | grep work
drwxrwxr-x  2 root www-data 4.0K  5月  6 23:29 work
步骤6 打开网页,测试是否安装成功,如果成功,地址栏输入http://192.168.142.15/brat或http://localhost/brat可以看到下边的页面
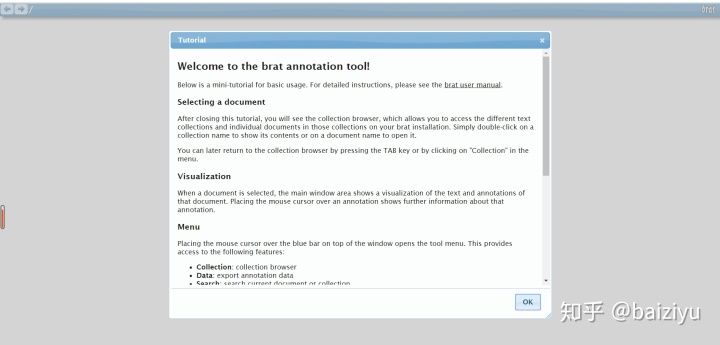
至此,brat的安装与部署全部完成。关于配置,将在以后介绍。不过说实话,这个界面我也不喜欢,一点儿都不好看。


 1万+
1万+

 被折叠的 条评论
为什么被折叠?
被折叠的 条评论
为什么被折叠?
 到【灌水乐园】发言


