


记得点赞哟
首先进行环境测试
- which gfortran
- which cpp
- which gcc
进行上述操作之后会显示库的位置即可
cd TESTS 创建一个测试文件夹
下载fortran 和 c 语言的测试包 测试环境
https://www2.mmm.ucar.edu/wrf/OnLineTutorial/compile_tutorial/tar_files/Fortran_C_tests.tar
将下载好的文件上传至TESTS目录下
执行一下操作
Test #1: 测试1Type the following in the command line: 输入如下命令
gfortran TEST_1_fortran_only_fixed.f
Now type:
./a.out
The following should print out to the screen: 显示下行则测试成功
SUCCESS test 1 fortran only fixed format
Test #2: Free Format Fortran: TEST_2_fortran_only_free.f90测试2Type the following in the command line:输入如下命令
gfortran TEST_2_fortran_only_free.f90
and then type:
./a.out
The following should print out to the screen: 显示下列字符则测试成功
Assume Fortran 2003: has FLUSH, ALLOCATABLE, derived type, and ISO C Binding
SUCCESS test 2 fortran only free format
Test #3: C: TEST_3_c_only.c 测试3Type the following in the command line: 输入如下命令
gcc TEST_3_c_only.c
and then type:
./a.out
The following should print out to the screen: 测试成功
SUCCESS test 3 c only
Test #4: Fortran Calling a C Function (our gcc and gfortran have different defaults, so we force both to always use 64 bit [-m64] when combining them): TEST_4_fortran+c_c.c, and TEST_4_fortran+x_f.f90 测试4Type the following in the command line:输入如下命令
gcc -c -m64 TEST_4_fortran+c_c.c
and then type:
gfortran -c -m64 TEST_4_fortran+c_f.f90
and then:
gfortran -m64 TEST_4_fortran+c_f.o TEST_4_fortran+c_c.o
and then issue:
./a.out
The following should print out to the screen: 测试成功
C function called by Fortran
Values are xx = 2.00 and ii = 1
SUCCESS test 4 fortran calling c
测试5、6、7
Test #5:csh In the command line, type:
./TEST_csh.csh
The result should be:
SUCCESS csh testTest #6:perl In the command line, type:
./TEST_perl.pl
The result should be:
SUCCESS perl testTest #7:sh In the command line, type:
./TEST_sh.sh
The result should be:
SUCCESS sh test
3 库的安装
由于CMAQ本身部分代码由icc编写、故安装包需要安装两种编译器的版本。
所有库安装版本如下
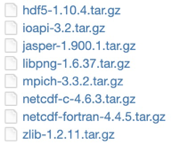
在自己电脑下载安装包之后上传至服务器即可
3.1 gcc编译库的安装
加载gcc模块(统一安装库的gcc版本)
设置库的安装路径
module load gcc
export DIR=$PATH
库的安装依照如下顺序,可以给每个库分别创建文件夹存储
1 zlib的安装
解压:tar -zxvf zlib-1.2.11.tar.gz
进入解压目录,命令:./configure --prefix=$DIR
编译,命令:make
编译检查 make check
安装,命令:make install
2 png的安装
解压:tar -zxvf libpng-1.6.37.tar.gz
进入解压目录,配置ruby安装参数,命令:./configure --prefix=$DIR
编译,命令:make
编译检查 make check
安装,命令:make install
3 jasper的安装
解压:tar -zxvf jasper1.900.1.tar.gz
进入解压目录,配置ruby安装参数,命令:./configure --prefix=$DIR
编译,命令:make
编译检查 make check
安装,命令:make install
4 hdf5的安装
解压:tar -zxvf hdf5-1.10.4.tar.gz
进入解压目录,配置ruby安装参数,命令:./configure --prefix=$DIR --with-zlib=$DIR/lib
编译,命令:make
编译检查 make check
安装,命令:make install
5 netcdf的安装
先安装c再安装fortran
c
解压:tar -zxvf netcdf-c-4.7.3.tar.gz
进入解压目录,配置ruby安装参数,命令:./configure --prefix=$DIR LDFLAGS=-L$DIR/lib CPPFLAGS=-I$DIR/include --disable-dap --enable-netcdf-4
编译,命令:make
编译检查 make check
安装,命令:make install
Fortran
解压:tar -zxvf netcdf-fortran-4.4.4.tar.gz
进入解压目录,配置ruby安装参数,命令:./configure --prefix=$DIR CPPFLAGS=-I$DIR/include LD_LIBRARY_PATH=$DIR/lib:$LD_LIBRARY_PATH LDFLAGS=-L$DIR/lib
编译,命令:make
编译检查 make check
安装,命令:make install
6 Mpich安装
解压:tar -zxvf mpich3.3.2.tar.gz
进入解压目录,配置ruby安装参数,命令:./configure prefix=$DIR/mpich
编译,命令:make
编译检查 make check
安装,命令:make install
3.2 icc编译库的安装
Icc建议使用自己单独的intel编译器(防止版本问题导致错误)
设置变量
export CC=icc
export CXX=icpc
export FC=ifort
export DIR=$PATH
1 zlib的安装
解压:tar -zxvf zlib-1.2.11.tar.gz
进入解压目录,命令:./configure --prefix=$DIR
编译,命令:make
编译检查 make check
安装,命令:make install
2 png的安装
解压:tar -zxvf libpng-1.6.37.tar.gz
进入解压目录,配置ruby安装参数,命令:./configure --prefix=$DIR
编译,命令:make
编译检查 make check
安装,命令:make install
3 jasper的安装
解压:tar -zxvf jasper1.900.1.tar.gz
进入解压目录,配置ruby安装参数,命令:./configure --prefix=$DIR
编译,命令:make
编译检查 make check
安装,命令:make install
4 hdf5的安装
解压:tar -zxvf hdf5-1.10.4.tar.gz
进入解压目录,配置ruby安装参数,命令:./configure --prefix=$DIR --with-zlib=$DIR/lib
编译,命令:make
编译检查 make check
安装,命令:make install
5 netcdf的安装
先安装c再安装fortran 参考 https://www.cnblogs.com/fsquared/p/3804863.html
c
解压:tar -zxvf netcdf-c-4.7.3.tar.gz
进入解压目录,配置ruby安装参数,命令:./configure --prefix=$DIR LDFLAGS=-L$DIR/lib CPPFLAGS=-I$DIR/include --disable-dap
编译,命令:make
编译检查 make check
安装,命令:make install
Fortran
解压:tar -zxvf netcdf-fortran-4.4.4.tar.gz
进入解压目录,配置ruby安装参数,命令:./configure --prefix=$DIR CPPFLAGS=-I$DIR/include LD_LIBRARY_PATH=$DIR/lib:$LD_LIBRARY_PATH LDFLAGS=-L$DIR/lib
编译,命令:make
编译检查 make check (存在异常可跳过直接install)
安装,命令:make install
6 Mpich安装
解压:tar -zxvf mpich3.3.2.tar.gz
进入解压目录,配置ruby安装参数,命令:./configure prefix=$DIR/mpich
编译,命令:make
编译检查 make check
安装,命令:make install
7 ioapi安装
参考 http://blog.sciencenet.cn/blog-2733016-1108689.html
解压ioapi文件至$DIR/ioapi-3.2 下
cp Makefile.template Makefile
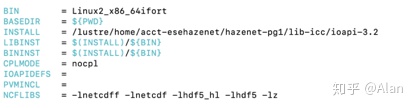
修改ioapi-3.2目录下的Makefile
在ioapi-3.2/iopai 以及 ioapi-3.2/m3tools 下均复制makefile文件
cd ioapi
cp Makefile.nocpl Makefile
cd ../m3tools
cp Makefile.nocpl Makefile
cd .. #切换到ioapi-3.2目录下
export BIN=Linux2_x86_64ifort
mkdir $BIN #创建Linux2_x86_64gfort,目录位于ioapi-3.2目录内
cd $BIN #进入文件夹
cp $DIR/lib/lib* ./ #将库拷贝至该处
cd .. #切换到ioapi-3.2目录下
make configure
make
make instal
安装之后将Linux2_x86_64ifort下的文件全部复制到ioapi-3.2/ioapi下
之后调用ioapi就直接调用 ioapi-3.2/ioapi
至此 库已全部安装完毕
4 WRF的安装以3.9.1为例
设置如下命令
module load gcc
ulimit -s unlimited
ulimit -l unlimited
export DIR=$PATH
export INCLUDE=${DIR}/include:${INCLUDE}
export PATH=${DIR}/bin: ${PATH}
export LD_LIBRARY_PATH=${DIR}/lib: ${LD_LIBRARY_PATH}
export NETCDF=$PATH/lib-gcc
export JASPERLIB=$PATH/lib
export JASPERINC=$PATH/include
export WRFIO_NCD_NO_LARGE_FILE_SUPPORT=1
export WRF_EM_CORE=1
可以将如下命令存储为.sh文件每次调用即可
调用命令 source setenv-gcc.sh
解压 tar –zxvf WRFV3.9.1TAR.gz
进入解压文件夹 cd WRFV3
清除之前的安装文件 ./clean –a
查看配置文件 configure.wrf
执行配置 ./configure
根据自己的配置选择
配置之后编译即可
./compile em_real>& compile.log
可以在compile.log中查看编译的错误
在main的目录下可以看到ndown.exe, real.exe, tc.exe, wrf.exe
即编译成功
5 WPS的安装以3.9.1为例
同样需要wrf时用到的变量 通过source加载
解压 tar –zxvf WRSV3.9.1TAR.gz
进入解压文件夹 cd WPS
清除之前的安装文件 ./clean –a
查看配置文件 configure.wps 配置如下 具体路径自行修改
./compile >& compile.log
如果编译成功,最后会在WPS代码根目录得到以下三个程序链接,
geogrid.exe -> geogrid/src/geogrid.exe
ungrib.exe -> ungrib/src/ungrib.exe
metgrid.exe -> metgrid/src/metgrid.exe
至此wps编译完成
7 CMAQ的安装及使用以5.2.1为例
先配置icc环境下的文件
module load icc
export LIBDIR=$PATH
export NETCDF=${LIBDIR}
export LD_LIBRARY_PATH=${LIBDIR}/lib:${LD_LIBRARY_PATH}
export INCLUDE=${LIBDIR}/include:${INCLUDE}
export PATH=${LIBDIR}/bin:${PATH}
export JASPERLIB=$PATH/lib
export JASPERINC=$PATH/include
export CC=icc
export FC=ifort
export CXX=icpc
2 获取 CMAQ5.2.1 安装包
git clone -b 5.2.1 https://github.com/USEPA/CMAQ.git 5.2.1
cd 5.2.1
设置 bldit_project.csh 脚本第 18 行
设置对应的cmaq路径
./bldit_project.csh #运行该脚本
修改config_cmaq.csh 文件
修改对应ioapi路径
csh #切换 csh 终端 直接输入csh
source config_cmaq.csh intel #选择 intel 编译器
ICON 编译
cd PREP/icon/scripts
设置 bldit_icon.csh 脚本第 68-78 行如下 #修改化学机制
./bldit_icon.csh intel
运行之后会报错 同时生成BLD_ICON_v52_profile_intel文件夹
进入该文件夹
make clean. #将刚才安装的清除掉
修改makefile

保存之后 在该文件夹下make即可
Bcon/CCTM 操作同理
Bcon 配置
Cctm 配置
MCIP 编译
cd ../../PREP/mcip/src
设置netcdf 48-56行 路径
设置Makefile 文件第 48-56 行如上
make #执行成功后会在 src 目录下生成 mcip.exe 应用程序
combine 编译
cd ~/5.2.1/POST/combine/scripts
./bldit_combine.csh intel #执行成功后会在 BLD_combine_v521_intel 目录下生成
combine_v521.exe 应用程序
CMAQ5.2.1 安装完毕


 5497
5497


 被折叠的 条评论
为什么被折叠?
被折叠的 条评论
为什么被折叠?
 到【灌水乐园】发言


