


配置文件详情
此处以nacos的配置为例做一说明,配置如下:
server:
  port: 8090

spring:
  application:
    name: demo-whq
  profiles:
    active: dev
  main:
    allow-bean-definition-overriding: true
  cloud:
    nacos:
      test: test
      test_a: testA
      discovery:
        server-addr: 127.0.0.1:8848,127.0.0.2:8848,127.0.0.3:8848
        namespace: 688400d8-cdae-4bb8-a0b5-18c011ae8cf8
      config:
        refresh-enabled: true
        name: ${spring.application.name}
        file-extension: yml
        server-addr: 127.0.0.1:8848,127.0.0.2:8848,127.0.0.3:8848
        namespace: 688400d8-cdae-4bb8-a0b5-18c011ae8cf8
        enabled: true
代码示例
import lombok.Data;
import org.springframework.boot.context.properties.ConfigurationProperties;
import org.springframework.stereotype.Component;

@Data
@Component
@ConfigurationProperties(prefix = "spring.cloud.nacos")
public class NacosProperties {
	// 使用构造函数注入
    public NacosProperties(NacosDiscoveryProperties nacosDiscoveryProperties, NacosConfigProperties nacosConfigProperties) {
        this.nacosDiscoveryProperties = nacosDiscoveryProperties;
        this.nacosConfigProperties = nacosConfigProperties;
    }

    private String test;
    private String testA;
    private final NacosDiscoveryProperties nacosDiscoveryProperties;
    private final NacosConfigProperties nacosConfigProperties;
}
import lombok.Data;
import org.springframework.boot.context.properties.ConfigurationProperties;
import org.springframework.stereotype.Component;

@Data
@Component
@ConfigurationProperties(prefix = "spring.cloud.nacos.discovery")
public class NacosDiscoveryProperties {
    private String serverAddr;
    private String namespace;
    private Boolean enabled = true;
    private Boolean registerEnabled = true;
}
import lombok.Data;
import org.springframework.boot.context.properties.ConfigurationProperties;
import org.springframework.stereotype.Component;

@Data
@Component
@ConfigurationProperties(prefix = "spring.cloud.nacos.config")
public class NacosConfigProperties {
    private Boolean refreshEnabled = true;
    private String name;
    private String fileExtension;
    private String serverAddr;
    private String namespace;
    private Boolean enabled;
}
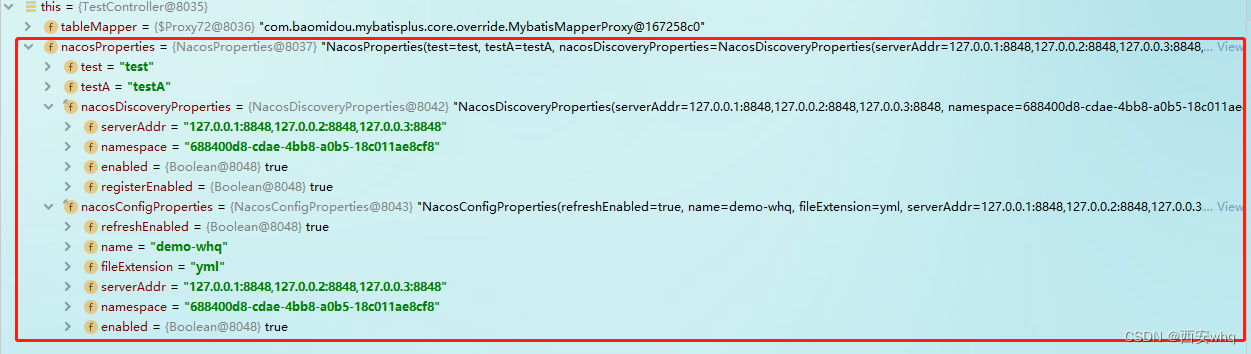
测试验证结果
总结
网上多数示例中使用的是内部类处理的,个人还是觉得将内部类提出处理更好一点。
对于配置文件中的"_"、"-",创建实体类时直接使用驼峰即可(其他场景未自测)。


 1943
1943

 被折叠的 条评论
为什么被折叠?
被折叠的 条评论
为什么被折叠?
 到【灌水乐园】发言


