


大家好,我是 菲鸽,今天带给大家 unibest 文档系列文章第8篇 —— 请求篇。欢迎食用~
本篇分为三块内容:
-
普通请求
-
图片上传
-
多后台地址
普通请求
普通请求分2种处理,一种是只在页面请求一次的一次性请求,这种请求占大多数;一种是项目多处用到的请求,这种请求占小部分,需要单独编写一个请求函数放到 api文件夹 or service文件夹。
unibest里面是使用service文件夹后面不再说明。
下面来分别演示:
一次性请求
template 部分编码如下:
<template>
  <button @click="run">请求</button>
  <view v-if="loading" class="text-blue h-10">请求中...</view>
  <view v-if="error" class="text-red h-10">请求错误</view>
  <view v-else class="text-green h-10">{{ JSON.stringify(data) }}</view>
</template>
script 部分使用 菲鸽 封装好的 useRequest 即可实现请求状态一体化,如下:
<script setup>
type IFooItem = { name: string }
const { loading, error, data, run } = useRequest<IFooItem>(() => httpGet('/foo', { name: '菲鸽' }))
</script>
看吧,使用非常简单。
重复性请求
重复性请求 与 一次性请求 的 html部分 是一样的,唯一的区别是 请求函数 放到了 service文件夹,如下所示:
<script setup>
import { getFooAPI, IFooItem } from '@/service/index/foo' // 看这里
const { loading, error, data, run } = useRequest<IFooItem>(() => getFooAPI('菲鸽'))
</script>
对应的 src/service/index/foo.ts 文件如下:
import { http, httpGet } from '@/utils/http'
export interface IFooItem {
  id: string
  name: string
}

/** GET 请求 */
export const getFooAPI = (name: string) => {
  return http<IFooItem>({
    url: `/foo`,
    method: 'GET',
    query: { name },
  })
}

/** GET 请求 - 再次简化,看大家是否喜欢这种简化 */
export const getFooAPI2 = (name: string) => {
  return httpGet<IFooItem>('/foo', { name })
}
依然非常简洁,深受妹子喜爱。
图片上传
template 部分编码如下:
<template>
  <view class="p-4 text-center">
    <wd-button @click="run">选择图片并上传</wd-button>
    <view v-if="loading" class="text-blue h-10">上传...</view>
    <template v-else>
      <view class="m-2">上传后返回的图片地址:</view>
      <view class="m-2">{{ data }}</view>
      <view class="h-80 w-full">
        <image v-if="data" :src="data" mode="scaleToFill" />
      </view>
    </template>
  </view>
</template>
script 部分使用 菲鸽 封装好的 useUpload 即可实现请求状态一体化,如下:
<script lang="ts" setup>
const { loading, data, run } = useUpload<string>({ user: '菲鸽' })
</script>
使用非常简单,深受汉子和妹子的喜爱。
多后台地址
上面的 普通请求 默认是只有一个请求地址的,在 .env 里面配置 VITE_SERVER_BASEURL,如下:
VITE_SERVER_BASEURL = 'https://ukw0y1.laf.run'
并且在 src/interceptors/request.ts 里面有设置:
-
如果是
http开头的请求路径,则直接请求 -
如果不是,则拼接上
VITE_SERVER_BASEURL
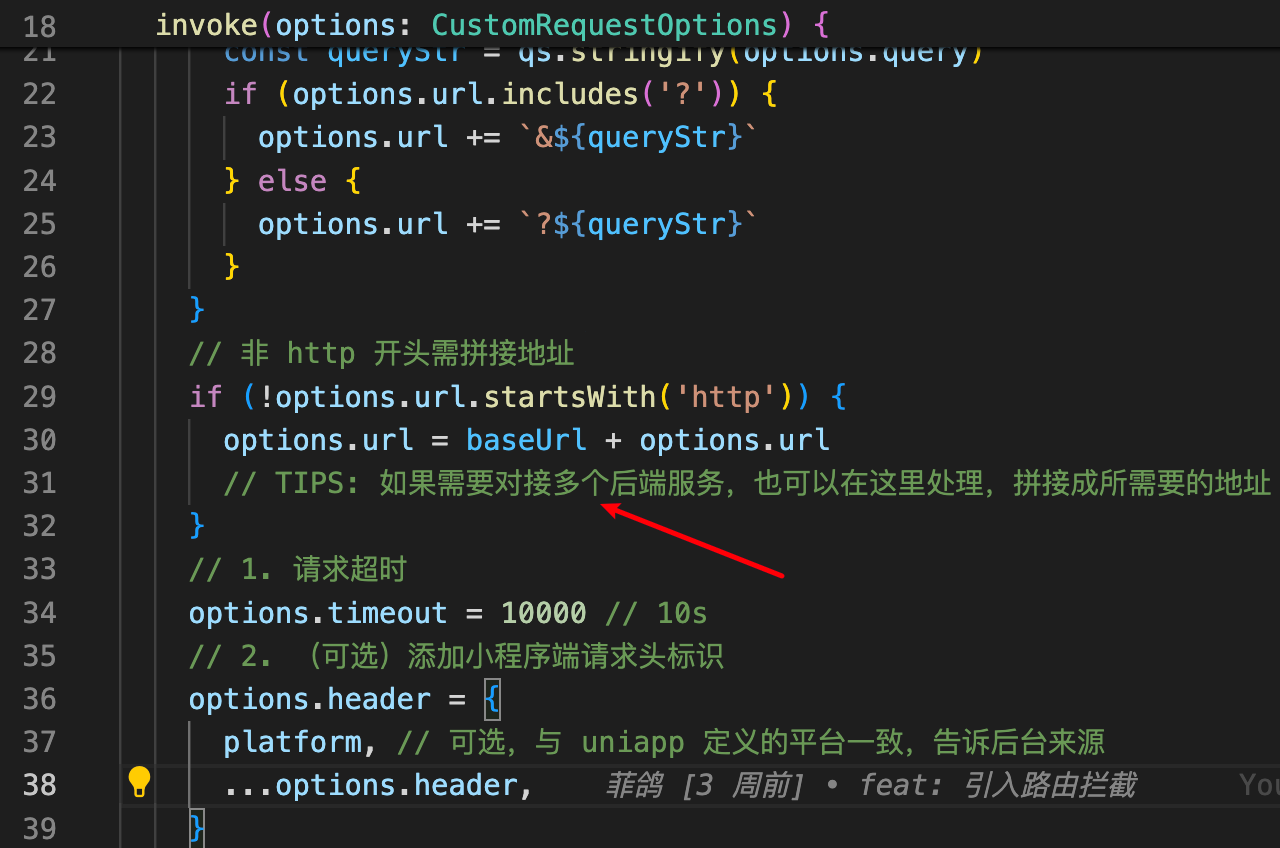
但在多后台地址时就不能这么玩了,需要处理如下:(关注上图的箭头部分)
// 可以写一个映射对象,如:
const proxyMap = {
  cms:'http://localhost:8080/cms',
  ums:'http://localhost:8080/ums',
}

// 拦截器部分(上图箭头部分)修改如下
Object.keys(proxyMap).forEach(key=>{
  if(options.url.startsWith(`/${key}`)){
    options.url = proxyMap[key] + options.url
  }
}

// 接口调用的地方使用如下格式:
export const getFooAPI = (name: string) => {
  return http<IFooItem>({
    url: `/cms/foo`, // 看这里,前缀不用!!!
    method: 'GET',
    query: { name },
  })
}
useRequest + useUpload 源码
授人予鱼不如授人以渔,下面看看2个文件的源码吧。
useRequest
文件 src/hooks/useRequest.ts 源码如下:
type IUseRequestOptions<T> = {
  /** 是否立即执行,如果是则在onLoad执行 */
  immediate?: boolean
  /** 初始化数据 */
  initialData?: T
}

/**
 * useRequest是一个定制化的请求钩子,用于处理异步请求和响应。
 * @param func 一个执行异步请求的函数,返回一个包含响应数据的Promise。
 * @param options 包含请求选项的对象 {immediate, initialData}。
 * @param options.immediate 是否立即执行请求,默认为true。
 * @param options.initialData 初始化数据,默认为undefined。
 * @returns 返回一个对象{loading, error, data, run},包含请求的加载状态、错误信息、响应数据和手动触发请求的函数。
 */
export default function useRequest<T>(
  func: () => Promise<IResData<T>>,
  options: IUseRequestOptions<T> = { immediate: true },
) {
  const loading = ref(false)
  const error = ref(false)
  const data = ref<T>()
  const run = async () => {
    loading.value = true
    func()
      .then((res) => {
        data.value = res.data
        error.value = false
      })
      .catch((err) => {
        error.value = err
      })
      .finally(() => {
        loading.value = false
      })
  }

  onLoad(() => {
    options.immediate && run()
  })
  return { loading, error, data, run }
}
注意,需要在 .env 里面配置 VITE_SERVER_BASEURL,用在 src/interceptors/request.ts 文件拼接请求地址;而 多后台地址 时则用不上,可以删除。
VITE_SERVER_BASEURL = 'https://ukw0y1.laf.run'
useUpload
文件 src/hooks/useUpload.ts 源码如下:
/**
 * useUpload 是一个定制化的请求钩子,用于处理上传图片。
 * @param formData 额外传递给后台的数据,如{name: '菲鸽'}。
 * @returns 返回一个对象{loading, error, data, run},包含请求的加载状态、错误信息、响应数据和手动触发请求的函数。
 */
export default function useUpload<T>(formData: Record<string, any> = {}) {
  const loading = ref(false)
  const error = ref(false)
  const data = ref<T>()
  const url = import.meta.env.VITE_UPLOAD_BASEURL
  const run = () => {
    // #ifdef MP-WEIXIN
    // 微信小程序从基础库 2.21.0 开始, wx.chooseImage 停止维护,请使用 uni.chooseMedia 代替。
    // 微信小程序在2023年10月17日之后,使用本API需要配置隐私协议
    uni.chooseMedia({
      count: 1,
      mediaType: ['image'],
      success: (res) => {
        console.log(res)
        loading.value = true
        const tempFilePath = res.tempFiles[0].tempFilePath
        uni.uploadFile({
          url,
          filePath: tempFilePath,
          name: 'file',
          formData,
          success: (uploadFileRes) => {
            console.log(uploadFileRes.data)
            data.value = uploadFileRes.data as T
          },
          fail: (err) => {
            console.log('uni.uploadFile err->', err)
            error.value = true
          },
          complete: () => {
            loading.value = false
          },
        })
      },
      fail: (err) => {
        console.log('uni.chooseMedia err->', err)
        error.value = true
      },
    })
    // #endif
    // #ifndef MP-WEIXIN
    uni.chooseImage({
      count: 1,
      success: (res) => {
        console.log(res)
        loading.value = true
        const tempFilePath = res.tempFilePaths[0]
        uni.uploadFile({
          url,
          filePath: tempFilePath,
          name: 'file',
          formData,
          success: (uploadFileRes) => {
            console.log(uploadFileRes.data)
            data.value = uploadFileRes.data as T
          },
          fail: (err) => {
            console.log('uni.uploadFile err->', err)
            error.value = true
          },
          complete: () => {
            loading.value = false
          },
        })
      },
      fail: (err) => {
        console.log('uni.chooseImage err->', err)
        error.value = true
      },
    })
    // #endif
  }

  return { loading, error, data, run }
}
注意,需要在 .env 里面配置 VITE_UPLOAD_BASEURL:
VITE_UPLOAD_BASEURL = 'https://ukw0y1.laf.run/upload'
总结
本文介绍了多种请求方式,使用都非常简单,最后给出了 useRequest 和 useUpload 的源码。
希望您收获的不仅是 鱼,还有 渔。
unibest 链接地址
-
文档地址:unibest 官方文档
-
github 地址:https://github.com/feige996/unibest
-
gitee 地址:https://githee.com/feige996/unibest
下面的是就的账号和文档,只是留个纪念。
旧的 github: https://github.com/codercup/unibest
旧的文档地址:unibest
微信交流群 因不能贴引流二维码,有需要的同学请看 官方文档微信群 。
全文完~


 853
853

 被折叠的 条评论
为什么被折叠?
被折叠的 条评论
为什么被折叠?
 到【灌水乐园】发言


