


编辑:zero
关注 搜罗最好玩的计算机视觉论文和应用,AI算法与图像处理 微信公众号,获得第一手计算机视觉相关信息
本文转载自:公众号:AI公园
作者:Arseny Kravchenko
编译:ronghuaiyang
导读
给大家总结了8个计算机视觉深度学习中的常见bug,相信大家或多或少都遇到过,希望能帮助大家避免一些问题。
人是不完美的,我们经常在软件中犯错误。有时这些错误很容易发现:你的代码根本不能工作,你的应用程序崩溃等等。但是有些bug是隐藏的,这使得它们更加危险。
在解决深度学习问题时,由于一些不确定性,很容易出现这种类型的bug:很容易看到web应用程序路由请求是否正确,而不容易检查你的梯度下降步骤是否正确。然而,有很多错误是可以避免的。
我想分享一些我的经验,关于我在过去两年的计算机视觉工作中看到或制造的错误。我(在会议上)谈到过这个话题(https://datafest.ru/ia/),很多人在会后告诉我:“是的,我也有很多这样的bug。”我希望我的文章可以帮助你至少避免其中的一些问题。
1. 翻转图片以及关键点.
假设在关键点检测的问题上。数据看起来像一对图像和一系列的关键点元组。其中每个关键点是一对x和y坐标。
让我们对这个数据进行基础的增强:
def flip_img_and_keypoints(img: np.ndarray, kpts: Sequence[Sequence[int]]):
    img = np.fliplr(img)
    h, w, *_ = img.shape
    kpts = [(y, w - x) for y, x in kpts]
    return img, kpts
看起来是正确的,嗯?我们把它可视化。
image = np.ones((10, 10), dtype=np.float32)
kpts = [(0, 1), (2, 2)]
image_flipped, kpts_flipped = flip_img_and_keypoints(image, kpts)
img1 = image.copy()
for y, x in kpts:
    img1[y, x] = 0
img2 = image_flipped.copy()
for y, x in kpts_flipped:
    img2[y, x] = 0

_ = plt.imshow(np.hstack((img1, img2)))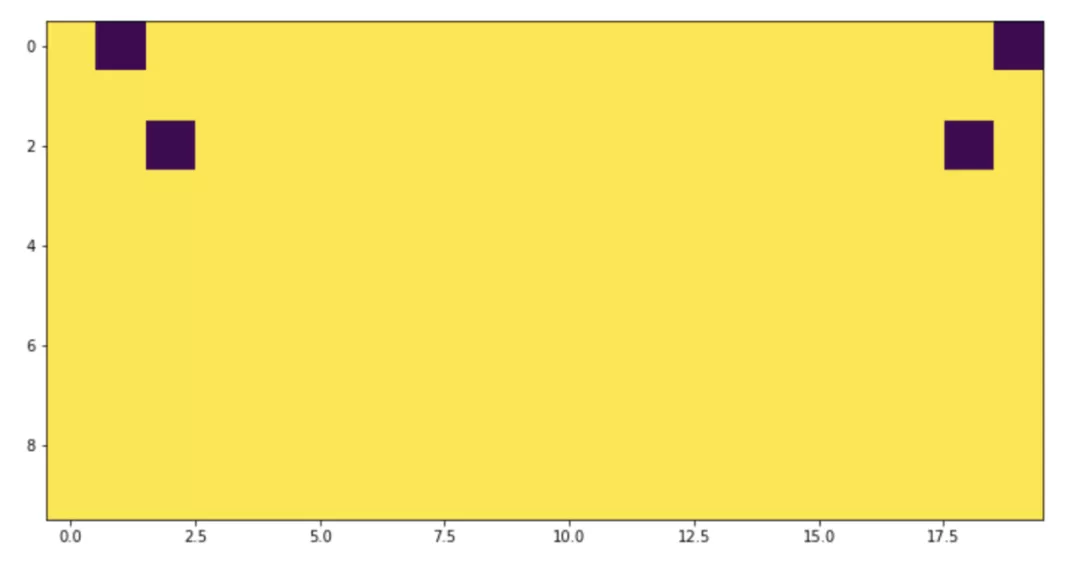
不对称,看起来很奇怪!如果我们检查极值呢?
image = np.ones((10, 10), dtype=np.float32)
kpts = [(0, 0), (1, 1)]
image_flipped, kpts_flipped = flip_img_and_keypoints(image, kpts)
img1 = image.copy()
for y, x in kpts:
    img1[y, x] = 0
img2 = image_flipped.copy()
for y, x in kpts_flipped:
    img2[y, x] = 0
---------------------------------------------------------------------------
IndexError Traceback (most recent call last)
<ipython-input-5-997162463eae> in <module>
 8 img2 = image_flipped.copy()
 9 for y, x in kpts_flipped:
---> 10     img2[y, x] = 0
IndexError: index 10 is out of bounds for axis 1 with size 10
不好!这是一个典型的off-by-one错误。正确的代码是这样的:
def flip_img_and_keypoints(img: np.ndarray, kpts: Sequence[Sequence[int]]):
    img = np.fliplr(img)
    h, w, *_ = img.shape
    kpts = [(y, w - x - 1) for y, x in kpts]
 return img, kpts
我们通过可视化发现了这个问题,但是,使用“x = 0”点进行单元测试也会有所帮助。一个有趣的事实是:有一个团队中有三个人(包括我自己)独立地犯了几乎相同的错误。
2. 继续是关键点相关的问题
即使在上面的函数被修复之后,仍然存在危险。现在更多的是语义,而不仅仅是一段代码。
假设需要用两只手掌来增强图像。看起来很安全:手是左,右翻转。
但是等等!我们对关键点的语义并不很了解。如果这个关键点的意思是这样的:
kpts = [
 (20, 20), # left pinky
 (20, 200), # right pinky
 ...
 ]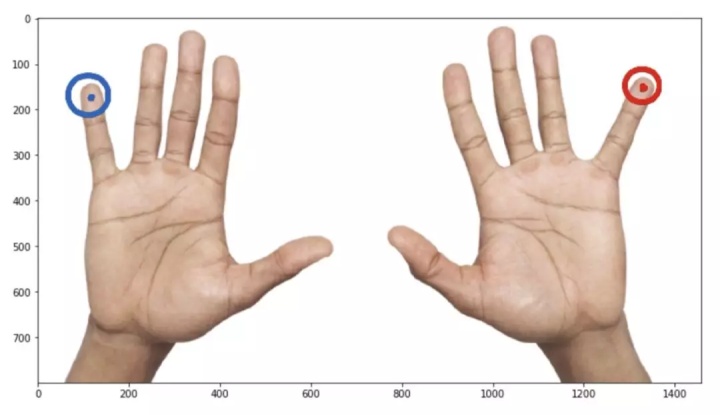
这意味着增强实际上改变了语义:左变成右,右变成左,但我们不交换数组中的关键点索引。它会给训练带来大量的噪音和更糟糕的度量。
我们应该吸取一个教训:
- 在应用增强或其他花哨的功能之前,了解并考虑数据结构和语义
- 保持你的实验原子性:添加一个小的变化(例如一个新的变换),检查它如何进行,如果分数提高才加进去。
3. 编写自己的损失函数
熟悉语义分割问题的人可能知道IoU指标。不幸的是,我们不能直接用SGD来优化它,所以常用的方法是用可微损失函数来近似它。
def iou_continuous_loss(y_pred, y_true):
    eps = 1e-6
    def _sum(x):
       return x.sum(-1).sum(-1)
    numerator = (_sum(y_true * y_pred) + eps)
    denominator = (_sum(y_true ** 2) + _sum(y_pred ** 2)
                  - _sum(y_true * y_pred) + eps)
    return (numerator / denominator).mean()
看起来不错,我们先做个小的检查:
In [3]: ones = np.ones((1, 3, 10, 10))
 ...: x1 = iou_continuous_loss(ones * 0.01, ones)
 ...: x2 = iou_continuous_loss(ones * 0.99, ones)
In [4]: x1, x2
Out[4]: (0.010099999897990103, 0.9998990001020204)
在 x1中,我们计算了一些与ground truth完全不同的东西的损失,而 x2则是非常接近ground truth的东西的结果。我们预计 x1会很大,因为预测是错误的, x2应该接近于零。怎么了?
上面的函数是对metric的一个很好的近似。metric不是一种损失:它通常(包括这种情况)越高越好。当我们使用SGD来最小化损失时,我们应该使用一些相反的东西:
def iou_continuous(y_pred, y_true):
    eps = 1e-6
    def _sum(x):
        return x.sum(-1).sum(-1)
    numerator = (_sum(y_true * y_pred) + eps)
    denominator = (_sum(y_true ** 2) + _sum(y_pred ** 2)
                  - _sum(y_true * y_pred) + eps)
    return (numerator / denominator).mean()
def iou_continuous_loss(y_pred, y_true):
    return 1 - iou_continuous(y_pred, y_true)
这些问题可以从两个方面来确定:
- 编写一个单元测试,检查损失的方向:形式化的期望,更接近ground truth应该输出更低的损失。
- 运行一个健全的检查,让你的模型在单个batch中过拟合。
4. 当我们使用Pytorch的时候
假设有一个预先训练好的模型,开始做infer。
from ceevee.base import AbstractPredictor
class MySuperPredictor(AbstractPredictor):
    def __init__(self,
                 weights_path: str,
              ):
        super().__init__()
        self.model = self._load_model(weights_path=weights_path)
    def process(self, x, *kw):
        with torch.no_grad():
            res = self.model(x)
        return res
    @staticmethod
    def _load_model(weights_path):
        model = ModelClass()
        weights = torch.load(weights_path, map_location='cpu')
        model.load_state_dict(weights)
        return model
这个代码正确吗?也许!这确实适用于某些模型。例如,当模型没有dropout或norm层,如 torch.nn.BatchNorm2d。或者当模型需要为每个图像使用实际的norm统计量时(例如,许多基于pix2pix的架构需要它)。
但是对于大多数计算机视觉应用程序来说,代码忽略了一些重要的东西:切换到评估模式。
如果试图将动态PyTorch图转换为静态PyTorch图,这个问题很容易识别。 torch.jit用于这种转换。
In [3]: model = nn.Sequential(
 ...:     nn.Linear(10, 10),
 ...:     nn.Dropout(.5)
 ...: )
 ...:
 ...: traced_model = torch.jit.trace(model, torch.rand(10))
/Users/Arseny/.pyenv/versions/3.6.6/lib/python3.6/site-packages/torch/jit/__init__.py:914: TracerWarning: Trace had nondeterministic nodes. Did you forget call .eval() on your model? Nodes:
 %12 : Float(10) = aten::dropout(%input, %10, %11), scope: Sequential/Dropout[1] # /Users/Arseny/.pyenv/versions/3.6.6/lib/python3.6/site-packages/torch/nn/functional.py:806:0
This may cause errors in trace checking. To disable trace checking, pass check_trace=False to torch.jit.trace()
  check_tolerance, _force_outplace, True, _module_class)
/Users/Arseny/.pyenv/versions/3.6.6/lib/python3.6/site-packages/torch/jit/__init__.py:914: TracerWarning: Output nr 1. of the traced function does not match the corresponding output of the Python function. Detailed error:
Not within tolerance rtol=1e-05 atol=1e-05 at input[5] (0.0 vs. 0.5454154014587402) and 5 other locations (60.00%)
check_tolerance, _force_outplace, True, _module_class)
简单的修复一下:
In [4]: model = nn.Sequential(
   ...:     nn.Linear(10, 10),
   ...:     nn.Dropout(.5)
   ...: )
   ...:
   ...: traced_model = torch.jit.trace(model.eval(), torch.rand(10))
   # No more warnings!
在这种情况下, torch.jit.trace将模型运行几次并比较结果。这里的差别是可疑的。
然而 torch.jit.trace在这里不是万能药。这是一种应该知道和记住的细微差别。
5. 复制粘贴的问题
很多东西都是成对存在的:训练和验证、宽度和高度、纬度和经度……
def make_dataloaders(train_cfg, val_cfg, batch_size):
    train = Dataset.from_config(train_cfg)
    val = Dataset.from_config(val_cfg)
    shared_params = {'batch_size': batch_size, 'shuffle': True, 'num_workers': cpu_count()}
    train = DataLoader(train, **shared_params)
    val = DataLoader(train, **shared_params)
    return train, val
不仅仅是我犯了愚蠢的错误。例如,在非常流行的albumentations库也有一个类似的版本。
# https://github.com/albu/albumentations/blob/0.3.0/albumentations/augmentations/transforms.py
def apply_to_keypoint(self, keypoint, crop_height=0, crop_width=0, h_start=0, w_start=0, rows=0, cols=0, **params):
    keypoint = F.keypoint_random_crop(keypoint, crop_height, crop_width, h_start, w_start, rows, cols)
    scale_x = self.width / crop_height
    scale_y = self.height / crop_height
    keypoint = F.keypoint_scale(keypoint, scale_x, scale_y)
    return keypoint
别担心,已经修改好了。
如何避免?不要复制和粘贴代码,尽量以不需要复制和粘贴的方式编写代码。
datasets = []
data_a = get_dataset(MyDataset(config['dataset_a']), config['shared_param'], param_a)
datasets.append(data_a)
data_b = get_dataset(MyDataset(config['dataset_b']), config['shared_param'], param_b)
datasets.append(data_b)
datasets = []
for name, param in zip(('dataset_a', 'dataset_b'),
(param_a, param_b),
):
datasets.append(get_dataset(MyDataset(config[name]), config['shared_param'], param))6. 合适的数据类型
让我们编写一个新的增强
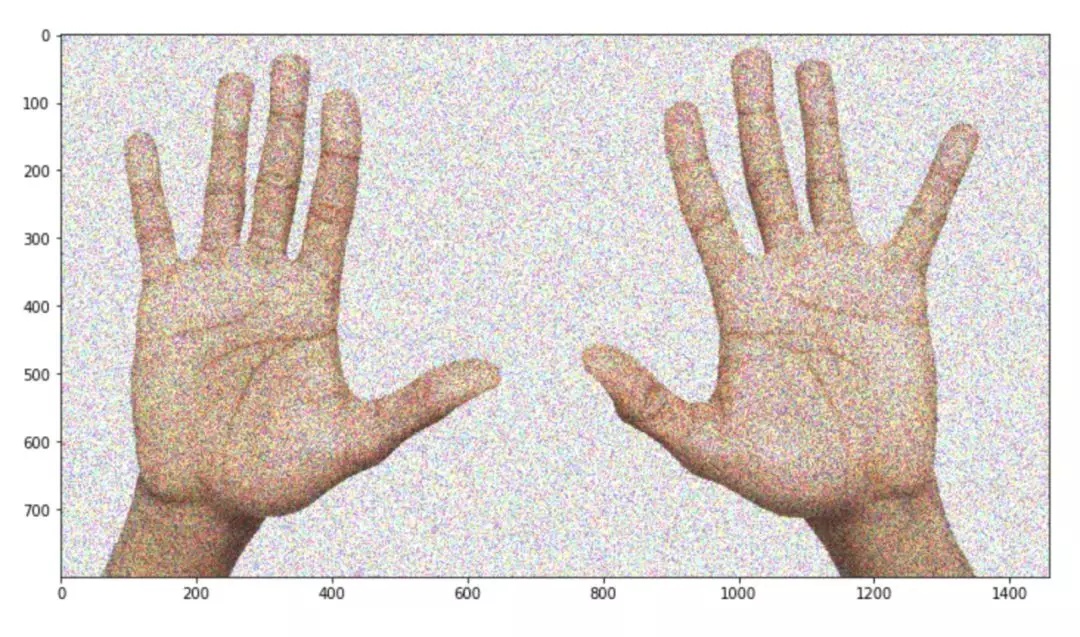
def add_noise(img: np.ndarray) -> np.ndarray:
    mask = np.random.rand(*img.shape) + .5
    img = img.astype('float32') * mask
    return img.astype('uint8')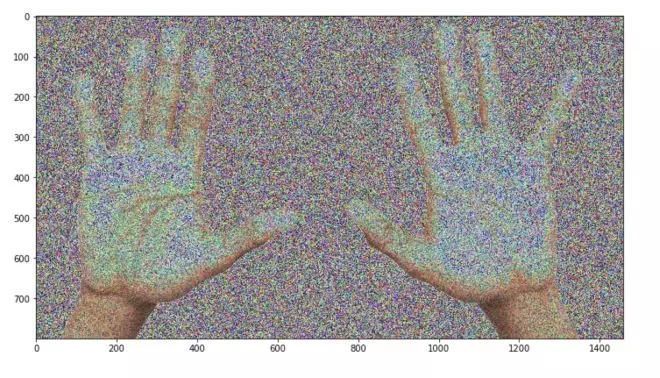
图像已被更改。这是我们所期望的吗?嗯,也许它改变得太多了。
这里有一个危险的操作:将 float32 转换为 uint8。它可能会导致溢出:
def add_noise(img: np.ndarray) -> np.ndarray:
mask = np.random.rand(*img.shape) + .5
img = img.astype('float32') * mask
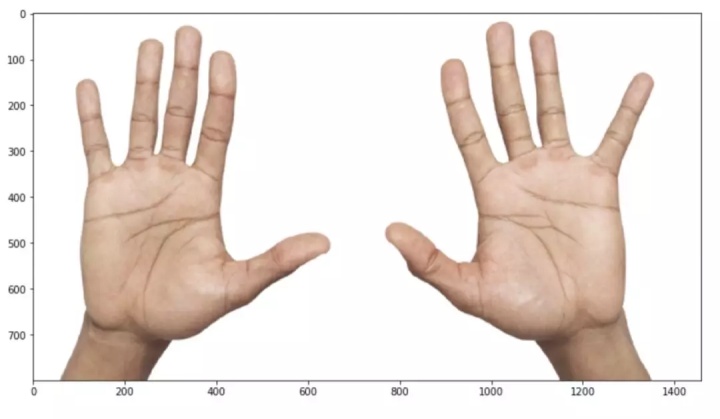
return np.clip(img, 0, 255).astype('uint8')
img = add_noise(cv2.imread('two_hands.jpg')[:, :, ::-1])
_ = plt.imshow(img)

看起来好多了,是吧?
顺便说一句,还有一种方法可以避免这个问题:不要重新发明轮子,不要从头开始编写增强代码并使用现有的扩展: albumentations.augmentations.transforms.GaussNoise。
我曾经做过另一个同样起源的bug。
raw_mask = cv2.imread('mask_small.png')
mask = raw_mask.astype('float32') / 255
mask = cv2.resize(mask, (64, 64), interpolation=cv2.INTER_LINEAR)
mask = cv2.resize(mask, (128, 128), interpolation=cv2.INTER_CUBIC)
mask = (mask * 255).astype('uint8')
_ = plt.imshow(np.hstack((raw_mask, mask)))
这里出了什么问题?首先,用三次插值调整掩模的大小是一个坏主意。同样的问题 float32到 uint8:三次插值可以输出值大于输入,这会导致溢出。

我在做可视化的时候发现了这个问题。在你的训练循环中到处放置断言也是一个好主意。
7. 拼写错误
假设需要对全卷积网络(如语义分割问题)和一个巨大的图像进行推理。该图像是如此巨大,没有机会把它放在你的GPU中,它可以是一个医疗或卫星图像。
在这种情况下,可以将图像分割成网格,独立地对每一块进行推理,最后合并。此外,一些预测交叉可能有助于平滑边界附近的artifacts。
from tqdm import tqdm
class GridPredictor:
 """
    This class can be used to predict a segmentation mask for the big image
    when you have GPU memory limitation
    """
 def __init__(self, predictor: AbstractPredictor, size: int, stride: Optional[int] = None):
        self.predictor = predictor
        self.size = size
        self.stride = stride if stride is not None else size // 2
 def __call__(self, x: np.ndarray):
        h, w, _ = x.shape
        mask = np.zeros((h, w, 1), dtype='float32')
        weights = mask.copy()
        for i in tqdm(range(0, h - 1, self.stride)):
            for j in range(0, w - 1, self.stride):
                a, b, c, d = i, min(h, i + self.size), j, min(w, j + self.size)
                patch = x[a:b, c:d, :]
                mask[a:b, c:d, :] += np.expand_dims(self.predictor(patch), -1)
                weights[a:b, c:d, :] = 1
       return mask / weights
有一个符号输入错误,代码段足够大,可以很容易地找到它。我怀疑仅仅通过代码就能快速识别它。但是很容易检查代码是否正确:
class Model(nn.Module):
 def forward(self, x):
 return x.mean(axis=-1)
model = Model()
grid_predictor = GridPredictor(model, size=128, stride=64)
simple_pred = np.expand_dims(model(img), -1)
grid_pred = grid_predictor(img)
np.testing.assert_allclose(simple_pred, grid_pred, atol=.001)
---------------------------------------------------------------------------
AssertionError Traceback (most recent call last)
<ipython-input-24-a72034c717e9> in <module>
 9 grid_pred = grid_predictor(img)
 10
---> 11 np.testing.assert_allclose(simple_pred, grid_pred, atol=.001)
~/.pyenv/versions/3.6.6/lib/python3.6/site-packages/numpy/testing/_private/utils.py in assert_allclose(actual, desired, rtol, atol, equal_nan, err_msg, verbose)
 1513     header = 'Not equal to tolerance rtol=%g, atol=%g' % (rtol, atol)
 1514     assert_array_compare(compare, actual, desired, err_msg=str(err_msg),
-> 1515                          verbose=verbose, header=header, equal_nan=equal_nan)
 1516
 1517
~/.pyenv/versions/3.6.6/lib/python3.6/site-packages/numpy/testing/_private/utils.py in assert_array_compare(comparison, x, y, err_msg, verbose, header, precision, equal_nan, equal_inf)
 839                                 verbose=verbose, header=header,
 840                                 names=('x', 'y'), precision=precision)
--> 841 raise AssertionError(msg)
 842 except ValueError:
 843 import traceback
AssertionError:
Not equal to tolerance rtol=1e-07, atol=0.001
Mismatch: 99.6%
Max absolute difference: 765.
Max relative difference: 0.75000001
 x: array([[[215.333333],
 [192.666667],
 [250. ],...
 y: array([[[ 215.33333],
 [ 192.66667],
 [ 250. ],...
下面是 __call__方法的正确版本:
def __call__(self, x: np.ndarray):
        h, w, _ = x.shape
        mask = np.zeros((h, w, 1), dtype='float32')
        weights = mask.copy()
        for i in tqdm(range(0, h - 1, self.stride)):
            for j in range(0, w - 1, self.stride):
                a, b, c, d = i, min(h, i + self.size), j, min(w, j + self.size)
                patch = x[a:b, c:d, :]
                mask[a:b, c:d, :] += np.expand_dims(self.predictor(patch), -1)
                weights[a:b, c:d, :] += 1
        return mask / weights
如果你仍然不知道问题出在哪里,请注意 weights[a:b,c:d,:]+=1这一行。
8. Imagenet归一化
当一个人需要进行转移学习时,用训练Imagenet时的方法将图像归一化通常是一个好主意。
让我们使用我们已经熟悉的albumentations库。
from albumentations import Normalize
norm = Normalize()
img = cv2.imread('img_small.jpg')
mask = cv2.imread('mask_small.png', cv2.IMREAD_GRAYSCALE)
mask = np.expand_dims(mask, -1) # shape (64, 64) ->  shape (64, 64, 1)
normed = norm(image=img, mask=mask)
img, mask = [normed[x] for x in ['image', 'mask']]
def img_to_batch(x):
    x = np.transpose(x, (2, 0, 1)).astype('float32')
 return torch.from_numpy(np.expand_dims(x, 0))
img, mask = map(img_to_batch, (img, mask))
criterion = F.binary_cross_entropy
现在是时候训练一个网络并对单个图像进行过度拟合了——正如我所提到的,这是一种很好的调试技术:
model_a = UNet(3, 1)
optimizer = torch.optim.Adam(model_a.parameters(), lr=1e-3)
losses = []
for t in tqdm(range(20)):
loss = criterion(model_a(img), mask)
losses.append(loss.item())
optimizer.zero_grad()
loss.backward()
optimizer.step()
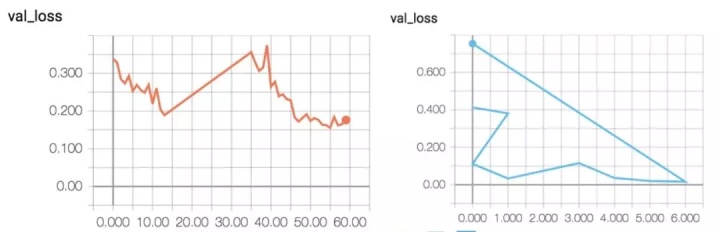
_ = plt.plot(losses)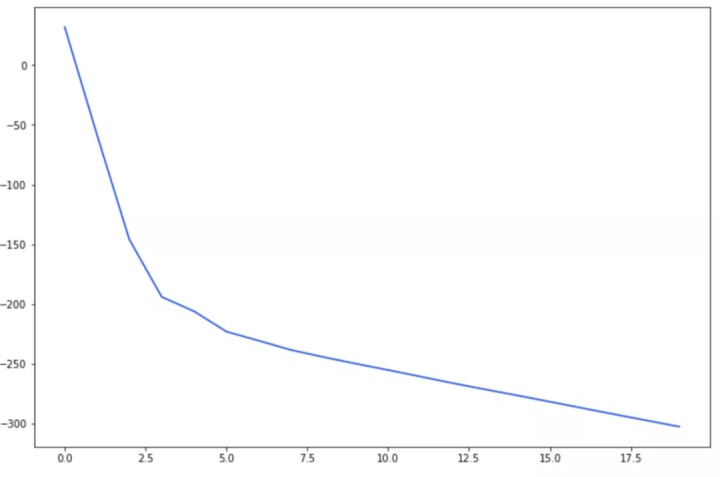
曲率看起来很好,但是交叉熵的损失值-300是不可预料的。是什么问题?
归一化处理图像效果很好,但是mask没有:需要手动缩放到 [0,1]。
model_b = UNet(3, 1)
optimizer = torch.optim.Adam(model_b.parameters(), lr=1e-3)
losses = []
for t in tqdm(range(20)):
    loss = criterion(model_b(img), mask / 255.)
    losses.append(loss.item())
    optimizer.zero_grad()
    loss.backward()
    optimizer.step()

_ = plt.plot(losses)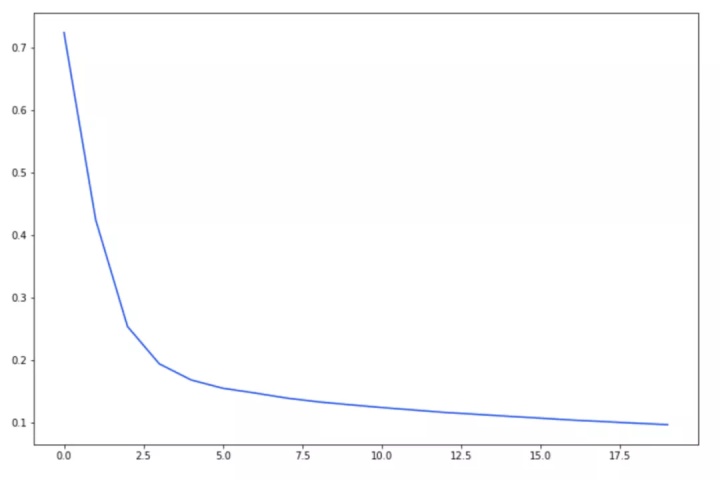
训练循环的简单运行时断言(例如 assertmask.max()<=1会很快检测到问题。同样,也可以是单元测试。
总结
- 测试很有必要
- 运行时断言可以用于训练的pipeline;
- 可视化是一种幸福
- 复制粘贴是一种诅咒
- 没有什么是灵丹妙药,一个机器学习工程师必须总是小心(或只是受苦)。

翻译原文链接:
8个计算机视觉深度学习中常见的Bug
英文原文链接:https://medium.com/@arseny_info/8-deep-learning-computer-vision-bugs-and-how-i-could-have-avoided-them-d40b0e4b1da
欢迎关注:辛苦翻译的小伙伴 AI公园 和辛勤的搬运工 AI算法与图像处理
关注 搜罗最好玩的计算机视觉论文和应用,AI算法与图像处理 微信公众号,获得第一手计算机视觉相关信息


 269
269


 被折叠的 条评论
为什么被折叠?
被折叠的 条评论
为什么被折叠?
 到【灌水乐园】发言


