


我的博客:http://www.hao127.com.cn/,欢迎浏览博客!

上一章 http://hao127.com.cn/#/view/69当中,我们对配置中心进行进行了深入的了解,本章将继续微服务架构的深入学习,了解在微服务中是如何做到负载均衡的。
前言
简单来讲,Ribbon是Netflix发布的开源项目,主要的功能是提供客户端的软件负载均衡算法。它可以在客户端配置服务端类别,然后轮询请求以实现负载均衡。
当项目引入Eureka依赖后,会自动的引入ribbon的依赖,当然我们可以显示的引入ribbon依赖。在集成Eureka时,DiscoveryEnabledNIWSServerList重写了Ribbon的服务列表,在com.netflix.ribbon:ribbon-eureka:2.3.0模块我们可以看到,同时使用 NIWSDiscoveryPing取代IPing:

一、Ribbo快速使用
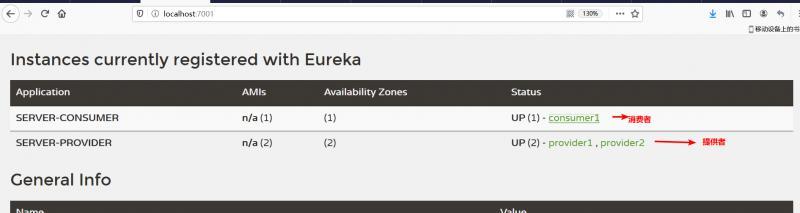
当前的实例我们会涉及到Eureka注册中心,两个服务提供者(server-provider),一个服务消费者(server-consumer),首先,我们启动两个服务提供者,并注册到Eureka,服务提供接口如下:
@RestControllerpublic class RibbonController { @RequestMapping("/sayHello") public String sayHello(String name) { return "hello!,"+name; }}接下来,对之前文章的Eureka客户端,即服务消费者进行相关改造,首先引入ribbon依赖(其实在引入eureka-client时就已经默认引入了Ribbon):
org.springframework.cloud spring-cloud-starter-netflix-ribbon 并对服务消费者代码进行改造,将DiscoveryClient改为LoadBalancerClient,顾名思义,改成支持负载均衡的客户端,同时在消费者的主类上添加@EnableDiscoveryClient注解,开启发现服务功能:
import org.springframework.beans.factory.annotation.Autowired;import org.springframework.cloud.client.ServiceInstance;import org.springframework.cloud.client.loadbalancer.LoadBalancerClient;import org.springframework.context.annotation.Bean;import org.springframework.web.bind.annotation.GetMapping;import org.springframework.web.bind.annotation.RestController;import org.springframework.web.client.RestTemplate;@RestControllerpublic class RibbonController { @Bean public RestTemplate restTemplate() { return new RestTemplate(); } @Autowired private LoadBalancerClient client; @Autowired RestTemplate restTemplate; @GetMapping("/sayHello") public String sayHello(String name) { ServiceInstance instance = client.choose("server-provider"); String res = restTemplate. getForObject(instance.getUri().toString() + "sayHello?name=" + name, String.class); return res + " from :" + instance.getPort(); }}先后启动Eureka注册中心,启动两个服务提供者和一个服务消费者,在Eureka的监控页面我们可以看到如下的内容:
接下来用浏览器请求服务调用者的接口得到的结果是:
hello!,test from :9001 hello!,test from :9002响应为9001和9002交替的出现,这表明Ribbon客户端正在用轮询的方式实现了负载均衡。
当然我们还可以使用一种更为简单的方法,修改客户端的调用代码,给RestTemplate添加 @LoadBalanced注解,通过restTemplate直接使用URL :http://server-provider/sayHello?name=test的方式调用,这里的server-provider是服务提供者的注册在Eureka的服务名称, @LoadBalanced的默认算法是轮询:
import org.springframework.beans.factory.annotation.Autowired;import org.springframework.cloud.client.loadbalancer.LoadBalanced;import org.springframework.cloud.client.loadbalancer.LoadBalancerClient;import org.springframework.context.annotation.Bean;import org.springframework.web.bind.annotation.GetMapping;import org.springframework.web.bind.annotation.RestController;import org.springframework.web.client.RestTemplate;@RestControllerpublic class RibbonController { @Bean @LoadBalanced public RestTemplate restTemplate() { return new RestTemplate(); } @Autowired RestTemplate restTemplate; @GetMapping("/sayHello") public String sayHello(String name) { String res = restTemplate .getForObject("http://server-provider/sayHello?name=" + name, String.class); return res; }通过这样简洁的方式同样可以实现负载均衡的调用。
二 、Ribbon进阶配置
上文简单的展示了Ribbon的基本功能,但是Ribbon还可以有更多自定义的配置,比如我们想修改默认的负载均衡算法、自定义HTTP线程池等,我们该如何实现呢?
2.1 Ribbon的核心组件
在ribbon-loadbalancer项目中,定义和很多的接口,其中就有
- IRule:轮询的策略的接口。
- ServerList:定义用于获取服务器列表的额方法的接口。
- IPing:定义了以什么方式去检查服务之间是否通讯良好的接口。
-
2.2 实现自定义算法
Spring Cloud提供了为Ribbon的默认实现,当然我们也可以自定义的去修改轮询策略等配置,首选我们在客户端你的启动类上添加@RibbonClient注解,
import com.microservice.RibbonConfig;import org.springframework.boot.SpringApplication;import org.springframework.boot.autoconfigure.SpringBootApplication;import org.springframework.cloud.client.discovery.EnableDiscoveryClient;import org.springframework.cloud.netflix.eureka.EnableEurekaClient;import org.springframework.cloud.netflix.ribbon.RibbonClient;@SpringBootApplication@EnableEurekaClient@EnableDiscoveryClient@RibbonClient(name = "server-provider",configuration = RibbonConfig.class)public class ServerConsumerApplication { public static void main(String[] args) { SpringApplication.run(ServerConsumerApplication.class, args); }}@RibbonClient(name = "server-provider",= RibbonConfig.class) 中
- name:是服务提供者注册在Eureka的名称;
- configuration :是我们即将自定义的配置类;
接下来,我们新建RibbonConfig配置类,
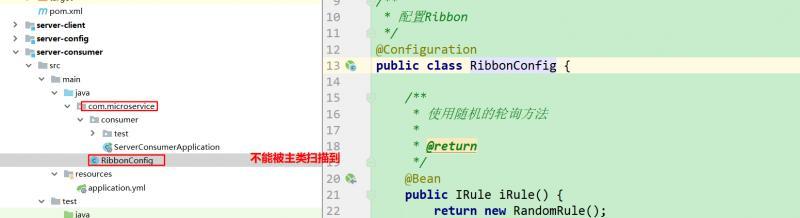
import com.netflix.loadbalancer.IRule;import com.netflix.loadbalancer.RandomRule;import org.springframework.context.annotation.Bean;import org.springframework.context.annotation.Configuration;/** * 配置Ribbon */@Configurationpublic class RibbonConfig { /** * 使用随机的轮询方法 * * @return */ @Bean public IRule iRule() { return new RandomRule(); }}*注意:确保RibbonConfig所在的包不能被@ComponentScan扫描到,如果主类使用@SpringBootApplication,也需要避免会被自动扫描,具体的配置如下:*
服务调用的代码不变化:
import org.springframework.beans.factory.annotation.Autowired;import org.springframework.cloud.client.loadbalancer.LoadBalanced;import org.springframework.cloud.client.loadbalancer.LoadBalancerClient;import org.springframework.context.annotation.Bean;import org.springframework.web.bind.annotation.GetMapping;import org.springframework.web.bind.annotation.RestController;import org.springframework.web.client.RestTemplate;@RestControllerpublic class RibbonController { @Bean @LoadBalanced public RestTemplate restTemplate() { return new RestTemplate(); } @Autowired RestTemplate restTemplate; @GetMapping("/sayHello") public String sayHello(String name) { String res = restTemplate.getForObject("http://server-provider/sayHello?name=" + name, String.class); return res; }我们使用浏览器调用接口 http://192.168.1.103:5168/sayHello?name=test,返回的结果是以随机的方式返回的;
2.3 @RibbonClient注解
我们通过指定@RibbonClient中configuration的配置可以修改默认的实现,针对IRule的实现,SpringCloud有以下的实现:
- RoundRobinRule:轮询,默认的每一次的请求都是轮流分配给服务提供者;
- AvailabilityFilteringRule:更具可用性进行过滤的策略。默认情况下,如果RestClient最后三次连接失败,则实例会电路跳闸,一旦实例跳闸,它将保持这个状态30s,之后会被再次启用;如果在连续连接失败,则再会变成电路跳闸,等待的时间会指数级增长;
- WeightedResponseTimeRule:每个服务器根据响应的时间给予权重,响应时间越长,权重越少;
- RandomRule:随机策略
当然还有其他的权重策略,有兴趣的同学可以自行的研究源代码。
Spring Cloud提供了@RibbonClients这样的一个注解,我们的客户端不可能只会调用一个提供者,这样的注解我们可以配置多个提供者。
三、总结
本章介绍了Ribbon组件作为一个客户端的负载均衡器对微服务架构方面起到了非常大的作用,我们对Ribbon有了一个深入的理解,同时我们也可以自定义一些配置,我相信微服务的学习并不是一件很难的事。

.以就是本期的分享,你还可以关注公众号: 程序员笑笑生,关注更多精彩内容!


 被折叠的 条评论
为什么被折叠?
被折叠的 条评论
为什么被折叠?
 到【灌水乐园】发言


