


从 1994 年 10 月 17 日发布的 Perl 5.000 起,Perl 增加了模块的概念,用来提供面向对象编程的能力。这是 Perl 语言发展史上的一个里程碑。此后,广大自由软件爱好者开发了大量功能强大、构思精巧的 Perl 模块,极大地扩展了 Perl 语言的功能。
CPAN,Comprehensive Perl Archive Network(https://www.cpan.org/) 是 Perl 模块最大的集散地,包含了现今公布的几乎所有的 perl 模块。CPAN 从 1995 年 10 月 26 日开始创建,截止 2019 年 4 月该网站已经囊括了超过 13,750 位作者编写的 180,202 个 Perl 模块,其镜像分布在全球在 257 台服务器上。
Perl 作为生物信息数据预处理、文本处理和格式转换中的一把瑞士军刀,其强大和重要性不言而喻。今天,我们在这里主要介绍一下各种平台下 perl 模块的安装方法。以安装 Bio::SeqIO 模块为例。
一、Linux 下安装 Perl 模块
Linux/Unix下安装Perl模块有两种方法:手工安装和自动安装。第一种方法是从 CPAN 上下载您需要的模块,手工编译、安装。第二种方法是使用 CPAN 模块自动完成下载、编译、安装的全过程。
1.1 手工安装
# 从 CPAN(https://metacpan.org/)下载了 BioPerl 模块 1.7.5 版的压缩文件 BioPerl-1.7.5.tar.gz# 假设放在/usr/local/src/下。$ cd /usr/local/src# 解压缩这个文件,这时会新建一个 BioPerl-1.7.5 的目录。$ tar xvzf BioPerl-1.7.5.tar.gz# 换到解压后的目录$ cd BioPerl-1.7.5# 生成 makefile,如果要指定模块的安装路径,需要添加 PREFIX=/path/to/install 路径$ perl Makefile.PL (PREFIX=/home/shenweiyan/perl_modules)# 生成模块$ make# 测试模块(这步可有可无):$ make test# 如果测试结果报告"all test ok",您就可以放心地安装编译好的模块了。# 安装模块前,先要确保您对 perl5 安装目录有可写权限(通常以 su 命令获得),执行:$ make install# 现在,试试 Bio::SeqIO 模块吧。如果下面的命令没有给出任何输出,那就没问题。$ perl -MBio::SeqIO -e1# 如果指定 PREFIX 安装路径,模块安装完成后,需要把模块安装的新路径添加到 PERL5LIB 环境变量$ export PERL5LIB=$PERL5LIB:/home/shenweiyan/perl_modules/lib/site_perl //或者把该行内容添加到 ~/.bashrc
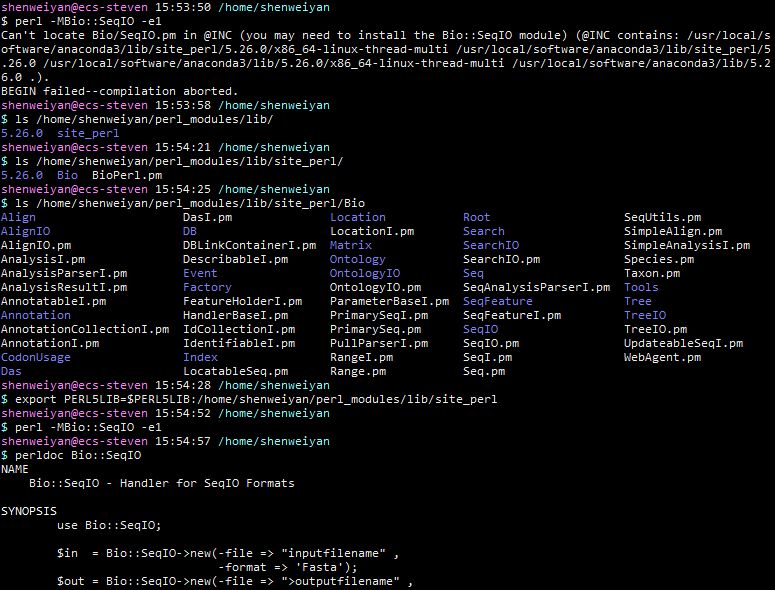
上述步骤适合于 Linux/Unix 下绝大多数的 Perl 模块。可能还有少数模块的安装方法略有差别,所以最好先看看安装目录里的 README 或 INSTALL。
有的时候如果是 Build.PL 的需要以下安装步骤:(需要 Module::Build 模块支持)
$ perl Build.PL$ ./Build$ ./Build test$ ./Build install
1.2 自动安装
Linux/Unix 下自动安装 Perl 模块主要有两种方法,一是利用 perl -MCPAN -e 'install 模块' 安装;二是直接使用 cpan 的命令执行安装。这两种方法都是通过与 CPAN 进行交互,然后执行对应模块的自动安装,本质上都是一样的。需要先安装 CPAN 模块。
root@ecs-steven 16:07:59 /tmp$ perl -MCPAN -e shellCan't locate CPAN.pm in @INC (@INC contains: /usr/local/lib64/perl5 /usr/local/share/perl5 /usr/lib64/perl5/vendor_perl /usr/share/perl5/vendor_perl /usr/lib64/perl5 /usr/share/perl5 .).
BEGIN failed--compilation aborted.
[root@ecs-steven ~]# perl -MCPAN -e shell
CPAN.pm requires configuration, but most of it can be done automatically.
If you answer 'no' below, you will enter an interactive dialog for each
configuration option instead.
Would you like to configure as much as possible automatically? [yes] ^C
[root@ecs-steven CPAN-2.26]# perl -MCPAN -e shell
Sorry, we have to rerun the configuration dialog for CPAN.pm due to
some missing parameters. Configuration will be written to
 <>
CPAN.pm requires configuration, but most of it can be done automatically.
If you answer 'no' below, you will enter an interactive dialog for each
configuration option instead.
# 输入yes会自动配置,输入no会让手动的配置一些参数。这里我选择了yes,配置好后的配置文件存放在 ~/.cpan/CPAN/MyConfig.pm
Would you like to configure as much as possible automatically? [yes]   #直接回车
Autoconfiguration complete.
commit: wrote '/root/.cpan/CPAN/MyConfig.pm'
You can re-run configuration any time with 'o conf init' in the CPAN shell
Terminal does not support AddHistory.
To fix that, maybe try>  install Term::ReadLine::Perl
cpan shell -- CPAN exploration and modules installation (v2.26)
Enter 'h' for help.
cpan[1]>
除了 cpan 以外,Perl 的模块安装还可以通过 cpanm 命令进行安装,而要获取 cpanm 命令我们需要先安装 Perl 的 App::cpanminus 模块:
[root@ecs-steven data]# cpanLoading internal logger. Log::Log4perl recommended for better loggingTerminal does not support AddHistory.To fix that, maybe try> install Term::ReadLine::Perlcpan shell -- CPAN exploration and modules installation (v2.26)Enter 'h' for help.cpan[14]> install App::cpanminusRunning install for module 'App::cpanminus'Fetching with HTTP::Tiny:http://www.cpan.org/authors/id/M/MI/MIYAGAWA/App-cpanminus-1.7044.tar.gz CPAN: checksum security checks disabled because Digest::SHA not installed. Please consider installing the Digest::SHA module.Scanning cache /root/.cpan/build for sizes......
App::cpanminus 模块安装完成后,cpanm 命令就会自动安装到对应 Perl 所在的目录(如果用的是 /bin/perl,cpanm 将默认安装到 /usr/local/bin/cpanm)。
1.2.1 使用 CPAN 模块自动安装方法一
安装前需要先联上网,有无 root 权限均可。对于非 root 用户,Perl 提供了 'local::lib'、'sudo' or 'manual' 三种使用 CPAN 模块自动安装的方式,初次运行 CPAN 时需要用户自行进行选择设置,默认为 'local::lib'。
执行 perl -MCPAN -e shell 命令,运行 CPAN,进入 cpan 交互模式。
初次运行 CPAN 时需要做一些设置,如果我们的机器是直接与因特网相联,那么一路回车就行了。
常用 cpan 命令:
# 获得帮助cpan> help
# 列出 CPAN 上所有模块的列表cpan>m
# 安装模块,自动完成 Bio::SeqIO 模块从下载到安装的全过程。cpan> install Bio::SeqIO
# 查看当前 CPAN 使用的镜像站点cpan[3]> o conf urllist
# 查看当前 CPAN 的配置信息cpan[2]> o conf
# 退出cpan> quit
1.2.2 使用CPAN模块自动安装方法二
cpan -i 模块名例如:cpan -i CGI
1.2.3 修改CPAN mirror的默认源
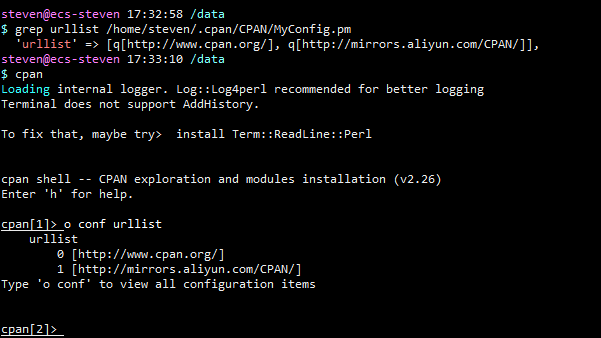
安装 perl 下的很多模块文件时,比较快捷的方法是使用 cpan 工具。默认 cpan shell 使用的是 cpan.org 的源,在国内使用的话速度会非常的慢。如果更换为国内的如阿里或网易等公司的源的话,速度会明显提高。修改方法如下:
执行 cpan 命令,或者通过
perl -MCPAN -e shell命令进入 CPAN 交互模式查看当前源配置
cpan[1]> o conf$CPAN::Config options from /root/.cpan/CPAN/MyConfig.pm: commit [Commit changes to disk] defaults [Reload defaults from disk] help [Short help about 'o conf' usage] init [Interactive setting of all options] applypatch [] auto_commit [0] build_cache [100] build_dir [/root/.cpan/build] build_dir_reuse [0] ......cpan[2]> o conf urllist urllist 0 [http://www.cpan.org/]Type 'o conf' to view all configuration items
增加源或移出源并提交
cpan[2]> o conf urllist urllist 0 [http://www.cpan.org/]Type 'o conf' to view all configuration itemscpan[3]> o conf urllist push https:mirrors.aliyun.com/CPAN/Please use 'o conf commit' to make the config permanent!cpan[4]> o conf commitcommit: wrote '/root/.cpan/CPAN/MyConfig.pm'cpan[5]> o conf urllist urllist 0 [http://www.cpan.org/] 1 [https://mirrors.aliyun.com/CPAN/]Type 'o conf' to view all configuration items
移出一个源或者多个源可以使用 pop 函数,如下:
cpan[6]> o conf urllist pop https://mirrors.aliyun.com/CPAN/cpan[3]> o conf urllist pop http://www.cpan.org/ https://mirrors.aliyun.com/CPAN/
也可以一次增加多个源:
cpan[4]> o conf urllist ftp://mirrors.sohu.com/CPAN/ http://mirrors.163.com/cpan/
或者直接修改
~/.cpan/CPAN/MyConfig.pm文件的 urllist
$ grep urllist /home/steven/.cpan/CPAN/MyConfig.pm 'urllist' => [q[http://www.cpan.org/], q[http://mirrors.aliyun.com/CPAN/]],$ cpanLoading internal logger. Log::Log4perl recommended for better loggingTerminal does not support AddHistory.To fix that, maybe try> install Term::ReadLine::Perlcpan shell -- CPAN exploration and modules installation (v2.26)Enter 'h' for help.cpan[1]> o conf urllist urllist 0 [http://www.cpan.org/] 1 [http://mirrors.aliyun.com/CPAN/]Type 'o conf' to view all configuration items
如果对当前的当前所有的 cpan shell 的配置不满意,也可以通过命令重新初始化该文件,如下:
cpan> o conf init
1.2.4 使用 cpanm 命令安装
参数名直接为模块名称即可。如:
$ sudo cpanm CGI::Session$ sudo cpanm Template
注: 如果不是 root 权限,cpanm 也一样能用。它会将模块下载安装到用户的根目录(~)下。
为了加快 cpanm 下载速度, 可以指定使用镜像. 并只从镜像下载. 如下:
$ sudo cpanm --mirror http://mirrors.163.com/cpan --mirror-only CGI::Session
二、windows 下 Perl 模块安装
在开始介绍 windows 下 Perl 模块安装前,我们先来了解一些关于 make、gmake、nmake、dmake 等编译工具。
Make 是一种自动化构建工具,用于从源码自动生成可执行程序和库(通常借助于 makefile 来推导出目标程序);Make 有多个版本,如 Unix/Linux下 的 GNU Make(之所以有 gmake,是因为在别的平台上 make 一般被占用,GNU make 只好叫 gmake 了)、Windows 下的 Microsoft nmake 等。dmake 则是一个适用于 Linux、Solaris、Win32 以及其他平台的跨平台的命令行编译工具,除此之外,跨平台编译工具中还有一个大名鼎鼎的 cmake。
关于 Make 的详细介绍,具体可参考:Wikipedia: Make (Software)。dmake 工具:https://metacpan.org/release/dmake,具体安装方法请自行谷歌(dmake 貌似是 cpan 环境配置好就有了在 "C:\Perl\site\bin" 下)。
nmake 是 Microsoft Visual Studio 中的附带命令,需要安装 VS;安装 VS 后,nmake.exe 出现在 C:\Program Files (x86)\Microsoft Visual Studio 9\VC\bin 目录下(bin 文件夹的位置根据每个人系统不同,找到自己的安装位置,bin 文件夹中包含 nmake 即可)。如果 VS 安装过程中,没有注册 VS 的环境变量,因此直接在 cmd 的 DOC 中输入 nmake 就会出现:"'nmake' 不是内部或者外部命令,也不是可运行的程序或批处理文件" 报错。
使用 nmake 的方法有两种:
打开 VS 自带的命令行 "
Visual Studio 2008 Command Prompt",然后在该命令行中使用 nmake;将路径 "
C:\Program Files (x86)\Microsoft Visual Studio 9\VC\bin" 设置到环境变量中去,然后在 DOS 命令行中使用 nmake。
2.1 解压编译手动安装
windows 下手动 Perl 模块方法跟 Linux类似。都需要解压后执行:
perl makefile.pl nmake/dmake nmake/dmake testnmake/dmake install
2.2 cpan 自动安装
安装前需要对 cpan 配置,cpan需要安装其他的模块 dmake 和 MinGw gcc compiler。完成后,进入 cpan 交互界面安装(参考上面的 linux cpan 自动安装)。
2.3 PPM 自动安装
如果使用 ActivePerl,可以使用 PPM(Perl Package Manager) 来安装,使用 PPM GUI 或 PPM Commandline。PPM commandline 实例如下:
add correct repositories.
c:\perl\bin\ppm repo add http://theoryx5.uwinnipeg.ca/ppms/package.lstc:\perl\bin\ppm repo add http://www.roth.net/perl/packages/
通过设置不同的 repositories 可以加速部分 Perl 模块的下载,我们也可以通过 ppm 命令查看可用的 repositories list:
# Use the command ppm repo list to list all installed PPM repositories in ActivePerl 5.10 through 5.14.PS C:\> ppm repo list┌────┬───────┬────────────────────────────────┐│ id │ pkgs │ name │├────┼───────┼────────────────────────────────┤│ 1 │ 13334 │ ActiveState Package Repository ││ 2 │ 294 │ Theoryx │└────┴───────┴────────────────────────────────┘ (2 enabled repositories)PS C:\># The command ppm repo desc #, where "#" is the number of the repository (in the order it was added), will display information about that repository:PS C:\> ppm repo desc 2Id: 2Name: TheoryxURL: http://cpan.uwinnipeg.ca/PPMPackages/14xx/Enabled: yesLast-Status: 200 OKLast-Access: 9 seconds agoRefresh-In: 1 day
install the packages
c:\perl\bin\ppm install Carp-Assertc:\perl\bin\ppm install Log-Log4perlc:\perl\bin\ppm install YAML-Syck
更多关于 ActivePerl 的文档与资料,可以参考:http://docs.activestate.com/。
更多生信分析套路,请加微信13621202201


 2223
2223


 被折叠的 条评论
为什么被折叠?
被折叠的 条评论
为什么被折叠?
 到【灌水乐园】发言


