


序言
@Component是一个类级别的注解,被此注解作用的Java类,将被Spring视为应用程序中的组件。在开启组件扫描后,被@Component注解的类会被Spring Framework扫描并纳入到Spring容器的管理。在默认情况下,@Component所产生的是一个单例模式的普通组件,且组件的名称为类名(首字母小写,使用驼峰命名)。
1.组件扫描
在使用@Component注解之前,需要在应用程序中开启组件扫描,你可以采用基于XML文件的配置方式,也可以使用@ComponentScan注解进行配置(推荐使用该方式进行配置)。例如:
AppConfig.java
@Configuration@ComponentScan(basePackages = {"com.ramostear.component.annotation.beans"})public class AppConfig {}接下来,创建一个名为Demo的Java类,并使用@Component进行注解。
2.使用@Component注解
在com.ramostear.component.annotation.beans包中创建Demo.java类,并使用@Component进行注解,内容如下:
Demo.java
@Componentpublic class Demo { private String text; public Demo() { this.text = "hello world."; System.out.println("--- Initializing Demo component and text="+this.text+" ---"); }}下面,我们通过AnnotationConfigApplicationContext获得应用上下文,并从上下文中获取Demo的bean实例。
3.获取组件
在main()方法中,可以使用AnnotationConfigApplicationContext类加载应用上下文,并获得相应的bean。代码如下:
ComponentAnnotationApplication.java
@SpringBootApplicationpublic class ComponentAnnotationApplication { public static void main(String[] args) { SpringApplication.run(ComponentAnnotationApplication.class, args); AnnotationConfigApplicationContext context = new AnnotationConfigApplicationContext(AppConfig.class); Demo demo = context.getBean(Demo.class); System.out.println("demo text is : "+ demo.getText()); }}运行main()方法,观察控制台输出。
Output
--- Initializing Demo component and text=hello world. ---demo text is : hello world.4.组件命名
在上面的例子中,我们是通过Bean的类型获得组件的,除此之外,我们还可以对组件进行命名,然后通过名称来获取上下文中的bean。代码如下:
Demo.java
@Component(value = "demoBean")public class Demo { //省略其他...}使用value属性指定Demo的bean名称,接下来,在main()中就可以通过beanName获得Demo的bean实例。
ComponentAnnotationApplication.java
@SpringBootApplicationpublic class ComponentAnnotationApplication { public static void main(String[] args) { SpringApplication.run(ComponentAnnotationApplication.class, args); AnnotationConfigApplicationContext context = new AnnotationConfigApplicationContext(AppConfig.class); /*Demo demo = context.getBean(Demo.class);*/ Demo demo = (Demo)context.getBean("demoBean"); System.out.println("demo text is : "+ demo.getText()); }}Output
--- Initializing Demo component and text=hello world. ---demo text is : hello world.5.与@Repository,@Service和@Controller的区别和联系
首先,@Component,@Repository,@Service和@Controller这四个注解都是用于定义一个被Spring容器所管理的Bean。应用程序启动时,Spring会根据类路径去扫描带有这些注解的类,然后完成依赖注入工作。对于这四个注解,在技术上的核心目的是相同的,都是为了Spring能够自动扫描和识别这些组件。而它们之间的却别在于业务上的分类。下面做一下简单的介绍:
- @Component : 它是一个通用的注解,可以在整个应用程序中使用,表明只是一个普通的组件;
- @Controller : 视图层的注释,主要是在Spring MVC中使用,用于定义一个视图控制器;
- @Service : 在业务逻辑层使用的注解;
- @Repository: 数据持久层注解,通常承担向数据库读写数据的任务。
最后,我们可以通过一张图进一步了解这四个注解的区别和联系:
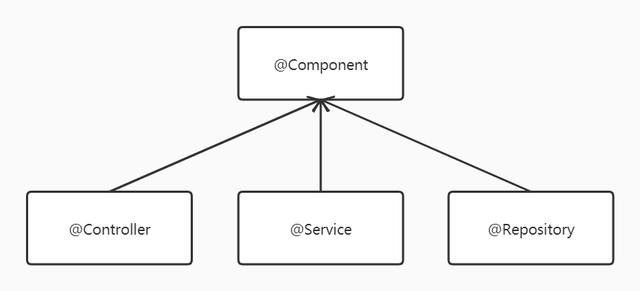
简单来说,@Controller,@Service和@Repository是@Component的一种特殊情况,从它们的源码就能一探究竟:
Component.java
@Target({ElementType.TYPE})@Retention(RetentionPolicy.RUNTIME)@Documented@Indexedpublic @interface Component { String value() default "";}Controller.java
@Target({ElementType.TYPE})@Retention(RetentionPolicy.RUNTIME)@Documented@Component //@Component注解public @interface Controller { @AliasFor( annotation = Component.class ) String value() default "";}Service.java
@Target({ElementType.TYPE})@Retention(RetentionPolicy.RUNTIME)@Documented@Component //@Component注解public @interface Service { @AliasFor( annotation = Component.class ) String value() default "";}Repository.java
@Target({ElementType.TYPE})@Retention(RetentionPolicy.RUNTIME)@Documented@Component //@Component注解public @interface Repository { @AliasFor( annotation = Component.class ) String value() default "";}本文所涉及到的源码,你可以点击下方的按钮进行下载:

https://github.com/ramostear/spring-annotations-daily-example


 2436
2436


 被折叠的 条评论
为什么被折叠?
被折叠的 条评论
为什么被折叠?
 到【灌水乐园】发言


