


Java8 引入了方法引用特性,使用它可以简化 Lambda 表达式,我们知道 Lambda 是用来替代匿名类的,即使用 Lambda 可以更加方便地实现函数接口的方法,如下所示。
1、自定义函数接口
public interface MyInterface { public void test(int num);}2、接口调用
public class Test { public static void main(String[] args) { test(10,(num)->{ num++; System.out.println(num); }); } public static void test(int num,MyInterface myInterface){ myInterface.test(num); }}在这个案例中
(num)->{ num++; System.out.println(num);})上面这段代码就是对 MyInterface 接口 test(int num) 方法的具体实现,如果 test(int num) 方法只需要调用 System.out.println(num); 而不需要添加额外的逻辑代码,可以这样写,省略 {}。
test(10,(num)->System.out.println(num));如果还觉得不够简化,可以使用方法引用进一步简化代码,如下所示。
test(10,System.out::println);System.out::println 就是方法引用,表示调用 System.out 的 println 方法,方法引用提供了一种引用而不执行方法的方式,它需要由兼容的函数式接口构成的目标类型上下文,执行时方法引用会自动创建函数式接口的一个实例。
简单来说,方法引用本身就是一个 Lambda 表达式,它是一种更加简洁、易读的 Lambda 表达式,通过双冒号 :: 来引用目标方法。
方法引用是用来简化 Lambda 表达式的,因为在某些特定场景下,Lambda 表达式可能只需要调用一个已存在的方法,而不做其他任何逻辑处理,针对这种情况,通过一个方法名字来引用这个已存在的方法会使得代码结构更加清晰,这就是方法引用的底层逻辑。
方法引用的具体操作形式有以下四种:
1、引用目标类的静态方法。
2、引用目标对象的实例方法。
3、引用目标类的构造方法。
4、引用目标类型任意对象的实例方法。
接下来我们分别做演示。
引用目标类的静态方法
1、自定义函数接口。
public interface MyInterface { public void test();}2、自定义一个类,提供静态方法。
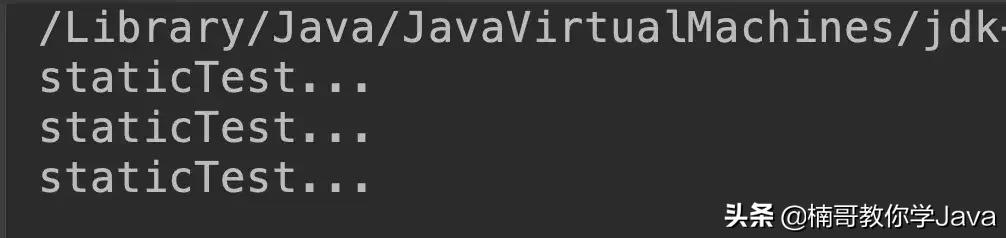
public class MyDemo { public static void staticTest(){ System.out.println("staticTest..."); }}3、测试类如下所示,我们分别用匿名类、Lambda 表达式、方法引用 3 种方式来实现,方便大家做对比,从匿名类简化到 Lambda 表达式,再简化到方法引用的过程。
public class Test { public static void main(String[] args) { //1、匿名类 test(new MyInterface() { @Override public void test() { MyDemo.staticTest(); } }); //2、Lambda表达式 test(()->MyDemo.staticTest()); //3、方法引用 test(MyDemo::staticTest); } public static void test(MyInterface myInterface){ myInterface.test(); }}4、运行结果如下图所示。
引用目标对象的实例方法
1、自定义函数接口。
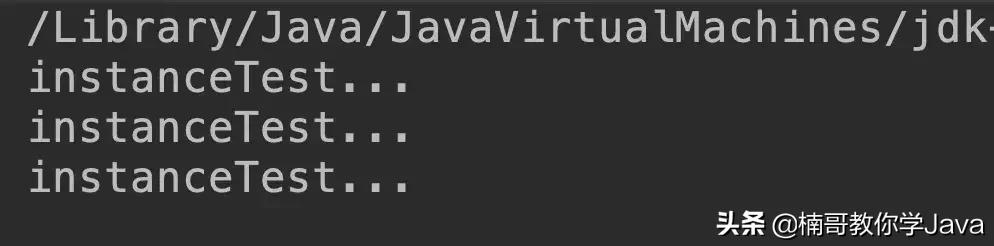
public interface MyInterface { public void test(MyDemo myDemo);}2、自定义一个类,提供实例方法。
public class MyDemo { public void instanceTest(){ System.out.println("instanceTest..."); }}3、测试类如下所示。
public class Test { public static void main(String[] args) { //1、匿名类 test(new MyDemo(),new MyInterface() { @Override public void test(MyDemo myDemo) { myDemo.instanceTest(); } }); //2、Lambda表达式 test(new MyDemo(),(myDemo)->myDemo.instanceTest()); //3、方法引用 test(new MyDemo(),MyDemo::instanceTest); } public static void test(MyDemo myDemo,MyInterface myInterface){ myInterface.test(myDemo); }}4、运行结果如下图所示。
引用目标类的构造方法
1、自定义函数接口。
public interface MyInterface { public MyDemo test();}2、自定义一个类,提供构造方法,使用默认的无参构造。
public class MyDemo {}3、测试类如下所示。
public class Test { public static void main(String[] args) { //1、匿名类 test(new MyInterface() { @Override public MyDemo test() { return new MyDemo(); } }); //2、Lambda表达式 test(()->new MyDemo()); //3、方法引用 test(MyDemo::new); } public static void test(MyInterface myInterface){ System.out.println(myInterface.test()); }}4、运行结果如下图所示。

引用目标类型任意对象的实例方法
1、自定义函数接口。
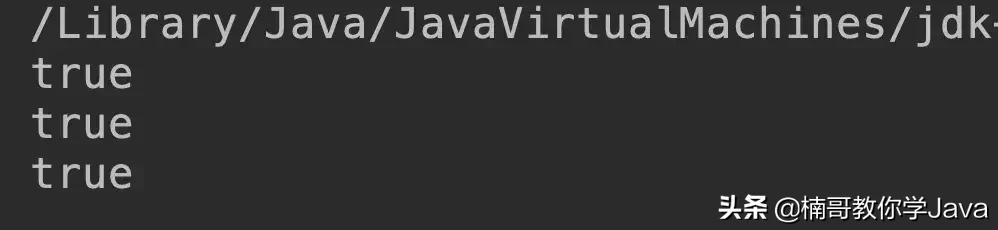
public interface MyInterface { public boolean test(MyDemo myDemo1,MyDemo myDemo2);}2、自定义一个类,提供 compare 方法,逻辑很简单,通过两个实例对象的 num 值判断大小。
public class MyDemo { private Integer num; public Integer getNum() { return num; } public MyDemo(Integer num){ this.num = num; } public boolean compare(MyDemo myDemo){ if(this.num > myDemo.getNum()){ return true; } return false; }}3、测试类如下所示。
public class Test { public static void main(String[] args) { //1、匿名类 test(new MyDemo(2), new MyDemo(1), new MyInterface() { @Override public boolean test(MyDemo myDemo1, MyDemo myDemo2) { return myDemo1.compare(myDemo2); } }); //2、Lambda表达式 test(new MyDemo(2), new MyDemo(1),(MyDemo myDemo1, MyDemo myDemo2)->myDemo1.compare(myDemo2)); //3、方法引用 test(new MyDemo(2), new MyDemo(1),MyDemo::compare); } public static void test(MyDemo myDemo1,MyDemo myDemo2,MyInterface myInterface){ System.out.println(myInterface.test(myDemo1,myDemo2)); }}4、运行结果如下图所示。
实际案例
看到这里,想必你已经对方法引用的概念和具体操作有了一定的了解,接下来我们通过两个实际案例来帮助大家更好的掌握方法引用的使用。
案例1:对 Integer 数组进行排序
1、使用 Lambda 表达式的操作如下所示。
public class Test { public static void main(String[] args) { Integer[] array = {1,6,2,3,5,4}; Arrays.sort(array,(num1,num2)->num1.compareTo(num2)); System.out.println(Arrays.asList(array)); }}2、使用方法引用的操作如下所示。
public class Test { public static void main(String[] args) { Integer[] array = {1,6,2,3,5,4}; Arrays.sort(array,Integer::compareTo); System.out.println(Arrays.asList(array)); }}3、运行结果如下图所示。

案例2:根据年龄对自定义数据类型 Student 进行排序
1、自定义 Student,定义根据年龄进行排序的方法。
public class Student { private Long id; private String name; private Integer age; public Integer getAge() { return age; } public Student(Long id, String name, Integer age) { this.id = id; this.name = name; this.age = age; } @Override public String toString() { return "Student{" + "id=" + id + 


 913
913


 被折叠的 条评论
为什么被折叠?
被折叠的 条评论
为什么被折叠?
 到【灌水乐园】发言


