ubuntu系统sip 服务器搭建,ubuntu12.04安装配置opensips,搭建voip服务器

通过部署opensips, opensips-cp, rtpproxy, mediaproxy实现voip通话。测试可以通过安卓原生客户端验证,CSipSimple客户端通话(拨打/接收)

1.安装opensips

opensips需要编译源码安装

官网:http://opensips.org

文件目录:http://opensips.org/pub/opensips/1.11.2/src/

wget http://opensips.org/pub/opensips/1.11.2/src/opensips-1.11.2_src.tar.gz

tar xcf opensips-1.11.2_src.tar.gz

cd opensips-1.11.2-tls/

make menuconfig

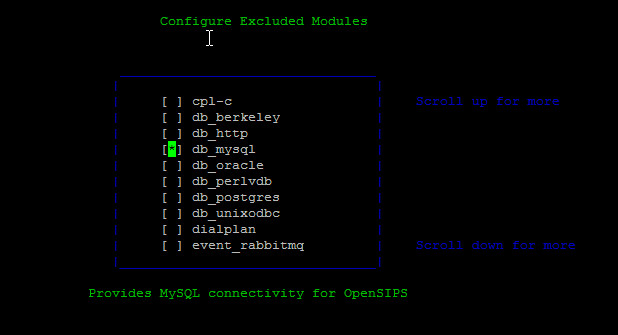
在menuconfig中选择—>Configure Compile Options—> Configure Excluded Modules

方向键向下滚动,按空格选中[*] db_mysql

ea11bb82bac770aa8268b3aab84400f5.png

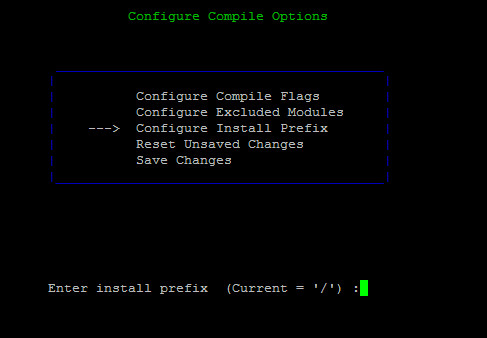
按q键返回上一级,选择—> Configure Install Prefix,输入/回车表示安装在/目录下的配置目录而不是/usr/local目录下。

580caac7fc1c755e86c480c37712f8ee.png

选择 —> Save Changes 保存修改。

5dbe3aa761e3575e9113b758fe062d31.png

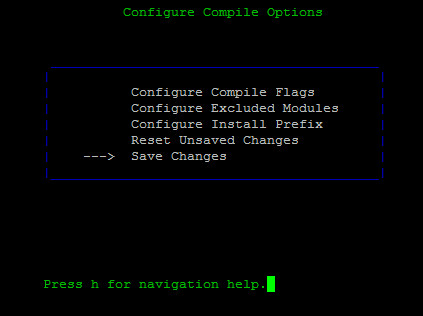
按q返回,选择 —> Compile And Install OpenSIPS,回车安装。

安装完成后会将配置文件放在/etc/opensips目录下。运行文件在/sbin目录下。

如果出现依赖错误,先通过apt-get安装依赖。

2.配置opensips

进入/etc/opensips目录,运行osipsconfig命令

cd /etc/opensips

osipsconfig

依次选择—> Generate OpenSIPS Script —> Residential Script —> Configure Residential Script

选中如下几项

[*] ENABLE_TCP

[*] USE_ALIASES

[*] USE_AUTH

[*] USE_DBACC

[*] USE_DBUSRLOC

[*] USE_DIALOG

[*] USE_NAT

按q返回,选择 —> Generate Residential Script 回车,生成新的配置文件。按q(三次)退出命令

将新生成的opensips_residential_*.cfg文件重命名为opensips.cfg编辑

mv opensips_residential_2014-7-10_16:19:22.cfg opensips.cfg

vi opensips.cfg

修改为如下内容

debug=3

log_stderror=no

log_facility=LOG_LOCAL0

fork=yes

children=4

/* uncomment the following lines to enable debugging */

#debug=6

#fork=no

#log_stderror=yes

/* uncomment the next line to enable the auto temporary blacklisting of

not available destinations (default disabled) */

#disable_dns_blacklist=no

/* uncomment the next line to enable IPv6 lookup after IPv4 dns

lookup failures (default disabled) */

#dns_try_ipv6=yes

/* comment the next line to enable the auto discovery of local aliases

based on revers DNS on IPs */

auto_aliases=no

  • 0
    点赞
  • 4
    收藏
    觉得还不错? 一键收藏
  • 0
    评论
Ubuntu 12.04中进行网络配置有以下步骤: 1. 打开网络配置文件 /etc/network/interfaces:sudo vim /etc/network/interfaces 2. 如果要配置动态获取IP地址,添加以下内容: ``` auto eth0 iface eth0 inet dhcp ``` 3. 如果要配置静态IP地址,添加以下内容(根据实际情况修改IP地址、子网掩码和网关): ``` auto eth0 iface eth0 inet static address 192.168.1.201 netmask 255.255.255.0 gateway 192.168.1.1 ``` 4. 重启网络接口使配置生效: ``` sudo ifconfig eth0 down sudo ifconfig eth0 up ``` 5. 使用 ifconfig 命令检查IP地址是否配置成功。 6. 如果仍然无法上网,可能是DNS服务器配置。编辑 /etc/resolv.conf 文件并添加DNS服务器地址: ``` nameserver 8.8.8.8 nameserver 8.8.4.4 ``` 注意,如果 /etc/resolv.conf 文件是从 /etc/resolvconf/resolv.conf.d/head 文件加载的,可以直接编辑 head 文件添加上述两行配置: ``` sudo vim /etc/resolvconf/resolv.conf.d/head ``` 7. 保存修改后,重启网络服务使配置生效: ``` sudo /etc/init.d/networking restart ``` 以上是在Ubuntu 12.04中进行网络配置的步骤,通过按照上述步骤进行配置,您应该能够成功连接到互联网。如果仍然无法连接,请尝试重新启动机器。<span class="em">1</span><span class="em">2</span><span class="em">3</span> #### 引用[.reference_title] - *1* [ubuntu12.04 server 配置网络](https://blog.csdn.net/weixingstudio/article/details/7912572)[target="_blank" data-report-click={"spm":"1018.2226.3001.9630","extra":{"utm_source":"vip_chatgpt_common_search_pc_result","utm_medium":"distribute.pc_search_result.none-task-cask-2~all~insert_cask~default-1-null.142^v92^chatsearchT0_1"}}] [.reference_item style="max-width: 50%"] - *2* *3* [ubuntu 12.04 网络设置](https://blog.csdn.net/PHPData/article/details/12655733)[target="_blank" data-report-click={"spm":"1018.2226.3001.9630","extra":{"utm_source":"vip_chatgpt_common_search_pc_result","utm_medium":"distribute.pc_search_result.none-task-cask-2~all~insert_cask~default-1-null.142^v92^chatsearchT0_1"}}] [.reference_item style="max-width: 50%"] [ .reference_list ]

“相关推荐”对你有帮助么?

  • 非常没帮助
  • 没帮助
  • 一般
  • 有帮助
  • 非常有帮助
提交
评论
添加红包

请填写红包祝福语或标题

红包个数最小为10个

红包金额最低5元

当前余额3.43前往充值 >
需支付:10.00
成就一亿技术人!
领取后你会自动成为博主和红包主的粉丝 规则
hope_wisdom
发出的红包
实付
使用余额支付
点击重新获取
扫码支付
钱包余额 0

抵扣说明:

1.余额是钱包充值的虚拟货币,按照1:1的比例进行支付金额的抵扣。
2.余额无法直接购买下载,可以购买VIP、付费专栏及课程。

余额充值