


1. 首先需要一台Linux的服务器,并进行系统预配置工作
1.1 进行服务器防火墙的关闭操作
# 关闭防火墙 systemctl stop firewalld # 禁止开机启动 systemctl disable firewalld

1.2 关闭SELINUX并重启系统
# 该配置调整为 disabled
2. 安装Omnibus Gitlab-ce package (必要的插件的集合版本)
2.1 安装gitlab依赖的组件
sudo yum -y install curl policycoreutils openssh-server openssh-clients postfix
2.2 配置YUM仓库
curl -sS https://packages.gitlab.com/install/repositories/gitlab/gitlab-ce/script.rpm.sh | sudo bash
2.3 添加启动 postfix邮件服务
systemctl start postfix && systemctl enable postfix
2.4 安装Gitlab-ce 社区版本
yum install -y gitlab-ce
3. 在安装完毕GitLab-CE 后,进行后续的配置工作
3.1 创建gitlab 证书 (openssl 详细使用介绍)
# 创建目录 sudo mkdir -p /etc/gitlab/ssl
# 创建秘钥
sudo openssl genrsa -out "/etc/gitlab/ssl/gitlab.examle.com.cn.key"  2048
sudo openssl req -new -key "/etc/gitlab/ssl/gitlab.examle.com.cn.key" -out
"/etc/gitlab/ssl/gitlab.examle.com.cn.csr"
# 根据指示填写秘钥生成内容
You are about to be asked to enter information that will be incorporated into your certificate request.
What you are about to enter is what is called a Distinguished Name or a DN.
There are quite a few fields but you can leave some blank For some fields
there will be a default value, If you enter '.', the field will be left blank.
----- Country Name (2 letter code) [XX]:cn State or Province Name (full name) []:biejing
Locality Name (eg, city) [Default City]:beijing
Organization Name (eg, company) [Default Company Ltd]:
Organizational Unit Name (eg, section) []:
Common Name (eg, your name or your server's hostname) []:gitlab.******.com
Email Address []:*********@qq.com  Please enter the following 'extra'
attributes to be sent with your certificate request A challenge password []:123456789
An optional company name []:admin  sudo openssl x509 -req -days 365 -in "/etc/gitlab/ssl/gitlab.examle.com.cn.csr" - signkey "/etc/gitlab/ssl/gitlab.examle.com.cn.key" -out "/etc/gitlab/ssl/gitlab.examle.com.cn.crt" Signature ok subject=/C=cn/ST=biejing/L=beijing/O=Default Company Ltd/CN=gitlab.example.com.cn/emailAddress=********@qq.com Getting Private key  sudo openssl dhparam -out /etc/gitlab/ssl/dhparams.pem
3.2 把创建的证书 配置到gitlab
sudo vi /etc/gitlab/gitlab.rb
## GitLab URL ##! URL on which GitLab will be reachable.
##! For more details on configuring external_url see:
##! https://docs.gitlab.com/omnibus/settings/configuration.html#configuring-the-external-url-for-gitlab
##!
##! Note: During installation/upgrades, the value of the environment variable
##! EXTERNAL_URL will be used to populate/replace this value.
##! On AWS EC2 instances, we also attempt to fetch the public hostname/IP
##! address from AWS. For more details, see:
##! https://docs.aws.amazon.com/AWSEC2/latest/UserGuide/instancedata-data-retrieval.html
# 调整前  external_url 'http://gitlab.example.com' external_url 'https://gitlab.example.com'
# 然后搜索包含 /redirect_http_to_https 内容的配置
# nginx['enable'] = true # nginx['client_max_body_size'] = '250m'
# nginx['redirect_http_to_https'] = false
# 放开该行注释并调整属性
nginx['redirect_http_to_https'] = true
# nginx['redirect_http_to_https_port'] = 80

# 继续更改 key 的地址(也就是前面生成的key)
# nginx['ssl_certificate'] = "/etc/gitlab/ssl/gitlab.examle.com.cn.crt"
# nginx['ssl_certificate_key'] = "/etc/gitlab/ssl/gitlab.examle.com.cn.key"
# nginx['ssl_dhparam'] = nil # Path to dhparams.pem, eg. /etc/gitlab/ssl/dhparams.pem
# 调整为之前生成的key # nginx['ssl_dhparam'] = /etc/gitlab/ssl/dhparams.pem
# Path to dhparams.pem, eg. /etc/gitlab/ssl/dhparams.pem # nginx['listen_addresses'] = ['*', '[::]']
# 修改调整完进行保存退出
3.3 初始化gitlab的相关配置
# 进行 gitlab 相关的应用进行初始化
4. web页面的访问
4.1 在所使用的系统中添加 host DNS 配置
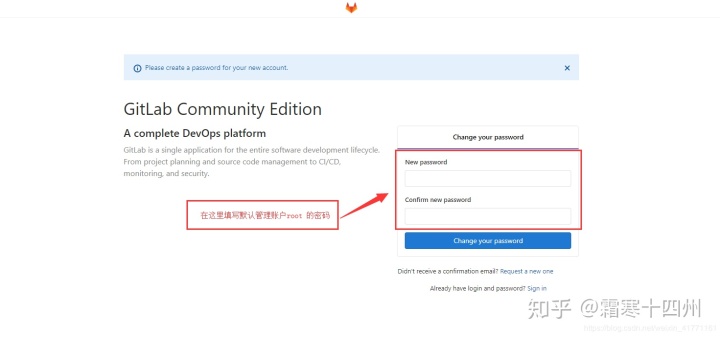
4.2 在浏览器访问你所配置的域名 会出现下列页面,


 1585
1585

 被折叠的 条评论
为什么被折叠?
被折叠的 条评论
为什么被折叠?
 到【灌水乐园】发言


