


学而思的数独小游戏,H5版本的小游戏,使用vue 构建项目,简单方便,开发打包都超级方便。目,简单方便,开发打包都超级方便。目,简单方便,开发打包都超级方便。目,简单方便,开发打包都超级方便。目,简单方便,开发打包都超级方便。目,简单方便,开发打包都超级方便。目,简单方便,开发打包都超级方便。目,简单方便,开发打包都超级方便。
之前写过使用element-ui进行前端页面开发,不过只用了一部分功能,这一次做一下首页页面的前端部分。
目前导航栏菜单还是使用的element-ui给的样例的菜单。后期需要添加功能在进一步完善,一步一步来,这样比较有计划性。
VUE的app.vue是页面入口,导航栏在大部分页面都需要使用,所以我们就把导航栏当作一个组件放在app.vue里面
*{
margin: 0;
padding: 0;
}
body{
font-family:Arial,"STHeiti", Helvetica, sans-serif;
background:#efefef;
font-size:14px;
color:#444!important;
min-height:100vh;
width:100%;
overflow-x: hidden;
-webkit-overflow-x: hidden;
-webkit-tap-highlight-color: transparent;
}
#app {
font-family: 'Avenir', Helvetica, Arial, sans-serif;
-webkit-font-smoothing: antialiased;
-moz-osx-font-smoothing: grayscale;
text-align: center;
color: #2c3e50;
margin-top: 60px;
}
.container{
max-width: 80%;
margin:0 auto;
padding:0 10px;
/*verflow-x: hidden;*/
/* -webkit-overflow-x: hidden;*/
}
a{
text-decoration:none;
color:#000;
}
p{
display: block;
}
ol, ul {
list-style: none;
}
路由配置,将登陆页面的头部不显示导航栏
import Vue from 'vue' //引入 Vue
import VueRouter from 'vue-router' //引入 Vue 路由
import Login from '../views/login/login'
import Home from '../views/home/home'
Vue.use(VueRouter); //安装插件
export const constantRouterMap = [
//配置默认的路径,默认显示登录页
{
path: '/login',
name: 'Login',
component: Login,
meta: {
keepAlive: false
}
},
{
path: '/home',
name: 'Home',
component: Home,
meta: {
keepAlive: true
}
}
]
export default new VueRouter({
mode: 'history', //后端支持可开
scrollBehavior: () => ({y: 0}),
routes: constantRouterMap //指定路由列表
})
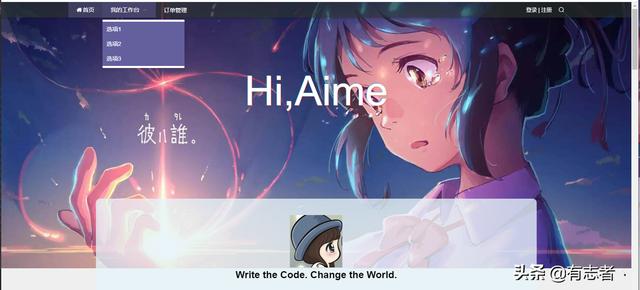
2.使用NavMenu组件
@select="handleSelect" text-color="#fff" :router="true">
首页
我的工作台
选项1
选项2
选项3
订单管理
登录 | 注册
个人中心
喜欢列表
收藏列表
退出登录
{{this.$store.state.themeObj.autograph?this.$store.state.themeObj.autograph:"Write the Code. Change the World."}}
@import "../assets/css/header.scss";
在 标签中开启了 router 模式,解释如下

头部页面效果如下
下面就需要完善左边列表页面,我们继续把左边列表页面当成一个组件来完成
新建文件temSharelist.vue
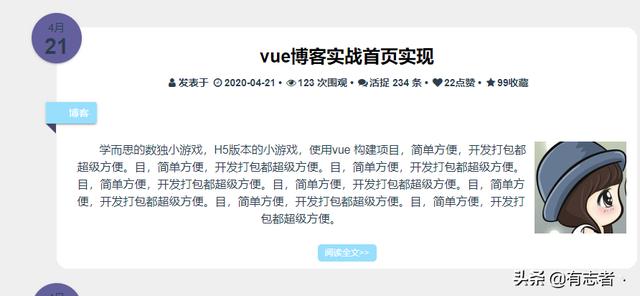
4月
21
vue博客实战首页实现
发表于
•
123 次围观 •
活捉 234 条 •
22点赞 •
99收藏
博客
学而思的数独小游戏,H5版本的小游戏,使用vue 构建项目,简单方便,开发打包都超级方便。目,简单方便,开发打包都超级方便。目,简单方便,开发打包都超级方便。目,简单方便,开发打包都超级方便。目,简单方便,开发打包都超级方便。目,简单方便,开发打包都超级方便。目,简单方便,开发打包都超级方便。目,简单方便,开发打包都超级方便。
阅读全文>>
/**文章列表*/
.sharelistBox{
transtion: all 0.5s ease-out;
font-size: 15px;
}
/** 文章列表盒子*/
.tcommonBox{
background:#fff;
white-space: normal;
word-wrap: break-spaces;
word-break: break-all;
position: relative;
padding: 15px;
border-radius: 16px;
margin-bottom: 40px;
font-size: 15px;
}
.tcommonBox header{
white-space: normal;
word-wrap: break-spaces;
word-break: break-all;
}
.tcommonBox header h1{
margin: 10px 0;
font-size: 25px;
font-weight: 700;
text-align: center;
color:#000;
line-height: 30px;
}
.tcommonBox header h2{
font-size: 14px;
line-height: 24px;
text-align: center;
font-weight: 700;
margin: 10px 0;
}
.s-round-date{
top:-20px;
left:-35px;
height:60px;
width:70px;
background: #64609E;
position: absolute;
padding-top:10px;
border-radius: 100px;
box-shadow: 0 2px 2px 0 rgba(0,0,0,.14), 0 3px 1px -2px rgba(0,0,0,.2), 0 1px 5px 0 rgba(0,0,0,.12);
}
.s-round-date span{
text-align: center;
display: block;
}
.s-round-date .day{
font-size: 30px;
font-weight: 700;
}
.article-content{
font-size: 16px;
white-space: normal;
word-wrap: break-word;
word-break: break-all;
display: flex;
}
.article-content p{
margin:10px 0;
line-height: 24px;
margin-left: 10px;
}
.s-item .viewdetail a{
color:#fff;
font-size: 12px;
padding:5px 10px;
border-radius: 5px;
background: #97dffd;
}
.maxW{
max-height:300px;
overflow:hidden;
text-align:center;
}
.clearfloat:after{display:block;clear:both;content:"";visibility:hidden;height:0}
.clearfloat{zoom:1}
/*公共标签*/
.ui.label{
float: left;
border-color:#97dffd;
box-shadow: 0 2px 2px 0 rgba(0,0,0,.14), 0 3px 1px -2px rgba(0,0,0,.2), 0 1px 5px 0 rgba(0,0,0,.12);
background-color: #97dffd;
margin:5px 0 15px 2px;
font-size: 14px;
position: relative;
left:-32px;
border-radius: 0 4px 4px 0;
padding:7px 11.2px 7px 32px;
display: inline-block;
color:#fff;
}
.ui.label::after{
position: absolute;
content: '';
top:100%;
left:0;
border-top: 0 solid transparent;
border-right-width:1em;
border-right-color:#48456D;
border-right-style:solid;
border-bottom: 1em solid transparent;
border-left: 0 solid transparent;
width:0;
height:0;
}
.ui.label a{
color:#fff;
line-height: 100%;
}
这里用到的element-ui都比较基础,就不介绍了,直接看官方文档即可
完成一个然后写个循环即可
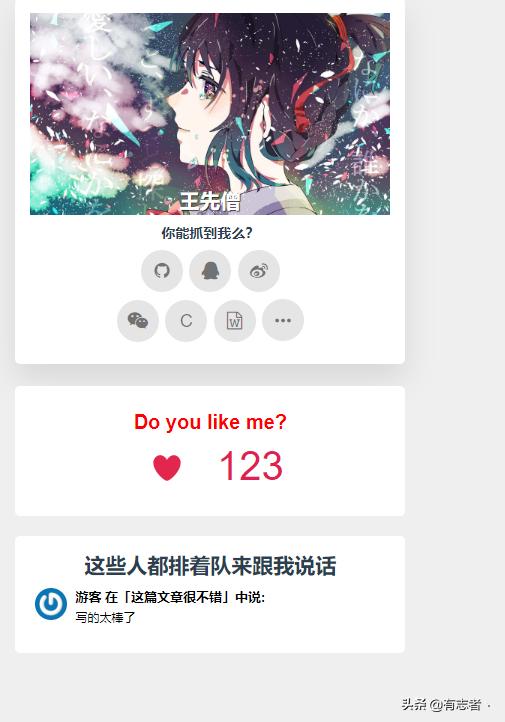
左边完成后,开始完成右边的卡片栏,这里继续抽成一个组件模块
新建文件temRightlist.vue
王先僧
你能抓到我么?
C
Do you like me?
123
这些人都排着队来跟我说话
{{item.content}}
.rightlistBox{
position: relative;
}
.rightlistBox section {
transition: all 0.2s linear;
position: relative;
background: #fff;
padding:15px;
margin-bottom: 20px;
border-radius: 5px;
}
.rightlistBox section:hover{
transform: translate(0,-2px);
box-shadow:0 15px 30px rgba(0,0,0,.1);
}
/*第一个section*/
.rightlistBox .r1-head{
text-align: center;
border-radius: 4px 4px 0 0 ;
text-align: center;
position: relative;
/*box-shadow: inset 0 -70px 100px -50px rgba(0,0,0,.5);*/
}
.rightlistBox .r1-head img{
width:100%;
min-height: 100px;
}
.rightlistBox .r1-head h1{
position: absolute;
margin: 0 0 0 -65px;
font-size: 20px;
letter-spacing: 0.5px;
color: #ffffff;
text-shadow: 1px 1px 1px rgba(0,0,0,.7);
font-weight: 700;
width: 130px;
left: 50%;
bottom: 5px;
}
.rightlistBox .r1-body p{
font-size: 14px;
margin: 5px 0 8px 0;
font-weight: 700;
text-align: center;
}
.rightlistBox .r1-body .catch-me{
text-align: center;
}
.rightlistBox .r1-body .catch-me a{
display: inline-block;
margin-bottom: 7px;
position: relative;
text-decoration: none;
}
.rightlistBox .r1-body .catch-me a:hover i{
color:#fff;
background: #F4692C;
}
.rightlistBox .r1-body .catch-me a i{
display: inline-block;
font-size: 18px;
width:42px;
height:42px;
line-height: 42px;
border-radius: 42px;
color:rgba(0,0,0,0.5);
background: rgba(0,0,0,0.1);
transition: all 0.3s ease-in-out;
font-style: normal;
margin:0 3.2px;
}
/*************do you like me*******************/
.rs2{
min-height: 100px;
}
.rs2 h1{
color:red;
cursor: pointer;
font-size: 20px;
margin-bottom: 10px;
white-space: nowrap;
overflow: hidden;
text-overflow: ellipsis; /*显示省略符号来代表被修剪的文本。*/
text-align: center;
margin-top:10px;
font-weight: 700;
}
.rs2 div{
color: #DF2050;
cursor: pointer;
font-size: 40px;
position: absolute;
width: 100%;
height: 100px;
line-height: 100px;
left: 0;
top: 30px;
}
.rs2 div i.heart{
display: inline-block;
background-image: url(../assets/img/heart.png);
background-position:0 0 ;
text-align: center;
width: 100px;
height: 100px;
margin-left: -20px;
margin-top: -5px;
cursor: pointer;
vertical-align: middle;
-webkit-transition: background-position 1s steps(28);
transition: background-position 1s steps(28);
-webkit-transition-duration: 0s;
transition-duration: 0s;
}
/**第三个section*/
.rightlistBox .rs3 .rs3-item{
font-size: 13px;
line-height: 20px;
}
.rightlistBox .rs3 .rs3-item a{
display:block;
padding:5px;
transition: all .3s ease-out;
border-bottom: 1px solid #ddd;
margin:5px 0;
}
.rightlistBox .rs3 .rs3-item a:hover{
background: rgba(230,244,250,.5);
border-radius: 5px;
}
.rightlistBox .rs3 .rs3-photo{
float:left;
}
.rightlistBox .rs3 .rs3-photo img{
border-radius: 50%;
width:32px;
height:32px;
/*object-fit CSS 属性指定可替换元素的内容应该如何适应到其使用的高度和宽度确定的框。*/
/*您可以通过使用 object-position 属性来切换被替换元素的内容对象在元素框内的对齐方式。*/
/*fill*/
/* 被替换的内容正好填充元素的内容框。整个对象将完全填充此框。如果对象的宽高比与内容框不相匹配,那么该对象将被拉伸以适应内容框。
cover
被替换的内容在保持其宽高比的同时填充元素的整个内容框。如果对象的宽高比与内容框不相匹配,该对象将被剪裁以适应内容框。*/
object-fit: cover;
}
.rightlistBox .rs3 .rs3-inner{
margin-left: 40px;
}
.rightlistBox .rs3 .rs3-inner p.rs3-author{
font-weight: 700;
padding: 0;
text-align: left;
}
.rightlistBox .rs3 .rs3-inner .rs3-text{
font-size: 12px;
text-align: justify;
}
.rightlistBox .rs3 .rs3-item:last-child a{
border-bottom: none;
}
/************排队看这些***************/
.rightlistBox .rs4 li{
padding:8px 0;
text-align: justify;
}
.rightlistBox .rs4 li a{
font-weight: 600;
}
.rightlistBox .rs4 li a:hover {
color: #64609E;
}
显示效果
这样模块都写完了下面就组合到home.vue页面即可
{{$store.state.user.userDetail.token}}
这里使用el-row主要是打算做成响应式的
接着访问http://localhost:4000/home
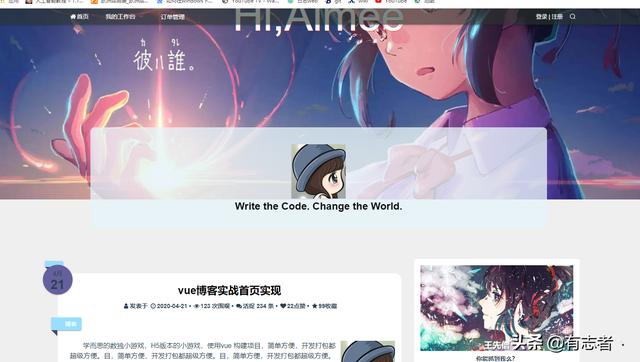
前端博客首页完成,后期需要在添加即可
 3846
3846


 被折叠的 条评论
为什么被折叠?
被折叠的 条评论
为什么被折叠?
 到【灌水乐园】发言


