


参考:http://segmentfault.com/a/1190000000735743 : Android NDK and OpenCV Development With Android Studio
#####################################################################
目前我使用的是Ubuntu14.04系统,所以选择Linux下的NDK版本android-ndk-*.bin
这是一个自解压的二进制文件,下载完成后赋予执行权限,再进行解压:
chmod u+x android-ndk-*.bin
./android-ndk-*.bin即得到ndk开发的包
note:ndk官方的例子在其所在开发包的samples子目录下
在Android Studio上设置NDK的路径,在local.properties上添加:
ndk.dir=$$
现在运行最简单的hello-jni工程,打开Android Studio,导入${NDK_HOME}/samples/hello-jni工程
精简后代码如下:
Hellojni.java
package com.example.hellojni;
import android.app.Activity;
import android.widget.TextView;
import android.os.Bundle;
public class HelloJni extends Activity
{
/** Called when the activity is first created. */
@Override
public void onCreate(Bundle savedInstanceState)
{
super.onCreate(savedInstanceState);
/* Create a TextView and set its content.
* the text is retrieved by calling a native
* function.
*/
TextView tv = new TextView(this);
tv.setText( stringFromJNI() );
setContentView(tv);
}
/* A native method that is implemented by the
* 'hello-jni' native library, which is packaged
* with this application.
*/
public native String stringFromJNI();
/* This is another native method declaration that is *not*
* implemented by 'hello-jni'. This is simply to show that
* you can declare as many native methods in your Java code
* as you want, their implementation is searched in the
* currently loaded native libraries only the first time
* you call them.
*
* Trying to call this function will result in a
* java.lang.UnsatisfiedLinkError exception !
*/
public native String unimplementedStringFromJNI();
/* this is used to load the 'hello-jni' library on application
* startup. The library has already been unpacked into
* /data/data/com.example.hellojni/lib/libhello-jni.so at
* installation time by the package manager.
*/
static {
System.loadLibrary("hello-jni");
}
}
hello-jni.c
#include
#include
/* This is a trivial JNI example where we use a native method
* to return a new VM String. See the corresponding Java source
* file located at:
*
* apps/samples/hello-jni/project/src/com/example/hellojni/HelloJni.java
*/
jstring
Java_com_example_hellojni_HelloJni_stringFromJNI( JNIEnv* env,
jobject thiz )
{
return (*env)->NewStringUTF(env, "Hello from JNI !");
}
app/build.gradle
apply plugin: 'com.android.model.application'
model {
android {
compileSdkVersion = 23
buildToolsVersion = "23.0.2"
defaultConfig.with {
applicationId = "com.example.hellojni"
minSdkVersion.apiLevel = 4
targetSdkVersion.apiLevel = 23
}
}
compileOptions.with {
sourceCompatibility=JavaVersion.VERSION_1_7
targetCompatibility=JavaVersion.VERSION_1_7
}
/*
* native build settings
*/
android.ndk {
moduleName = "hello-jni"
/*
* Other ndk flags configurable here are
* cppFlags.add("-fno-rtti")
* cppFlags.add("-fno-exceptions")
* ldLibs.addAll(["android", "log"])
* stl = "system"
*/
}
android.buildTypes {
release {
minifyEnabled = false
proguardFiles.add(file('proguard-rules.txt'))
}
}
}
此时并不能运行,因为该工程并没有为hello-jni.c和Hellojni.java之间建立联系
#######################################################
在Android Studio上可以设置javah快捷键,这样有助于开发
在菜单栏上,点击File->Settings
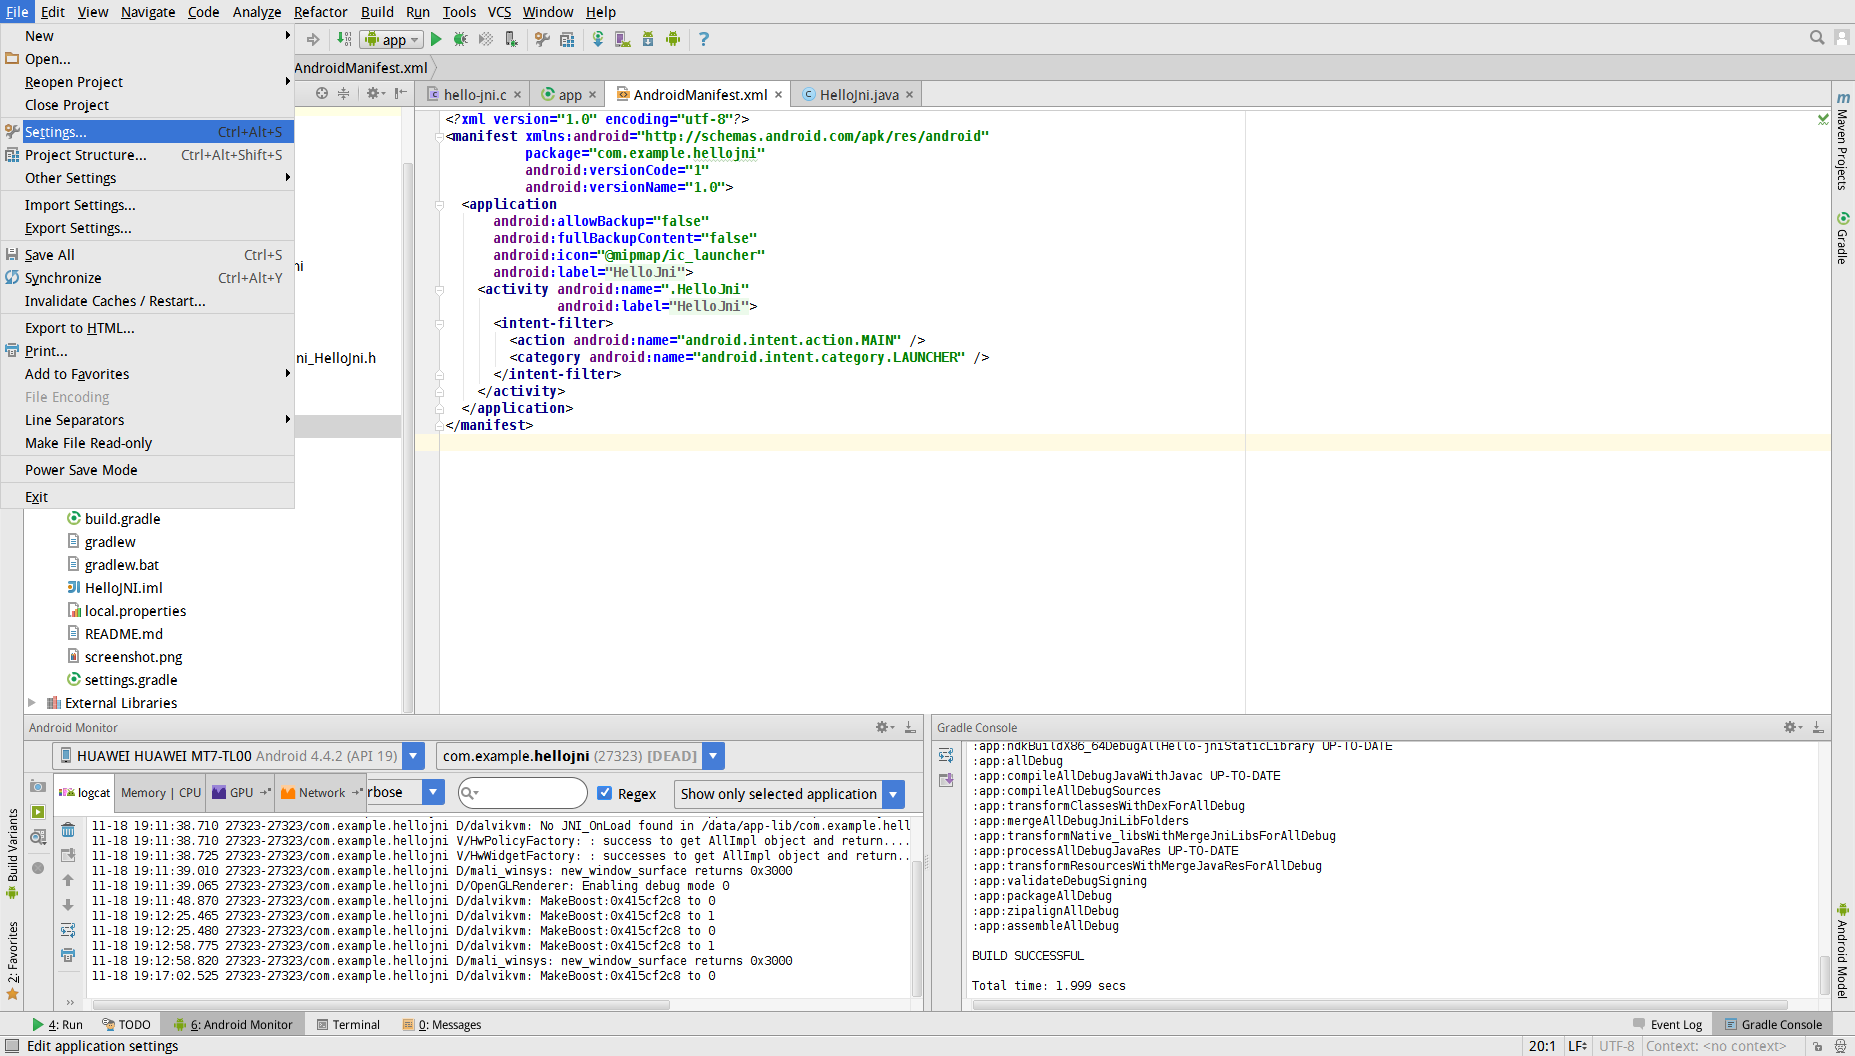
在搜索栏上输入External Tools

在左边tab键上点击+号,修改如下

点击OK,这样就可以在以后开发NDK工程中使用javah快捷键
#################################################################
在app->src->jni路径下新建文件Android.mk:
LOCAL_PATH := ${call my-dir}
include $(CLEAR_VARS)
LOCAL_MODULE := hello-jni
LOCAL_SRC_FILES := hello-jni.c
include $(BUILD_SHARED_LIBRARY)
点击Hellojni.java文件,点击鼠标右键->External Tools->javah,在jni路径下就会生成一个com_example_hellojni_Hellojni.h文件
/* DO NOT EDIT THIS FILE - it is machine generated */
#include
/* Header for class com_example_hellojni_HelloJni */
#ifndef _Included_com_example_hellojni_HelloJni
#define _Included_com_example_hellojni_HelloJni
#ifdef __cplusplus
extern "C" {
#endif
/*
* Class: com_example_hellojni_HelloJni
* Method: stringFromJNI
* Signature: ()Ljava/lang/String;
*/
JNIEXPORT jstring JNICALL Java_com_example_hellojni_HelloJni_stringFromJNI
(JNIEnv *, jobject);
/*
* Class: com_example_hellojni_HelloJni
* Method: unimplementedStringFromJNI
* Signature: ()Ljava/lang/String;
*/
JNIEXPORT jstring JNICALL Java_com_example_hellojni_HelloJni_unimplementedStringFromJNI
(JNIEnv *, jobject);
#ifdef __cplusplus
}
#endif
#endif
这样整个工程就算成功了,点击运行即可
################################################################################
NDK(The Native Development Kit :本地开发包)是一个工具集,允许你在Android应用中去利用C和C++代码。你可以利用它去构建自己的源代码或者利用现有的库
当你想要使用本地库中的某个函数时,你需要在java文件中声明,使用关键字native表示该实现是在本地库中:
public native int add(int x, int y);这就是一个本地函数声明
同时,在java文件上加上
static{
System.loadLibrary("hello-jni")
}
用于载入本地库,"hello-jni"是本地库的名字
然后在app->build.gradle中加入:
model {
android.ndk {
moduleName="hello-jni"
}
}
必须在app->src->main->jni路径下创建一个Android.mk配置文件,系统在运行时会查看这个文件
Android.mk文件包含了模块名(库名),被编译的源文件名,构建符号以及链接的库
一个Android.mk文件必须以下语句:
LOCAL_PATH := $(call my-dir)
Android.mk必须由该语句开始,这个变量表明了源文件在开发树上的位置。其中,宏函数my-dir由构建系统提供,返回当前目录路径,这个路径包含Android.mk文件本身,所以,如下:
LOCAL_PATH := $(call app/src/main/jni/Android.mk)可也运行,不过使用宏函数有助于开发
下一条语句声明了CLEAR_VARS变量,其值由系统提供:
include $(CLEAR_VARS)变量CLEAR_VARS指向一个指定的GNU Makefile,用于清除需要LOCAL_XXX类型的变量,比如LOCAL_MODULE, LOCAL_SRC_FILES, LOCAL_STATIC_LIBRARIES等,
不过该变量不会清除LOCAL_PATH。
必须使用这条语句,因为系统在运行过程中,会在一个单一的GNU构建环境下解析所有的构建控制文件,所以所有变量都是全局变量,你必须在每一个Module中声明该变量
变量LOCAL_MODULE声明了你想要去构建的Module的名字,在应用中每个Module声明一次:
LOCAL_MODULE := hello-jni
note:Module名不能重复并且没有空格
在构建系统中,当生成最终的共享库文件时,会自动加上lib前缀和.so后缀,例如,上述工程最后生成的共享库名为libhello-jni.so。但如果你的文件名是由lib开头的,那么并不会在添加lib前缀,只会加上.so扩展名
下一行为:
LOCAL_SRC_FILES := hello-jni.c在这里应该列出所有使用到的源文件名,用空格隔开,例如:
LOCAL_SRC_FILES := hello_jni.c hello.c hi.c
最后一行表示结束:
include ${BUILD_SHARED_LIBRARY}变量BUILD_SHARED_LINRARY指向一个GNU Makefile脚本,用于收集你定义的所有LOCAL_XXX的信息,决定构建社么以及如何构建。
以上这些语句就是Android.mk文件必须拥有的,总结如下
LOCAL_PATH := ${call my-dir}
include $(CLEAR_VARS)
LOCAL_MODULE := hello-jni
LOCAL_SRC_FILES := hello-jni.c
include $(BUILD_SHARED_LIBRARY)


 5972
5972


 被折叠的 条评论
为什么被折叠?
被折叠的 条评论
为什么被折叠?
 到【灌水乐园】发言


