


PS: 最近经常有朋友问我有没有用kubeadm搭建高可用集群的文档,说实在的我确实没有,我自己测试的话就用kubeadm单master版,公司用的话就用二进制搭建的。所以就找了个下班时间搭建测试了一番。希望对大家有帮助!如果觉得有用的话就帮忙点个关注或转发吧,哈哈~
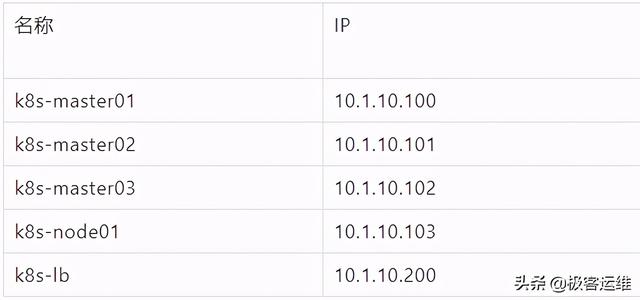
节点规划信息
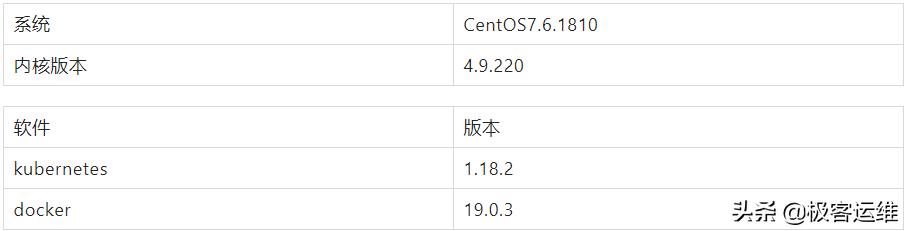
基础环境配置
环境信息
环境初始化
环境初始化 (1)、配置主机名,以k8s-master01为例
hostnamectl set-hostname k8s-master01(1)、配置主机hosts映射
10.1.10.100 k8s-master0110.1.10.101 k8s-master0210.1.10.102 k8s-master0310.1.10.103 k8s-node0110.1.10.200 k8s-lb配置完后可以通过如下命令测试
for host in k8s-master01 k8s-master02 k8s-master03 k8s-node01 k8s-lb;do ping -c 1 $host;done这里ping k8s-node01不通,是因为我们还没配置VIP
(2)、禁用防火墙
systemctl stop firewalldsystemctl disable firewalld
(3)、关闭selinux
setenforce 0sed -i "s/^SELINUX=.*/SELINUX=disabled/g" /etc/sysconfig/selinuxsed -i "s/^SELINUX=.*/SELINUX=disabled/g" /etc/selinux/config
(4)、关闭swap分区
swapoff -a && sysctl -w vm.swappiness=0(5)、时间同步
yum install chrony -ysystemctl enable chronydsystemctl start chronydchronyc sources(6)、配置ulimt
ulimit -SHn 65535(7)、配置内核参数
cat >> /etc/sysctl.d/k8s.conf <使之生效
sysctl -p(8)、master之间添加互信(按需)
ssh-keygenssh-copy-id 10.1.10.101ssh-copy-id 10.1.10.102内核升级
由于centos7.6的系统默认内核版本是3.10,3.10的内核有很多BUG,最常见的一个就是group memory leak。
(1)、下载所需要的内核版本,我这里采用rpm安装,所以直接下载的rpm包
wget https://cbs.centos.org/kojifiles/packages/kernel/4.9.220/37.el7/x86_64/kernel-4.9.220-37.el7.x86_64.rpm(2)、执行rpm升级即可
rpm -ivh kernel-4.9.220-37.el7.x86_64.rpm(3)、升级完reboot,然后查看内核是否成功升级
rebootuname -r组件安装
安装ipvs
(1)、安装ipvs需要的软件
由于我准备使用ipvs作为kube-proxy的代理模式,所以需要安装相应的软件包。
yum install ipvsadm ipset sysstat conntrack libseccomp -y(2)、加载模块
cat > /etc/sysconfig/modules/ipvs.modules <注意:在内核4.19版本nf_conntrack_ipv4已经改为nf_conntrack
配置重启自动加载
chmod 755 /etc/sysconfig/modules/ipvs.modules && bash /etc/sysconfig/modules/ipvs.modules && lsmod | grep -e ip_vs -e nf_conntrack安装docker-ce
# 安装需要的软件yum install -y yum-utils device-mapper-persistent-data lvm2# 添加yum源yum-config-manager --add-repo https://download.docker.com/linux/centos/docker-ce.repo查看是否有docker-ce包
# yum list | grep docker-cecontainerd.io.x86_64 1.2.13-3.1.el7 docker-ce-stabledocker-ce.x86_64 3:19.03.8-3.el7 docker-ce-stabledocker-ce-cli.x86_64 1:19.03.8-3.el7 docker-ce-stabledocker-ce-selinux.noarch 17.03.3.ce-1.el7 docker-ce-stable安装docker-ce
yum install docker-ce-19.03.8-3.el7 -ysystemctl start dockersystemctl enable docker配置镜像加速
curl -sSL https://get.daocloud.io/daotools/set_mirror.sh | sh -s http://f1361db2.m.daocloud.iosystemctl restart docker安装kubernetes组件
添加yum源
cat < /etc/yum.repos.d/kubernetes.repo[kubernetes]name=Kubernetesbaseurl=http://mirrors.aliyun.com/kubernetes/yum/repos/kubernetes-el7-x86_64enabled=1gpgcheck=0repo_gpgcheck=0gpgkey=http://mirrors.aliyun.com/kubernetes/yum/doc/yum-key.gpg http://mirrors.aliyun.com/kubernetes/yum/doc/rpm-package-key.gpgEOF安装软件
yum install -y kubelet-1.18.2-0 kubeadm-1.18.2-0 kubectl-1.18.2-0 --disableexcludes=kubernetes将kubelet设置为开机自启动
systemctl enable kubelet.service以上操作在所有节点执行
集群初始化
配置VIP
高可用采用的是HAProxy+Keepalived,HAProxy和KeepAlived以守护进程的方式在所有Master节点部署。
安装软件
yum install keepalived haproxy -y配置haproxy
所有master节点的配置相同,如下:
#---------------------------------------------------------------------# Global settings#---------------------------------------------------------------------global # to have these messages end up in /var/log/haproxy.log you will # need to: # # 1) configure syslog to accept network log events. This is done # by adding the '-r' option to the SYSLOGD_OPTIONS in # /etc/sysconfig/syslog # # 2) configure local2 events to go to the /var/log/haproxy.log # file. A line like the following can be added to # /etc/sysconfig/syslog # # local2.* /var/log/haproxy.log # log 127.0.0.1 local2 chroot /var/lib/haproxy pidfile /var/run/haproxy.pid maxconn 4000 user haproxy group haproxy daemon # turn on stats unix socket stats socket /var/lib/haproxy/stats#---------------------------------------------------------------------# common defaults that all the 'listen' and 'backend' sections will# use if not designated in their block#---------------------------------------------------------------------defaults mode http log global option httplog option dontlognull option http-server-close option redispatch retries 3 timeout http-request 10s timeout queue 1m timeout connect 10s timeout client 1m timeout server 1m timeout http-keep-alive 10s timeout check 10s maxconn 3000#---------------------------------------------------------------------# kubernetes apiserver frontend which proxys to the backends#---------------------------------------------------------------------frontend kubernetes mode tcp bind *:16443 option tcplog default_backend kubernetes-apiserver#---------------------------------------------------------------------# round robin balancing between the various backends#---------------------------------------------------------------------backend kubernetes-apiserver mode tcp balance roundrobin server k8s-master01 10.1.10.100:6443 check server k8s-master02 10.1.10.101:6443 check server k8s-master03 10.1.10.102:6443 check#---------------------------------------------------------------------# collection haproxy statistics message#---------------------------------------------------------------------listen stats bind *:9999 stats auth admin:P@ssW0rd stats refresh 5s stats realm HAProxy Statistics stats uri /admin?stats配置keepalived
k8s-master01
! Configuration File for keepalivedglobal_defs { notification_email { acassen@firewall.loc failover@firewall.loc sysadmin@firewall.loc } notification_email_from Alexandre.Cassen@firewall.loc smtp_server 192.168.200.1 smtp_connect_timeout 30 router_id LVS_DEVEL vrrp_skip_check_adv_addr vrrp_garp_interval 0 vrrp_gna_interval 0}# 定义脚本vrrp_script check_apiserver { script "/etc/keepalived/check_apiserver.sh" interval 2 weight -5 fall 3 rise 2 }vrrp_instance VI_1 { state MASTER interface eth33 virtual_router_id 51 priority 100 advert_int 1 authentication { auth_type PASS auth_pass 1111 } virtual_ipaddress { 10.1.10.200 } # 调用脚本 track_script { check_apiserver }}k8s-master02
! Configuration File for keepalivedglobal_defs { notification_email { acassen@firewall.loc failover@firewall.loc sysadmin@firewall.loc } notification_email_from Alexandre.Cassen@firewall.loc smtp_server 192.168.200.1 smtp_connect_timeout 30 router_id LVS_DEVEL vrrp_skip_check_adv_addr vrrp_garp_interval 0 vrrp_gna_interval 0}# 定义脚本vrrp_script check_apiserver { script "/etc/keepalived/check_apiserver.sh" interval 2 weight -5 fall 3 rise 2 }vrrp_instance VI_1 { state MASTER interface eth33 virtual_router_id 51 priority 99 advert_int 1 authentication { auth_type PASS auth_pass 1111 } virtual_ipaddress { 10.1.10.200 } # 调用脚本 track_script { check_apiserver }}k8s-master03
! Configuration File for keepalivedglobal_defs { notification_email { acassen@firewall.loc failover@firewall.loc sysadmin@firewall.loc } notification_email_from Alexandre.Cassen@firewall.loc smtp_server 192.168.200.1 smtp_connect_timeout 30 router_id LVS_DEVEL vrrp_skip_check_adv_addr vrrp_garp_interval 0 vrrp_gna_interval 0}# 定义脚本vrrp_script check_apiserver { script "/etc/keepalived/check_apiserver.sh" interval 2 weight -5 fall 3 rise 2 }vrrp_instance VI_1 { state MASTER interface ens33 virtual_router_id 51 priority 98 advert_int 1 authentication { auth_type PASS auth_pass 1111 } virtual_ipaddress { 10.1.10.200 } # 调用脚本 #track_script { # check_apiserver #}}先把健康检查关闭,等部署好了过后再打开
编写健康检测脚本check-apiserver.sh
#!/bin/bashfunction check_apiserver(){ for ((i=0;i<5;i++)) do apiserver_job_id=${pgrep kube-apiserver} if [[ ! -z ${apiserver_job_id} ]];then return else sleep 2 fi done apiserver_job_id=0}# 1->running 0->stoppedcheck_apiserverif [[ $apiserver_job_id -eq 0 ]];then /usr/bin/systemctl stop keepalived exit 1else exit 0fi启动haproxy和keepalived
systemctl enable --now keepalivedsystemctl enable --now haproxy部署master
(1)、在k8s-master01上,编写kubeadm.yaml配置文件,如下:
cat >> kubeadm.yaml <提前下载镜像
kubeadm config images pull --config kubeadm.yaml进行初始化,看到initialized successfully标识初始化成功。
kubeadm init --config kubeadm.yaml --upload-certs.......Your Kubernetes control-plane has initialized successfully!To start using your cluster, you need to run the following as a regular user: mkdir -p $HOME/.kube sudo cp -i /etc/kubernetes/admin.conf $HOME/.kube/config sudo chown $(id -u):$(id -g) $HOME/.kube/configYou should now deploy a pod network to the cluster.Run "kubectl apply -f [podnetwork].yaml" with one of the options listed at: https://kubernetes.io/docs/concepts/cluster-administration/addons/You can now join any number of the control-plane node running the following command on each as root: kubeadm join k8s-lb:16443 --token 3k4vr0.x3y2nc3ksfnei4y1 --discovery-token-ca-cert-hash sha256:a5f761f332bd45a199d0676875e7f58c323226df6fb9b4f0b977b6f63b252791 --control-plane --certificate-key f25e738324e4f027703f24b55d47d28f692b4edc21c2876171ff87877dc8f2efPlease note that the certificate-key gives access to cluster sensitive data, keep it secret!As a safeguard, uploaded-certs will be deleted in two hours; If necessary, you can use"kubeadm init phase upload-certs --upload-certs" to reload certs afterward.Then you can join any number of worker nodes by running the following on each as root:kubeadm join k8s-lb:16443 --token 3k4vr0.x3y2nc3ksfnei4y1 --discovery-token-ca-cert-hash sha256:a5f761f332bd45a199d0676875e7f58c323226df6fb9b4f0b977b6f63b252791 配置环境变量
cat >> /root/.bashrc <查看节点状态
# kubectl get nodesNAME STATUS ROLES AGE VERSIONk8s-master01 NotReady master 3m1s v1.18.2安装网络插件
wget https://docs.projectcalico.org/v3.8/manifests/calico.yaml如果有节点是多网卡,所以需要在资源清单文件中指定内网网卡
vi calico.yaml
......spec: containers: - env: - name: DATASTORE_TYPE value: kubernetes - name: IP_AUTODETECTION_METHOD # DaemonSet中添加该环境变量 value: interface=ens33 # 指定内网网卡 - name: WAIT_FOR_DATASTORE value: "true"......kubectl apply -f calico.yaml # 安装calico网络插件
当网络插件安装完成后,查看node节点信息如下:
# kubectl get nodesNAME STATUS ROLES AGE VERSIONk8s-master01 Ready master 10m v1.18.2可以看到状态已经从NotReady变为ready了。
(2)、将master02加入集群
提前下载镜像
kubeadm config images pull --config kubeadm.yaml加入集群
kubeadm join k8s-lb:16443 --token 3k4vr0.x3y2nc3ksfnei4y1 --discovery-token-ca-cert-hash sha256:a5f761f332bd45a199d0676875e7f58c323226df6fb9b4f0b977b6f63b252791 --control-plane --certificate-key f25e738324e4f027703f24b55d47d28f692b4edc21c2876171ff87877dc8f2ef输出如下:
...This node has joined the cluster and a new control plane instance was created:* Certificate signing request was sent to apiserver and approval was received.* The Kubelet was informed of the new secure connection details.* Control plane (master) label and taint were applied to the new node.* The Kubernetes control plane instances scaled up.* A new etcd member was added to the local/stacked etcd cluster.To start administering your cluster from this node, you need to run the following as a regular user: mkdir -p $HOME/.kube sudo cp -i /etc/kubernetes/admin.conf $HOME/.kube/config sudo chown $(id -u):$(id -g) $HOME/.kube/configRun 'kubectl get nodes' to see this node join the cluster....配置环境变量
cat >> /root/.bashrc <另一台的操作一样。
查看集群状态
# kubectl get nodes NAME STATUS ROLES AGE VERSIONk8s-master01 Ready master 41m v1.18.2k8s-master02 Ready master 29m v1.18.2k8s-master03 Ready master 27m v1.18.2查看集群组件状态
# kubectl get pod -n kube-system -o wideNAME READY STATUS RESTARTS AGE IP NODE NOMINATED NODE READINESS GATEScalico-kube-controllers-77c5fc8d7f-stl57 1/1 Running 0 26m 192.168.32.130 k8s-master01 calico-node-ppsph 1/1 Running 0 26m 10.1.10.100 k8s-master01 calico-node-tl6sq 0/1 Init:2/3 0 26m 10.1.10.101 k8s-master02 calico-node-w92qh 1/1 Running 0 26m 10.1.10.102 k8s-master03 coredns-546565776c-vtlhr 1/1 Running 0 42m 192.168.32.129 k8s-master01 coredns-546565776c-wz9bk 1/1 Running 0 42m 192.168.32.131 k8s-master01 etcd-k8s-master01 1/1 Running 0 42m 10.1.10.100 k8s-master01 etcd-k8s-master02 1/1 Running 0 30m 10.1.10.101 k8s-master02 etcd-k8s-master03 1/1 Running 0 28m 10.1.10.102 k8s-master03 kube-apiserver-k8s-master01 1/1 Running 0 42m 10.1.10.100 k8s-master01 kube-apiserver-k8s-master02 1/1 Running 0 30m 10.1.10.101 k8s-master02 kube-apiserver-k8s-master03 1/1 Running 0 28m 10.1.10.102 k8s-master03 kube-controller-manager-k8s-master01 1/1 Running 1 42m 10.1.10.100 k8s-master01 kube-controller-manager-k8s-master02 1/1 Running 1 30m 10.1.10.101 k8s-master02 kube-controller-manager-k8s-master03 1/1 Running 0 28m 10.1.10.102 k8s-master03 kube-proxy-6sbpp 1/1 Running 0 28m 10.1.10.102 k8s-master03 kube-proxy-dpppr 1/1 Running 0 42m 10.1.10.100 k8s-master01 kube-proxy-ln7l7 1/1 Running 0 30m 10.1.10.101 k8s-master02 kube-scheduler-k8s-master01 1/1 Running 1 42m 10.1.10.100 k8s-master01 kube-scheduler-k8s-master02 1/1 Running 1 30m 10.1.10.101 k8s-master02 kube-scheduler-k8s-master03 1/1 Running 0 28m 10.1.10.102 k8s-master03 查看CSR
kubectl get csrNAME AGE SIGNERNAME REQUESTOR CONDITIONcsr-cfl2w 42m kubernetes.io/kube-apiserver-client-kubelet system:node:k8s-master01 Approved,Issuedcsr-mm7g7 28m kubernetes.io/kube-apiserver-client-kubelet system:bootstrap:3k4vr0 Approved,Issuedcsr-qzn6r 30m kubernetes.io/kube-apiserver-client-kubelet system:bootstrap:3k4vr0 Approved,Issued部署node
node节点只需加入集群即可
kubeadm join k8s-lb:16443 --token 3k4vr0.x3y2nc3ksfnei4y1 --discovery-token-ca-cert-hash sha256:a5f761f332bd45a199d0676875e7f58c323226df6fb9b4f0b977b6f63b252791 输出日志如下:
W0509 23:24:12.159733 10635 join.go:346] [preflight] WARNING: JoinControlPane.controlPlane settings will be ignored when control-plane flag is not set.[preflight] Running pre-flight checks [WARNING IsDockerSystemdCheck]: detected "cgroupfs" as the Docker cgroup driver. The recommended driver is "systemd". Please follow the guide at https://kubernetes.io/docs/setup/cri/[preflight] Reading configuration from the cluster...[preflight] FYI: You can look at this config file with 'kubectl -n kube-system get cm kubeadm-config -oyaml'[kubelet-start] Downloading configuration for the kubelet from the "kubelet-config-1.18" ConfigMap in the kube-system namespace[kubelet-start] Writing kubelet configuration to file "/var/lib/kubelet/config.yaml"[kubelet-start] Writing kubelet environment file with flags to file "/var/lib/kubelet/kubeadm-flags.env"[kubelet-start] Starting the kubelet[kubelet-start] Waiting for the kubelet to perform the TLS Bootstrap...This node has joined the cluster:* Certificate signing request was sent to apiserver and a response was received.* The Kubelet was informed of the new secure connection details.Run 'kubectl get nodes' on the control-plane to see this node join the cluster.然后查看集群节点信息
# kubectl get nodes NAME STATUS ROLES AGE VERSIONk8s-master01 Ready master 47m v1.18.2k8s-master02 Ready master 35m v1.18.2k8s-master03 Ready master 32m v1.18.2k8s-node01 Ready node01 55s v1.18.2测试切换
关闭一台master主机,看集群是否可用。
关闭master01主机,然后查看整个集群。
# 模拟关掉keepalivedsystemctl stop keepalived# 然后查看集群是否可用[root@k8s-master03 ~]# kubectl get nodesNAME STATUS ROLES AGE VERSIONk8s-master01 Ready master 64m v1.18.2k8s-master02 Ready master 52m v1.18.2k8s-master03 Ready master 50m v1.18.2k8s-node01 Ready 18m v1.18.2[root@k8s-master03 ~]# kubectl get pod -n kube-systemNAME READY STATUS RESTARTS AGEcalico-kube-controllers-77c5fc8d7f-stl57 1/1 Running 0 49mcalico-node-8t5ft 1/1 Running 0 19mcalico-node-ppsph 1/1 Running 0 49mcalico-node-tl6sq 1/1 Running 0 49mcalico-node-w92qh 1/1 Running 0 49mcoredns-546565776c-vtlhr 1/1 Running 0 65mcoredns-546565776c-wz9bk 1/1 Running 0 65metcd-k8s-master01 1/1 Running 0 65metcd-k8s-master02 1/1 Running 0 53metcd-k8s-master03 1/1 Running 0 51mkube-apiserver-k8s-master01 1/1 Running 0 65mkube-apiserver-k8s-master02 1/1 Running 0 53mkube-apiserver-k8s-master03 1/1 Running 0 51mkube-controller-manager-k8s-master01 1/1 Running 2 65mkube-controller-manager-k8s-master02 1/1 Running 1 53mkube-controller-manager-k8s-master03 1/1 Running 0 51mkube-proxy-6sbpp 1/1 Running 0 51mkube-proxy-dpppr 1/1 Running 0 65mkube-proxy-ln7l7 1/1 Running 0 53mkube-proxy-r5ltk 1/1 Running 0 19mkube-scheduler-k8s-master01 1/1 Running 2 65mkube-scheduler-k8s-master02 1/1 Running 1 53mkube-scheduler-k8s-master03 1/1 Running 0 51m到此集群搭建完了,然后可以开启keepalived的检查脚本了。另外一些组件就自己自行安装。
安装自动补全命令
yum install -y bash-completionsource /usr/share/bash-completion/bash_completionsource > ~/.bashrc


 391
391


 被折叠的 条评论
为什么被折叠?
被折叠的 条评论
为什么被折叠?
 到【灌水乐园】发言


