


点击蓝字关注我们
BIO、NIO、AIO区别
BIO:Block IO 同步阻塞式 IO,在传统的java.io包下,它基于流模型实现(面向流的IO操作),提供了我们最熟知的一些IO功能,例如File 抽象、输入输出流等。BIO的交互方式是同步、阻塞的方式,即在读取输入流或者写入输出流时,在读、写动作完成之前,线程会一直阻塞在那里,它们之间的调用是可靠的线性顺序。
NIO:non-blocking IO 同步非阻塞 IO,是在JDK1.4中引入的NIO框架(java.nio包),可以看作是传统IO的升级,NIO支持面向缓冲区的、基于通道的IO操作。NIO提供了Selector、 Channel、Buffer 等新的抽象,可以构建多路复用的、同步非阻塞IO程序,提供了更接近操作系统底层的高性能数据操作方式。
AIO:Asynchronous IO 是NIO的升级,在JDK1.7中实现,也叫 NIO2,实现了异步非堵塞IO,异步IO的操作基于事件和回调机制。
NIO知识整理
NIO主要有三大核心部分:Selector(选择器)、Channel(通道)、Buffer(缓冲区);
NIO是面向缓冲区,面向块的编程,数据读取到一个稍后会处理的缓冲区,需要时可在缓冲区中前后移动,这就增加了处理过程中的灵活性,使用NIO可以提供非阻塞式的高伸缩性网络。
NIO与IO区别
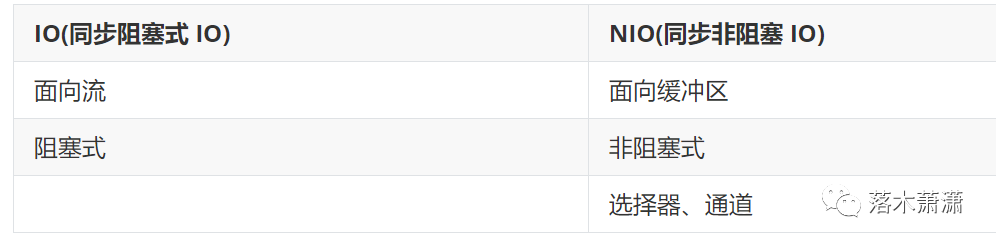
IO是面向流的,流是单向的,比如从文件(磁盘、网络)到程序的过程中使用的输入输出流都是单向的。
NIO是面向缓冲区的,NIO在文件(磁盘、网络)和程序之间建立通道(Channel),传输的数据通过缓冲区进行存取,缓冲区在通道中进行传递运输,例如火车与铁轨的关系,是双向的。
通道与缓冲区
通道表示打开到 IO 设备(例如:文件、套接字)的连接。若需要使用NIO系统,需要获取用于连接 IO 设备的通道以及用于容纳数据的缓冲区。然后操作缓冲区,对数据进行处理。
Channel 负责传输、连接, Buffer 负责数据存储、操作。
缓冲区(Buffer):一个用于特定基本数据类型的容器。它主要用于与 NIO 通道进行交互,数据是从通道读入缓冲区,从缓冲区写入通道中的。
缓冲区Buffer
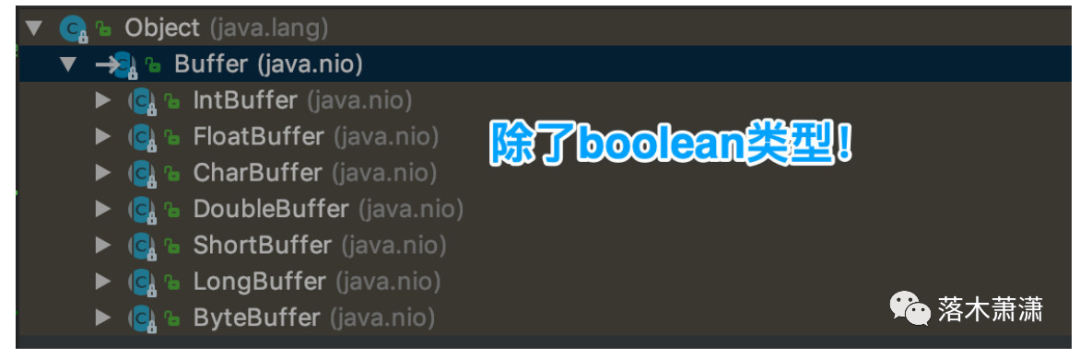
由java.nio包定义,所有缓冲区都是Buffer抽象类的子类。常用子类如下:
Buffer中的四个核心属性:
标记、位置、限制、容量遵守以下不变式:0 <= mark <= position <= limit <= capacity。
public abstract class Buffer { //标记 (mark)与重置 (reset):标记是一个索引,通过 Buffer 中的 mark() 方法指定 Buffer 中一个特定的 position,之后可以通过调用 reset() 方法恢复到这个 position。 private int mark = -1; //下一个要读取或写入的数据的索引。缓冲区的位置不能为负,并且不能大于其限制 private int position = 0; //限制 (limit):第一个不应该读取或写入的数据的索引,即位于 limit 后的数据不可读写。缓冲区的限制不能为负,并且不能大于其容量。 private int limit; //容量 (capacity) :表示 Buffer 最大数据容量,缓冲区容量不能为负,并且创建后不能更改。 private int capacity;}
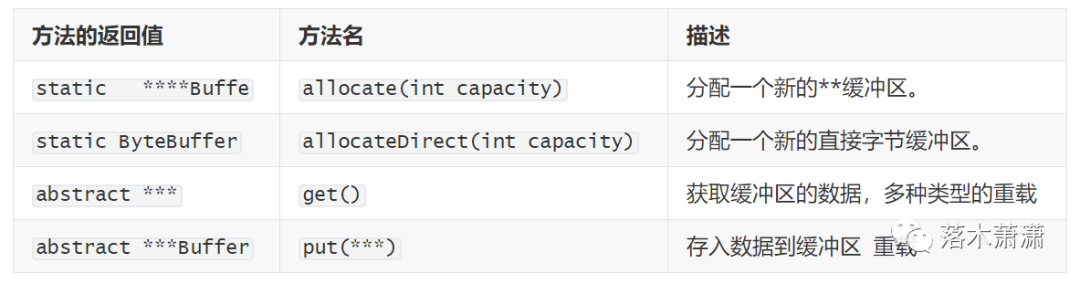
Buffer 的常用方法:

Buffer的子类常用方法,注意字节缓冲区中的直接缓冲区与非直接缓冲区的区别。
直接缓冲区可以通过allocateDirect()和FileChannel的map()方法来创建,返回值为MappedByteBuffer。
代码练习
@Testpublic void testBufer(){ String str = "Practice Buffer"; //1、创建一个字节缓冲区 分配大小为128 ByteBuffer byteBuffer = ByteBuffer.allocate(128); //2、核心属性 0 <= mark <= position <= limit <= capacity // 2.1拿到容量 System.out.println("容量为:"+byteBuffer.capacity()); // 2.2拿到限制 System.out.println("限制为:"+byteBuffer.limit()); // 2.3拿到位置 System.out.println("当前位置为:"+byteBuffer.position()); //3、put() 将数据写入缓冲区 byteBuffer.put(str.getBytes()); //4、flip() 切换读写模式 byteBuffer.flip(); //5、get() 读取数据 byte[] bytes = new byte[byteBuffer.limit()]; byteBuffer.get(bytes); System.out.println(new String(bytes,0,bytes.length)); //6、rewind() 可重复读 将位置设为为 0 byteBuffer.rewind(); //7、读两个位置的数据 byte[] dst = new byte[byteBuffer.limit()]; byteBuffer.get(dst, 0, 2); System.out.println(new String(dst, 0, 2)); //拿到位置和限制 System.out.println("当前位置为:"+byteBuffer.position()+",当前限制为"+byteBuffer.limit()); //8、核心属性标记 mark byteBuffer.mark(); //9、在读两个字节的数据 byteBuffer.get(dst,2,2); //拿到位置和限制 System.out.println("当前位置为:"+byteBuffer.position()+",当前限制为"+byteBuffer.limit()); //10、reset() 恢复到 标记mark位置 byteBuffer.reset(); //拿到位置和限制 System.out.println("当前位置为:"+byteBuffer.position()+",当前限制为"+byteBuffer.limit()); //11、hasRemaining() 判断缓冲区是否还有元素 if(byteBuffer.hasRemaining()){ //12、可以操作的数量 返回 position 和 limit 之间的元素个数 System.out.println(byteBuffer.remaining()); } //取消设置的 mark byteBuffer.rewind(); //13、clear(); 清空缓冲区 但是缓冲区中数据仍然存在 byteBuffer.clear(); System.out.println((char)byteBuffer.get()); //14、分配直接缓冲区 ByteBuffer buf = ByteBuffer.allocateDirect(1024); //判断字节缓冲区是直接还是非直接 System.out.println(buf.isDirect());}通道(Channel)
在java.nio.channels包中定义,它表示 IO 源与目标打开的连接。可以将其类比于传统的“流”。但Channel本身不能直接访问数据, 它只能与Buffer进行交互。
获取通道:
可以对支持通道的对象调用getChannel()方法。支持通道的类有:本地IO为FileInputStream、FileOutputStream、RandomAccessFile,网络IO为DatagramSocket、Socket、 ServerSocket;
在NIO2中,通过通道的静态方法 open() 打开并返回指定通道;
在NIO2中,使用Files类的静态方法newByteChannel()获取字节通道。
/** * 1、FileChannel 的open()方法 作用打开或创建文件,返回文件通道以访问该文件。 * 2、参数:path - 打开或创建文件的路径 options - 指定文件打开方式的选项 * 3、OpenOption 使用StandardOpenOption枚举类指定 * APPEND:如果文件打开 WRITE访问,则字节将被写入文件的末尾而不是开头。 * CREATE:创建一个新文件(如果不存在)。 * CREATE_NEW:创建一个新的文件,如果该文件已经存在失败。 * DELETE_ON_CLOSE:关闭时删除。 * DSYNC:要求将文件内容的每次更新都与底层存储设备同步写入。 * READ:打开阅读权限。 * SPARSE:稀疏文件 * SYNC:要求将文件内容或元数据的每次更新都同步写入底层存储设备。 * TRUNCATE_EXISTING:如果文件已经存在,并且打开 WRITE访问,则其长度将截断为0。 * WRITE:打开以进行写入。 */public static FileChannel open(Path path, OpenOption... options) throws IOException{ Set<OpenOption> set = new HashSet<OpenOption>(options.length); Collections.addAll(set, options); return open(path, set, NO_ATTRIBUTES);}可以利用通道完成整个数据传输,不使用缓冲区,使用通道的transferFrom()和transferTo()方法。
通道的分散(Scatter)和聚集(Gather):
分散读取(Scattering Reads)是指从Channel中读取的数据“分散”到多个 Buffer中。
聚集写入(Gathering Writes)是指将多个Buffer中的数据“聚集”到 Channel。
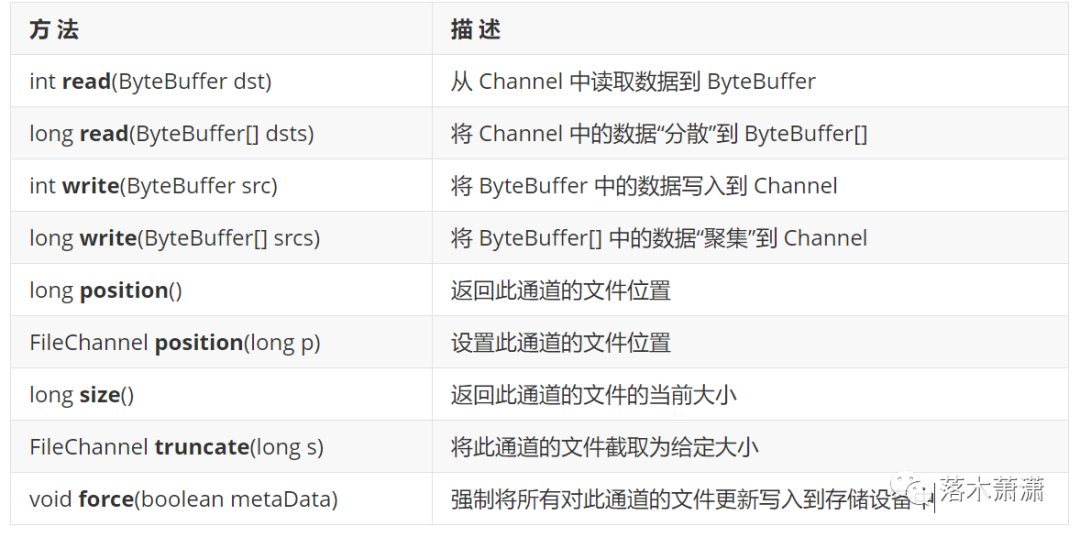
通道的常用方法:
代码练习
//为了简化 未做异常处理@Testpublic void testChannel() throws IOException { //一、使用非直接缓冲区完成文件复制 //1、创建文件输入流 FileInputStream fileInputStream = new FileInputStream("爱情与友情.jpg"); //2、创建文件输出流 FileOutputStream fileOutputStream = new FileOutputStream("爱情与友情6.jpg"); //3、fileInputStream 与 fileOutputStream 支持通道 获取通道 FileChannel inputStreamChannel = fileInputStream.getChannel(); FileChannel outputStreamChannel = fileOutputStream.getChannel(); //4、分配缓冲区 ByteBuffer byteBuffer = ByteBuffer.allocate(1024); //5、将通道中数据存入缓冲区 while (inputStreamChannel.read(byteBuffer)!=-1){ //6、切换读写模式 byteBuffer.flip(); //7、将数据写入到通道中 outputStreamChannel.write(byteBuffer); //8、清空缓冲区 byteBuffer.clear(); }//*********************************************************************************// //二、使用直接缓冲区完成文件复制 通道的静态方法 open() 打开并返回指定通道 //1、创建通道 FileChannel inChannle = FileChannel.open(Paths.get("爱情与友情.jpg"), StandardOpenOption.READ); FileChannel outChannle = FileChannel.open(Paths.get("爱情与友情7.jpg"), StandardOpenOption.READ,StandardOpenOption.WRITE,StandardOpenOption.CREATE); //2、直接缓冲区,内存映射文件 // 此频道文件的区域直接映射到内存中。只读:READ_ONLY 读写:READ_WRITE 私有:PRIVATE MappedByteBuffer inMappedByteBuffer = inChannle.map(FileChannel.MapMode.READ_ONLY, 0, inChannle.size()); MappedByteBuffer outMappedByteBuffer = outChannle.map(FileChannel.MapMode.READ_WRITE, 0, inChannle.size()); byte[] bytes = new byte[inMappedByteBuffer.limit()]; inMappedByteBuffer.get(bytes); outMappedByteBuffer.put(bytes); inChannle.close(); outChannle.close(); //*********************************************************************************// //三、通道之间的数据传输 FileChannel inChannle1 = FileChannel.open(Paths.get("爱情与友情.jpg"), StandardOpenOption.READ); FileChannel outChannle1 = FileChannel.open(Paths.get("爱情与友情8.jpg"), StandardOpenOption.READ,StandardOpenOption.WRITE,StandardOpenOption.CREATE); //inChannle1.transferTo(0,inChannle.size(),outChannle1); outChannle1.transferFrom(inChannle1,0,inChannle1.size()); inChannle1.close(); outChannle1.close();//*********************************************************************************// //四、分散和聚集 //四-1 分散读取 //1、创建一个随机存取文件流 RandomAccessFile randomAccessFile = new RandomAccessFile("hello1.txt", "rw"); //2、获取通道 FileChannel channel = randomAccessFile.getChannel(); //3、获取缓冲区 ByteBuffer byteBuffer1 = ByteBuffer.allocate(10); ByteBuffer byteBuffer2 = ByteBuffer.allocate(100); //4、分散读取 ByteBuffer[] byteBuffers = {byteBuffer1,byteBuffer2}; //5、将通道中数据分散到buffer中 channel.read(byteBuffers); for (ByteBuffer byteBuffer3 : byteBuffers) { //6、读写切换 byteBuffer3.flip(); } //7、查看结果 System.out.println(new String(byteBuffers[0].array(), 0, byteBuffers[0].limit())); System.out.println("==================================="); System.out.println(new String(byteBuffers[1].array(), 0, byteBuffers[1].limit())); //四-2 聚集写入 RandomAccessFile raf2 = new RandomAccessFile("hello5.txt", "rw"); FileChannel channel2 = raf2.getChannel(); channel2.write(byteBuffers);}选择器
传统的阻塞IO方式在数据被读取或写入时,该线程在此期间不能执行其他任务。而NIO的非阻塞方式在没有数据可用时,该线程可以进行其他任务。线程通常将非阻塞 IO 的空闲时间用于在其他通道上执行 IO 操作,所以单独的线程可以管理多个输入和输出通道。
选择器Selector会不断地轮询注册在其上的Channel,如果某个Channel上面有新的TCP连接接入、读、写以及接收事件,这个Channel就处于就绪状态,会被Selector轮询出来,然后通过SelectionKey可以获取就绪Channel的集合,进行后续的I/O操作。也就是说选择器监控这些通道的IO状况(连接接入、读、写以及接收事件)。
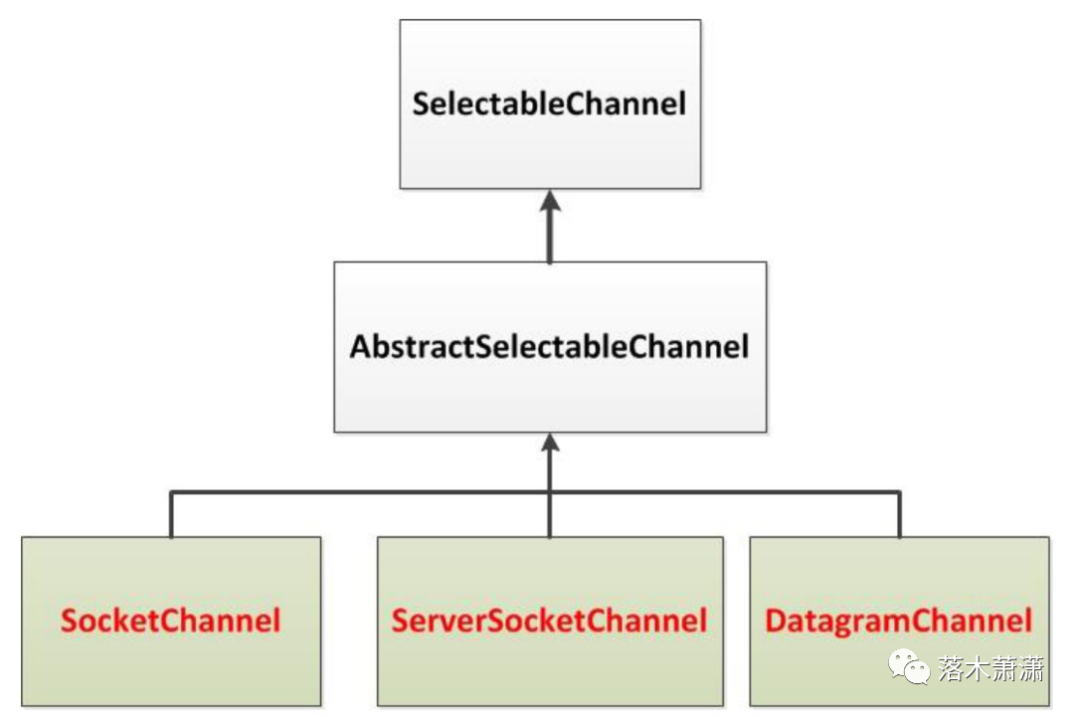
选择器(Selector)是SelectableChannle 对象的多路复用器,Selector 可以同时监控多个SelectableChannel的IO状况,也就是说,利用 Selector可使一个单独的线程管理多个Channel。Selector是非阻塞IO的核心。
SelectableChannle是可通过Selector复用的通道,它是所有支持就绪检查的通道类的父类,提供了实现通道的可选择性所需要的公共方法。注意:FileChannel类没有继承SelectableChannel因此不是可选通道。
选择键(SelectionKey):选择键封装了特定的通道SelectableChannel与特定的选择器Selector的注册关系。选择键对象被SelectableChannel.register()返回并提供一个表示这种注册关系的标记。
注册方法详解,第二个参数可以理解为选择器对通道的监听事件。多个监听事件时可以使用位或‘|’连接。
//sel - 要注册该频道的选择器 ops - 为结果键设置的兴趣//SelectionKey中有四个事件:OP_CONNECT、OP_ACCEPT、OP_READ、OP_WRITEpublic final SelectionKey register(Selector sel, int ops) throws ClosedChannelException代码实例。
阻塞式IO
//阻塞式IO@Testpublic void testClient1() throws IOException { //1、获取通道 SocketChannel socketChannel = SocketChannel.open(new InetSocketAddress("127.0.0.1", 9999)); //2、获取文件通道 FileChannel fileChannel = FileChannel.open(Paths.get("爱情与友情.jpg"), StandardOpenOption.READ); //3、创建缓冲区 ByteBuffer byteBuffer = ByteBuffer.allocate(1024); //4、读取本地文件,发送到服务器 while (fileChannel.read(byteBuffer) != -1){ byteBuffer.flip(); socketChannel.write(byteBuffer); byteBuffer.clear(); } //5、关闭连接以进行写入,而不关闭通道。 socketChannel.shutdownOutput(); //6、接收服务器的反馈 int len = 0; while ((len = socketChannel.read(byteBuffer)) != -1){ //7、读写切换 byteBuffer.flip(); System.out.println(new String(byteBuffer.array(),0,len)); //8、清除缓存 byteBuffer.clear(); } //9、关闭通道 socketChannel.close(); fileChannel.close();;}@Testpublic void testServer1() throws IOException { //1、获取通道 ServerSocketChannel serverSocketChannel = ServerSocketChannel.open(); //2、打开文件通道 FileChannel fileChannel = FileChannel.open(Paths.get("爱情与友情9.jpg"), StandardOpenOption.WRITE, StandardOpenOption.CREATE); //3、将通道的套接字绑定到本地地址,并配置套接字以监听连接。 serverSocketChannel.bind(new InetSocketAddress(9999)); //4、接收客户端的连接 SocketChannel socketChannel = serverSocketChannel.accept(); //5、创建缓冲区 ByteBuffer byteBuffer = ByteBuffer.allocate(1024); //6、读取数据并写入 while(socketChannel.read(byteBuffer) != -1){ byteBuffer.flip(); fileChannel.write(byteBuffer); byteBuffer.clear(); } //7、发送数据到客户端 byteBuffer.put("我是服务端,我已经成功接收到数据".getBytes()); byteBuffer.flip(); //8、将数据写入到通道 socketChannel.write(byteBuffer); //9、关闭通道 socketChannel.close(); fileChannel.close(); serverSocketChannel.close();}-
非阻塞式IO
//非阻塞式IO@Testpublic void testclient2() throws IOException { //1、获取通道 SocketChannel socketChannel = SocketChannel.open(new InetSocketAddress("127.0.0.1", 8888)); //2、切换非阻塞模式 socketChannel.configureBlocking(false); //3、分配缓冲区 ByteBuffer byteBuffer = ByteBuffer.allocate(1024); //4、发送数据给服务端 byteBuffer.put(("客户端传送时间数据:" + new Date()).getBytes()); byteBuffer.flip(); socketChannel.write(byteBuffer); byteBuffer.clear(); //5、关闭通道 socketChannel.close();}@Testpublic void testServer2() throws IOException { //1. 获取通道 ServerSocketChannel serverSocketChannel = ServerSocketChannel.open(); //2. 切换非阻塞模式 serverSocketChannel.configureBlocking(false); //3. 绑定连接 serverSocketChannel.bind(new InetSocketAddress(8888)); //4. 获取选择器 Selector selector = Selector.open(); //5. 将通道注册到选择器上, 并且指定“监听接收事件” serverSocketChannel.register(selector, SelectionKey.OP_ACCEPT); //6. 轮询式的获取选择器上已经“准备就绪”的事件 while (selector.select()>0){ //7. 获取当前选择器中所有注册的“选择键(已就绪的监听事件)” Iterator iterator = selector.selectedKeys().iterator(); while (iterator.hasNext()){ //8. 获取准备“就绪”的事件 SelectionKey selectionKey = iterator.next(); //9. 判断具体是什么事件准备就绪 if(selectionKey.isAcceptable()){ //10. 若“接收就绪”,获取客户端连接 SocketChannel socketChannel = serverSocketChannel.accept(); //11. 切换非阻塞模式 socketChannel.configureBlocking(false); //12. 将该通道注册到选择器上 socketChannel.register(selector,SelectionKey.OP_READ); } else if(selectionKey.isReadable()){ //13. 获取当前选择器上“读就绪”状态的通道 SocketChannel socketChannel = (SocketChannel) selectionKey.channel(); //14. 创建缓冲区 读取数据 ByteBuffer byteBuffer = ByteBuffer.allocate(1024); int len = 0; while ((len = socketChannel.read(byteBuffer))>0){ byteBuffer.flip(); System.out.println(new String(byteBuffer.array(),0,len)); byteBuffer.clear(); } } //15. 取消选择键 SelectionKey iterator.remove(); } }}NIO2知识整理
新增Path接口,Paths工具类,Files工具类。这些接口和工具类对NIO中的功能进行了高度封装,大大简化了文件系统的IO编程。
java.nio.file.Path接口代表一个平台无关的平台路径,描述了目录结构中文件的位置。
java.nio.file.Paths仅由静态方法组成,通过转换路径字符串返回Path或URI 。
java.nio.file.Files用于操作文件或目录的工具类。

# java高级之泛型② # java高级之IO流① #
# 集合源码分析③ # java高级之泛型① #
# java高级之集合① # java高级之集合② #
# java高级之注解 # 设计模式之单例模式 #
# java高级之反射① # java高级之反射② #
# java高级之多线程 # java高级之枚举 #
END
博客园地址 : https://www.cnblogs.com/manongxiao

落木萧潇公众号
文 | 言 熙
编辑 | PeNg.Fall

球分享
球点赞
球在看


 2428
2428


 被折叠的 条评论
为什么被折叠?
被折叠的 条评论
为什么被折叠?
 到【灌水乐园】发言


