


1. 前言
原文发布在语雀:
<Vue 源码笔记系列6>计算属性 computed 的实现 · 语雀www.yuque.com
上一章我们已经学习过 watch,这一章就来看一下计算属性 computed 的实现。
2. 流程图
老规矩,先上图。
但是本期的流程图比较简略,因为 computed 的实现很大程度上依赖了之前我们讲的数据响应式原理的部分,这部分代码主要是桥梁的作用。而数据响应式我们花了三章来讲,所以这里的流程图就不再包含重复的内容了。
不过也不用担心,代码讲解完毕后我们会根据一个小的示例来详细说明每一部分是如何工作的,在那里我们会附上针对性的讲解图,新的讲解图将会覆盖到之前以讲过的内容。但是仍然建议不熟悉前三章的同学先回顾一下,因为他们是基础中的基础。
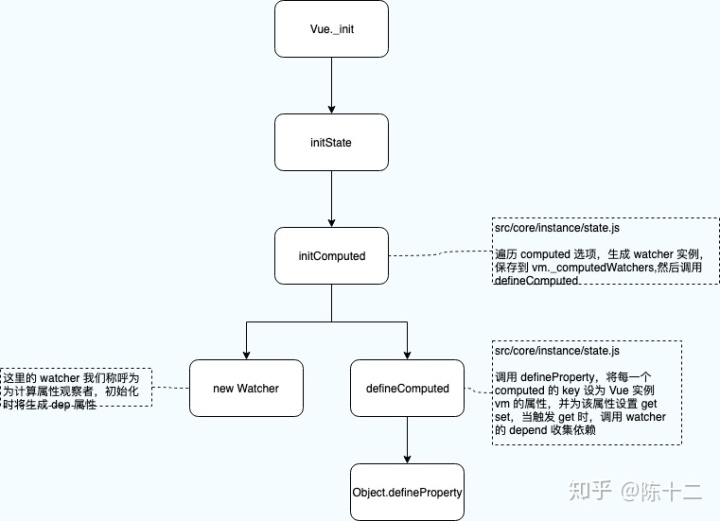
3. computed 初始化
仍然从 initState 讲起:
// src/core/instance/state.js

export function initState (vm: Component) {
  vm._watchers = []
  const opts = vm.$options
  if (opts.props) initProps(vm, opts.props)
  if (opts.methods) initMethods(vm, opts.methods)
  if (opts.data) {
    initData(vm)
  } else {
    observe(vm._data = {}, true /* asRootData */)
  }
  if (opts.computed) initComputed(vm, opts.computed)
  if (opts.watch && opts.watch !== nativeWatch) {
    initWatch(vm, opts.watch)
  }
}
可以大致看到,initState 的作用是初始化 Prop、 Methods、Data、Computed、Watch。并且是按照顺序此顺序进行初始化工作的。
前边我们已经了解过 initData 和 initWatch 了,本期我们来看看 initComputed,剩下的内容放在后边的章节。
if (opts.computed) initComputed(vm, opts.computed)
如果传入了 computed 选项,调用 initComputed,并将 Vue 实例 vm,以及 computed 选项作为参数。
3.1 initComputed
// src/core/instance/state.js

function initComputed (vm: Component, computed: Object) {
  // $flow-disable-line
  const watchers = vm._computedWatchers = Object.create(null)
  // computed properties are just getters during SSR
  const isSSR = isServerRendering()

  for (const key in computed) {
    const userDef = computed[key]
    const getter = typeof userDef === 'function' ? userDef : userDef.get
    if (process.env.NODE_ENV !== 'production' && getter == null) {
      warn(
        `Getter is missing for computed property "${key}".`,
        vm
      )
    }

    if (!isSSR) {
      // create internal watcher for the computed property.
      watchers[key] = new Watcher(
        vm,
        getter || noop,
        noop,
        computedWatcherOptions
      )
    }

    // component-defined computed properties are already defined on the
    // component prototype. We only need to define computed properties defined
    // at instantiation here.
    if (!(key in vm)) {
      defineComputed(vm, key, userDef)
    } else if (process.env.NODE_ENV !== 'production') {
      if (key in vm.$data) {
        warn(`The computed property "${key}" is already defined in data.`, vm)
      } else if (vm.$options.props && key in vm.$options.props) {
        warn(`The computed property "${key}" is already defined as a prop.`, vm)
      }
    }
  }
}
第 5 行:
const watchers = vm._computedWatchers = Object.create(null)
首先声明变量 watchers,赋值为 vm._computedWatchers,并且初始化值为空对象。
接下来是遍历 computed:
for (const key in computed) {
  //...
}
来看一下遍历 computed 时做了什么事:
第 10 到 17 行:
const userDef = computed[key]
const getter = typeof userDef === 'function' ? userDef : userDef.get
if (process.env.NODE_ENV !== 'production' && getter == null) {
  warn(
    `Getter is missing for computed property "${key}".`,
    vm
  )
}
声明 userDef 为 computed 当次遍历的键值。
如果 userDef 为函数则将其值赋给 getter,否则 getter 值为 userDef.get。
然后在开发环境下,getter 如果为 null 打印警告。
如此我们就可以理解 computed 的两种写法了:
computed: {
    compA: function() { return this.a + 1 },
  compB: {
    get: function() { return this.b + 1 },
  }
}
19 到 27 行:
if (!isSSR) {
  // create internal watcher for the computed property.
  watchers[key] = new Watcher(
    vm,
    getter || noop,
    noop,
    computedWatcherOptions
  )
}
非服务端渲染的情况下:
针对当次循环的 computed,调用 new Watcher。watchers 保存了 vm._computedWatchers 的引用,所以这里同样会将该 watcher 保存到 vm._computedWatchers。所以我们可以知道,每一个 computed 的 key,都会生成一个 watcher 实例,并且保存到 vm._computedWatchers 这个对象上。
new Watcher 做的事情,我们在依赖收集的章节已经详细介绍过:
与之前渲染函数的观察者不太相同的地方是在 Watcher 构造函数的最后一部分:
// src/core/observer/watcher.js

if (this.computed) {
  this.value = undefined
  this.dep = new Dep()
} else {
  this.value = this.get()
}
我们这里的 watcher 实例称为计算属性观察者,this.computed 为 true,所以在初始化阶段并没有触发 this.get,另外我们还为 watcher 添加了 dep 属性。这两点区别是非常重要的。
生成渲染函数观察者之后,initComputed 剩下的代码如下:
if (!(key in vm)) {
  defineComputed(vm, key, userDef)
} else if (process.env.NODE_ENV !== 'production') {
  if (key in vm.$data) {
    warn(`The computed property "${key}" is already defined in data.`, vm)
  } else if (vm.$options.props && key in vm.$options.props) {
    warn(`The computed property "${key}" is already defined as a prop.`, vm)
  }
}
if 语句用来检测 computed 的命名是否与 data,props 冲突,在非生产环境将会打印警告信息。
不冲突时,调用 defineComputed 方法。
3.2 defineComputed
// src/core/instance/state.js
const sharedPropertyDefinition = {
  enumerable: true,
  configurable: true,
  get: noop,
  set: noop
}

export function defineComputed (
  target: any,
  key: string,
  userDef: Object | Function
) {
  const shouldCache = !isServerRendering()
  if (typeof userDef === 'function') {
    sharedPropertyDefinition.get = shouldCache
      ? createComputedGetter(key)
      : userDef
    sharedPropertyDefinition.set = noop
  } else {
    sharedPropertyDefinition.get = userDef.get
      ? shouldCache && userDef.cache !== false
        ? createComputedGetter(key)
        : userDef.get
      : noop
    sharedPropertyDefinition.set = userDef.set
      ? userDef.set
      : noop
  }
  if (process.env.NODE_ENV !== 'production' &&
      sharedPropertyDefinition.set === noop) {
    sharedPropertyDefinition.set = function () {
      warn(
        `Computed property "${key}" was assigned to but it has no setter.`,
        this
      )
    }
  }
  Object.defineProperty(target, key, sharedPropertyDefinition)
}
代码比较简单,主要是为 sharedPropertyDefinition 添加 get, set 属性,值为 computed 选项相关。最后将该 computed 属性添加到 Vue 实例 vm 上,并使用 sharedPropertyDefinition 作为设置项。
其中 get 部分涉及到一个方法:
function createComputedGetter (key) {
  return function computedGetter () {
    const watcher = this._computedWatchers && this._computedWatchers[key]
    if (watcher) {
      watcher.depend()
      return watcher.evaluate()
    }
  }
}
在这里我们只需要知道 get 被设置为这个方法的返回值就行,具体的执行过程我们在触发阶段详细讲。
4. computed 依赖收集的触发与更新
初始化完毕后我们的准备工作就完成了,那么Vue 是如何收集到依赖,又是如何在 data 变化时更新的呢。为了更好地理解,我们用一个示例来具体讲解。
有如下 data 与 computed:
data () {
  return {
    a: 1
  }
},
computed: {
  compA () {
    return this.a + 1
  }
}
以及如下模板:
<div>{{ compA }}</div>在依赖收集的触发中,我们讲解过 data 触发依赖收集的过程相关代码。
我们依然从 $mount 讲起,$mount 实际是调用 mountComponent, 在 mountComponent 中执行 new Watcher,这个 watcher 为渲染函数的观察者即 renderWatcher。代码如下:
// src/core/instance/lifecycle.js

export function mountComponent () {
    // ...
    updateComponent = () => {
    vm._update(vm._render(), hydrating)
  }
    // ...
    new Watcher(vm, updateComponent, noop, {
    before () {
      if (vm._isMounted) {
        callHook(vm, 'beforeUpdate')
      }
    }
  }, true /* isRenderWatcher */)
}
我们进入 Watcher 中看一下:
// src/core/observer/watcher.js

export default class Watcher {
  // ...
  constructor () {
    // ...
    if (this.computed) {
      this.value = undefined
      this.dep = new Dep()
    } else {
      this.value = this.get()
    }
  }
  get () {
    pushTarget(this)
    // ...
    value = this.getter.call(vm, vm)
    // ...
    return value
  }
}
因为这里是渲染函数的观察者,所以会执行 this.get,在 get 中我们执行了 pushTarget:
export function pushTarget (_target: ?Watcher) {
  if (Dep.target) targetStack.push(Dep.target)
  Dep.target = _target
}
所以此时全局变量 Dep.target 值为渲染函数观察者 renderWatcher。
this.get 也执行了 this.getter,该方法将生成 VNode,经过 patch 再渲染成真实 DOM,所以这里会读取模板中的值 compA,触发我们在computed初始化阶段为其设置的 get 拦截器。我们知道拦截器代码如下:
function computedGetter () {
  const watcher = this._computedWatchers && this._computedWatchers[key]
  if (watcher) {
    watcher.depend()
    return watcher.evaluate()
  }
}
先从 vm._computedWatchers 找到 compA 的计算属性观察者 computedWatcher。
接着调用 computedWatcher 的 depend 方法。
// src/core/observer/watcher.js

/**
 * Depend on this watcher. Only for computed property watchers.
 */
depend () {
  if (this.dep && Dep.target) {
    this.dep.depend()
  }
}
注释已经告诉我们这个方法是专为 computed 设计的。
前边我们讲到过 computedWatcher 的独特之处在于没有调用 this.get, 为自己添加了 this.dep 属性。这里调用了 this.dep.depend:
// src/core/observer/dep.js

depend () {
  if (Dep.target) {
    Dep.target.addDep(this)
  }
}
还记得之前的加粗提示文字吗,我们说 此时全局变量 Dep.target 值为渲染函数观察者 renderWatcher,所以这里 renderWatcher 收集了这个 dep。考虑下为什么 computedWatcher 初始化时不调用 this.get 吗,原因之一就是,调用 this.get 会改变 Dep.target 的值。
// src/core/observer/watcher.js

addDep (dep: Dep) {
    // ...
  dep.addSub(this)
}
需要注意的是这里的 dep 为 computedWatcher的 dep 属性
// src/core/observer/dep.js

addSub (sub: Watcher) {
  this.subs.push(sub)
}
执行完毕后,computedWatcher 的 dep.subs 包含了 renderWatcher。这就建立了 compA 与渲染函数的桥梁。
到这里我们为 vm.compA 设置的 get 拦截器还没完呢,下边还有一句 return watcher.evaluate(),看一下 evaluate:
// src/core/observer/watcher.js

evaluate () {
  if (this.dirty) {
    this.value = this.get()
    this.dirty = false
  }
  return this.value
}
this.dirty 标志是否还没有求值,因为 computed 是惰性求值所以有此判断。
我们在这里才调用了 this.get, 在 get 执行中将 Dep.target 设置为 computedWatcher,然后执行 this.getter,这里对应为:
function () {
  return this.a + 1
}
这里我们使用了 this.a , 触发了其 get 拦截器(前三章有讲):
get: function reactiveGetter () {
  const value = getter ? getter.call(obj) : val
  if (Dep.target) {
    dep.depend()
    if (childOb) {
      childOb.dep.depend()
      if (Array.isArray(value)) {
        dependArray(value)
      }
    }
  }
  return value
}
可以知道在 a 的 dep.subs 中保存了此时的 computedWatcher,这就建立了 compA 与 a 的联系。
综上,我们可以知道 Vue 在 compA 与 a 与 renderWatcher 之间建立了联系,如下图:
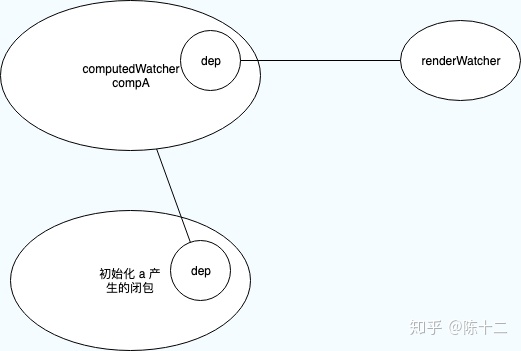
a 的闭包 dep.subs 包含了 compA 对应的 computedWatcher, computedWatcher 的 dep.subs 包含了 renderWatcher。
5. data 改变触发 computed 的改变
接着上边的示例,当 a 改变时, 如:
this.a = 2
改变 a 将触发其 set 拦截器:
// src/core/observer/index.js
set: function reactiveSetter (newVal) {
  // ...
  dep.notify()
}
dep.notify:
notify () {
  // stabilize the subscriber list first
  const subs = this.subs.slice()
  for (let i = 0, l = subs.length; i < l; i++) {
    subs[i].update()
  }
}
我们知道 a 闭包的 dep.subs 包含了 compA 的 computedWatcher。这里就会调用computedWatcher的 update 方法:
update () {
  if (this.computed) {
    if (this.dep.subs.length === 0) {
      this.dirty = true
    } else {
      this.getAndInvoke(() => {
        this.dep.notify()
      })
    }
  } else if (this.sync) {
    this.run()
  } else {
    queueWatcher(this)
  }
}
computedWatcher 的 computed 属性为 true。
判断 computedWatcher.subs 长度不为 0 时,调用 getAndInvoke,这个函数将会判断值是否变化,当compA 的新旧值不同时,执行回调 this.dep.notify。
computedWatcher.dep 包含了 renderWatcher,notify 将调用 renderWatcher 的 update 方法。最终将renderWatcher 加入异步队列,在合适的时机执行,最终更新DOM。
6. 总结
computed 的初始化工作就是在 computed 与 data、renderWatcher 之间建立联系。核心仍然是响应式那一套。得益于良好的设计,这部分代码并不复杂。
关于 initState 函数,我们还剩下 initProps 与 initMethods 没有介绍,别着急,下一章就是了。


 389
389

 被折叠的 条评论
为什么被折叠?
被折叠的 条评论
为什么被折叠?
 到【灌水乐园】发言


