


本文首发于简书,为同一作者
最近开始使用 RSS 这种信息聚合神器,再也不要打开各种 App 了。然而对于像微博、bilibili 这些不提供 RSS 订阅的网站还是有些头疼。于是尝试了 RSSHub 这个东西,发现官方文档中的示例服务在一些反爬很严格的网站上有时会失效,就考虑自己搭建一个。
一、安装 Docker
1. 从官方 Docker 存储库安装 Docker
参考 如何在 Ubuntu 上安装使用 Docker - 云+社区 - 腾讯云 代码如下:
$ sudo apt install apt-transport-https ca-certificates curl software-properties-common
$ curl -fsSL https://download.docker.com/linux/ubuntu/gpg | sudo apt-key add -
$ sudo add-apt-repository "deb [arch=amd64] https://download.docker.com/linux/ubuntu bionic stable"
$ sudo apt update
$ apt-cache policy docker-ce -y
$ sudo apt install docker-ce -y
查看Docker的运行状态:
$ sudo systemctl status docker输出应类似如下:
docker.service - Docker Application Container Engine
   Loaded: loaded (/lib/systemd/system/docker.service; enabled; vendor preset: enabled)
   Active: active (running) since Thu 2018-07-05 15:08:39 UTC; 2min 55s ago
     Docs: https://docs.docker.com
 Main PID: 10096 (dockerd)
    Tasks: 16
   CGroup: /system.slice/docker.service
           ├─10096 /usr/bin/dockerd -H fd://
           └─10113 docker-containerd --config /var/run/docker/containerd/containerd.toml
二、部署 RSSHub
1. 安装
参考 部署 | RSSHub 运行下面的命令下载 RSSHub 镜像.
$ docker pull diygod/rsshub然后运行 RSSHub 即可
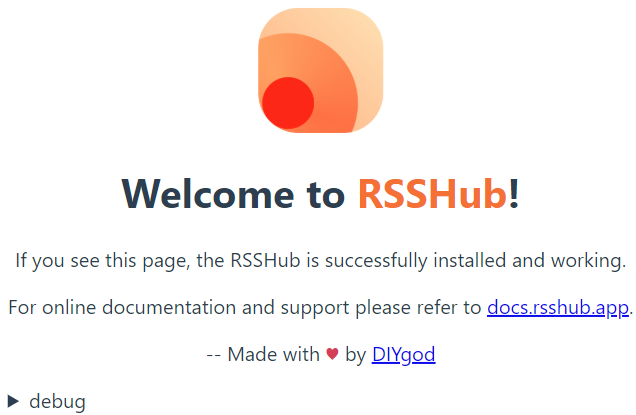
$ docker run -d --name rsshub -p 1200:1200 diygod/rsshub配置防火墙,开放1200端口,在浏览器中输入「主机IP:端口号」,如果安装成功,就会出现RSSHub欢迎界面。

可以使用下面的命令来关闭 RSSHub.
$ docker stop rsshub2. 更新
可以使用下面的命令来更新镜像。
# 先关闭 rsshub
$ docker stop rsshub

# 删除现有的容器
$ docker rm rsshub

# 下载最新版的 rsshub 镜像
$ docker pull diygod/rsshub
3. 添加配置
配置运行在 docker 中的 RSSHub,最便利的方法是使用环境变量。
以设置缓存时间为 1 小时举例,只需要在运行时增加参数:-e CACHE_EXPIRE=3600
# 此处添加自动重启指令
$ docker run --restart=always -d --name rsshub -p 1200:1200 -e CACHE_EXPIRE=3600 -e GITHUB_ACCESS_TOKEN=example diygod/rsshub
更多配置项请看 应用配置
三、设置 RSSHub 服务网址
该操作基于 nginx。
通过设置子域名解析到部署 RSSHub 的服务器,以避免将服务器IP直接暴露出来。我们将基于 Let's Encrypt 配置 SSL 证书,让 RSSHub 服务走 https,并且配置端口转发,这样 RSSHub 服务器地址就可以只用域名,而不需要加端口号。
1. 配置证书
在域名管理面板配置好子域名(下文使用 rss.example.com 作为示例),在服务器上配置证书。 参考 Nginx 实现 HTTPS(基于 Let's Encrypt 的免费证书) - kikajack的博客 - CSDN博客
1.1. 获取官方工具 certbot-auto
$ wget https://dl.eff.org/certbot-auto # 下载到本地
$ chmod a+x ./certbot-auto # 添加可执行权限
$ ./certbot-auto --help all # 查看帮助
1.2. 验证域名所有权
配置 Nginx,使要获取证书的域名对应的 80 端口可以正常访问。在 /etc/nginx/conf.d/目录下为域名创建新文件 rss.example.com.conf,并添加相关配置信息:
server {
    root /var/www/html;
    server_name rss.example.com;
    index  index.html index.htm index.php;

    location ~ .php(.*)$  {
        fastcgi_pass   127.0.0.1:9000;
        fastcgi_index  index.php;
        fastcgi_split_path_info  ^((?U).+.php)(/?.+)$;
        fastcgi_param  SCRIPT_FILENAME  $document_root$fastcgi_script_name;
        fastcgi_param  PATH_INFO  $fastcgi_path_info;
        fastcgi_param  PATH_TRANSLATED  $document_root$fastcgi_path_info;
        include        fastcgi_params;
    }
}
验证配置文件是否有语法错误
$ sudo nginx -t如果没有错误,输出应类似如下:
nginx: the configuration file /etc/nginx/nginx.conf syntax is ok
nginx: configuration file /etc/nginx/nginx.conf test is successful
重启 Nginx
$ sudo systemctl restart nginx
或
$ sudo nginx -s reload   #有人说这个命令是否生效有些玄学,望大神解答
1.3. 生成证书
$ sudo certbot-auto --nginx -d rss.example.com如果是第一次使用,会进入交互式界面,提示你输入邮箱(在证书失效前收到通知邮件),并同意官方协议。证书生成成功后,会让你选择是否将所有的 HTTP 请求重定向到 HTTPS(输入 1 或者 2)。 如果选 1,则通过 HTTP 和 HTTPS 都可以访问。如果选 2,则所有通过 HTTP 来的请求,都会被 301 重定向到 HTTPS。本文选2,即全部重定向。 输完 1 或者 2 回车后,会有成功提示,并说明证书放在 /etc/letsencrypt/live/证书的域名 这个位置:
IMPORTANT NOTES:
 - Congratulations! Your certificate and chain have been saved at:
   /etc/letsencrypt/live/rss.example.com/fullchain.pem
   Your key file has been saved at:
   /etc/letsencrypt/live/rss.example.com/privkey.pem
   Your cert will expire on 2019-03-09. To obtain a new or tweaked
   version of this certificate in the future, simply run certbot again
   with the "certonly" option. To non-interactively renew *all* of
   your certificates, run "certbot renew"
 - If you like Certbot, please consider supporting our work by:

   Donating to ISRG / Let's Encrypt:   https://letsencrypt.org/donate
   Donating to EFF:                    https://eff.org/donate-le
2. 配置端口转发
由于上文中使用 --nginx 参数,certbot-auto 会自动改写配置文件,且所有改写过的行都在后面加了注释:# managed by Certbot。 我们在文件中添加如下配置:
location / {
        proxy_pass http://localhost:1200;
        proxy_set_header Host $host;
        proxy_redirect off;
        proxy_set_header X-Real-IP $remote_addr;
        proxy_set_header X-Forwarded-For $proxy_add_x_forwarded_for;
        proxy_set_header X-Forwarded-Proto $scheme;
    }
验证语法并重启 nginx 后,访问 https://rss.example.com/ 查看设置是否正确,如果设置正确,会看到欢迎界面。
四、信息安全
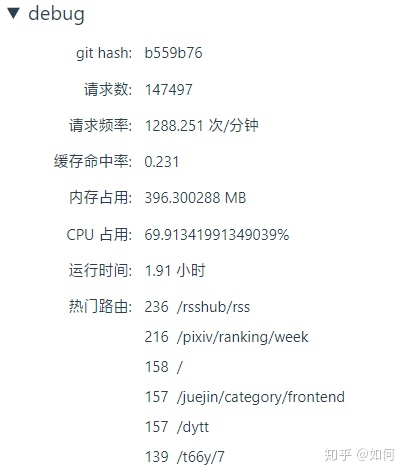
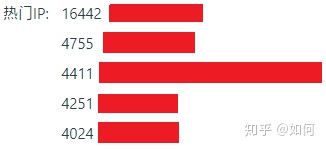
由于自建的 RSSHub 主要用来获取自己感兴趣的内容,而在其欢迎界面的 debug 项中,会输出这些信息与请求者的 ip,因此在 nginx 中采取相关配置来阻止用户访问服务器根目录。
在端口转发配置上方添加如下配置:
location = / {
    return 404;
}
这样,当用户访问 https://rss.example.com/ 时,会返回错误 404,从而达到阻止用户访问欢迎界面的目的。
参考汇总
- RSSHub官方文档
- 如何在Ubuntu上安装使用Docker - 云+社区 - 腾讯云
- Nginx 实现 HTTPS(基于 Let's Encrypt 的免费证书) - kikajack的博客 - CSDN博客
- RSSHub+Miniflux搭建个人阅读源 - Yaecho的博客


 1206
1206

 被折叠的 条评论
为什么被折叠?
被折叠的 条评论
为什么被折叠?
 到【灌水乐园】发言


