


 本文介绍了使用Vue3、TypeScript和Vite搭建FlavourUI组件库官网的过程,包括创建项目、配置Vue Router、封装组件以及处理Vue2与Vue3的区别。还详细讲述了如何处理Vue3中TS对.vue文件的理解问题,以及实现路由切换和组件的显示隐藏逻辑。
- 技术栈
- Vue3.0
- TypeScript
- Vue Router
- Vite
- 目录
- 使用 Vite 搭建官网
- Switch 组件
- Button 组件
- Dialog 组件
- Tabs 组件
- 官网细节完善
- 发布代码到 npm
- 用 Vite 构建官网,创建项目
进入自定义的项目目录
全局安装 create-vite-app
- yarn global add create-vite-app@1.18.0
- 或者 npm i -g create-vite-app@1.18.0
- 创建项目目录,cva flavour-ui(这个是项目名可以自己修改)
- yarn
- yarn dev
小知识
- npx createa-vite-app
- 即 npx 会帮你全局安装用到的包
- 全局安装 create-vite-app 然后
cva- npm init vite-app
- yarn create vite-app
- vite 文档给出的命令是
- 等价于
- 等价于
- npx createa-vite-app
使用 VSCode 或 WebStorm 打开目录
- 将目录拖进即可
自己尝试去修改里面的文件,并尝试新建组件
- Vue 3 的 Template 支持多个根标签,Vue 2 不支持
- Vue 3 有 createApp(),而 Vue 2 的是 new Vue()
- createApp(组件),new Vue({template, render})
- 发现 Vue2 和 Vue3 的区别
- 90%的写法完全一致:除了以下几点
提交一下代码,git init
- 引入 Vue Router 4
- 路由器,用于页面切换
- 使用命令行查看 vue-router 所有版本号
- npm info vue-router versions
- 安装 vue-router
- yarn add vue-router@4.0.0-beta.3
- 初始化 vue-router
- 新建 history 对象
- 新建 router 对象
- 引入 TypeScript
- app.use(router)
- 添加
- 添加
- 把 main.js 改成 main.ts 出现问题,找不到模块 xxx.vue
- 创建 xxx.d.ts,告诉 TS 如何理解 .vue 文件
- 出现原因,TypeScript 只能理解 .ts 文件,无法理解 .vue 文件
- 解决办法,Google 搜索 Vue 3 can not find module
// shims-vue.d.ts
declare module '*.vue' {
  import { ComponentOptions } from 'vue'
  const ComponentOptions: ComponentOptions;
  export default ComponentOptions
}
- 开始创建官网,创建首页和文档页
- 新建 views 文件夹
- Topnav:同上
- Content:左边是 aside,右边是 main
- Topnav:左边是 logo,右边是 menu
- Banner:文字介绍 + 开始按钮
- Home.vue
- Doc.vue
- 封装 topNav 组件
- home 页面和 doc 页面都用到了 topNav 组件,需要进行封装
<div class="topnav"><div class="logo">LOGOdiv><ul class="menu"><li>菜单1li><li>菜单2li>ul>div>template><script lang="ts">script><style lang="scss" scoped>
.topnav {
  background: pink;
  display: flex;
  padding: 16px;
  > .logo {
    max-width: 6em;
    margin-right: auto;
  }
  > .menu {
    display: flex;
    white-space: nowrap;
    flex-wrap: nowrap;
    > li {
      margin: 0 1em;
    }
  }
}style>- 完善 home 页面样式
- 写一大堆样式
- 完善 Doc 样式
- 边栏+主内容,参考 vue 文档样式
- 定好目标,需要实现手机和 pc 端样式
- 先实现手机,因为手机用户群大
- 在 aside 里添加 router-link
- 方便用户切换组件文档,即传说中的嵌套路由
<div><Topnav>Topnav><div class="content"><aside>边栏aside><aside><h2>组件列表h2><ol><li><router-link to="/doc/swich">Switch 组件router-link>li><li><router-link to="/doc/button">Button 组件router-link>li><li><router-link to="/doc/dialog">Dialog 组件router-link>li><li><router-link to="/doc/tabs">Tabs 组件router-link>li>ol>aside><main>主内容main>div>div>template>- 调节 topnav 和 aside 样式
- 写一大堆的 css
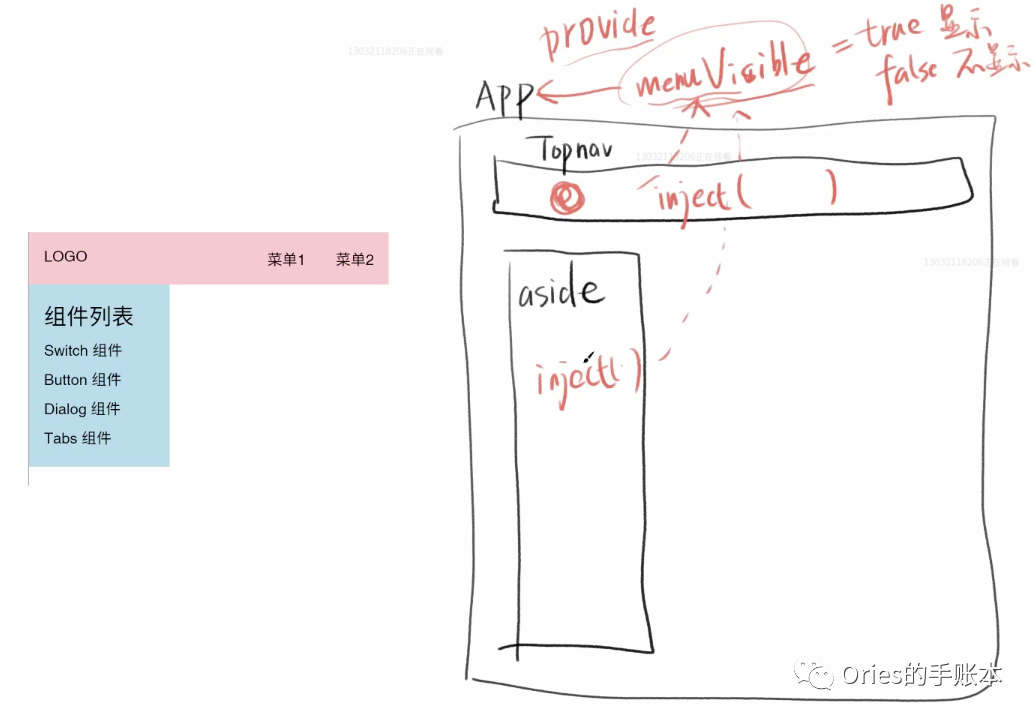
- 实现切换 aside
- 点击一次显示,再点击一次隐藏,实现这个功能需要使用到 vue 的 provide/inject
- 将 menuVisible 变量放到 APP,通过 provide 告诉子组件可以访问到,具体见下图
// app.vue
import { ref, provide } from "vue";
export default {
  name: "App",
  setup() {
    const menuVisible = ref(false); //  ref理解成盒子,里面有个值false
    provide("menuVisible", menuVisible); // set,标记为所有子组件都可以用
  },
};
// topnav.vue
<div class="topnav"><div class="logo" @click="toggleMenu">LOGOdiv><ul class="menu"><li>菜单1li><li>菜单2li>ul>div>template>
// doc.vue
<div><Topnav>Topnav><div class="content"><aside v-if="menuVisible"><h2>组件列表h2><ol><li><router-link to="/doc/switch">Switch 组件router-link>li><li><router-link to="/doc/button">Button 组件router-link>li><li><router-link to="/doc/dialog">Dialog 组件router-link>li><li><router-link to="/doc/tabs">Tabs 组件router-link>li>ol>aside><main>主内容main>div>div>template>- 改造 topnav,添加一个切换按钮
- 通过媒体查询完成,写一大堆 css
- 完善 aside 逻辑
- 需要根据屏幕宽度动态判断是否显示按钮
export default {
  name: "App",
  setup() {
    const width = document.documentElement.clientWidth;
    const menuVisible = ref(width <= 800 ? false : true);
    provide("menuVisible", menuVisible); // set
  },
};
- 点击组件,显示响应文档
- 知识点,嵌套路由
// main.ts
router.afterEach(() => {
  console.log("路由切换了"); // 每次点击路由会执行
});
- 先把 router 封装成单独的 route.ts
import { createWebHashHistory, createRouter } from "vue-router";
// @ts-ignore
import Home from "./views/Home.vue";
// @ts-ignore
import Doc from "./views/Doc.vue";
// @ts-ignore
import SwitchDemo from "./components/SwitchDemo.vue";

const history = createWebHashHistory();
export const router = createRouter({
  history: history,
  routes: [
    { path: "/", component: Home },
    {
      path: "/doc",
      component: Doc,
      children: [{ path: "switch", component: SwitchDemo }],
    },
  ],
});

router.afterEach(() => {
  console.log("路由切换了");
});
- 在 app 里面引 router
- 在 app.vue 里将 menuVisible.value 变 false,如果是 pc 就不要隐藏
<router-view/>template><script lang="ts">import {ref, provide} from 'vue'import {router} from "./router"export default {name: 'App',
  setup(){const width = document.documentElement.clientWidth;const menuVisible = ref(width <= 800 ? false : true);
    provide("menuVisible", menuVisible); // set
    router.afterEach(() => {if(width <= 800){
        menuVisible.value = false
      }
    })
  }
}script>- 完善路由,添加二级默认路由
const history = createWebHashHistory();
export const router = createRouter({
  history:history,
  routes: [
    {path:'/', component: Home},
    {path:'/doc', component: Doc,children: [
      { path: "", component: DocDemo }, // 二级组件的根路由
      { path: "switch", component: SwitchDemo },
      { path: "button", component: ButtonDemo },
      { path: "dialog", component: DialogDemo },
      { path: "tabs", component: TabsDemo }
    ],
    }
  ]
});
- 最终效果

- 点击阅读全文获取源代码


 1618
1618

 被折叠的 条评论
为什么被折叠?
被折叠的 条评论
为什么被折叠?
 到【灌水乐园】发言


