


有一个/dev/sdc的盘,上面划分了3个主分区/dev/sdc1-3,一个扩展分区/dev/sdc4,在扩展分区上划分了一/dev/sdc5。问题来了,想扩容这个/dev/sdc硬盘,怎么新建分区或者扩容分区呢?

解决思路
可能由于是处女座的原因(都怪处女座),在工作中也要力争有条理。不太喜欢在虚拟机中添加一堆磁盘“sdb,sdc,sdd.....”总觉得不太好管理。
碰到知识盲区以后,也咨询过很几个2000人运维群,遗憾的是“这里突然静悄悄”“顾左右而言他”,于是,在这里再次申明“并非是争论面红耳赤的Lvm扩容问题”。
那么,上面这个问题该怎么解决呢?
思路一:使用gparted等磁盘管理工具,来扩容扩展分区。
思路二:使用linux系统工具来执行扩容操作。
解决方案
思路一的方法,在没办法的情况可以试验下,本文重点介绍第二种方式。我们在虚拟化环境中,将/dev/sdc的盘从10G增大到12G并保存配置。
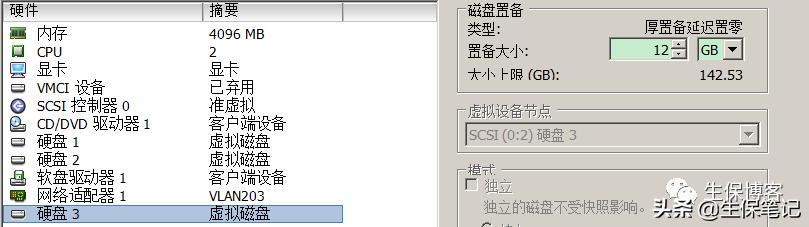
重新扫描/dev/sdc的磁盘,并且识别到12G。
echo 1 > /sys/class/scsi_device/0:0:2:0/device/rescan再解释清楚点,这个问题。扩容lvm首先pv需要扩容。在这里已经无法再创建分区了,也就无法给pv扩容。
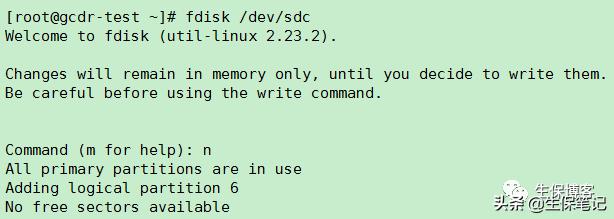
问题清楚了,在操作前先备份,我在这里只做了快照。我们需要删除扩容分区并且重建,这个操作需要记录起始位置的sectors,只有这样数据才不会丢失。
卸载/dev/sdc5挂载,我这里使用的是lvm,所以卸载命令为:
Bash
umount /dev/sdc_1/sdc1开始删除,并重建/dev/sdc4以及/dev/sdc5。
Bash
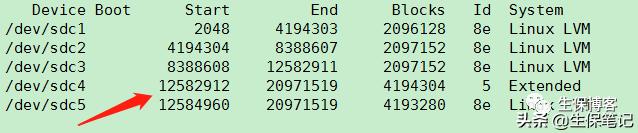
[root@gcdr-test ~]# fdisk /dev/sdcWelcome to fdisk (util-linux 2.23.2).Changes will remain in memory only, until you decide to write them.Be careful before using the write command.Command (m for help): pDisk /dev/sdc: 12.9 GB, 12884901888 bytes, 25165824 sectorsUnits = sectors of 1 * 512 = 512 bytesSector size (logical/physical): 512 bytes / 512 bytesI/O size (minimum/optimal): 512 bytes / 512 bytesDisk label type: dosDisk identifier: 0x00076296 Device Boot Start End Blocks Id System/dev/sdc1 2048 4194303 2096128 8e Linux LVM/dev/sdc2 4194304 8388607 2097152 8e Linux LVM/dev/sdc3 8388608 12582911 2097152 8e Linux LVM/dev/sdc4 12582912 20971519 4194304 5 Extended/dev/sdc5 12584960 20971519 4193280 8e Linux LVMCommand (m for help): dPartition number (1-5, default 5): 5Partition 5 is deletedCommand (m for help): dPartition number (1-4, default 4): 4Partition 4 is deletedCommand (m for help): nPartition type: p primary (3 primary, 0 extended, 1 free) e extendedSelect (default e): eSelected partition 4First sector (12582912-25165823, default 12582912):Using default value 12582912Last sector, +sectors or +size{K,M,G} (12582912-25165823, default 25165823):Using default value 25165823Partition 4 of type Extended and of size 6 GiB is setCommand (m for help): nAll primary partitions are in useAdding logical partition 5First sector (12584960-25165823, default 12584960):Using default value 12584960Last sector, +sectors or +size{K,M,G} (12584960-25165823, default 25165823):Using default value 25165823Partition 5 of type Linux and of size 6 GiB is setCommand (m for help): wThe partition table has been altered!Calling ioctl() to re-read partition table.WARNING: Re-reading the partition table failed with error 16: Device or resource busy.The kernel still uses the old table. The new table will be used atthe next reboot or after you run partprobe(8) or kpartx(8)Syncing disks.接着需要扩容lvm(有可能需要重启服务器)。
Bash
[root@gcdr-test ~]# pvs PV VG Fmt Attr PSize PFree /dev/sda2 rhel lvm2 a-- 15.51g 0 /dev/sdb swapvg lvm2 a-- 8.00g 0 /dev/sdc1 sdc_1 lvm2 a-- 2.00g 0 /dev/sdc2 sdc_1 lvm2 a-- 2.00g 0 /dev/sdc3 sdc_1 lvm2 a-- 2.00g 0 /dev/sdc5 sdc_1 lvm2 a-- 4.00g 0 [root@gcdr-test ~]# pvresize /dev/sdc5 Physical volume "/dev/sdc5" changed 1 physical volume(s) resized / 0 physical volume(s) not resized [root@gcdr-test ~]# pvs PV VG Fmt Attr PSize PFree /dev/sda2 rhel lvm2 a-- 15.51g 0 /dev/sdb swapvg lvm2 a-- 8.00g 0 /dev/sdc1 sdc_1 lvm2 a-- 2.00g 0 /dev/sdc2 sdc_1 lvm2 a-- 2.00g 0 /dev/sdc3 sdc_1 lvm2 a-- 2.00g 0 /dev/sdc5 sdc_1 lvm2 a-- 6.00g 2.00g[root@gcdr-test ~]# vgs VG #PV #LV #SN Attr VSize VFree rhel 1 1 0 wz--n- 15.51g 0 sdc_1 4 1 0 wz--n- 11.98g 2.00g swapvg 1 1 0 wz--n- 8.00g 0 [root@gcdr-test ~]# lvextend -l +100%free /dev/sdc_1/sdc1 Size of logical volume sdc_1/sdc1 changed from 9.98 GiB (2556 extents) to 11.98 GiB (3068 extents). Logical volume sdc1 successfully resized [root@gcdr-test ~]# e2fsck -f /dev/sdc_1/sdc1e2fsck 1.42.9 (28-Dec-2013)Pass 1: Checking inodes, blocks, and sizesPass 2: Checking directory structurePass 3: Checking directory connectivityPass 4: Checking reference countsPass 5: Checking group summary information/dev/sdc_1/sdc1: 402/655360 files (0.0% non-contiguous), 83136/2617344 blocks[root@gcdr-test ~]# resize2fs /dev/sdc_1/sdc1resize2fs 1.42.9 (28-Dec-2013)Resizing the filesystem on /dev/sdc_1/sdc1 to 3141632 (4k) blocks.The filesystem on /dev/sdc_1/sdc1 is now 3141632 blocks long.扩容完成,挂载检查。
Bash
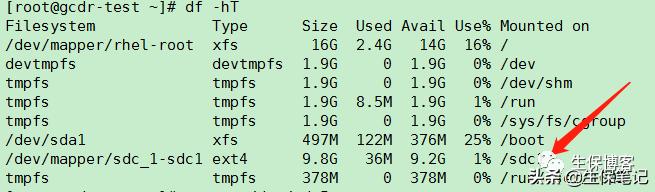
[root@gcdr-test ~]# mount /dev/sdc_1/sdc1 /sdc1/[root@gcdr-test ~]# ll /sdc1/total 20drwxr-xr-x. 21 root root 4096 Jul 25 09:48 devdrwx------. 2 root root 16384 Jul 25 09:50 lost+found结束
以上就是在3个主分区一个扩展分区下,如何扩容lvm的全部步骤。感谢@袁麟技术指导。


 279
279

 被折叠的 条评论
为什么被折叠?
被折叠的 条评论
为什么被折叠?
 到【灌水乐园】发言


